Input
 Desktop
Unity supports keyboard, joystick and gamepad input.
Virtual axes and buttons can be created in the Input Manager, and end users can configure Keyboard input in a nice screen configuration dialog.

You can setup joysticks, gamepads, keyboard, and mouse, then access them all through one simple scripting interface.
From scripts, all virtual axes are accessed by their name.
Every project has the following default input axes when it's created:
- Horizontal and Vertical are mapped to w, a, s, d and the arrow keys.
- Fire1, Fire2, Fire3 are mapped to Control, Option (Alt), and Command, respectively.
- Mouse X and Mouse Y are mapped to the delta of mouse movement.
- Window Shake X and Window Shake Y is mapped to the movement of the window.
Adding new Input Axes
If you want to add new virtual axes go to the menu. Here you can also change the settings of each axis.
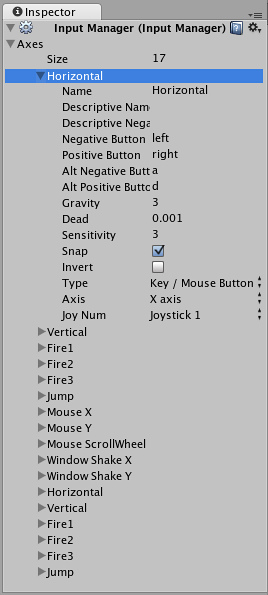
You map each axis to two buttons on a joystick, mouse, or keyboard keys.
| Name | The name of the string used to check this axis from a script. |
| Descriptive Name | Positive value name displayed in the input tab of the dialog for standalone builds. |
| Descriptive Negative Name | Negative value name displayed in the Input tab of the dialog for standalone builds. |
| Negative Button | The button used to push the axis in the negative direction. |
| Positive Button | The button used to push the axis in the positive direction. |
| Alt Negative Button | Alternative button used to push the axis in the negative direction. |
| Alt Positive Button | Alternative button used to push the axis in the positive direction. |
| Gravity | Speed in units per second that the axis falls toward neutral when no buttons are pressed. |
| Dead | Size of the analog dead zone. All analog device values within this range result map to neutral. |
| Sensitivity | Speed in units per second that the the axis will move toward the target value. This is for digital devices only. |
| Snap | If enabled, the axis value will reset to zero when pressing a button of the opposite direction. |
| Invert | If enabled, the Negative Buttons provide a positive value, and vice-versa. |
| Type | The type of inputs that will control this axis. |
| Axis | The axis of a connected device that will control this axis. |
| Joy Num | The connected Joystick that will control this axis. |
Use these settings to fine tune the look and feel of input. They are all documented with tooltips in the Editor as well.
Using Input Axes from Scripts
You can query the current state from a script like this:
value = Input.GetAxis ("Horizontal");
An axis has a value between -1 and 1. The neutral position is 0. This is the case for joystick input and keyboard input.
However, Mouse Delta and Window Shake Delta are how much the mouse or window moved during the last frame. This means it can be larger than 1 or smaller than -1 when the user moves the mouse quickly.
It is possible to create multiple axes with the same name. When getting the input axis, the axis with the largest absolute value will be returned. This makes it possible to assign more than one input device to one axis name. For example, create one axis for keyboard input and one axis for joystick input with the same name. If the user is using the joystick, input will come from the joystick, otherwise input will come from the keyboard. This way you don't have to consider where the input comes from when writing scripts.
Button Names
To map a key to an axis, you have to enter the key's name in the Positive Button or Negative Button property in the Inspector.
The names of keys follow this convention:
- Normal keys: "a", "b", "c" ...
- Number keys: "1", "2", "3", ...
- Arrow keys: "up", "down", "left", "right"
- Keypad keys: "[1]", "[2]", "[3]", "[+]", "[equals]"
- Modifier keys: "right shift", "left shift", "right ctrl", "left ctrl", "right alt", "left alt", "right cmd", "left cmd"
- Mouse Buttons: "mouse 0", "mouse 1", "mouse 2", ...
- Joystick Buttons (from any joystick): "joystick button 0", "joystick button 1", "joystick button 2", ...
- Joystick Buttons (from a specific joystick): "joystick 1 button 0", "joystick 1 button 1", "joystick 2 button 0", ...
- Special keys: "backspace", "tab", "return", "escape", "space", "delete", "enter", "insert", "home", "end", "page up", "page down"
- Function keys: "f1", "f2", "f3", ...
The names used to identify the keys are the same in the scripting interface and the Inspector.
value = Input.GetKey ("a");
Mobile Input
On iOS and Android, the Input class offers access to touchscreen, accelerometer and geographical/location input.
Access to keyboard on mobile devices is provided via the iOS keyboard.
Multi-Touch Screen
The iPhone and iPod Touch devices are capable of tracking up to five fingers touching the screen simultaneously. You can retrieve the status of each finger touching the screen during the last frame by accessing the Input.touches property array.
Android devices don't have a unified limit on how many fingers they track. Instead, it varies from device to device and can be anything from two-touch on older devices to five fingers on some newer devices.
Each finger touch is represented by an Input.Touch data structure:
| fingerId | The unique index for a touch. |
| position | The screen position of the touch. |
| deltaPosition | The screen position change since the last frame. |
| deltaTime | Amount of time that has passed since the last state change. |
| tapCount | The iPhone/iPad screen is able to distinguish quick finger taps by the user. This counter will let you know how many times the user has tapped the screen without moving a finger to the sides. Android devices do not count number of taps, this field is always 1. |
| phase | Describes so called "phase" or the state of the touch. It can help you determine if the touch just began, if user moved the finger or if he just lifted the finger. |
Phase can be one of the following:
| Began | A finger just touched the screen. |
| Moved | A finger moved on the screen. |
| Stationary | A finger is touching the screen but hasn't moved since the last frame. |
| Ended | A finger was lifted from the screen. This is the final phase of a touch. |
| Canceled | The system cancelled tracking for the touch, as when (for example) the user puts the device to her face or more than five touches happened simultaneously. This is the final phase of a touch. |
Following is an example script which will shoot a ray whenever the user taps on the screen:
var particle : GameObject;
function Update () {
	for (var touch : Touch in Input.touches) {
		if (touch.phase == TouchPhase.Began) {
			// Construct a ray from the current touch coordinates
			var ray = Camera.main.ScreenPointToRay (touch.position);
			if (Physics.Raycast (ray)) {
				// Create a particle if hit
				Instantiate (particle, transform.position, transform.rotation);
			}
		}
	}
}
Mouse Simulation
On top of native touch support Unity iOS/Android provides a mouse simulation. You can use mouse functionality from the standard Input class.
Accelerometer
As the mobile device moves, a built-in accelerometer reports linear acceleration changes along the three primary axes in three-dimensional space. Acceleration along each axis is reported directly by the hardware as G-force values. A value of 1.0 represents a load of about +1g along a given axis while a value of -1.0 represents -1g. If you hold the device upright (with the home button at the bottom) in front of you, the X axis is positive along the right, the Y axis is positive directly up, and the Z axis is positive pointing toward you.
You can retrieve the accelerometer value by accessing the Input.acceleration property.
The following is an example script which will move an object using the accelerometer:
var speed = 10.0;
function Update () {
	var dir : Vector3 = Vector3.zero;

	// we assume that the device is held parallel to the ground
	// and the Home button is in the right hand

	// remap the device acceleration axis to game coordinates:
	//  1) XY plane of the device is mapped onto XZ plane
	//  2) rotated 90 degrees around Y axis
	dir.x = -Input.acceleration.y;
	dir.z = Input.acceleration.x;

	// clamp acceleration vector to the unit sphere
	if (dir.sqrMagnitude > 1)
		dir.Normalize();

	// Make it move 10 meters per second instead of 10 meters per frame...
	dir *= Time.deltaTime;

	// Move object
	transform.Translate (dir * speed);
}
Low-Pass Filter
Accelerometer readings can be jerky and noisy. Applying low-pass filtering on the signal allows you to smooth it and get rid of high frequency noise.
The following script shows you how to apply low-pass filtering to accelerometer readings:
var AccelerometerUpdateInterval : float = 1.0 / 60.0;
var LowPassKernelWidthInSeconds : float = 1.0;

private var LowPassFilterFactor : float = AccelerometerUpdateInterval / LowPassKernelWidthInSeconds; // tweakable
private var lowPassValue : Vector3 = Vector3.zero;
function Start () {
	lowPassValue = Input.acceleration;
}

function LowPassFilterAccelerometer() : Vector3 {
	lowPassValue = Mathf.Lerp(lowPassValue, Input.acceleration, LowPassFilterFactor);
	return lowPassValue;
}
The greater the value of LowPassKernelWidthInSeconds, the slower the filtered value will converge towards the current input sample (and vice versa).
I'd like as much precision as possible when reading the accelerometer. What should I do?
Reading the Input.acceleration variable does not equal sampling the hardware. Put simply, Unity samples the hardware at a frequency of 60Hz and stores the result into the variable. In reality, things are a little bit more complicated -- accelerometer sampling doesn't occur at consistent time intervals, if under significant CPU loads. As a result, the system might report 2 samples during one frame, then 1 sample during the next frame.
You can access all measurements executed by accelerometer during the frame. The following code will illustrate a simple average of all the accelerometer events that were collected within the last frame:
var period : float = 0.0;
var acc : Vector3 = Vector3.zero;
for (var evnt : iPhoneAccelerationEvent  in iPhoneInput.accelerationEvents) {
	acc += evnt.acceleration * evnt.deltaTime;
	period += evnt.deltaTime;
}
if (period > 0)
	acc *= 1.0/period;
return acc;
iOS Game Controller support
Starting with OS 7, a standardized Game Controller Input API is provided by Apple. Unity support for this API comes as part of the standard Unity Input API.
Detecting attached Game Controllers
Calling Input.GetJoystickNames will enumerate the names of all attached controllers. Names follow the pattern: "[$profile_type,$connection_type] joystick $number by $model". $profile_type might be either "basic" or "extended", $connection_type is either "wired" or "wireless". It could be used to detect the kind of connected controller. It is worth re-checking this list every few seconds to detect if controllers have been attached or detached. Here�s an example how of to do it in C#:
    private bool connected = false;
    IEnumerator CheckForControllers()
    {
        while(true)
        {
            var controllers = Input.GetJoystickNames();
            if (!connected && controllers.Length > 0)
            {
                connected = true;
                Debug.Log("Connected");
            }
            else if (connected && controllers.Length == 0)
            {
                connected = false;
                Debug.Log("Disconnected");
            }
            yield return new WaitForSeconds(1f);
        }
    }
    void Awake()
    {
        StartCoroutine(CheckForControllers());
    }
When controllers are detected you can either hide on-screen touch controls or amend them to supplement controller input. The next task is to check for Game Controller input.
Handling input
Actual input scheme is highly dependent on the type of game you are developing. But in any case it goes down to reading axes and button states. Let's take following 2D game stage as simple example:
The player controls the bean character, which can move right or left, jump and fire at the bad guys. By default, the Unity Input "Horizontal" axis is mapped to basic profile game controller dpad and the left analog stick on extended profile controllers. So the code used to move the character back and forth is pretty simple:
    float h = Input.GetAxis("Horizontal");
    if(h * rigidbody2D.velocity.x < maxSpeed)
        rigidbody2D.AddForce(Vector2.right * h * moveForce);
You can set up jump and fire actions in Unity's Input Manager. Access it from the Unity editor menu as follows: Edit > Project Settings > Input. Lets pick joystick button "A" for the "Jump" action and "X" for "Fire". Open the following actions in the Unity Input Manager and specify "joystick button 14" for "Jump" and "joystick button 15" for "Fire".
The code handling them looks like this:
    if(Input.GetButtonDown("Jump") && grounded)
    {
        rigidbody2D.AddForce(new Vector2(0f, jumpForce));
    }
    if(Input.GetButtonDown("Fire"))
    {
        Rigidbody2D bulletInstance = Instantiate(rocket, transform.position, Quaternion.Euler(new Vector3(0,0,0))) as Rigidbody2D;
        bulletInstance.velocity = new Vector2(speed, 0);
    }
The following cheatsheet should help you map controller input in the Unity Input Manager:
| Name | KeyCode | Axis |
| A | joystick button 14 | N/A |
| B | joystick button 13 | N/A |
| X | joystick button 15 | N/A |
| Y | joystick button 12 | N/A |
| Left Stick | N/A | Axis 1 (X) - Horizontal, Axis 2 (Y) - Vertical |
| Right Stick | N/A | Axis 3 - Horizontal, Axis 4 - Vertical |
| Dpad | joystick button 4 .. joystick button 7 | Basic profile only: Axis 1 (X) - Horizontal, Axis 2 (Y) - Vertical |
| Pause | joystick button 0 | N/A |
| L1/R1 | joystick button 8/joystick button 9 | N/A |
| L2/R2 | joystick button 10/joystick button 11 | N/A |
Final notes on Game Controller API support
The Game Controller framework is loaded dynamically by Unity iOS runtime only if it is available. For older iOS versions it will just return an empty list of controllers.
Apple documentation explicitly states that controller input must be optional and your game should be playable without them.
Page last updated: 2013-11-26