Off-mesh Links
In general, the walkable floor area of a game world will not be limited to just a single mesh. For design purposes, it is often easier to break a floor surface up into a number of separate sections even if the floor is continuous. Also, you may want to allow a character to walk between two points on a playing area but only by passing through a "bottleneck" feature (eg, crossing a river only at a narrow bridge). For these and other purposes, Unity allows you to connect two navmeshes together using off-mesh links.
An off-mesh link has two end points, one on each of the two meshes that are to be connected. When a agent needs to cross between two linked navmeshes, it will head for the endpoint of the nearest link between the two. It will then traverse the link to the endpoint on the other navmesh. Its journey then continues to the destination as normal. By default, off-mesh links are traversed automatically but you can also enable your script to detect when an agent reaches a link and optionally deny it passage. This can be useful for simulating something like a locked door which can be passed but only when the character has the right key.
Adding Off-mesh Links During Baking
Links can easily be added automatically during the mesh baking process. To enable this, you should first select Off Mesh Link Generation for all required navmesh objects in the Object tab of the Navigation window:-

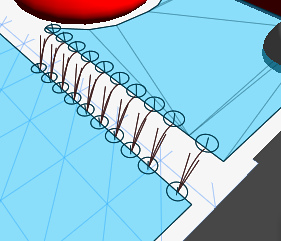
If you then switch to the Baking tab, you will see a section entitled Generated Off Mesh Links. The Drop Height and Jump Distance properties represent the maximum vertical and horzontal distance that can be bridged by a link between the two meshes. When you click the Bake button, you should see in the Scene view that all meshes within the allowed drop height and jump distance are connected by arched black lines. These lines represent the links between the meshes. A navmesh agent on one mesh will now be able to reach a target point on a separate mesh by following any available link between the two.
Note that you can restrict link generation so that links can only be crossed in one direction but not the reverse. If you have the Off Mesh Link Generation option set for mesh A (in the Navigation window's Object panel) but not for mesh B then links going from A to B will be generated but links going from B to A will not. This is useful for simulating something like a high ledge where the character can fall off but then can't climb back up again.
Adding Off-mesh Links Manually
In some cases, two navmeshes should be connected wherever their edges overlap. This typically happens when the two meshes represent a single surface that includes a step or gap. Sometimes though, links can be positioned specifically to enable a situation in the game. For example, a single link can be placed to represent a doorway, bridge or other narrow point of contact between two separate sections of the playing area. Furthermore, it will often help with pathfinding performance on a large game world if that world is broken down into separate navmeshes with only a few limited points of contact between them. The automatic link generation won't be able to places links judiciously like this but you can add your own links between meshes manually using the Off Mesh Link component.
An Off Mesh Link component can be added to any available object (menu: ). Full details are given on the component reference page but the main properties are Start and End; these specify object Transforms that mark the start and end positions of the link and it is often convenient to add the Off Mesh Link component to one of these objects. The anchor points of these marker objects need to be placed quite close to the surface of the navmesh for the link to be enabled. When the endpoints are correctly placed, you will see the link line appear in the Scene view as long as the Navigation window is selected at the time.
Page last updated: 2013-10-04