If you double-click on an interface in Figure 4.3, “The “Capture Options” dialog box” the following dialog box pops up.
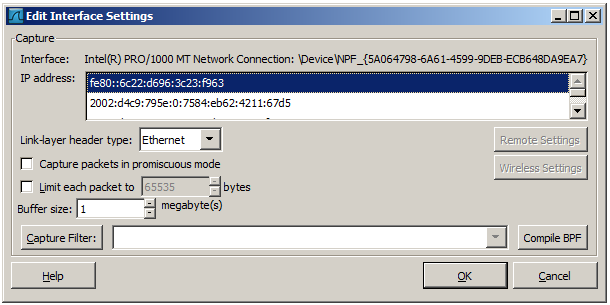
You can set the following fields in this dialog box:
- IP address
- The IP address(es) of the selected interface. If no address could be resolved from the system “none” will be shown.
- Link-layer header type
- Unless you are in the rare situation that requires this keep the default setting. For a detailed description. See Section 4.12, “Link-layer header type”
- Wireless settings (Windows only)
- Here you can set the settings for wireless capture using the AirPCap adapter. For a detailed description see the AirPCap Users Guide.
- Remote settings (Windows only)
- Here you can set the settings for remote capture. For a detailed description see Section 4.9, “The “Remote Capture Interfaces” dialog box”
- Capture packets in promiscuous mode
- This checkbox allows you to specify that Wireshark should put the interface in promiscuous mode when capturing. If you do not specify this Wireshark will only capture the packets going to or from your computer (not all packets on your LAN segment).
![[Note]](wsug_graphics/note.svg) | Note |
|---|---|
If some other process has put the interface in promiscuous mode you may be capturing in promiscuous mode even if you turn off this option. Even in promiscuous mode you still won’t necessarily see all packets on your LAN segment. See the Wireshark FAQ for more information. |
- Limit each packet to n bytes
This field allows you to specify the maximum amount of data that will be captured for each packet, and is sometimes referred to as the snaplen. If disabled the value is set to the maximum 65535 which will be sufficient for most protocols. Some rules of thumb:
- If you are unsure just keep the default value.
- If you don’t need or don’t want all of the data in a packet - for example, if you only need the link-layer, IP, and TCP headers - you might want to choose a small snapshot length, as less CPU time is required for copying packets, less buffer space is required for packets, and thus perhaps fewer packets will be dropped if traffic is very heavy.
- If you don’t capture all of the data in a packet you might find that the packet data you want is in the part that’s dropped or that reassembly isn’t possible as the data required for reassembly is missing.
- Buffer size: n megabyte(s)
- Enter the buffer size to be used while capturing. This is the size of the kernel buffer which will keep the captured packets, until they are written to disk. If you encounter packet drops, try increasing this value.
- Capture packets in monitor mode (Unix/Linux only)
- This checkbox allows you to setup the Wireless interface to capture all traffic it can receive, not just the traffic on the BSS to which it is associated, which can happen even when you set promiscuous mode. Also it might be necessary to turn this option on in order to see IEEE 802.11 headers and/or radio information from the captured frames.
| Note |
|---|---|
In monitor mode the adapter might disassociate itself from the network it was associated to. |
- Capture Filter
This field allows you to specify a capture filter. Capture filters are discussed in more details in Section 4.13, “Filtering while capturing”. It defaults to empty, or no filter.
You can also click on the button and Wireshark will bring up the “Capture Filters” dialog box and allow you to create and/or select a filter. Please see Section 6.6, “Defining and saving filters”
- Compile BPF
- This button allows you to compile the capture filter into BPF code and pop up a window showing you the resulting pseudo code. This can help in understanding the working of the capture filter you created.