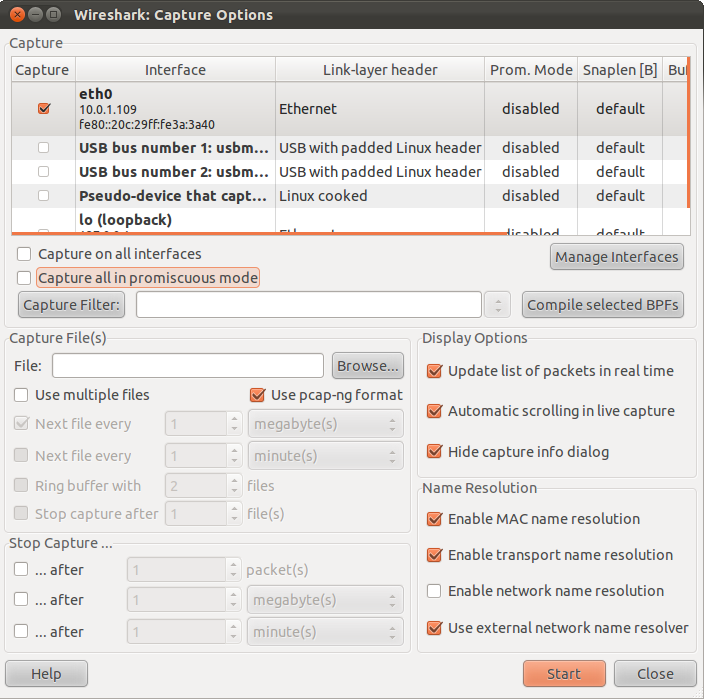
When you select → (or use the corresponding item in the main toolbar), Wireshark pops up the “Capture Options” dialog box as shown in Figure 4.3, “The “Capture Options” dialog box”.
![[Tip]](wsug_graphics/tip.svg) | Tip |
|---|---|
If you are unsure which options to choose in this dialog box just try keeping the defaults as this should work well in many cases. |
The table shows the settings for all available interfaces:
- The name of the interface and its IP addresses. If no address could be resolved from the system, “none” will be shown.
![[Note]](wsug_graphics/note.svg) | Note |
|---|---|
Loopback interfaces are not available on Windows platforms. |
- The link-layer header type.
- The information whether promicuous mode is enabled or disabled.
- The maximum amount of data that will be captured for each packet. The default value is set to the 65535 bytes.
- The size of the kernel buffer that is reserved to keep the captured packets.
- The information whether packets will be captured in monitor mode (Unix/Linux only).
- The chosen capture filter.
By marking the checkboxes in the first column the interfaces are selected to be captured from. By double-clicking on an interface the “Edit Interface Settings” dialog box as shown in Figure 4.4, “The “Edit Interface Settings” dialog box” will be opened.
- Capture on all interfaces
- As Wireshark can capture on multiple interfaces it is possible to choose to capture on all available interfaces.
- Capture all packets in promiscuous mode
- This checkbox allows you to specify that Wireshark should put all interfaces in promiscuous mode when capturing.
- Capture Filter
This field allows you to specify a capture filter for all interfaces that are currently selected. Once a filter has been entered in this field, the newly selected interfaces will inherit the filter. Capture filters are discussed in more details in Section 4.13, “Filtering while capturing”. It defaults to empty, or no filter.
You can also click on the button and Wireshark will bring up the Capture Filters dialog box and allow you to create and/or select a filter. Please see Section 6.6, “Defining and saving filters”
- Compile selected BPFs
- This button allows you to compile the capture filter into BPF code and pop up a window showing you the resulting pseudo code. This can help in understanding the working of the capture filter you created. The button leads you to Figure 4.5, “The “Compile Results” dialog box”.
| Tip |
|---|---|
Linux power user tip |
The execution of BPFs can be sped up on Linux by turning on BPF JIT by executing
$ echo 1 >/proc/sys/net/core/bpf_jit_enable
if it is not enabled already. To make the change persistent you can use sysfsutils.
- Manage Interfaces
- The button opens the Figure 4.6, “The “Add New Interfaces” dialog box” where pipes can be defined, local interfaces scanned or hidden, or remote interfaces added (Windows only).
An explanation about capture file usage can be found in Section 4.11, “Capture files and file modes”.
- File
This field allows you to specify the file name that will be used for the capture file. This field is left blank by default. If the field is left blank, the capture data will be stored in a temporary file. See Section 4.11, “Capture files and file modes” for details.
You can also click on the button to the right of this field to browse through the filesystem.
- Use multiple files
- Instead of using a single file Wireshark will automatically switch to a new one if a specific trigger condition is reached.
- Use pcap-ng format
- This checkbox allows you to specify that Wireshark saves the captured packets in pcap-ng format. This next generation capture file format is currently in development. If more than one interface is chosen for capturing, this checkbox is set by default. See https://wiki.wireshark.org/Development/PcapNg for more details on pcap-ng.
- Next file every n megabyte(s)
- Multiple files only. Switch to the next file after the given number of byte(s)/kilobyte(s)/megabyte(s)/gigabyte(s) have been captured.
- Next file every n minute(s)
- Multiple files only: Switch to the next file after the given number of second(s)/minutes(s)/hours(s)/days(s) have elapsed.
- Ring buffer with n files
- Multiple files only: Form a ring buffer of the capture files with the given number of files.
- Stop capture after n file(s)
- Multiple files only: Stop capturing after switching to the next file the given number of times.
- … after n packet(s)
- Stop capturing after the given number of packets have been captured.
- … after n megabytes(s)
- Stop capturing after the given number of byte(s)/kilobyte(s)/megabyte(s)/gigabyte(s) have been captured. This option is greyed out if “Use multiple files” is selected.
- … after n minute(s)
- Stop capturing after the given number of second(s)/minutes(s)/hours(s)/days(s) have elapsed.
- Update list of packets in real time
- This option allows you to specify that Wireshark should update the packet list pane in real time. If you do not specify this, Wireshark does not display any packets until you stop the capture. When you check this, Wireshark captures in a separate process and feeds the captures to the display process.
- Automatic scrolling in live capture
- This option allows you to specify that Wireshark should scroll the packet list pane as new packets come in, so you are always looking at the last packet. If you do not specify this Wireshark simply adds new packets onto the end of the list but does not scroll the packet list pane. This option is greyed out if “Update list of packets in real time” is disabled.
- Hide capture info dialog
- If this option is checked, the capture info dialog described in Section 4.14, “While a Capture is running …” will be hidden.
- Enable MAC name resolution
- This option allows you to control whether or not Wireshark translates MAC addresses into names. See Section 7.7, “Name Resolution”.
- Enable network name resolution
- This option allows you to control whether or not Wireshark translates network addresses into names. See Section 7.7, “Name Resolution”.
- Enable transport name resolution
- This option allows you to control whether or not Wireshark translates transport addresses into protocols. See Section 7.7, “Name Resolution”.
Once you have set the values you desire and have selected the options you need, simply click on to commence the capture or to cancel the capture.
If you start a capture, Wireshark allows you to stop capturing when you have enough packets captured, for details see Section 4.14, “While a Capture is running …”.