Working with Gerrit
Follow these instructions to collaborate on the Zephyr Project through the Gerrit review system.
Make sure to subscribe to the mailing list by filling out the registration form.
Follow the steps available at Checking Out the Source Code for information about how to access the source code using Git and Gerrit.
Gerrit assigns the following roles to users:
- Submitters: May submit changes for consideration, review other code changes, and make recommendations for acceptance or rejection by voting +1 or -1, respectively.
- Maintainers: May approve or reject changes based upon feedback from reviewers voting +2 or -2, respectively.
- Builders: May use the build automation infrastructure to verify the change.
A comprehensive walk-through of Gerrit is beyond the scope of this document. There are plenty of resources available on the Internet. Good summaries can be found here:
Commit Message Formatting
When preparing to submit a change, each patch set will contain multiple edits or modifications to files. The patch set prefixed by a commit message detailing all the changes. The Zephyr Project has a few best practices for creating commit messages to ease the acceptance of the change.
Don’t reference the patch itself. For example, no “This patch...”
The first line shall begin with the component being altered followed by a colon. For example, doc:, i2c:, spi:, microkernel: , etc. After the colon, a short (less than 70 characters) shall be provided after, detailing the brief basics of the change. As an example:
doc: Updating gerrit commit detailsWhen adding a new file to the tree, it is important to detail the source of origin on the file, provide attributions, and detail the intended usage. In cases where the file is an original to Zephyr, the commit message shall include the following:
Origin: OriginalIn cases where the file is imported from an external project, the commit message shall contain details regarding the original project, the location of the project, the SHA-id of the origin commit the file, the intended purpose, and if the file will be maintained by the Zephyr project, in other words, whether or not the Zephyr project will contain a localized branch or if it is a downstream copy.
For example a copy of a locally maintained import:
Origin: Contiki OS
URL: http://www.contiki-os.org/
commit: 853207acfdc6549b10eb3e44504b1a75ae1ad63a
Purpose: Introduction of networking stack.
Maintained-by: Zephyr
For example a copy of an externally maintained import:
Origin: Tiny Crypt
URL: https://github.com/01org/tinycrypt
commit: 08ded7f21529c39e5133688ffb93a9d0c94e5c6e
Purpose: Introduction of TinyCrypt
Maintained-by: External
Submitting a Change
Currently, Gerrit is the only method to submit a change for review.
Before submitting, please ensure each commit follows contributing_code guidelines. Directions for building the source code are beyond the scope of this document. Please see the Getting Started Guide for further detail.
When a change is ready for submission, Gerrit requires that the change be pushed to a special branch. The name of this special branch contains a reference to the final branch where the code should reside, once accepted.
For the Zephyr Project, the special branch is called refs/for/master .
Push the current local development branch to the gerrit server, type:
$ git push origin HEAD:refs/for/masterIf the command executes correctly, the output should look similar to this:
Counting objects: 3, done.
Writing objects: 100% (3/3), 306 bytes | 0 bytes/s, done.
Total 3 (delta 0), reused 0 (delta 0)
remote: Processing changes: new: 1, refs: 1, done
remote:
remote: New Changes:
remote:   https://gerrit.zephyrproject.org/r/6 Test commit
remote:
To ssh://[email protected]:29418/zephyr
 * [new branch]      HEAD -> refs/for/master
The gerrit server generates a link where the change can be tracked.
Add reviewers to your change.
To specify a list of reviewers via the command line, add %r=reviewer@project.org to your push command. For example:
$ git push origin HEAD:refs/for/master%r=[email protected],[email protected]
Autoconfigure GIT to add a set of reviewers if your commits will have the same reviewers all at the time.
- In the cloned repo, open the
.git/configfile. - Add the following line in the
[ branch “master” ]section:
[branch "master"] #.... push =
HEAD:refs/for/master%r=[email protected],[email protected]`
- In the cloned repo, open the
Note
In the examples, actual email addresses should be used instead of the
@email.com and @notemail.comaddressses. Don’t forget to replaceoriginwith your git remote name.
Reviewing Using Gerrit
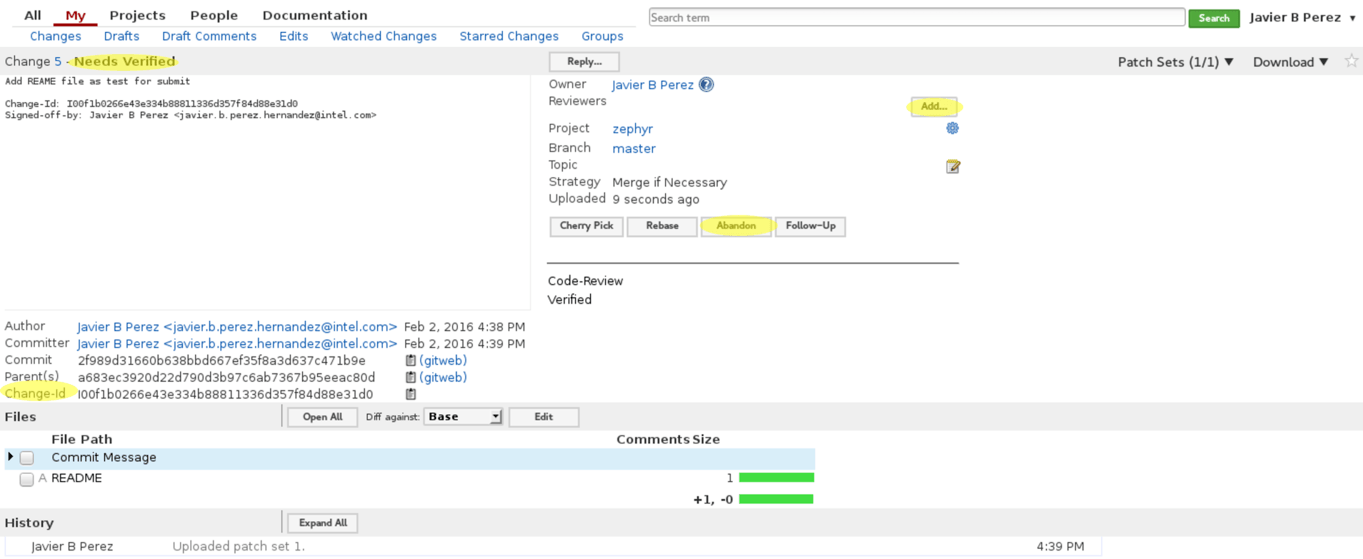
An example of a gerrit change review page:

An example of a Gerrit change review page.
- Add: This button allows the change submitter to manually add names of people who should review a change; start typing a name and the system will auto-complete based on the list of people registered and with access to the system. They will be notified by email that you are requesting their input.
- Abandon: This button is available to the submitter only; it allows a committer to abandon a change and remove it from the merge queue.
- Change-ID: This ID is generated by Gerrit (or system). It becomes useful when the review process determines that your commit(s) have to be amended. You may submit a new version; and if the same Change-ID header (and value) are present, Gerrit will remember it and present it as another version of the same change.
- Status: Currently, the example change is in review status, as indicated by “Needs Verified” in the upper-left corner. The list of Reviewers will all emit their opinion, voting +1 if they agree to the merge, -1 if they disagree. Gerrit users with a Maintainer role can agree to the merge or refuse it by voting +2 or -2 respectively.
Notifications are sent to the email address in your commit message’s Signed-off-by line. Visit your gerrit dashboard, to check the progress of your requests.
Click on a change and see a history tab similar to the one below:
Viewing Pending Changes
Find all pending changes by clicking on the link in the upper-left corner, or directly at: https://gerrit.zephyrproject.org/r/#/q/project:zephyr
If you collaborate in multiple projects, you may wish to limit searching to the specific branch through the search bar in the upper-right side.
Add the filter project:zephyr to limit the visible changes to only those from the Zephyr Project.
List all current changes you submitted, or list just those changes in need of your input by clicking on or going to: gerrit dashboard
Reviewing a Change
Click on a link for incoming or outgoing review, such as “Add REAME file as test for submit” shown in this figure:
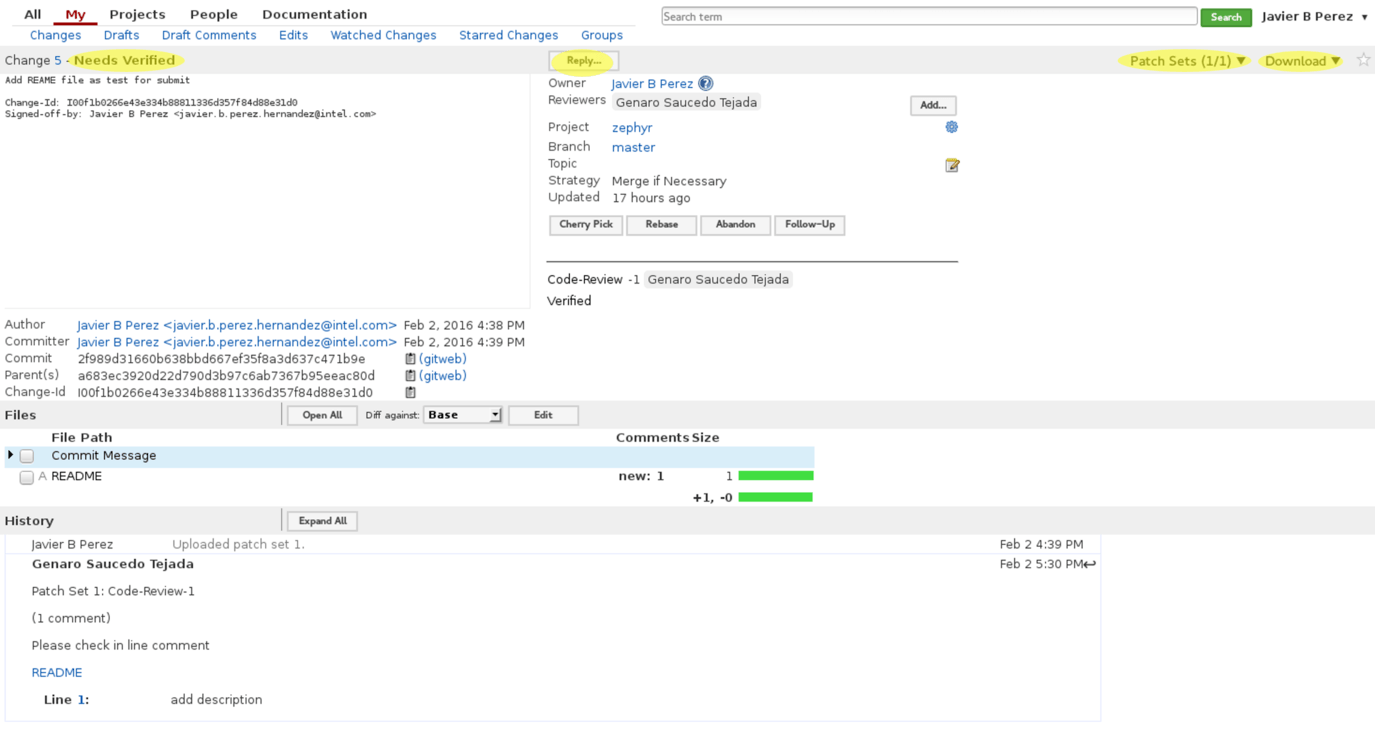
The details of the change and its current status are loaded:

An example of the detailed view of a change in Gerrit.
The highlighted items require further explanation.
From left to right:
- Status: Displays the current status of the change. In the example below, the status reads: Needs Verified.
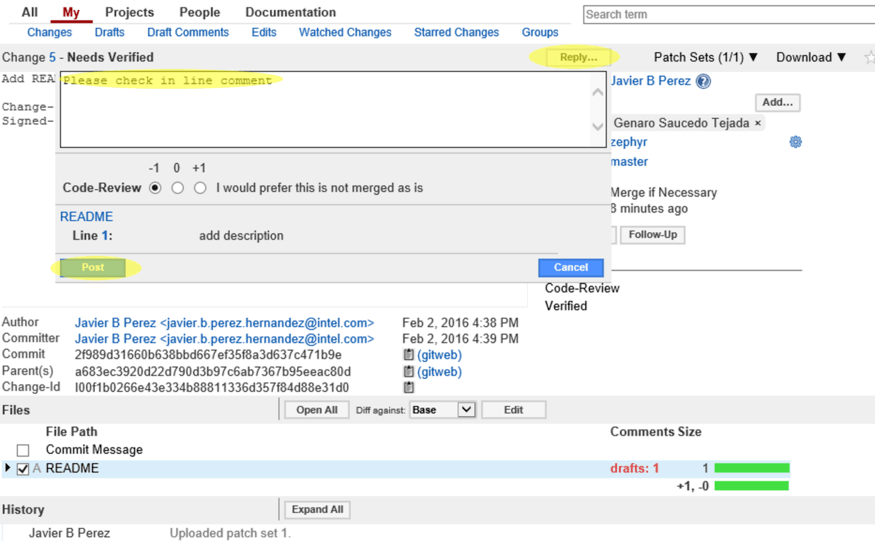
- Reply: Click on this button after reviewing to add a final review message and a score, -1, 0 or +1.
- Patch Sets: If multiple revisions of a patch exist, this button enables navigation among revisions to see the changes. By default, the most recent revision is presented.
- Download: This button brings up another window with multiple options to download or checkout the current changeset. The button on the right copies the line to your clipboard. You can easily paste it into your git interface to work with the patch as you prefer.
Underneath the commit information, the files that have been changed by this patch are displayed.
Click on a filename to review it. Select the code base to differentiate against. The default is Base and it will generally be what is needed.
The review page presents the changes made to the file. At the top of the review, the presentation shows some general navigation options. Navigate through the patch set using the arrows on the top right corner. It is possible to go to the previous or next file in the set or to return to the main change screen. Click on the yellow sticky pad to add comments to the whole file.
The focus of the page is on the comparison window. The changes made are presented in green on the right versus the base version on the left. Double click to highlight the text within the actual change to provide feedback on a specific section of the code. Press c once the code is highlighted to add comments to that section.
After adding the comment, it is saved as a Draft.
Once you have reviewed all files and provided feedback, click the green up arrow at the top right to return to the main change page. Click the Reply button, write some final comments, and submit your score for the patch set. Click Post to submit the review of each reviewed file, as well as your final comment and score. Gerrit sends an email to the change-submitter and all listed reviewers. Finally, it logs the review for future reference. All individual comments are saved as Draft until the Post button is clicked.


