This lesson teaches you to
Most apps have an inherent information model that can be expressed as a tree or graph of object types. In more obvious terms, you can draw a diagram of different kinds of information that represents the types of things users interact with in your app. Software engineers and data architects often use entity-relationship diagrams (ERDs) to describe an application's information model.
Let's consider an example application that allows users to browse through a set of categorized news stories and photos. One possible model for such an app is shown below in the form of an ERD.
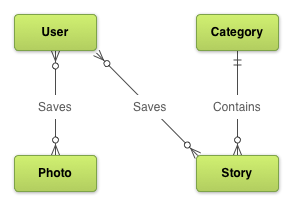
Figure 1. Entity-relationship diagram for the example news application.
Create a Screen List
Once you define the information model, you can begin to define the contexts necessary to enable users to effectively discover, view, and act upon the data in your application. In practice, one way to do this is to determine the exhaustive set of screens needed to allow users to navigate to and interact with the data. The set of screens we actually expose should generally vary depending on the target device; it's important to consider this early in the design process to ensure that the application can adapt to its environment.
In our example application, we want to enable users to view, save, and share categorized stories and photos. Below is an exhaustive list of screens that covers these use cases.
- Home or "launchpad" screen for accessing stories and photos
- List of categories
- List of news stories for a given category
- Story detail view (from which we can save and share)
- List of photos, uncategorized
- Photo detail view (from which we can save and share)
- List of all saved items
- List of saved photos
- List of saved stories
Diagram Screen Relationships
Now we can define the directed relationships between screens; an arrow from one screen A to another screen B implies that screen B should be directly reachable via some user interaction in screen A. Once we define both the set of screens and the relationships between them, we can express these in concert as a screen map, which shows all of your screens and their relationships:
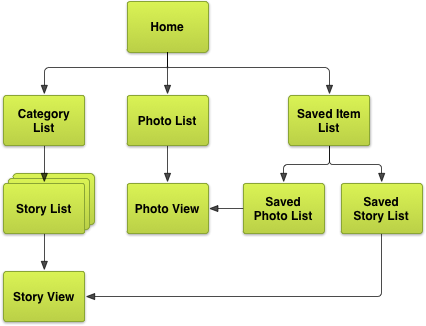
Figure 2. Exhaustive screen map for the example news application.
If we later wanted to allow users to submit news stories or upload photos, we could add additional screens to this diagram.
Go Beyond a Simplistic Design
At this point, it's possible to design a completely functional application from this exhaustive screen map. A simplistic user interface could consist of lists and buttons leading to child screens:
- Buttons leading to different sections (e.g., stories, photos, saved items)
- Vertical lists representing collections (e.g., story lists, photo lists, etc.)
- Detail information (e.g., story view, full-screen photo view, etc.)
However, you can use screen grouping techniques and more sophisticated navigation elements to present content in a more intuitive and device-sensitive way. In the next lesson, we explore screen grouping techniques, such as providing multi-pane layouts for tablet devices. Later, we'll dive into the various navigation patterns common on Android.