Tutorial for Embedded Development
The following tutorial describes how to create a project for embedded work with a target board (examples use the
x
86 board). You will change the build rules from working with a host system to work instead with the embedded target. You set up the directories, services and files that your application uses for the host so that the target environment matches your application's filesystem requirements.
In the following tutorial, you will build the
httpd-demo for your native and your embedded target. The
httpd-demo is a web server-based calendar. When you complete this tutorial, it will be running on your board; you can then connect to it from a web browser.
Creating the Build Rules for the Project
-
Create the httpd-demo project file
before creating build rules for a native project.
mkdir ~/demos
cd ~/demos
cp -R /opt/redhat/edk-000221/examples/httpd-demo .
Follow the same instructions as with Creating
a New Project and Working with a New
Project.
-
From the Symbol Browser, select
Tools
->
Build Settings
to start the
Build Settings
dialog.
Build Settings
dialog for creating a native project

-
Enter
x86_native
as the name of the native build project.
-
Click
Create. The
Edit Target
dialog opens (Edit Target dialog).
Edit Target
dialog

-
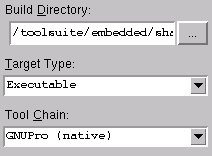
In the
Build Directory
field, click on the "..."
button and select the directory in which you will store the object files and the executable.
-
Select
Executable
in the
Target Type
field.
-
Select
GNUPro (native)
in the
Tool Chain
field.
See the results
in Providing data for Build Directory,
Target Type, and Tool Chain fields for the
Edit Target dialog fields.
Providing data for
Build Directory,
Target Type, and Tool Chain fields
-
Select all the files on the left hand side of the
Edit Target dialog by clicking on the first file and shift-clicking on the last file.
-
Click
Add Files
to copy the files to the
Target Files
list (Project files added to a project).
Project files added to a project

-
Click the
Build Rules
tab (Modifying rules for how the project builds).
Modifying rules for how the project builds

-
Double click on the line containing the rules
that you want to modify (C
type, in the example). The
Build Rule Settings
dialog appears (Selecting Debug
method).
Selecting
Debug
method

-
Select
Standard Debug
from the
Debug
dropdown menu.
-
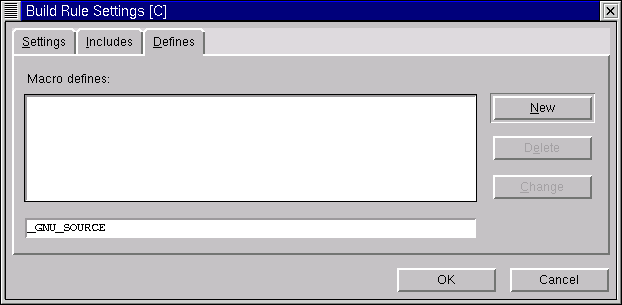
Click the
Defines
tab to define a macro (Defines tab).
Defines
tab

-
Enter
_GNU_SOURCE
in the text entry field (Adding a macro).
Adding a macro
-
Click the
New
button to create the definition. Click
OK
to close the
Build Rule Settings
dialog.
-
Click the
Link Rules
tab of the
Edit Target
dialog (Link Rules tab).
Link Rules
tab

-
Enter -static
in the
Link flags
field.
-
Click
Debug
from the
Debug/Execute Settings
buttons (see Results of modifying Link flags field for results).
Results of modifying
Link flags
field

-
Click
OK
to close the
Edit Target
dialog.
-
Click
Done
to close the
dialog.
You have now created the build target. Now you must compile the program.
Build the Native Application
-
Select
Tools
->
Build
from the Symbol Browser in Source-Navigator. The
Build
dialog opens.
-
In
Build Targets, select
x86_native
from the target list. Click
Start
(Compiling the x86_native application).
Compiling the
x86_native
application

-
x86_native
compiles without errors.
-
Click
Debug
to open the Insight visual debugger for debugging the demo on the host machine.
See Insight's
Help
menu or Working with Insight, the
Debugger Interface for more information about debugging.
- Use a web browser and connect to http://localhost:8080; you should see the calendar.
Working with an Embedded Target
Now that you have created the host demo project, you will create the build target using similar steps to download the project to the
x
86 target board.
IMPORTANT!
The PowerPC MBX target board's configuration has different settings.
For more information on the windows, dialog boxes, menus, buttons, and other features and functions of Source-Navigator, see its
Help
menu.
Setting Up a Target Configuration
Use Source-Navigator's
EDK Preferences
dialog to specify EDK-specific parameters.
-
Select
File
->
EDK Preferences
from the
Symbol Browser
window.
-
When the
EDK Preferences
dialog appears (Target
tab fields), enter the
<target-IP-address>
from Network information in
the
Hostname
field.
-
Enter
/tftpboot/<target-IP-address>/zImage
in the
Boot Image
field
(<target-IP-address>
indicates the target's IP address that the DHCP
server assigns, which you determined
from Network information).
Target
tab fields

-
Click the
Filesystem
tab (Sprecifying information for the Filesystem tab fields).
Specifying information for the
Filesystem
tab fields

-
Select
NFS Root
as the filesystem.
Enter
/tftpboot/<target-IP-address>
in the
Root Directory
field (where you substitute
<target-IP-address>
for the value that you determined
from Network information).
-
Click the
Kernel
tab.
Specifying information for the
Modules section of the Kernel
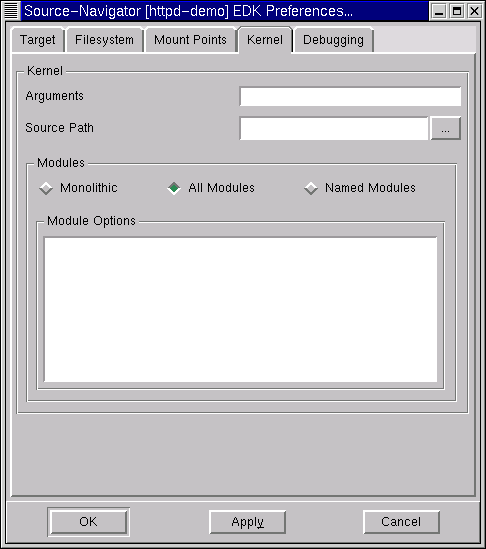
-
Specify the kernel in the
Source Path
dialog area.
- The path to the
x 86 kernel should be:
~/kernels/linux-2.2.14-5
-
The path to the PowerPC kernel should be:
~/kernels/linux-2.2.13
Select
Monolithic
in the
Modules
section.
-
Click
OK
to close the
EDK Preferences
dialog.
Creating an Embedded Target's Build Rules
-
Now, create the embedded target build rules. Choose
Tools
->
Build Settings
from the Symbol Browser in Source-Navigator to access the
Build Settings
dialog.
-
Enter
x86_embedded_linux
as the name for the build application.
IMPORTANT!
The PowerPC MBX target board will use a different
naming convention, such as
mbx_embedded_linux
for the build application.
Click
Create
(Adding an embedded build rule). The
Edit Target dialog opens.
Adding an embedded build rule

-
In the
Build Directory
field, click on the "..." button and select the directory in which you will store the object files and the executable.
-
Select
Executable
in the
Target Type
field.
-
Select
GNUPro (Embedded x86 linux)
in the
Tool Chain
field.
-
Select all the files on the left hand side of the Edit Target dialog by clicking on
the first file and shift-clicking on the last file.
-
Click
Add Files
to copy the files to the
Target Files
list.
-
Click the
Build Rules
tab.
-
Double click on the line containing the rules that you
want to modify (C type, in the example). The
Build Rule Settings
dialog appears.
-
Select
Standard Debug
from the
Debug
dropdown menu.
-
Click the
Defines
tab to define the macro.
-
Enter
_GNU_SOURCE
in the text entry field (Defining the macro for the embedded target).
Defining the macro for the embedded target
-
Click the
New
button to create the definition.
-
Click OK to close the Build Rule Settings.
-
Click the
Link Rules
tab of the
Edit Target
dialog.
Enter
-static in the
Link flags
field.
Click
Debug
from the
Debug/Execute Settings
buttons.
-
Click OK to close the
Edit Target dialog.
Click Done to close Build Settings.
Build the Rules for an Embedded Project
Now, build the embedded target application.
-
Select
Tools
->
Build. The
Build
dialog opens.
-
In the
Build Targets
field, select
x86_embedded_linux
from the file list.
- Click
Start
(Choosing the embedded application to build).
Choosing the embedded application to build

-
x86_embedded_linux generates without errors.
Debug an Executable Application on a Target Board
With the embedded executable application built into a program, you can debug it on the embedded target board with Insight.
-
Reboot the target board.
- For the x86 board, insert the boot ROM floppy and power up the board.
- For the MBX board, start Minicom, power up the board and type the following command at the EPPC-Bug prompt.
pl 20 0
The target board will get the boot image, the kernel will reboot,
gdbserver
will launch and the kernel's console window displays the message:
Process /app created; pid=8
-
gdbserver
will then be waiting for GDB. Click the
OK
button from Project to debug.
Insight launches, stopping at a breakpoint.
For a native project, click the Run button. For an embedded project, click Run and then click the Continue button.
For more details on debugging, see Working with Insight, the Debugger Interface.
WARNING!
Do not debug any applications in the background or else debugging will not work.
Run the Executable Application
-
After you successfully debug the target board application, now set up the application as an executable on the host.
-
Return to the
Symbol Browser
to select
Tools
->
Build Settings
to start the
Build Settings
dialog.
-
Double-click on
x86_embedded_linux. The
Edit Target
dialog opens. Click the
Link Rules
tab of the
Edit Target
dialog (Changing the application).
Changing the application

-
Click
Execute
from the
Debug/Execute Settings
buttons.
-
Click
OK
to close the
Edit Target
dialog.
-
From the
Symbol Browser, select
Tools
->
Build
to start the
Build Settings
dialog. Select the
x86_embedded_linux
target application from the
Build Targets
drop-down list (Building the executable for the target board).
Building the executable for the target board

Click
Start.
-
Restart the target board. When you restart
the target board, the application downloads to the
target board using the TFTP services.
-
Start your web browser and, in the location/address
field, provide the target
board's specific IP address followed by ":8080"
(as the following example shows).
http://192.168.1.100:8080
-
See a calendar from a web page, running as the executable application from the target board, displaying on the host screen (Executable in a web browser).
Executable in a web browser

