Getting Started
- Introduction
- Sample Application
- Environment Setup
- Starter App
- Entities
- Value Objects
- Services
- Console App
- Associations
- Complete the Model
- Enhance Console App
Project Documentation

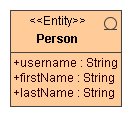
This page provides directions to create the Person entity using MagicDraw. The model is shown below for your reference.
org.andromda.timetracker as the name of the package. AndroMDA
will map this package to a Java package with the same name. Note: Make sure the package name is
exactly org.andromda.timetracker, with no leading or trailing spaces. We
have found that some browsers introduce a leading space in the package name if you copy
it from this page!domain under org.andromda.timetracker.
We will create our entities and supporting classes in this package. Note that AndroMDA
does not require this package structure. We are doing it simply to separate our business
domain classes from other classes such as value objects etc.domain package and select
New Diagram > Class Diagram. A Class Diagram Specification dialog appears. Type in
Domain Objects as the name of this diagram and click OK. The diagram is created and
opened in a new window.Person class. It is always a good
idea to document your model. Documentation added to model elements such as classes,
attributes and methods is carried over to the code as comments. Double-click on
the Person class to bring up the Class Specification dialog. Add the following
sentence in the Documentation field and click OK:
"This class represents any person whose time needs to be tracked."Entity to class Person. To do this,
right-click on the class and select Stereotype. In the next level menu, check Entity
and click Apply. The Person class will now have the Entity
stereotype.username as an attribute of Person.
Right-click on the Person class and select Insert New Attribute. A new attribute is
inserted with the specification "-unnamed1". Write over this specification with
this new one: "+username : String" (be sure to delete the minus sign in front of the name).
Do not press Enter after typing this attribute (that will create another attribute).
Instead click outside the class to finish entering the attribute. Note that
attributes are always generated as private members of a class. However the visibilities
of the associated getter and setter are determined by the visibility of the attribute
specification. In this case we have specified public visibility (by using the plus sign)
and hence the username getter and setter will be public.firstName and lastName
to the Person class. Make them String type.TimeTracker model by selecting File > Save Project.
Congratulations! You have now specified the Person entity of the TimeTracker
application. We are now ready to generate some code. Please go back to the main tutorial page and
continue from where you left off.