Getting Started
- Introduction
- Sample Application
- Environment Setup
- Starter App
- Entities
- Value Objects
- Services
- Console App
- Associations
- Complete the Model
- Enhance Console App
Project Documentation

In this section you will create your very first entity using AndroMDA. Since people
are central to TimeTracker, we will start out by modeling a Person
entity. Person has three attributes: username, firstName
and lastName. The model for the Person entity
is shown below.
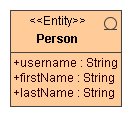
Note that we have marked the Person class with a stereotype
of Entity. This tells AndroMDA that Person is
an Entity as opposed to other type of model elements such as Enumeration or
EmbeddedValue. Stereotypes determine what pattern of code AndroMDA will
generate for a model element. More specifically, they determine which
AndroMDA code generation templates will be triggered.
Note that we have marked all three attributes to be of type String.
This type should not be confused with the Java type java.lang.String.
In model driven architecture, the model is kept independent of technology
and hence all model elements are defined in terms of platform independent
types. So String in this context is a platform independent type.
When we run AndroMDA to generate code, it will translate platform
independent types into platform dependent types such as java.lang.String.
If we were to use the same model to generate a .NET application, AndroMDA will
translate String into System.String, which is the
.NET equivalent of java.lang.String. As you can see, a key
advantage of the model driven approach is that your investment in the business
models is preserved even as technologies come and go.
Now let us enter the Person entity in the empty model that was created by the
AndroMDA application plugin. If you remember, this model was created at
timetracker/mda/src/uml/TimeTrackerModel.xmi. Please follow one of the links below to edit
the model with the UML tool of your choice.
Follow the steps below to generate code.
C:/timetracker.maven -o install. As mentioned earlier, the -o
option instructs maven to run in "offline" mode, using the libraries in the local
repository. This allows the build to run much faster. Make sure you get a
BUILD SUCCESSFUL message when Maven finishes execution.
Open the folder C:/timetracker/core/target/src/org/andromda/timetracker/domain in Windows Explorer.
Note that there are 6 files generated in this folder as a result of creating the single
Person entity in the application model.
Person entity. It contains the 3 attributes from the model along with their getters
and setters. AndroMDA automatically adds an id attribute that represents
the unique identifier for Person instances in the database. In addition,
AndroMDA generates equals() and hashCode() methods for the
entity. Note that Person is an abstract class - it cannot be instantiated.
The PersonImpl class described below, is a concrete class that extends
Person. It can be instantiated using the factory methods imbedded in
the Person class.PersonImpl is a concrete
extension of the Person class. It is meant to be a container for any custom code
that developers would like to add to the Person entity.PersonDao is the interface for the Person data access object.
It specifies CRUD methods for the DAO.PersonDaoBase implements all of the
CRUD methods specified in the PersonDao interface class.PersonDaoImpl is a concrete extension
of the PersonDaoBase class. It is meant to be a container for any custom code
that developers would like to add to the Person data access object.Person entity to its relational representation in the database.
Note that all six files are generated in the target folder of the core project.
The target folder is intended for auto generated files only. None of the files
in this folder should be modified by hand because code regeneration will wipe them out
completely, thus deleting all your changes. It is also a best practice not to check this
code into your source repository. Instead let your build script generate it on the fly.
By now you must be wondering where to add the custom code. We already said above that developers
can add custom code into PersonImpl.java and PersonDaoImpl.java.
But why are these classes generated in the target folder then? Well, AndroMDA is pretty
smart. You have given it no indication that you want to write custom code. As long as that is the
case it will keep generating the Impl classes in the target folder. However, as soon
as you tell AndroMDA that you want to write some custom code in these classes, it will generate them
in the src folder under the core project. Now you are free to modify the Impl
classes and add any code to them. AndroMDA will never overwrite files in the project src folder.
They are auto-generated only once for your convenience. In a later section of this tutorial we will
show you how to write custom code.
In addition to the entity and DAO classes shown above, AndroMDA automatically generates DDL
to create tables in your database. This DDL is located at C:/timetracker/core/target/schema-create.sql.
Open this file and review its contents. You should see the SQL to create the PERSON table.
Follow the steps below to create this table in your database.
Note that PostgreSQL does not like the first statement in schema-create.sql (drop sequence hibernate_sequence). Please comment out this line for PostgreSQL.
C:/timetracker.maven -o create-schema. This will create the
PERSON table in your database. Use your database utilities to verify
that the table has indeed been created.
Now that we have modeled the Person entity, it is time to create a value object to go with it.
Click
here
to model the PersonVO value object.