| 9.2. Security Realm Configuration | ||
|---|---|---|
 | Chapter 9. Security Configuration [DRAFT (1.0-pre)] |  |
| 9.2. Security Realm Configuration | ||
|---|---|---|
| | Chapter 9. Security Configuration [DRAFT (1.0-pre)] | |
This section reviews the process for configuring a standard or custom Geronimo security realm. There are two approaches: using the management console, and manually configuring and deploying a realm using GBeans and a Geronimo deployment plan. The console approach is the most convenient, but the manual approach has some additional flexibilitiy.
In either case, a security realm may use one or a series of login modules. Each of the standard Geronimo login modules requires certain configuration settings, described in Section 9.2.3, “Configuration Options for Standard Login Modules”. Third-party or custom login modules use the same general syntax to set login module options, but the specific options available will vary.
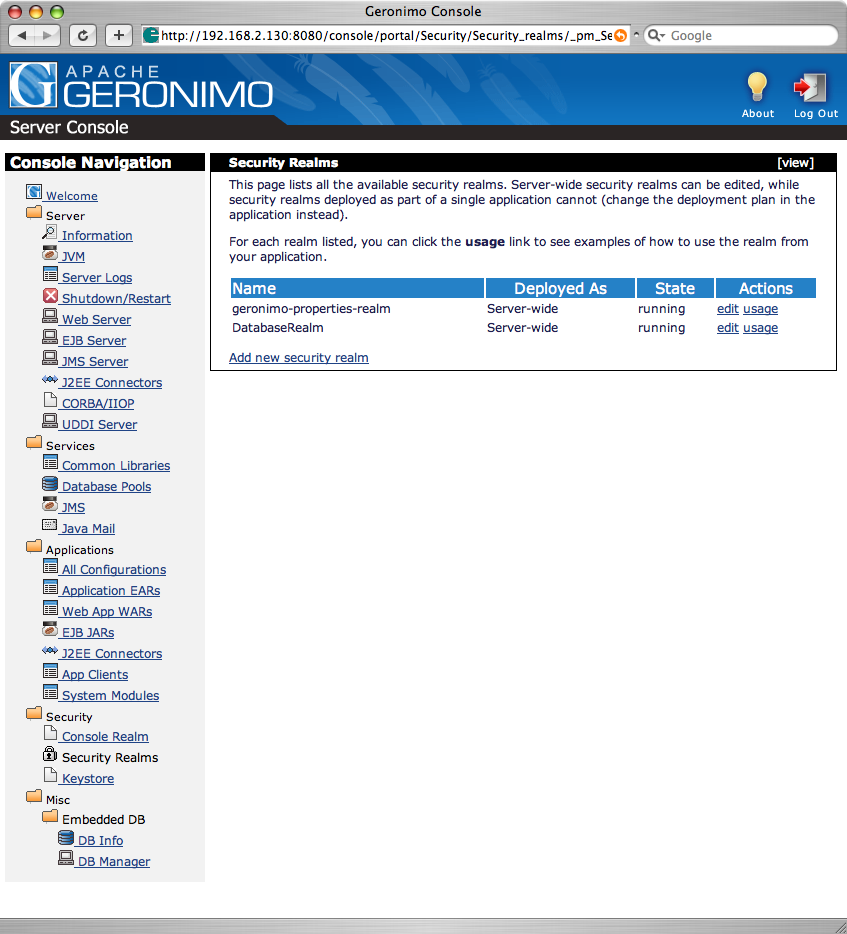
The most convenient way to configure a security realm is to use the Geronimo console. To get started, log in to the console and select Security Realms from the navigation area on the left:
![[Tip]](images/tip.png) | Tip |
|---|---|
Before creating a SQL security realm, create a database pool using the Database Pools entry in the console. For more details on creating database pools in the console, see Section 6.3, “Easy Configuration and Deployment using the Console”. | |
This screen lists the available security realms. Click the link to begin the process of creating a security realm.
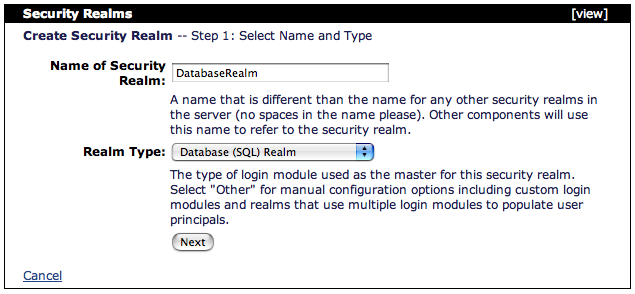
The first screen collects the basic settings for the new security realm:
The two settings on this screen are:
| Field | Description |
|---|---|
| Name of Security Realm | The name that applications will use to refer to this security realm. It should be different than the name used for any other resource in the server. |
| Realm Type | To use a security realm made up of standard Geronimo login modules, select the type here. If you want to use a custom login module type, include multiple login modules that perform authentication, or have full control over login domain names and other advanced features, select "Other" (and see Section 9.2.1.5, “Creating Custom Security Realms”). |
Select to continue.
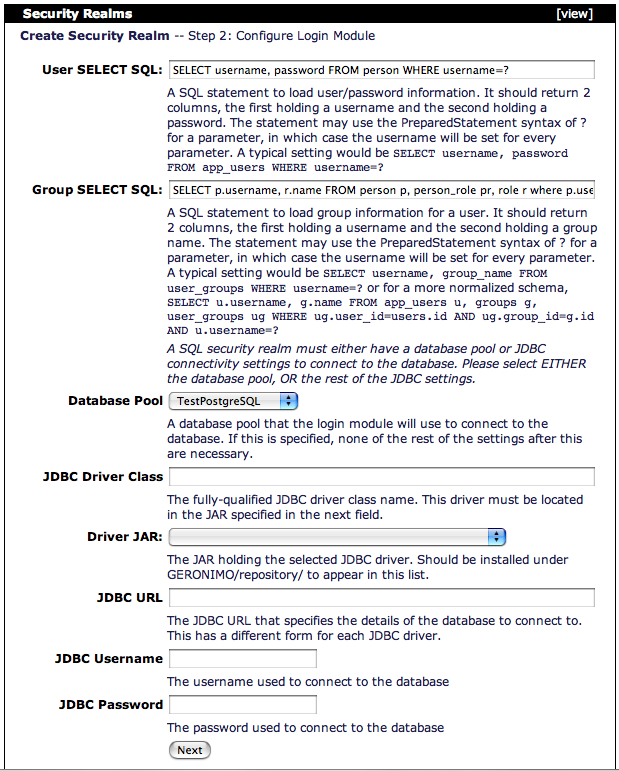
For the basic realm types, the next screen shows the configuration options for the selected type:
Each realm type has different settings on this screen (it essentially lets you configure the main login module for the realm). The options for each realm are described on the screen (or see Section 9.2.3, “Configuration Options for Standard Login Modules” for more information). Figure 9.3, “Console: Security Realm -- Main Settings” shows the settings for a SQL realm.
Select to continue.
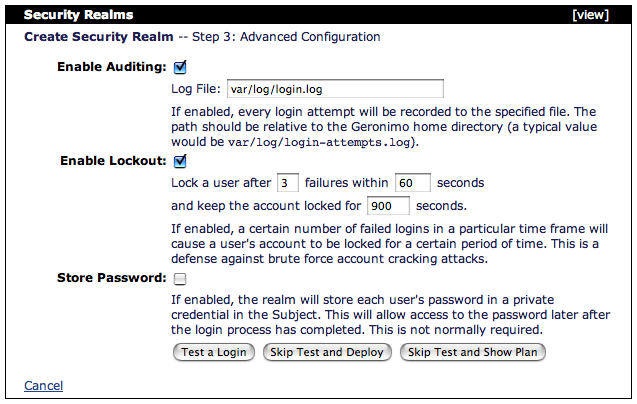
The next screen shows standard login options available to security realms in Geronimo. Under the covers, these are implemented by separate login modules, so that selecting options here configures additional login modules for the realm.
The options available on this screen are:
| Field | Description |
|---|---|
| Enable Auditing | If selected, login attempts will be recorded in a log file. Each login attempt will generally produce two lines ouf output, one listing the user attempting to authenticate, and one indicating whether the overall authentication process succeeded or failed. |
| Log File | The path to the log file (relative to the Geronimo installation directory). |
| Enable Lockout | If selected, user accounts will be locked out after too many failed login attempts in a particular time frame (that is, any subsequent login attempts will fail no matter what password is provided). If an account is locked there will not be any particular error message; logins will just fail until the lockout expires. |
| Lock a user after __ failures | The number of failures that cause the account to be locked. Default 5 failures. |
| within __ seconds | The window of time in which that many failures must happen for the account to be locked (in seconds). Default 5 minutes. |
| locked for __ seconds | If the account is locked, how long the user should stay locked out. There is no way to manually lock or unlock an account. Default 30 minutes. |
| Store Password | Normally not necessary. This is an advanced feature that will save the user's password in their Subject, so later custom security hooks can access it. |
From here, there are three ways to proceed:
If the login module can be tested, continues to the next screen where you can enter a username and password and see if the login module allows access. This is typically used just to ensure that the fundamental settings are correct. Note that not all realms can be tested (e.g. Kerberos or Client Certificates). See Section 9.2.1.4, “Step 4: Test Login”.
Deploys the security realm with the collected configuration information. This returns to the security realm list screen. If there is an error deploying the security realm, it will be printed to the server log.
Shows the Geronimo deployment plan constructed for the security realm. This can be used to deploy the realm as an application-scoped realm or to save the configuration for later use or automated deployment, etc. See Section 9.2.1.7, “Generate a Plan for an Application Scoped Realm”.
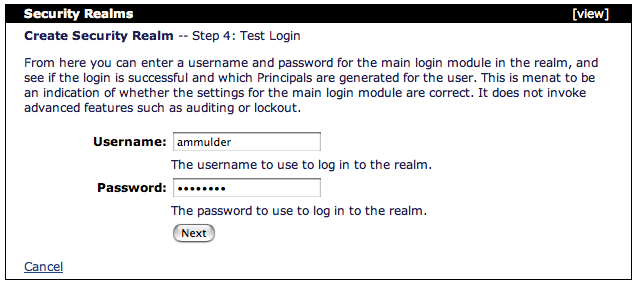
If the login test is selected, this screen prompts for a username and password:
Enter a valid username and password for the realm and select to continue. This will result in one of the following two screens, depending on whether the login was successful.
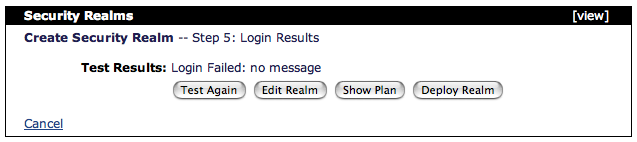
This screen indicates that the login failed. From here you can try again (), adjust the configuration for the realm (), show the Geronimo deployment plan generated for the realm (), or ignore the failure and deploy the realm anyway ().
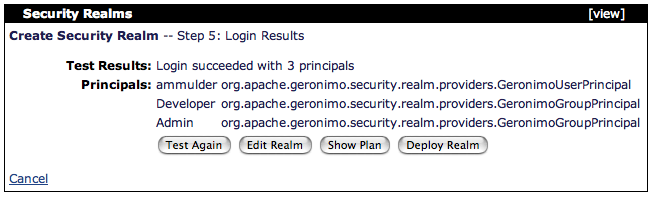
This screen indicates that the login succeeded. It shows which principals were generated for the user, with the principal name and principal class for each. This information (the principal class and name) can be used to map J2EE roles to specific users or groups in the security realm (see Section 9.4.2, “Mapping Roles to Principals”).
From here, there are four options:
Run the test again with a different login.
Adjust the configuration for the realm.
Show the Geronimo deployment plan constructed for the security realm. This can be used to deploy the realm as an application-scoped realm or to save the configuration for later use or automated deployment, etc. See Section 9.2.1.7, “Generate a Plan for an Application Scoped Realm”.
Deploys the security realm with the collected configuration information. This returns to the security realm list screen. If there is an error deploying the security realm, it will be printed to the server log.
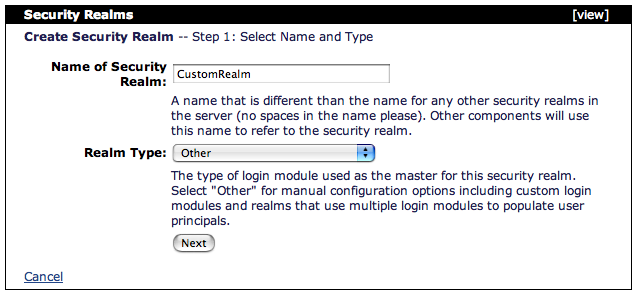
To create a security realm using non-standard login module, or to configure a realm with more control over the individual login modules and configuration, add a new realm from the realm list screen and select a Realm Type of Other:
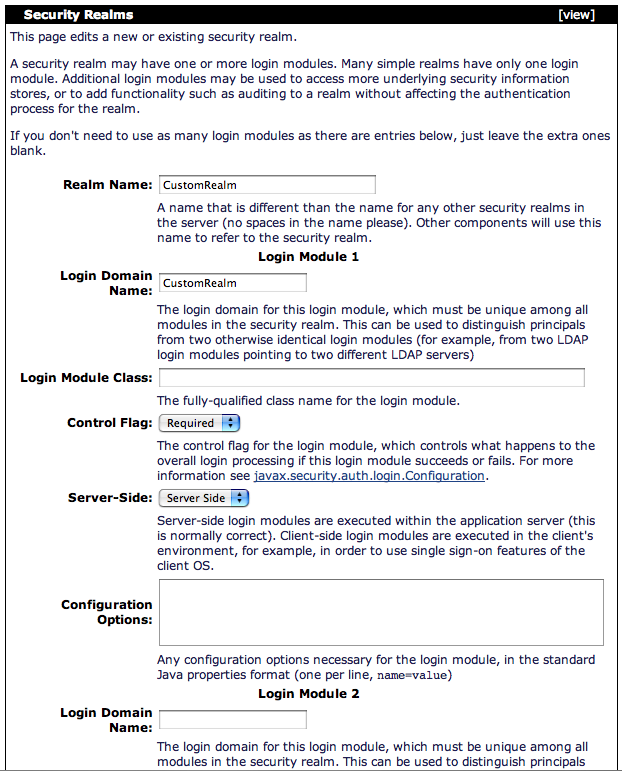
This brings up the detailed realm edit screen:
This screen has configuration settings for the realm and up to 5 login modules. The available settings are the same for all 5 login modules. If there are fewer than 5 login modules for the realm, the settings for all the additional login modules may be left blank. The available settings are:
| Field | Description |
|---|---|
| Login Domain Name | A name that uniquely identifies this login module. This can be used for advanced security role mapping, to distinguish between principals that come from 2 otherwise identical login modules (for example, two LDAP realms pointing to two distinct LDAP servers). Otherwise, this typically just needs to be different than the login domain name set for other login modules. |
| Login Module Class | The fully-qualified class name for the login module. This class must implement javax.security.auth.spi.LoginModule. |
| Control Flag | Each login module has a control flag, indicating what should happen to the overall login process if this module succeeds or fails. For example, it might be Required (this login module must succeed in order for the overall login to succeed, but other login modules will still be called even if this module fails). For more detail on JAAS control flags, see the JavaDoc for the JAAS Configuration class. If there's only one login module in the realm, it should typically be set to Required. |
| Server-Side | Most login modules should be run on the server side. Unless you know other wise, this should be set to Server Side. However, some modules such as the Kerberos login module have components that must run on the client side, and in that case this should be set to Client Side. |
| Configuration Options | Each login module takes a number of custom configuration options (for example, a debug option that may be set to true or false). In this box, you can enter any number of configuration options using the standard Java properties file format (one option per line, with the form name=value). |
| Tip |
|---|---|
If the security realm has multiple login modules, the Control Flag is particularly important to establish the relationship between the modules, and which modules will be run depending on whether the ones before them succeeded or failed. The order of the login modules is also important, in case the control flag for one of them is set such that success or failure stops the login process. | |
From here, there are two options:
Show the Geronimo deployment plan constructed for the security realm. This can be used to deploy the realm as an application-scoped realm or to save the configuration for later use or automated deployment, etc. See Section 9.2.1.7, “Generate a Plan for an Application Scoped Realm”.
Deploys the security realm with the collected configuration information. This returns to the security realm list screen. If there is an error deploying the security realm, it will be printed to the server log.
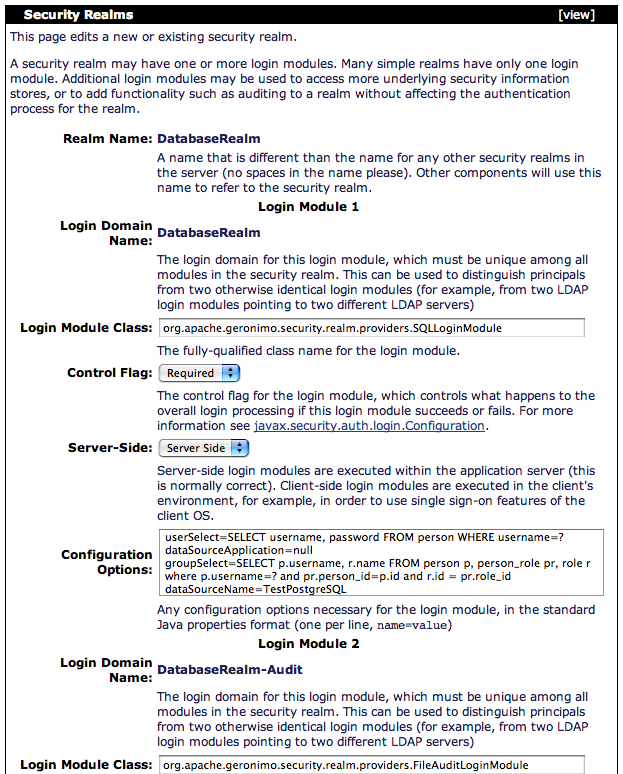
Editing existing security realms is similar to creating a custom security realm. To begin, click the link to the right of one of the realms on the initial security realm list screen. That brings up the edit screen:
This screen has configuration settings for each of the login modules in the realm. The available settings are the same for all the login modules:
| Field | Description |
|---|---|
| Login Module Class | The fully-qualified class name for the login module. This class must implement javax.security.auth.spi.LoginModule. |
| Control Flag | Each login module has a control flag, indicating what should happen to the overall login process if this module succeeds or fails. For example, it might be Required (this login module must succeed in order for the overall login to succeed, but other login modules will still be called even if this module fails). For more detail on JAAS control flags, see the JavaDoc for the JAAS Configuration class. If there's only one login module in the realm, it should typically be set to Required. |
| Server-Side | Most login modules should be run on the server side. Unless you know other wise, this should be set to Server Side. However, some modules such as the Kerberos login module have components that must run on the client side, and in that case this should be set to Client Side. |
| Configuration Options | Each login module takes a number of custom configuration options (for example, a debug option that may be set to true or false). In this box, you can enter any number of configuration options using the standard Java properties file format (one option per line, with the form name=value). |
| Tip |
|---|---|
If the security realm has multiple login modules, the Control Flag is particularly important to establish the relationship between the modules, and which modules will be run depending on whether the ones before them succeeded or failed. The order of the login modules is also important, in case the control flag for one of them is set such that success or failure stops the login process. | |
From here, there are two options:
Show a Geronimo deployment plan for the modified security realm. This can be used to deploy the realm as an application-scoped realm or to save the configuration for later use or automated deployment, etc. See Section 9.2.1.7, “Generate a Plan for an Application Scoped Realm”.
Updates the security realm with the collected configuration information. This returns to the security realm list screen. If there is an error updating the security realm, it will be printed to the server log.
The security realm features in the console can't update an application configuration. However, they can generate a deployment plan that can be used elsewhere to either deploy the pool with the command-line tools, or to include the plan in an application module.
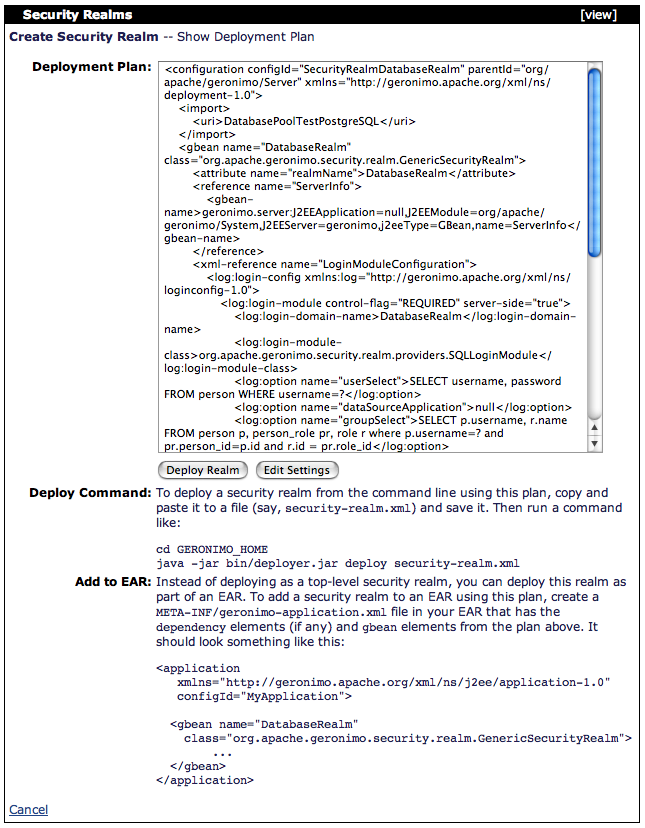
To do this, follow the normal process to create a pool outlined previously. From the advanced settings, test results, custom realm, or edit realm screens, select the command to to bring up the plan screen:
This screen shows the deployment plan that was generated based on the selections made on the previous screens. It also provides a command that could be used to deploy the security realm on the command line, as well as providing a simple procedure to add the security realm to an EAR as an application-scoped realm.
The main step to take from this screen is to copy the entire contents of the Deployment Plan text area (using Ctrl-A or a similar shortcut to be sure). The next three sections discuss the different ways to use this plan.
| Tip |
|---|---|
If you plan to deploy more than one pool in the same server using this plan, be sure to change the configId attribute in the top connector element, and the name specified in the connectiondefinition-instance element. | |
To deploy via the command-line deploy tool, save the plan to a file on disk. Then that file can be used to deploy the security realm. For example, if the plan was saved as GERONIMO_HOME/security-realm.xml, then a deploy command might look like this:
java -jar GERONIMO_HOME/bin/deployer.jar deploy \
GERONIMO_HOME/security-realm.xmlTo deploy the security realm as part of an EAR, create or edit the geronimo-application.xml deployment plan for the EAR (for more details on the Geronimo EAR deployment plan, see Chapter 15, Enterprise Applications (EARs) [DRAFT (1.0)]). Add the dependency (if any) and gbean elements to the EAR deployment plan. For example, the plan might look like this:
Example 9.1. EAR Deployment Plan with Application Scoped Security Realm
<?xml version="1.0" encoding="UTF-8"?>
<application
   xmlns="http://geronimo.apache.org/xml/ns/j2ee/application-1.0"
   configId="MyApplication">
  <gbean name="my-security-realm"
class="org.apache.geronimo.security.realm.GenericSecurityRealm">
    <attribute name="realmName">
      my-security-realm
    </attribute>
    <reference name="ServerInfo">
      <gbean-name>geronimo.server:J2EEApplication=null,
J2EEModule=geronimo/j2ee-system/1.0/car,J2EEServer=geronimo,
j2eeType=GBean,name=ServerInfo</gbean-name>
    </reference>
    <reference name="LoginService">
      <gbean-name>geronimo.server:J2EEApplication=null,
J2EEModule=geronimo/j2ee-security/1.0/car,J2EEServer=geronimo,
j2eeType=JaasLoginService,name=JaasLoginService</gbean-name>
    </reference>
    <xml-reference name="LoginModuleConfiguration">
      <log:login-config
xmlns:log="http://geronimo.apache.org/xml/ns/loginconfig-1.0">
        <log:login-module control-flag="REQUIRED"
                          server-side="true"
                          wrap-principals="false">
          <log:login-domain-name>
            my-security-realm
          </log:login-domain-name>
          <log:login-module-class>
            org.apache.geronimo.security.realm.providers.
                                        PropertiesFileLoginModule
          </log:login-module-class>
          <log:option name="usersURI">
            var/security/users.properties
          </log:option>
          <log:option name="groupsURI">
            var/security/groups.properties
          </log:option>
        </log:login-module>
      </log:login-config>
    </xml-reference>
  </gbean>
</applications>This section describes how to manually configure a security realm. Once you have the configuration information together, you can deploy and activate the new security realm using the process described in Section 9.3, “Deploying a Security Realm”.
A security realm should be a GBean, so it can be deployed like any other custom service. This section describes the basic GBean configuration procedure (though Chapter 18, GBeans: Adding New Services to Geronimo [EMPTY] contains a more thorough description of deploying services in Geronimo). The following sections describe the specific configuration settings for a Geronimo security realm and each of the standard LoginModule implementations.
To deploy a security realm, first you must create a deployment plan for it. Typical deployment information for a security realm looks like this:
Example 9.2. Sample Security Realm Configuration
<gbean name="some-properties-file-realm"
class="org.apache.geronimo.security.realm.GenericSecurityRealm">
  <attribute name="realmName">
    some-properties-file-realm
  </attribute>
  <reference name="ServerInfo">
    <application>null</application>
    <module>geronimo/j2ee-system/1.0/car</module>
    <name>ServerInfo</name>
  </reference>
  <xml-reference name="LoginModuleConfiguration">
    <login-config
           xmlns="http://geronimo.apache.org/xml/ns/loginconfig">
      <login-module control-flag="REQUIRED"
                       server-side="true">
        <login-domain-name>
          some-properties-file-login
        </login-domain-name>
        <login-module-class>
          org.apache.geronimo.security.realm.providers.
                                       PropertiesFileLoginModule
        </login-module-class>
        <option name="usersURI">
          var/security/some_users.properties
        </option>
        <option name="groupsURI">
          var/security/some_groups.properties
        </option>
      </login-module>
    </login-config>
  </xml-reference>
</gbean>
This GBean definition includes the basic security realm configuration (in other words, the name of the realm), and also includes an embedded block of XML that defines the LoginModules that this security realm will use.
The important elements and attributes in this configuration block are:
A unique name used to identify this GBean. By convention, for security realms, this should be the same as the value of the realmName attribute.
The implementation class for the GBean. For a security realm, this should always be org.apache.geronimo.security.realm.GenericSecurityRealm.
Sets a property exposed by the GBean class. The name identifies which GBean attribute this block applies to, and the contents of this element are the value to set for that attribute. The realmName attribute sets a unique name for this security realm, and it should always be used and by convention should match the GBean name.
Gives this GBean a reference to another one. The ServerInfo reference should always be configured exactly as shown here.
Provides a block of XML that the GBean will decode into additional settings or additional GBeans to load. The LoginModuleConfiguration XML block configures the LoginModules to use for this security realm. The contents of this element are described below. Note that it's important to specify a namespace for the nested elements, as the namespace is used to figure out how to decode the nested content. For a security realm, the contents should always use the namespace http://geronimo.apache.org/xml/ns/loginconfig (note the xmlns attribute on the topmost nested element, login-config).
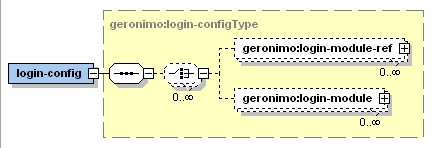
The login module configuration looks like this:
It basically provides a list of login modules, each of which may be listed in one of two ways:
Refers to an existing login module, configured elsewhere.
Defines a new login module configuration
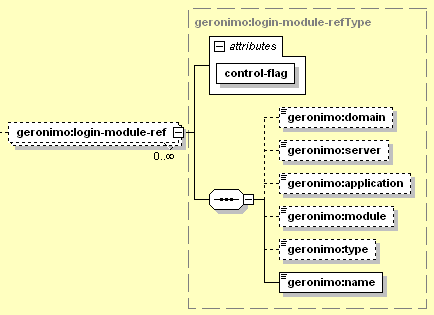
The reference to an existing login module looks like this:
The elements used here are fairly standard for referring to a GBean running elsewhere in the server; the only real difference is the JAAS control flag in addition:
Should be one of the defined JAAS control flag values (REQUIRED, REQUISITE, SUFFICIENT, or OPTIONAL). Refer to the JAAS API Documentation for a full definition of the login procedure for multiple modules based on their control flags. If there's only one login module for this realm then the value should typically be REQUIRED. For multiple modules, often the flags are set to REQUIRED or OPTIONAL. Note that REQUISITE and SUFFICIENT settings may prevent some login modules from executing in all cases (which would defeat an auditing login module, for example).
The domain name portion of the GBean Name identifying the login module to map to. This should usually be geronimo.server, and if not specified, it defaults to the domain of the JSR-77 J2EEServer that was configured for the deployer GBean that's deploying the current module -- which is going to be geronimo.server unless you have substantially altered your default configuration.
The J2EE Server portion of the GBean Name identifying the login module to map to. This should usually be geronimo, and if not specified, it defaults to the name of the JSR-77 J2EEServer that was configured for the deployer GBean that's deploying the current module -- which is going to be geronimo unless you have substantially altered your default configuration.
The name of the application that the target login module is in. If the target login module was not deployed as part of a J2EE application, this would be null. If it was deployed as part of an EAR, this should be the applicationId specified for the EAR, or the configId if no applicationId was specified. If omitted, defaults to null or the current application depending on where the security realm is being configured.
The configId of the module that the target login module is in. If omitted, defaults to the current module.
Should always be set to LoginModule in order to identify a login module.
The name of the target login module.
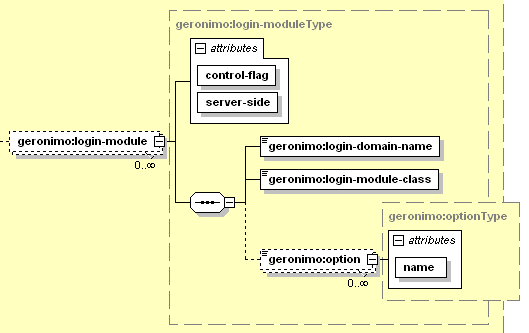
The definition for a new login module looks like this:
The elements introduced here are:
Should be one of the defined JAAS control flag values (REQUIRED, REQUISITE, SUFFICIENT, or OPTIONAL). Refer to the JAAS API Documentation for a full definition of the login procedure for multiple modules based on their control flags. If there's only one login module for this realm then the value should typically be REQUIRED. For multiple modules, often the flags are set to REQUIRED or OPTIONAL. Note that REQUISITE and SUFFICIENT settings may prevent some login modules from executing in all cases (which would defeat an auditing login module, for example).
If set to true, this login module should do all its processing on the server side. For example, if invoked by a client, the client's information would be passed to the server and the server would execute the authentication logic. This should almost always be set to true. The exception is for schemes where the client will retrieve its authorization information from the local operating system on the client side, in which case this attribute should be set to false.
Each login module is named with a login domain name. This allows a security realm to use two instances of the same login module, configured with different login domain names. For example, a security realm might use two LDAP login modules to communicate with two different LDAP servers, and their principals would be indistinguishable without a unique login domain name. For simple scenarios, this should just be set to a unique value.
The fully-qualified class name of the class that implements javax.security.auth.spi.LoginModule. The standard login modules shipped with Geronimo are all in the package org.apache.geronimo.security.realm.providers and are:
PropertiesFileLoginModule
SQLLoginModule
CertificateChainLoginModule
GeronimoPasswordCredentialLoginModule
CertificatePropertiesFileLoginModule
Each LoginModule may have a set of options it takes. There may be any number of option elements, and each one configures a single option for the login module. The content of this element is the value to set for this option.
Identifies the option that this element is setting.
This section describes the options available for each of the standard login modules. These can be set using the option element in the configuration block above (see Figure 9.14, “Security: New Login Module Configuration”).
A properties file login module reads users and groups from (plain text) properties files on the filesystem of the Geronimo server. The options for a properties file login module are:
Table 9.1. Properties File Realm Configuration
| Property | Type | Definition |
|---|---|---|
| usersURI | URI | The path to the user properties file, relative to the Geronimo directory. |
| groupURI | URI | The path to the group properties file, relative to the Geronimo directory. |
The user file contains one line for each user defined in the realm, with the format user=password.
Example 9.3. Properties File Realm: User File
user1=somepassword
another_user=my_password
this-user=secret
The usersURI configuration property points to the user file (relative to the Geronimo installation directory), so a value of var/security/users.properties would cause it to use geronimo/var/security/users.properties.
The group file contains one line for each group defined in the realm, with the format group=member,member,member...
Example 9.4. Properties File Realm: Group File
administrators=user1,this-user
normalUsers=another_user
The groupURI configuration property points to the group file (relative to the Geronimo installation directory), so a value of var/security/groups.properties would cause it to use geronimo/var/security/groups.properties.
A SQL login module reads users and groups from a database that's accessible to the Geronimo server. The options for a SQL file login module are:
Table 9.2. SQL Realm Configuration
| Property | Type | Definition |
|---|---|---|
| dataSourceName | String | The name of a JDBC data source deployed in Geronimo. If this is specified, then the JDBC Driver, URL, user, and password are unnecessary. |
| dataSourceApplication | String | If a data source is specified and the data source was deployed as an application-scoped data source (e.g. within an EAR), then the application name must be specified here. If the data source was deployed through the console or as a standalone (server-scoped) data source, then this setting is not necessary. |
| jdbcURL | String | The JDBC URL used to connect to the database that holds the users and groups. This is used when a data source is not specified. |
| jdbcUser | String | The username used to connect to the database. This is used when a data source is not specified. |
| jdbcPassword | String | The password used to connect to the database. This is used when a data source is not specified. |
| jdbcDriver | Class | The fully-qualified class name of the JDBC driver to use to connect to the database. This is used when a data source is not specified. |
| userSelect | String | A SQL query that returns the username and password for all users in the realm. Any prepared statment parameters (?'s) in the query will be set to the username for the current login attempt. |
| groupSelect | String | A SQL query that returns the username and group name for each group that the user is a member of. Any prepared statment parameters (?'s) in the query will be set to the username for the current login attempt. |
A sample user query might look like this. Note that the user name should be the first result column, and the password the second:
SELECT username, password FROM application_users
 WHERE username=?
A sample group query for a data model based on numeric IDs might look like this:
SELECT u.name, g.name
FROM user_groups ug, users u, groups g
WHERE u.id=ug.user_id AND g.id=ug.group_id
  AND u.name=?
The same query for a data model based on names might be more straightforward:
SELECT user_name, group_name FROM user_groups
 WHERE user_name=?
Note in any case that the user name should be the first result column, and the group name the second.
A Kerberos realm authenticates users by interacting with the local Kerberos client on a user's PC. Generally speaking, the security realm just identifies the current user's username. When the user then opens network communication with Geronimo, the network infrastructure can use GSSAPI and an exchange of Kerberos tickets to further enforce the user's identity and encrypt the communication. However, that network configuration is outside the purview of the security realm and must be configured separately. TODO: explain somewhere how to turn on GSSAPI networking and give a cross-reference here.
The options for a Kerberos login module are listed below. Geronimo just uses Sun's Kerberos LoginModule under the covers, so it will only work when running in a Sun JVM, and the configuration options are just passed on directly to the Krb5LoginModule.
When configuring the Kerberos login module, the following options are available. They should be configured using attributes of type String or boolean as appropriate:
clearPass
debug
doNotPrompt
keyTab
principal
refreshKrb5Config
storeKey
storePass
ticketCache
tryFirstPass
useFirstPass
useKeyTab
useTicketCache
These options are documented on Sun's site:
![[Note]](images/note.png) | Note |
|---|---|
In the case of an application client, the Kerberos realm needs components to be run on both the client PC and the server. Why? How is that set up? | |
| |  | |
| Chapter 9. Security Configuration [DRAFT (1.0-pre)] |  | 9.3. Deploying a Security Realm |