Quickstart
Goal of this quickstart
The goal of this quickstart guide is to provide you with a first hands-on look at Kafka Streams. We will demonstrate how to run your first Java application that uses the Kafka Streams library by showcasing a simple end-to-end data pipeline powered by Kafka.
It is worth noting that this quickstart will only scratch the surface of Kafka Streams. More details are provided in the remainder of the Kafka Streams documentation, and we will include pointers throughout the quickstart to give you directions.
What we want to do
During this quickstart we will run the WordCount demo application that is included in Apache Kafka. Here’s the gist of the code, converted to use Java 8 lambda expressions so that it is easier to read (taken from the variant WordCountLambdaExample):
// Serializers/deserializers (serde) for String and Long types
final Serde<String> stringSerde = Serdes.String();
final Serde<Long> longSerde = Serdes.Long();

// Construct a `KStream` from the input topic ""streams-file-input", where message values
// represent lines of text (for the sake of this example, we ignore whatever may be stored
// in the message keys).
KStream<String, String> textLines = builder.stream(stringSerde, stringSerde, "streams-file-input");

KStream<String, Long> wordCounts = textLines
    // Split each text line, by whitespace, into words.  The text lines are the message
    // values, i.e. we can ignore whatever data is in the message keys and thus invoke
    // `flatMapValues` instead of the more generic `flatMap`.
    .flatMapValues(value -> Arrays.asList(value.toLowerCase().split("\\W+")))
    // We use `groupBy` to ensure the words are available as message keys
    .groupBy((key, value) -> value)
    // Count the occurrences of each word (message key).
    .count("Counts")
    // Convert the `KTable<String, Long>` into a `KStream<String, Long>`.
    .toStream();

// Write the `KStream<String, Long>` to the output topic.
wordCounts.to(stringSerde, longSerde, "streams-wordcount-output");
In more detail, we will perform the following steps:
- Start a Kafka cluster on a single machine.
- Write example input data to a Kafka topic, using the so-called console producer included in Apache Kafka.
- Process the input data with a Java application that uses the Kafka Streams library. Here, we will leverage a demo application included in Apache Kafka called WordCount.
- Inspect the output data of the application, using the so-called console consumer included in Apache Kafka.
- Stop the Kafka cluster.
Start the Kafka cluster
In this section we install and start a Kafka cluster on a single machine. This cluster consists of a single-node Kafka cluster (= only one broker) alongside a single-node ZooKeeper ensemble. This single-machine setup is required because the WordCount demo application we are about to run assumes that the Kafka broker is running at localhost:9092 and the ZooKeeper process at localhost:2181.
First you must install Oracle Java JRE or JDK >= 1.7 on the machine.
For this example you will need exactly Confluent Platform 3.1.2 as installed using zip and tar archives.
# *** IMPORTANT STEP ****
# The subsequent paths and commands used throughout this quickstart assume that
# your are in the following working directory:
$ cd confluent-3.1.2/

# Note: If you want to uninstall the Confluent Platform at the end of this quickstart,
# run the following commands.
#
#   $ rm -rf confluent-3.1.2/
#   $ rm -rf /var/lib/kafka          # Data files of Kafka
#   $ rm -rf /var/lib/kafka-streams  # Data files of Kafka Streams
#   $ rm -rf /var/lib/zookeeper      # Data files of ZooKeeper
Tip
See Installation via ZIP and TAR archives and Confluent Platform Quickstart for further information.
We begin by starting the ZooKeeper instance, which will listen on localhost:2181.
Since this is a long-running service, you should run it in its own terminal.
# Start ZooKeeper.  Run this command in its own terminal.
$ ./bin/zookeeper-server-start ./etc/kafka/zookeeper.properties
Next we launch the Kafka broker, which will listen on localhost:9092 and connect to the ZooKeeper instance we just started.
Since this is a long-running service, too, you should run it in its own terminal.
# Start Kafka.  Run this command in its own terminal
$ ./bin/kafka-server-start ./etc/kafka/server.properties
Now that our single-node Kafka cluster is fully up and running, we can proceed to preparing the input data for our first Kafka Streams experiments.
Prepare the input data
Tip
In this section we will use built-in CLI tools to manually write some example data to Kafka. In practice, you would rather rely on other means to feed your data into Kafka, for instance via Kafka Connect if you want to move data from other data systems into Kafka, or via Kafka Clients from within your own applications.
We will now send some input data to a Kafka topic, which will be subsequently processed by a Kafka Streams application.
First, we need to create the input topic, named streams-file-input:
$ ./bin/kafka-topics --create \
          --zookeeper localhost:2181 \
          --replication-factor 1 \
          --partitions 1 \
          --topic streams-file-input
Next, we generate some input data and store it in a local file at /tmp/file-input.txt:
$ echo -e "all streams lead to kafka\nhello kafka streams\njoin kafka summit" > /tmp/file-input.txt
The resulting file will have the following contents:
all streams lead to kafka
hello kafka streams
join kafka summit
Lastly, we send this input data to the input topic:
$ cat /tmp/file-input.txt | ./bin/kafka-console-producer --broker-list localhost:9092 --topic streams-file-input
The Kafka console producer reads the data from STDIN line-by-line, and publishes each line as a separate Kafka
message to the topic streams-file-input, where the message key is null and the message value is the respective
line, encoded as a string.
Note
This Quickstart vs. Stream Data Reality(tm): You might wonder how this step-by-step quickstart compares to a “real” stream data platform, where data is always on the move, at large scale and in realtime. Keep in mind that the purpose of this quickstart is to demonstrate, in simple terms, the various facets of an end-to-end data pipeline powered by Kafka and Kafka Streams. For didactic reasons we intentionally split the quickstart into clearly separated, sequential steps.
In practice though, these steps will typically look a bit different and noticeably happen in parallel. For example, input data might not be sourced originally from a local file but sent directly from distributed devices, and the data would be flowing continuously into Kafka. Similarly, the stream processing application (see next section) might already be up and running before the first input data is being sent, and so on.
Process the input data with Kafka Streams
Now that we have generated some input data, we can run our first Kafka Streams based Java application.
We will run the WordCount demo application, which is included in Apache Kafka. It implements the WordCount algorithm, which computes a word occurrence histogram from an input text. However, unlike other WordCount examples you might have seen before that operate on bounded data, the WordCount demo application behaves slightly differently because it is designed to operate on an infinite, unbounded stream of data. Similar to the bounded variant, it is a stateful algorithm that tracks and updates the counts of words. However, since it must assume potentially unbounded input data, it will periodically output its current state and results while continuing to process more data because it cannot know when it has processed “all” the input data. This is a typical difference between the class of algorithms that operate on unbounded streams of data and, say, batch processing algorithms such as Hadoop MapReduce. It will be easier to understand this difference once we inspect the actual output data later on.
Because the WordCount demo is bundled with Kafka, it is already preinstalled and available on the Kafka broker. This means we can run it without much further ado, i.e. we do not need to compile any Java sources and so on.
# Run the WordCount demo application.  There won't be any STDOUT output.
# You can safely ignore any WARN log messages.
$ ./bin/kafka-run-class org.apache.kafka.streams.examples.wordcount.WordCountDemo
Note
No deployment magic here:
The WordCount demo – in fact, any application that uses the Kafka Streams library – can be started and deployed
like any normal Java application.
The script kafka-run-class is nothing
but a simple wrapper for java -cp ....
The WordCount demo application will read from the input topic streams-file-input, perform the computations of the WordCount
algorithm on the input data, and continuously write its current results to the output topic streams-wordcount-output
(the names of its input and output topics are hardcoded). The demo will run for a few seconds and then, unlike
typical stream processing applications, terminate automatically.
Inspect the output data
Tip
In this section we will use built-in CLI tools to manually read data from Kafka. In practice, you would rather rely on other means to retrieve data from Kafka, for instance via Kafka Connect if you want to move data from Kafka to other data systems, or via Kafka Clients from within your own applications.
We can now inspect the output of the WordCount demo application by reading from its output topic streams-wordcount-output:
$ ./bin/kafka-console-consumer --zookeeper localhost:2181 \
          --topic streams-wordcount-output \
          --from-beginning \
          --formatter kafka.tools.DefaultMessageFormatter \
          --property print.key=true \
          --property key.deserializer=org.apache.kafka.common.serialization.StringDeserializer \
          --property value.deserializer=org.apache.kafka.common.serialization.LongDeserializer
with the following output data being printed to the console for WordCount:
all     1
streams 1
lead    1
to      1
kafka   1
hello   1
kafka   2
streams 2
join    1
kafka   3
summit  1
Here, the first column is the Kafka message key in java.lang.String format, and the second column is the message
value in java.lang.Long format. You can stop the console consumer via Ctrl-C.
But wait a minute, doesn’t the output look odd? Why are there duplicate entries such as “streams”, which is listed twice? Shouldn’t the output rather be:
# Why not this, you may ask?
all     1
lead    1
to      1
hello   1
streams 2
join    1
kafka   3
summit  1
The explanation is that the output of the WordCount application is actually a continuous stream of updates, where each data record (i.e. each line in the original output above) is an updated count of a single word aka record key such as “kafka”. For multiple records with the same key, each later record is an update of the previous one.
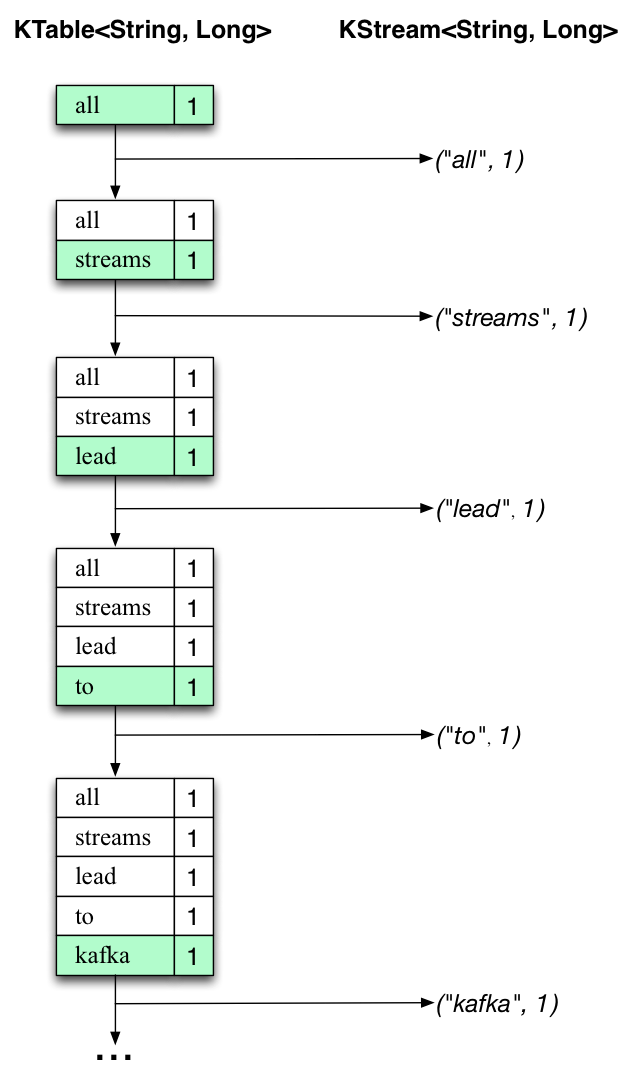
The two diagrams below illustrate what is essentially happening behind the scenes. The first column shows the evolution of the current state of the KTable<String, Long> that is counting word occurrences for countByKey. The second column shows the change records that result from state updates to the KTable and that eventually, once converted to a KStream<String, Long> via KTable#toStream(), are being sent to the output Kafka topic.
First the text line “all streams lead to kafka” is being processed. The KTable is being built up as each new word results in a new table entry (highlighted with a green background), and a corresponding change record is sent to the downstream KStream.
When the second text line “hello kafka streams” is processed, we observe, for the first time, that existing entries in
the KTable are being updated (here: for the words “kafka” and for “streams”). And again, change records are
being sent to the KStream.
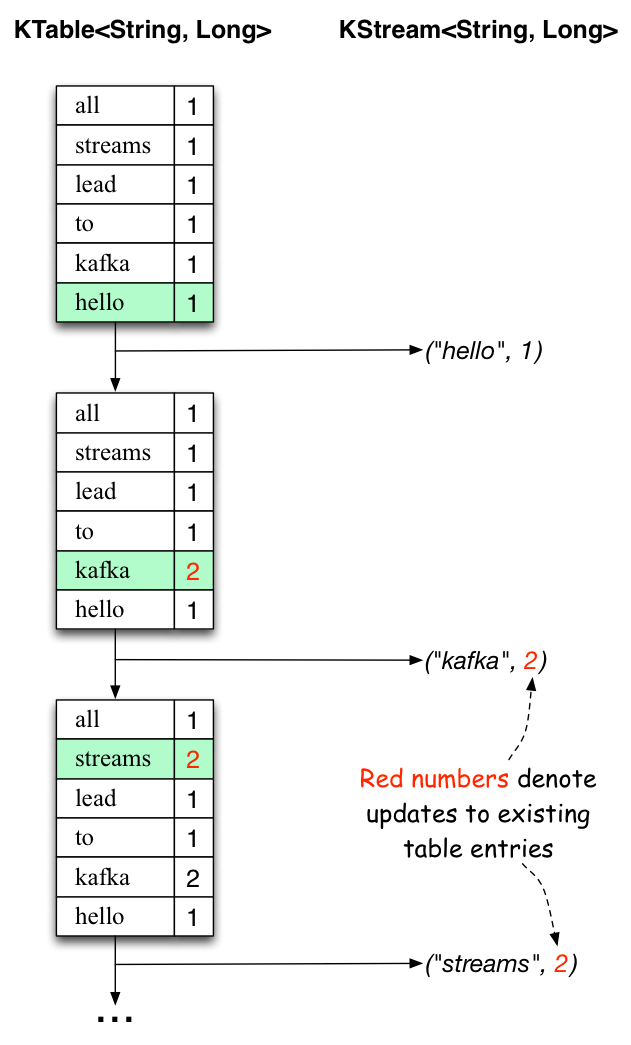
And so on (we skip the illustration of how the third line is being processed). This explains why the output topic has the contents we showed above, because it contains the full record of changes, i.e. the information shown in the second column for KStream above:
all     1
streams 1
lead    1
to      1
kafka   1
hello   1
kafka   2
streams 2
join    1
kafka   3
summit  1
Looking beyond the scope of this concrete example, what Kafka Streams is doing here is to leverage the duality between a table and a changelog stream (here: table = the KTable, changelog stream = the downstream KStream): you can publish every change of the table to a stream, and if you consume the entire changelog stream from beginning to end, you can reconstruct the contents of the table.
Stop the Kafka cluster
Once you are done with the quickstart you can shut down the Kafka cluster in the following order:
- First, stop the Kafka broker by entering
Ctrl-Cin the terminal it is running in. Alternatively, you cankillthe broker process. - Lastly, stop the ZooKeeper instance by entering
Ctrl-Cin its respective terminal. Alternatively, you cankillthe ZooKeeper process.
Congratulations, you have now run your first Kafka Streams applications against data stored in a single-node Kafka cluster, yay!
Where to go from here
As next steps we would recommend you to:
- Read the Kafka Streams Architecture to understand its key concepts and design principles.
- Take a deep dive into the Kafka Streams Developer Guide, which includes many code examples to get you started, as well as the documentation of the Kafka Streams DSL. This will get you started on writing your own Kafka Streams applications.
Beyond Kafka Streams, you might be interested in learning more about:
- Kafka Connect for moving data between Kafka and other data systems such as Hadoop.
- Kafka Clients for reading and writing data from/to Kafka from within your own applications.