by Kenneth Styrberg
Relevant to Blender v2.34
The Blender particle system allows particles to interact in two ways - force fields and deflection.
Force fields
There are two variants of force fields: a Standard Force field
that behaves like a gravity force field, and the Vortex field.
A vortex field gives more of a tornado effect, with particles spiralling
around the vortex center. Force fields are available for all object
types. Currently a point-based field with a spherical fall-off is implemented.
Force fields can be set to any object. Particles will then be:
attracted with a negative Strength value, or
repelled if you use a positive Strength value.
There is also a Fall-off parameter which defines
how much the strength diminishes with distance from the object's
origin.
Deflection
This allows you to set any mesh object as a
particle deflector. Particles will then bounce on the surface of
the mesh. You can control how much the particles bounce with the
Damping value, add some randomness to the bounce
with Rnd Damping, and you can define the
percentage of particles which pass through the mesh with the
Permeability parameter.
Note
Make sure that the normals of the mesh surface are facing towards the particles for correct deflection.
The particle interaction settings are controlled via the
Particle Interaction panel in Object context
(F7).
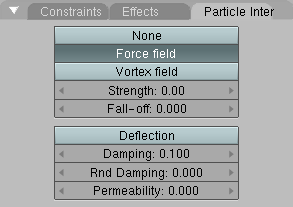
Force/Vortex field
Strength- The strength of the field effect.Fall-off- How much the strength diminishes with distance.
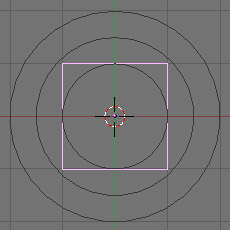
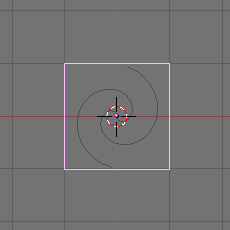
When adding a force/vortex field to an object, the object will get a small graphic indicating that there is a particle interaction connected to the object. The force field will have small grey circles (Figure 20.35, “Force field indicator.”), and vortex fields will have a spiral drawn (Figure 20.36, “Vortex field indicator.”).
The lower section of the panel in Figure 20.34, “Particle Interaction panel.” handles the settings for deflection.
Note
You will not see any extra graphic indicators with deflectors as you do with force fields.
Deflection parameters
Damping- Controls the amount of bounce that surfaces will have.0.0 - No damping, particles will have maximum bounce. 1.0 - Maximum damping, particles will not bounce at all. Rnd Damping- Adds a random element to the bounce. For example, with aDampingof 1.0 and aRnd Dampingof 0.5, the damping will vary between 1.0 and 1.5.Permeability- Percentage of particles passing through the mesh.0.0 - No particles pass through. 1.0 - All particles pass through the deflector.
If you set up a particle deflector you'll have to make sure sufficient keys are available for Blender to calculate the collisions with sufficent detail. If you see particles moving through your deflector or bouncing in the wrong positions, then there might be problem with too few keys or your particle/deflector is moving too fast.
Note
You can animate moving deflectors but particles can leak through
the mesh if the deflector moves to fast or if the mesh is complicated.
This can be partly solved by increasing the Keys
parameter for the particle emitter.
After changing any parameters, you will need to select your particle
emitter and go back to the Effects tab and press
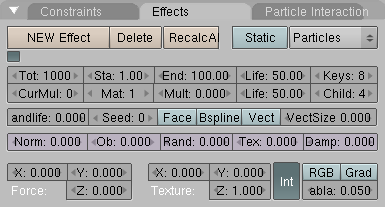
RecalcA button. (Figure 20.37, “Effects panel.”).
More keys means longer calculation times and usage of more memory. See the section called “Introduction” for how to set up particle emitters.
For all parameters for force fields and deflectors,
Ipo keys can be inserted. The Ipo
curves are edited as Object Ipo types in the
Ipo window. See Chapter 14, Animation of Undeformed Objects
for more on Animation and Ipo.
Here is a small example demonstrating particle deflectors.
| 1. Start with default scene with a cube object. |
2. In top view, add a Circle Mesh
and accept default 32 vertices. Press TAB to exit EditMode.
Switch to side view and move circle up 5 units.
|
| 3. With circle selected, press S, and scale it down to 0.1 in all directions. |
4. Now press F7 and go to the
Effects tab. Press NEW Effect
and in the Popup-list select Particles.
You should see the same picture as in Figure 20.37, “Effects panel.”.
|
5. Increase particle life from default 50 to 100
by changing the Life field to 100.
In the force field in the lower section of the tab, set the
Force Z to -0.100. If you
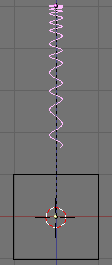
press ALT-A you should see an animation of
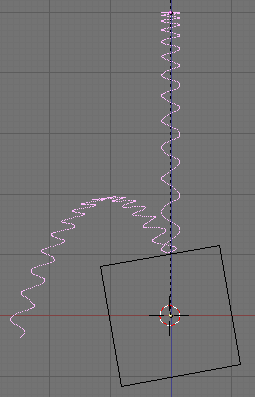
particles moving down towards our cube. See Figure 20.38, “Example frame 40.”.
So far, the particles travel straight through without noticing
the cube. This will change!
|
6. Now select our cube. With the Effect
context still active, go to the Particle Interaction
tab and set the Deflector settings as pictured in
Figure 20.39, “Example Deflection settings.”.
|

7. Now select the circle and press RecalcA
in the Effects tab. If you play the animation,
ALT-A, you will see the particles bounce off the
cube straight up and down. The problem is that the bounce is a bit
away from the cube. This is an effect of too few Keys.
In the Keys field enter 50,
and press RecalcA. Play the animation and the
particles will now bounce on the cube, or close enough.
|
| 8. Select the cube and tilt it 10 degrees in either direction. Select the circle and recalculate the particles. Now play the animation and you will see the particles bounce off in the direction you tilted the cube! (Figure 20.40, “Example end result.”). |