Table of Contents
Relevant to Blender v2.34
by Gaurav Nawani
Yafray integration is one of the best features added to Blender. The current release of Blender 2.35 has a very neat integration with Yafray from within Blender, and is fairly stable to use. Unfortunately, Yafray usage is limited to those who are already comfortable with the Blender interface or can hack their way through. The first part of the tutorial deals with the basic steps needed to render from Yafray and later parts serve as a guide for the rest of the Yafray's available features.
Blender has two of its own rendering engines built-in and that
includes its own raytracer and an older scan-line rendering engine.
Yafray however is a standalone raytracer. Its functionality is accessed
through Blender's interface by exporting the scene parameters to a
Yafray readable format by one of two options. For the first one Blender has the
required support built-in which allows Blender to use Yafray as a
plug-in, virtually as if Yafray were an inbuilt renderer, and the other
option is where Blender exports the scene data to Yafray format in an XML
file called YBtest.xml, and then Yafray renders it as
a standalone program. Both methods require Yafray to be first installed
on the system and it is assumed that you have both Blender 2.34 and
Yafray 0.07 installed on your system.
The Yafray integration in Blender can be broadly categorized in two parts. One relates to the interface for light or lamp settings. The other one to the core Yafray rendering features.
It is to be noted that this step might not be necessary for
Windows. Before we proceed, we first need to configure Yafray
preferences. Drag down the top menu bar to un-hide Blender's
User Preferences window. Here click on File
Paths button to open up the Path preferences menu. On the top
left part is the YFexport text entry box. Enter the
path where you would like to save the exported blend file in Yafray
format (XML file) while rendering with the second option. This is
necessary if you want to save the exported file and later edit it
manually.

As you are now aware, Blender allows you to choose between its own
internal ray-tracer and Yafray. To use Yafray you first have to instruct
Blender. To do that press F10 for Rendering Options
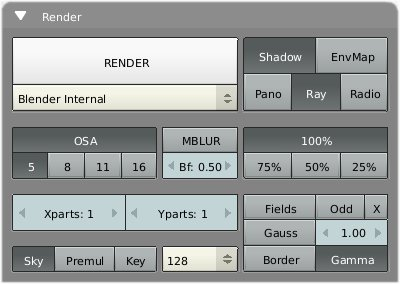
window, now go to the Render tab in the Render
Options window (Figure 28.2, “The default options in Render Tab.”).
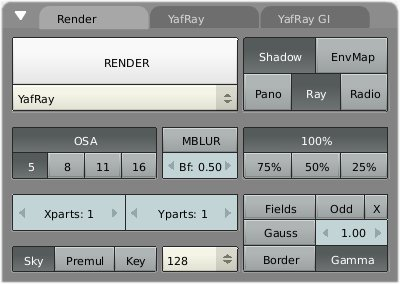
In the Render tab, select Yafray from the Render
engine drop down list (Figure 28.3, “Yafray raytracer selection and its two sub-tabs.”), by
default Blender internal is selected.
Note
Please do not get confused with the Ray button. This has nothing
to do with enabling Yafray's ray-tracing. It does not effect in any
way the Yafray renderings if Yafray is chosen as the raytracer from
the rendering engine drop down list.
Notice as soon as you choose Yafray two more tabs appear beside
the Render tab (Figure 28.3, “Yafray raytracer selection and its two sub-tabs.”). These two extra tabs are
Yafray and Yafray GI and these two
tabs have rendering and other features and parameters of Yafray.
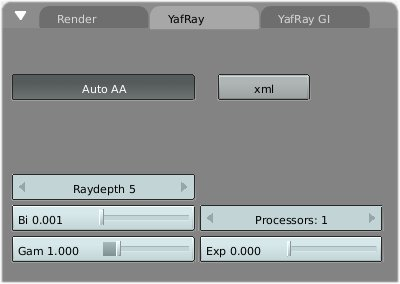
Now select the Yafray tab from the two new
tabs, there will be some functions visible, right now we are interested
in the button named XML (pressed by default) (Figure 28.4, “Default Yafray tab with Yafray file export enabled (XML
button).”). You go ahead and turn it off
right now. I will explain why, as I had told earlier that Blender has
two options for rendering with Yafray, either as plug-in interface or to
call Yafray as command line program.

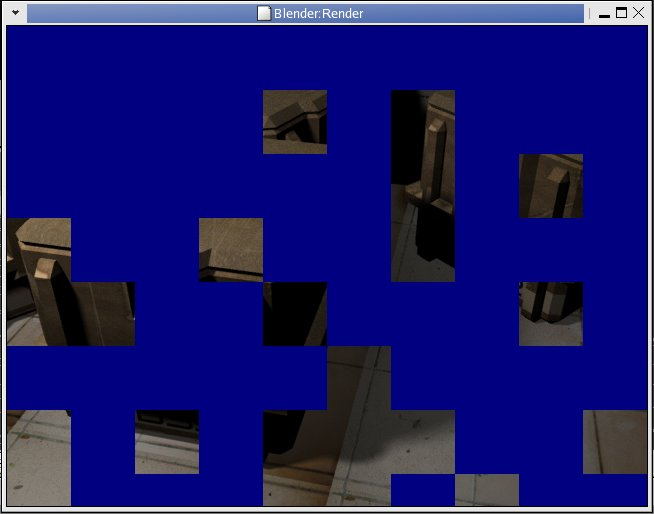
Choosing the plug-in or first option (XML
button off) allows you to see the rendering progress in the
Render window (Figure 28.6, “The rendering in progress for Yafray XML disabled.”), much like the Blender's own
rendering, and this is one of the reasons why Yafray requires and uses
more memory than before. Using the second option which is by default
(XML button pressed) active, will first export the
active scene to the YFexport path, which you have set in your
File Paths user preferences (the section called “Step-1”). The Yafray is then called
as a command line program, and it takes over the processing of the
exported XML file, and only after completion provides the image back to
the Render window, so there is no other interaction
in between, save for the textual output in the Blender's terminal
window.
After going through the first two steps you have virtually done every thing to make a Yafray render. At this time you have your scene ready with lamps of your choice, the best thing to proceed from here is to press F12 to render. Here is where the problem crops up for almost everyone. I will explain... Depending on the light settings in your scene, you either will see a blank screen or will see very faint outlines of the objects in the scene. Or if your lamps have higher light intensity (value) then you might see the scene properly. Alternatively, in extreme case, Yafray and Blender do a crash thingy.
In case you came up with black render the chances are good that you can render through Yafray, all you need now is to adjust the light's parameters, and you will have your own Yafray render within minutes.
The first problem for Yafray renders is almost every time a lack of sufficient light intensity in the scene. This is not actually a problem of Yafray, but an implementation issue from within Blender. So, in this case, you need to increase the light intensity, or value, of every lamp in the scene (more information in the section called “Part 2”).
If everything fails you might need to check the distance value of the lamps, since the light attenuation falloff is mostly sharper in CG (to reduce computations). Your objects in the scene might appear black because their ray casting distance just might not be reaching the objects in the scene. You can get around this by adjusting distance value in the
Lampstab.In case of crash please check the elysiun forums for possible answers.
- Global Illumination
It is a method (algorithm) of computation for light calculation in the scene which, takes in to account the light bounces from the neighboring surfaces, along with the normal illumination of direct lights. In Other words GI calculates the Indirect light also, thus it makes the renders more photo-realistic. Examples of GI methods are Radiosity and Ambient Occlusion in Blender and on a general scale Radiosity, Ray tracing and Caustics all use different GI algorithms.
- Ray tracing
A method in CG which uses an algorithm to calculate the effect of lights on the surface of objects in the scene. In CG the ray-tracer works by calculating the light effect on the scene by tracing the light photons back to the point of origin, from the scene or the camera. It uses the reverse of what is in real life, the sun shoots photons and we receive them through reflection/refraction from the objects, the photon energy is also modified by the objects by absorption or adsorption to form a particular texture or colour of the object.
The reverse way of ray-tracing is done so as to reduce the amount of calculations, as it is faster to take just the photons or lights which reach the scene or our eye or the camera, than calculating everything what is outside the view.
- Photon
The photon is also referred to as a Ray of Light, and it is the smallest unit of light energy.
- Caustics
The caustics are referred to as the refraction pattern formed by highly transparent objects such as a glass of fluids which have a certain degree of Total internal reflection, for example the light falling on a glass filled with wine will form some strange patterns of different colours and intensity which are referred to as light caustic. The computer method for Caustic calculation is also referred to as photon mapping. The photon lamp in Blender/Yafray is for this purpose only.
- HDRI
- High Dynamic Range Illumination
Or HDRI. This method is relatively new in GI. This uses the actual light probe value of a real scene in the real world taken through with special equipment to produce a 360 view of a scene, and stores the information of the light from all areas in the scene in a spherically mapped image called HDR. The renderer uses that information to shoot light from and provides even more photo-realistic rendering.
See Also HDRI.
- Anti aliasing
It is refers to a method to reduce the brightness levels between two neighboring pixels by overlapping the colours in the difference level to neighboring pixels. This make the images appear smoother.
- Photonmap
An assumed area or bound with-in which more density of photons are kept for calculations of indirect illumination.