CRUSH Maps
The CRUSH algorithm
determines how to store and retrieve data by computing data storage locations.
CRUSH empowers Ceph clients to communicate with OSDs directly rather than
through a centralized server or broker. With an algorithmically determined
method of storing and retrieving data, Ceph avoids a single point of failure, a
performance bottleneck, and a physical limit to its scalability.
CRUSH requires a map of your cluster, and uses the CRUSH map to pseudo-randomly
store and retrieve data in OSDs with a uniform distribution of data across the
cluster. For a detailed discussion of CRUSH, see
CRUSH - Controlled, Scalable, Decentralized Placement of Replicated Data
CRUSH maps contain a list of OSDs, a list of
‘buckets’ for aggregating the devices into physical locations, and a list of
rules that tell CRUSH how it should replicate data in a Ceph cluster’s pools. By
reflecting the underlying physical organization of the installation, CRUSH can
model—and thereby address—potential sources of correlated device failures.
Typical sources include physical proximity, a shared power source, and a shared
network. By encoding this information into the cluster map, CRUSH placement
policies can separate object replicas across different failure domains while
still maintaining the desired distribution. For example, to address the
possibility of concurrent failures, it may be desirable to ensure that data
replicas are on devices using different shelves, racks, power supplies,
controllers, and/or physical locations.
When you create a configuration file and deploy Ceph with ceph-deploy, Ceph
generates a default CRUSH map for your configuration. The default CRUSH map is
fine for your Ceph sandbox environment. However, when you deploy a large-scale
data cluster, you should give significant consideration to developing a custom
CRUSH map, because it will help you manage your Ceph cluster, improve
performance and ensure data safety.
For example, if an OSD goes down, a CRUSH map can help you can locate
the physical data center, room, row and rack of the host with the failed OSD in
the event you need to use onsite support or replace hardware.
Similarly, CRUSH may help you identify faults more quickly. For example, if all
OSDs in a particular rack go down simultaneously, the fault may lie with a
network switch or power to the rack or the network switch rather than the
OSDs themselves.
A custom CRUSH map can also help you identify the physical locations where
Ceph stores redundant copies of data when the placement group(s) associated
with a failed host are in a degraded state.
Note
Lines of code in example boxes may extend past the edge of the box.
Please scroll when reading or copying longer examples.
CRUSH Location
The location of an OSD in terms of the CRUSH map’s hierarchy is referred to
as a ‘crush location’. This location specifier takes the form of a list of
key and value pairs describing a position. For example, if an OSD is in a
particular row, rack, chassis and host, and is part of the ‘default’ CRUSH
tree, its crush location could be described as:
root=default row=a rack=a2 chassis=a2a host=a2a1
Note:
- Note that the order of the keys does not matter.
- The key name (left of =) must be a valid CRUSH type. By default
these include root, datacenter, room, row, pod, pdu, rack, chassis and host,
but those types can be customized to be anything appropriate by modifying
the CRUSH map.
- Not all keys need to be specified. For example, by default, Ceph
automatically sets a ceph-osd daemon’s location to be
root=default host=HOSTNAME (based on the output from hostname -s).
ceph-crush-location hook
By default, the ceph-crush-location utility will generate a CRUSH
location string for a given daemon. The location is based on, in order of
preference:
- A TYPE crush location option in ceph.conf. For example, this
is osd crush location for OSD daemons.
- A crush location option in ceph.conf.
- A default of root=default host=HOSTNAME where the hostname is
generated with the hostname -s command.
In a typical deployment scenario, provisioning software (or the system
administrator) can simply set the ‘crush location’ field in a host’s
ceph.conf to describe that machine’s location within the datacenter or
cluster. This will be provide location awareness to both Ceph daemons
and clients alike.
It is possible to manage the CRUSH map entirely manually by toggling
the hook off in the configuration:
osd crush update on start = false
Custom location hooks
A customize location hook can be used in place of the generic hook for OSD
daemon placement in the hierarchy. (On startup, each OSD ensure its position is
correct.):
osd crush location hook = /path/to/script
This hook is passed several arguments (below) and should output a single line
to stdout with the CRUSH location description.:
$ ceph-crush-location --cluster CLUSTER --id ID --type TYPE
where the cluster name is typically ‘ceph’, the id is the daemon
identifier (the OSD number), and the daemon type is typically osd.
Editing a CRUSH Map
To edit an existing CRUSH map:
- Get the CRUSH map.
- Decompile the CRUSH map.
- Edit at least one of Devices, Buckets and Rules.
- Recompile the CRUSH map.
- Set the CRUSH map.
To activate CRUSH Map rules for a specific pool, identify the common ruleset
number for those rules and specify that ruleset number for the pool. See Set
Pool Values for details.
Get a CRUSH Map
To get the CRUSH map for your cluster, execute the following:
ceph osd getcrushmap -o {compiled-crushmap-filename}
Ceph will output (-o) a compiled CRUSH map to the filename you specified. Since
the CRUSH map is in a compiled form, you must decompile it first before you can
edit it.
Decompile a CRUSH Map
To decompile a CRUSH map, execute the following:
crushtool -d {compiled-crushmap-filename} -o {decompiled-crushmap-filename}
Ceph will decompile (-d) the compiled CRUSH map and output (-o) it to the
filename you specified.
Compile a CRUSH Map
To compile a CRUSH map, execute the following:
crushtool -c {decompiled-crush-map-filename} -o {compiled-crush-map-filename}
Ceph will store a compiled CRUSH map to the filename you specified.
Set a CRUSH Map
To set the CRUSH map for your cluster, execute the following:
ceph osd setcrushmap -i {compiled-crushmap-filename}
Ceph will input the compiled CRUSH map of the filename you specified as the
CRUSH map for the cluster.
CRUSH Map Parameters
There are four main sections to a CRUSH Map.
- Devices: Devices consist of any object storage device–i.e., the storage
drive corresponding to a ceph-osd daemon. You should have a device for
each OSD daemon in your Ceph configuration file.
- Bucket Types: Bucket types define the types of buckets used in your
CRUSH hierarchy. Buckets consist of a hierarchical aggregation of storage
locations (e.g., rows, racks, chassis, hosts, etc.) and their assigned
weights.
- Bucket Instances: Once you define bucket types, you must declare bucket
instances for your hosts, and any other failure domain partitioning
you choose.
- Rules: Rules consist of the manner of selecting buckets.
If you launched Ceph using one of our Quick Start guides, you’ll notice
that you didn’t need to create a CRUSH map. Ceph’s deployment tools generate
a default CRUSH map that lists devices from the OSDs you defined in your
Ceph configuration file, and it declares a bucket for each host you specified
in the [osd] sections of your Ceph configuration file. You should create
your own CRUSH maps with buckets that reflect your cluster’s failure domains
to better ensure data safety and availability.
Note
The generated CRUSH map doesn’t take your larger grained failure
domains into account. So you should modify your CRUSH map to account for
larger grained failure domains such as chassis, racks, rows, data
centers, etc.
CRUSH Map Devices
To map placement groups to OSDs, a CRUSH map requires a list of OSD devices
(i.e., the names of the OSD daemons from the Ceph configuration file). The list
of devices appears first in the CRUSH map. To declare a device in the CRUSH map,
create a new line under your list of devices, enter device followed by a
unique numeric ID, followed by the corresponding ceph-osd daemon instance.
#devices
device {num} {osd.name}
For example:
#devices
device 0 osd.0
device 1 osd.1
device 2 osd.2
device 3 osd.3
As a general rule, an OSD daemon maps to a single storage drive or to a RAID.
CRUSH Map Bucket Types
The second list in the CRUSH map defines ‘bucket’ types. Buckets facilitate
a hierarchy of nodes and leaves. Node (or non-leaf) buckets typically represent
physical locations in a hierarchy. Nodes aggregate other nodes or leaves.
Leaf buckets represent ceph-osd daemons and their corresponding storage
media.
Tip
The term “bucket” used in the context of CRUSH means a node in
the hierarchy, i.e. a location or a piece of physical hardware. It
is a different concept from the term “bucket” when used in the
context of RADOS Gateway APIs.
To add a bucket type to the CRUSH map, create a new line under your list of
bucket types. Enter type followed by a unique numeric ID and a bucket name.
By convention, there is one leaf bucket and it is type 0; however, you may
give it any name you like (e.g., osd, disk, drive, storage, etc.):
#types
type {num} {bucket-name}
For example:
# types
type 0 osd
type 1 host
type 2 chassis
type 3 rack
type 4 row
type 5 pdu
type 6 pod
type 7 room
type 8 datacenter
type 9 region
type 10 root
CRUSH Map Bucket Hierarchy
The CRUSH algorithm distributes data objects among storage devices according
to a per-device weight value, approximating a uniform probability distribution.
CRUSH distributes objects and their replicas according to the hierarchical
cluster map you define. Your CRUSH map represents the available storage
devices and the logical elements that contain them.
To map placement groups to OSDs across failure domains, a CRUSH map defines a
hierarchical list of bucket types (i.e., under #types in the generated CRUSH
map). The purpose of creating a bucket hierarchy is to segregate the
leaf nodes by their failure domains, such as hosts, chassis, racks, power
distribution units, pods, rows, rooms, and data centers. With the exception of
the leaf nodes representing OSDs, the rest of the hierarchy is arbitrary, and
you may define it according to your own needs.
We recommend adapting your CRUSH map to your firms’s hardware naming conventions
and using instances names that reflect the physical hardware. Your naming
practice can make it easier to administer the cluster and troubleshoot
problems when an OSD and/or other hardware malfunctions and the administrator
need access to physical hardware.
In the following example, the bucket hierarchy has a leaf bucket named osd,
and two node buckets named host and rack respectively.
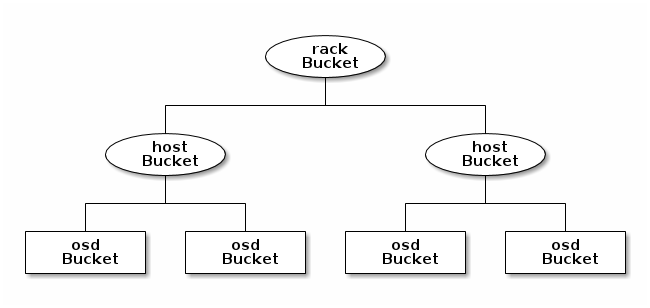
Note
The higher numbered rack bucket type aggregates the lower
numbered host bucket type.
Since leaf nodes reflect storage devices declared under the #devices list
at the beginning of the CRUSH map, you do not need to declare them as bucket
instances. The second lowest bucket type in your hierarchy usually aggregates
the devices (i.e., it’s usually the computer containing the storage media, and
uses whatever term you prefer to describe it, such as “node”, “computer”,
“server,” “host”, “machine”, etc.). In high density environments, it is
increasingly common to see multiple hosts/nodes per chassis. You should account
for chassis failure too–e.g., the need to pull a chassis if a node fails may
result in bringing down numerous hosts/nodes and their OSDs.
When declaring a bucket instance, you must specify its type, give it a unique
name (string), assign it a unique ID expressed as a negative integer (optional),
specify a weight relative to the total capacity/capability of its item(s),
specify the bucket algorithm (usually straw), and the hash (usually 0,
reflecting hash algorithm rjenkins1). A bucket may have one or more items.
The items may consist of node buckets or leaves. Items may have a weight that
reflects the relative weight of the item.
You may declare a node bucket with the following syntax:
[bucket-type] [bucket-name] {
        id [a unique negative numeric ID]
        weight [the relative capacity/capability of the item(s)]
        alg [the bucket type: uniform | list | tree | straw ]
        hash [the hash type: 0 by default]
        item [item-name] weight [weight]
}
For example, using the diagram above, we would define two host buckets
and one rack bucket. The OSDs are declared as items within the host buckets:
host node1 {
        id -1
        alg straw
        hash 0
        item osd.0 weight 1.00
        item osd.1 weight 1.00
}

host node2 {
        id -2
        alg straw
        hash 0
        item osd.2 weight 1.00
        item osd.3 weight 1.00
}

rack rack1 {
        id -3
        alg straw
        hash 0
        item node1 weight 2.00
        item node2 weight 2.00
}
Note
In the foregoing example, note that the rack bucket does not contain
any OSDs. Rather it contains lower level host buckets, and includes the
sum total of their weight in the item entry.
Bucket Types
Ceph supports four bucket types, each representing a tradeoff between
performance and reorganization efficiency. If you are unsure of which bucket
type to use, we recommend using a straw bucket. For a detailed
discussion of bucket types, refer to
CRUSH - Controlled, Scalable, Decentralized Placement of Replicated Data,
and more specifically to Section 3.4. The bucket types are:
- Uniform: Uniform buckets aggregate devices with exactly the same
weight. For example, when firms commission or decommission hardware, they
typically do so with many machines that have exactly the same physical
configuration (e.g., bulk purchases). When storage devices have exactly
the same weight, you may use the uniform bucket type, which allows
CRUSH to map replicas into uniform buckets in constant time. With
non-uniform weights, you should use another bucket algorithm.
- List: List buckets aggregate their content as linked lists. Based on
the RUSH P algorithm,
a list is a natural and intuitive choice for an expanding cluster:
either an object is relocated to the newest device with some appropriate
probability, or it remains on the older devices as before. The result is
optimal data migration when items are added to the bucket. Items removed
from the middle or tail of the list, however, can result in a significant
amount of unnecessary movement, making list buckets most suitable for
circumstances in which they never (or very rarely) shrink.
- Tree: Tree buckets use a binary search tree. They are more efficient
than list buckets when a bucket contains a larger set of items. Based on
the RUSH R algorithm,
tree buckets reduce the placement time to O(log n), making them
suitable for managing much larger sets of devices or nested buckets.
- Straw: List and Tree buckets use a divide and conquer strategy
in a way that either gives certain items precedence (e.g., those
at the beginning of a list) or obviates the need to consider entire
subtrees of items at all. That improves the performance of the replica
placement process, but can also introduce suboptimal reorganization
behavior when the contents of a bucket change due an addition, removal,
or re-weighting of an item. The straw bucket type allows all items to
fairly “compete” against each other for replica placement through a
process analogous to a draw of straws.
Hash
Each bucket uses a hash algorithm. Currently, Ceph supports rjenkins1.
Enter 0 as your hash setting to select rjenkins1.
Weighting Bucket Items
Ceph expresses bucket weights as doubles, which allows for fine
weighting. A weight is the relative difference between device capacities. We
recommend using 1.00 as the relative weight for a 1TB storage device.
In such a scenario, a weight of 0.5 would represent approximately 500GB,
and a weight of 3.00 would represent approximately 3TB. Higher level
buckets have a weight that is the sum total of the leaf items aggregated by
the bucket.
A bucket item weight is one dimensional, but you may also calculate your
item weights to reflect the performance of the storage drive. For example,
if you have many 1TB drives where some have relatively low data transfer
rate and the others have a relatively high data transfer rate, you may
weight them differently, even though they have the same capacity (e.g.,
a weight of 0.80 for the first set of drives with lower total throughput,
and 1.20 for the second set of drives with higher total throughput).
CRUSH Map Rules
CRUSH maps support the notion of ‘CRUSH rules’, which are the rules that
determine data placement for a pool. For large clusters, you will likely create
many pools where each pool may have its own CRUSH ruleset and rules. The default
CRUSH map has a rule for each pool, and one ruleset assigned to each of the
default pools, which include:
Note
In most cases, you will not need to modify the default rules. When
you create a new pool, its default ruleset is 0.
CRUSH rules defines placement and replication strategies or distribution policies
that allow you to specify exactly how CRUSH places object replicas. For
example, you might create a rule selecting a pair of targets for 2-way
mirroring, another rule for selecting three targets in two different data
centers for 3-way mirroring, and yet another rule for erasure coding over six
storage devices. For a detailed discussion of CRUSH rules, refer to
CRUSH - Controlled, Scalable, Decentralized Placement of Replicated Data,
and more specifically to Section 3.2.
A rule takes the following form:
rule <rulename> {

        ruleset <ruleset>
        type [ replicated | erasure ]
        min_size <min-size>
        max_size <max-size>
        step take <bucket-type>
        step [choose|chooseleaf] [firstn|indep] <N> <bucket-type>
        step emit
}
ruleset
| Description: | A means of classifying a rule as belonging to a set of rules.
Activated by setting the ruleset in a pool. |
|---|
| Purpose: | A component of the rule mask. |
|---|
| Type: | Integer |
|---|
| Required: | Yes |
|---|
| Default: | 0 |
|---|
type
| Description: | Describes a rule for either a storage drive (replicated)
or a RAID. |
|---|
| Purpose: | A component of the rule mask. |
|---|
| Type: | String |
|---|
| Required: | Yes |
|---|
| Default: | replicated |
|---|
| Valid Values: | Currently only replicated and erasure |
|---|
min_size
| Description: | If a pool makes fewer replicas than this number, CRUSH will
NOT select this rule. |
|---|
| Type: | Integer |
|---|
| Purpose: | A component of the rule mask. |
|---|
| Required: | Yes |
|---|
| Default: | 1 |
|---|
max_size
| Description: | If a pool makes more replicas than this number, CRUSH will
NOT select this rule. |
|---|
| Type: | Integer |
|---|
| Purpose: | A component of the rule mask. |
|---|
| Required: | Yes |
|---|
| Default: | 10 |
|---|
step take <bucket-name>
| Description: | Takes a bucket name, and begins iterating down the tree. |
|---|
| Purpose: | A component of the rule. |
|---|
| Required: | Yes |
|---|
| Example: | step take data |
|---|
step choose firstn {num} type {bucket-type}
| Description: | Selects the number of buckets of the given type. The number is
usually the number of replicas in the pool (i.e., pool size).
- If {num} == 0, choose pool-num-replicas buckets (all available).
- If {num} > 0 && < pool-num-replicas, choose that many buckets.
- If {num} < 0, it means pool-num-replicas - {num}.
|
|---|
| Purpose: | A component of the rule.
|
|---|
| Prerequisite: | Follows step take or step choose.
|
|---|
| Example: | step choose firstn 1 type row
|
|---|
step chooseleaf firstn {num} type {bucket-type}
| Description: | Selects a set of buckets of {bucket-type} and chooses a leaf
node from the subtree of each bucket in the set of buckets. The
number of buckets in the set is usually the number of replicas in
the pool (i.e., pool size).
- If {num} == 0, choose pool-num-replicas buckets (all available).
- If {num} > 0 && < pool-num-replicas, choose that many buckets.
- If {num} < 0, it means pool-num-replicas - {num}.
|
|---|
| Purpose: | A component of the rule. Usage removes the need to select a device using two steps.
|
|---|
| Prerequisite: | Follows step take or step choose.
|
|---|
| Example: | step chooseleaf firstn 0 type row
|
|---|
step emit
| Description: | Outputs the current value and empties the stack. Typically used
at the end of a rule, but may also be used to pick from different
trees in the same rule. |
|---|
| Purpose: | A component of the rule. |
|---|
| Prerequisite: | Follows step choose. |
|---|
| Example: | step emit |
|---|
Important
To activate one or more rules with a common ruleset number to a
pool, set the ruleset number of the pool.
Primary Affinity
When a Ceph Client reads or writes data, it always contacts the primary OSD in
the acting set. For set [2, 3, 4], osd.2 is the primary. Sometimes an
OSD isn’t well suited to act as a primary compared to other OSDs (e.g., it has
a slow disk or a slow controller). To prevent performance bottlenecks
(especially on read operations) while maximizing utilization of your hardware,
you can set a Ceph OSD’s primary affinity so that CRUSH is less likely to use
the OSD as a primary in an acting set.
ceph osd primary-affinity <osd-id> <weight>
Primary affinity is 1 by default (i.e., an OSD may act as a primary). You
may set the OSD primary range from 0-1, where 0 means that the OSD may
NOT be used as a primary and 1 means that an OSD may be used as a
primary. When the weight is < 1, it is less likely that CRUSH will select
the Ceph OSD Daemon to act as a primary.
Placing Different Pools on Different OSDS:
Suppose you want to have most pools default to OSDs backed by large hard drives,
but have some pools mapped to OSDs backed by fast solid-state drives (SSDs).
It’s possible to have multiple independent CRUSH heirarchies within the same
CRUSH map. Define two hierarchies with two different root nodes–one for hard
disks (e.g., “root platter”) and one for SSDs (e.g., “root ssd”) as shown
below:
device 0 osd.0
device 1 osd.1
device 2 osd.2
device 3 osd.3
device 4 osd.4
device 5 osd.5
device 6 osd.6
device 7 osd.7

      host ceph-osd-ssd-server-1 {
              id -1
              alg straw
              hash 0
              item osd.0 weight 1.00
              item osd.1 weight 1.00
      }

      host ceph-osd-ssd-server-2 {
              id -2
              alg straw
              hash 0
              item osd.2 weight 1.00
              item osd.3 weight 1.00
      }

      host ceph-osd-platter-server-1 {
              id -3
              alg straw
              hash 0
              item osd.4 weight 1.00
              item osd.5 weight 1.00
      }

      host ceph-osd-platter-server-2 {
              id -4
              alg straw
              hash 0
              item osd.6 weight 1.00
              item osd.7 weight 1.00
      }

      root platter {
              id -5
              alg straw
              hash 0
              item ceph-osd-platter-server-1 weight 2.00
              item ceph-osd-platter-server-2 weight 2.00
      }

      root ssd {
              id -6
              alg straw
              hash 0
              item ceph-osd-ssd-server-1 weight 2.00
              item ceph-osd-ssd-server-2 weight 2.00
      }

      rule data {
              ruleset 0
              type replicated
              min_size 2
              max_size 2
              step take platter
              step chooseleaf firstn 0 type host
              step emit
      }

      rule metadata {
              ruleset 1
              type replicated
              min_size 0
              max_size 10
              step take platter
              step chooseleaf firstn 0 type host
              step emit
      }

      rule rbd {
              ruleset 2
              type replicated
              min_size 0
              max_size 10
              step take platter
              step chooseleaf firstn 0 type host
              step emit
      }

      rule platter {
              ruleset 3
              type replicated
              min_size 0
              max_size 10
              step take platter
              step chooseleaf firstn 0 type host
              step emit
      }

      rule ssd {
              ruleset 4
              type replicated
              min_size 0
              max_size 4
              step take ssd
              step chooseleaf firstn 0 type host
              step emit
      }

      rule ssd-primary {
              ruleset 5
              type replicated
              min_size 5
              max_size 10
              step take ssd
              step chooseleaf firstn 1 type host
              step emit
              step take platter
              step chooseleaf firstn -1 type host
              step emit
      }
You can then set a pool to use the SSD rule by:
ceph osd pool set <poolname> crush_ruleset 4
Similarly, using the ssd-primary rule will cause each placement group in the
pool to be placed with an SSD as the primary and platters as the replicas.
Add/Move an OSD
To add or move an OSD in the CRUSH map of a running cluster, execute the
ceph osd crush set. For Argonaut (v 0.48), execute the following:
ceph osd crush set {id} {name} {weight} pool={pool-name} [{bucket-type}={bucket-name} ...]
For Bobtail (v 0.56), execute the following:
ceph osd crush set {id-or-name} {weight} root={pool-name} [{bucket-type}={bucket-name} ...]
Where:
id
| Description: | The numeric ID of the OSD. |
|---|
| Type: | Integer |
|---|
| Required: | Yes |
|---|
| Example: | 0 |
|---|
name
| Description: | The full name of the OSD. |
|---|
| Type: | String |
|---|
| Required: | Yes |
|---|
| Example: | osd.0 |
|---|
weight
| Description: | The CRUSH weight for the OSD. |
|---|
| Type: | Double |
|---|
| Required: | Yes |
|---|
| Example: | 2.0 |
|---|
root
| Description: | The root of the tree in which the OSD resides. |
|---|
| Type: | Key/value pair. |
|---|
| Required: | Yes |
|---|
| Example: | root=default |
|---|
bucket-type
| Description: | You may specify the OSD’s location in the CRUSH hierarchy. |
|---|
| Type: | Key/value pairs. |
|---|
| Required: | No |
|---|
| Example: | datacenter=dc1 room=room1 row=foo rack=bar host=foo-bar-1 |
|---|
The following example adds osd.0 to the hierarchy, or moves the OSD from a
previous location.
ceph osd crush set osd.0 1.0 root=default datacenter=dc1 room=room1 row=foo rack=bar host=foo-bar-1
Adjust an OSD’s CRUSH Weight
To adjust an OSD’s crush weight in the CRUSH map of a running cluster, execute
the following:
ceph osd crush reweight {name} {weight}
Where:
name
| Description: | The full name of the OSD. |
|---|
| Type: | String |
|---|
| Required: | Yes |
|---|
| Example: | osd.0 |
|---|
weight
| Description: | The CRUSH weight for the OSD. |
|---|
| Type: | Double |
|---|
| Required: | Yes |
|---|
| Example: | 2.0 |
|---|
Remove an OSD
To remove an OSD from the CRUSH map of a running cluster, execute the following:
ceph osd crush remove {name}
Where:
name
| Description: | The full name of the OSD. |
|---|
| Type: | String |
|---|
| Required: | Yes |
|---|
| Example: | osd.0 |
|---|
Add a Bucket
To add a bucket in the CRUSH map of a running cluster, execute the ceph osd crush add-bucket command:
ceph osd crush add-bucket {bucket-name} {bucket-type}
Where:
bucket-name
| Description: | The full name of the bucket. |
|---|
| Type: | String |
|---|
| Required: | Yes |
|---|
| Example: | rack12 |
|---|
bucket-type
| Description: | The type of the bucket. The type must already exist in the hierarchy. |
|---|
| Type: | String |
|---|
| Required: | Yes |
|---|
| Example: | rack |
|---|
The following example adds the rack12 bucket to the hierarchy:
ceph osd crush add-bucket rack12 rack
Move a Bucket
To move a bucket to a different location or position in the CRUSH map hierarchy,
execute the following:
ceph osd crush move {bucket-name} {bucket-type}={bucket-name}, [...]
Where:
bucket-name
| Description: | The name of the bucket to move/reposition. |
|---|
| Type: | String |
|---|
| Required: | Yes |
|---|
| Example: | foo-bar-1 |
|---|
bucket-type
| Description: | You may specify the bucket’s location in the CRUSH hierarchy. |
|---|
| Type: | Key/value pairs. |
|---|
| Required: | No |
|---|
| Example: | datacenter=dc1 room=room1 row=foo rack=bar host=foo-bar-1 |
|---|
Remove a Bucket
To remove a bucket from the CRUSH map hierarchy, execute the following:
ceph osd crush remove {bucket-name}
Note
A bucket must be empty before removing it from the CRUSH hierarchy.
Where:
bucket-name
| Description: | The name of the bucket that you’d like to remove. |
|---|
| Type: | String |
|---|
| Required: | Yes |
|---|
| Example: | rack12 |
|---|
The following example removes the rack12 bucket from the hierarchy:
ceph osd crush remove rack12
Tunables
New in version 0.48.
There are several magic numbers that were used in the original CRUSH
implementation that have proven to be poor choices. To support
the transition away from them, newer versions of CRUSH (starting with
the v0.48 argonaut series) allow the values to be adjusted or tuned.
Clusters running recent Ceph releases support using the tunable values
in the CRUSH maps. However, older clients and daemons will not correctly interact
with clusters using the “tuned” CRUSH maps. To detect this situation,
there are now features bits CRUSH_TUNABLES (value 0x40000) and CRUSH_TUNABLES2 to
reflect support for tunables.
If the OSDMap currently used by the ceph-mon or ceph-osd
daemon has non-legacy values, it will require the CRUSH_TUNABLES or CRUSH_TUNABLES2
feature bits from clients and daemons who connect to it. This means
that old clients will not be able to connect.
At some future point in time, newly created clusters will have
improved default values for the tunables. This is a matter of waiting
until the support has been present in the Linux kernel clients long
enough to make this a painless transition for most users.
Impact of Legacy Values
The legacy values result in several misbehaviors:
- For hiearchies with a small number of devices in the leaf buckets,
some PGs map to fewer than the desired number of replicas. This
commonly happens for hiearchies with “host” nodes with a small
number (1-3) of OSDs nested beneath each one.
- For large clusters, some small percentages of PGs map to less than
the desired number of OSDs. This is more prevalent when there are
several layers of the hierarchy (e.g., row, rack, host, osd).
- When some OSDs are marked out, the data tends to get redistributed
to nearby OSDs instead of across the entire hierarchy.
CRUSH_TUNABLES
- choose_local_tries: Number of local retries. Legacy value is
2, optimal value is 0.
- choose_local_fallback_tries: Legacy value is 5, optimal value
is 0.
- choose_total_tries: Total number of attempts to choose an item.
Legacy value was 19, subsequent testing indicates that a value of
50 is more appropriate for typical clusters. For extremely large
clusters, a larger value might be necessary.
CRUSH_TUNABLES2
- chooseleaf_descend_once: Whether a recursive chooseleaf attempt
will retry, or only try once and allow the original placement to
retry. Legacy default is 0, optimal value is 1.
CRUSH_TUNABLES3
- chooseleaf_vary_r: Whether a recursive chooseleaf attempt will
start with a non-zero value of r, based on how many attempts the
parent has already made. Legacy default is 0, but with this value
CRUSH is sometimes unable to find a mapping. The optimal value (in
terms of computational cost and correctness) is 1. However, for
legacy clusters that have lots of existing data, changing from 0 to
1 will cause a lot of data to move; a value of 4 or 5 will allow
CRUSH to find a valid mapping but will make less data move.
Which client versions support CRUSH_TUNABLES
- argonaut series, v0.48.1 or later
- v0.49 or later
- Linux kernel version v3.6 or later (for the file system and RBD kernel clients)
Which client versions support CRUSH_TUNABLES2
- v0.55 or later, including bobtail series (v0.56.x)
- Linux kernel version v3.9 or later (for the file system and RBD kernel clients)
Which client versions support CRUSH_TUNABLES3
- v0.78 (firefly) or later
- Linux kernel version v3.15 or later (for the file system and RBD kernel clients)
Warning when tunables are non-optimal
Starting with version v0.74, Ceph will issue a health warning if the
CRUSH tunables are not set to their optimal values (the optimal values are
the default as of v0.73). To make this warning go away, you have two options:
Adjust the tunables on the existing cluster. Note that this will
result in some data movement (possibly as much as 10%). This is the
preferred route, but should be taken with care on a production cluster
where the data movement may affect performance. You can enable optimal
tunables with:
ceph osd crush tunables optimal
If things go poorly (e.g., too much load) and not very much
progress has been made, or there is a client compatibility problem
(old kernel cephfs or rbd clients, or pre-bobtail librados
clients), you can switch back with:
ceph osd crush tunables legacy
You can make the warning go away without making any changes to CRUSH by
adding the following option to your ceph.conf [mon] section:
mon warn on legacy crush tunables = false
For the change to take effect, you will need to restart the monitors, or
apply the option to running monitors with:
ceph tell mon.\* injectargs --no-mon-warn-on-legacy-crush-tunables
A few important points
- Adjusting these values will result in the shift of some PGs between
storage nodes. If the Ceph cluster is already storing a lot of
data, be prepared for some fraction of the data to move.
- The ceph-osd and ceph-mon daemons will start requiring the
feature bits of new connections as soon as they get
the updated map. However, already-connected clients are
effectively grandfathered in, and will misbehave if they do not
support the new feature.
- If the CRUSH tunables are set to non-legacy values and then later
changed back to the defult values, ceph-osd daemons will not be
required to support the feature. However, the OSD peering process
requires examining and understanding old maps. Therefore, you
should not run old versions of the ceph-osd daemon
if the cluster has previously used non-legacy CRUSH values, even if
the latest version of the map has been switched back to using the
legacy defaults.
Tuning CRUSH
The simplest way to adjust the crush tunables is by changing to a known
profile. Those are:
- legacy: the legacy behavior from argonaut and earlier.
- argonaut: the legacy values supported by the original argonaut release
- bobtail: the values supported by the bobtail release
- firefly: the values supported by the firefly release
- optimal: the current best values
- default: the current default values for a new cluster
You can select a profile on a running cluster with the command:
ceph osd crush tunables {PROFILE}
Note that this may result in some data movement.
Tuning CRUSH, the hard way
If you can ensure that all clients are running recent code, you can
adjust the tunables by extracting the CRUSH map, modifying the values,
and reinjecting it into the cluster.
Extract the latest CRUSH map:
ceph osd getcrushmap -o /tmp/crush
Adjust tunables. These values appear to offer the best behavior
for both large and small clusters we tested with. You will need to
additionally specify the --enable-unsafe-tunables argument to
crushtool for this to work. Please use this option with
extreme care.:
crushtool -i /tmp/crush --set-choose-local-tries 0 --set-choose-local-fallback-tries 0 --set-choose-total-tries 50 -o /tmp/crush.new
Reinject modified map:
ceph osd setcrushmap -i /tmp/crush.new
Legacy values
For reference, the legacy values for the CRUSH tunables can be set
with:
crushtool -i /tmp/crush --set-choose-local-tries 2 --set-choose-local-fallback-tries 5 --set-choose-total-tries 19 --set-chooseleaf-descend-once 0 --set-chooseleaf-vary-r 0 -o /tmp/crush.legacy
Again, the special --enable-unsafe-tunables option is required.
Further, as noted above, be careful running old versions of the
ceph-osd daemon after reverting to legacy values as the feature
bit is not perfectly enforced.