| Red Hat Docs > Manuals > EDK Manuals > |

You learned how to create basic Source-Navigator projects in the "Starting a New Project" section in Getting Started. Now, you will learn to use the Project Editor to fine-tune your projects.
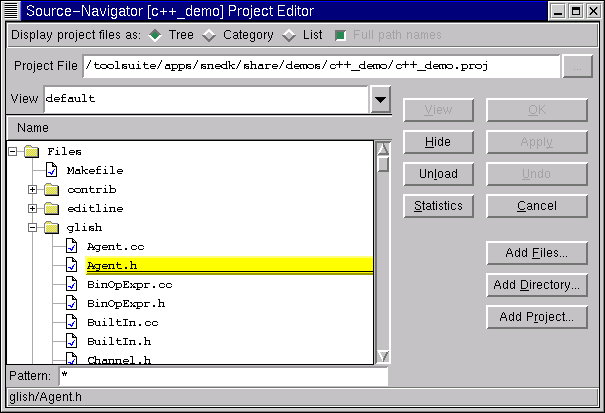
The Project Editor enables you to add, hide, and unload files from your project. You can also use it to create and change views. To open the Project Editor, from the File menu, select Project Editor.

Selecting an option listed next to Display project files as: changes the layout of the files and directories in the Project Editor window; Tree is the default layout.
The Project File text box contains a file path; the directory that your project file is located in is your project directory. From now on, every non-absolute path will be relative to this directory. If you would like to choose a different path, click the "..." button. You can change path only when creating a project.
If the source code included in the project is in a read-only directory, you will not be able to create the project and corresponding database files in the same directory as your source files. You must choose a directory where you have write permission for the project file and the database files.
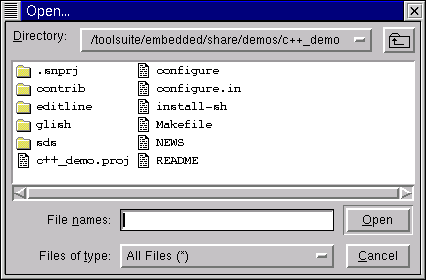
To add source files to a project, click the Add Files button. The Open dialog appears:

Click on Files of type: at the bottom of the dialog to bring up a menu from which you can filter files based on the file extensions shown in the menu; All files (*) is chosen by default. Select the source files to be added to the project and click the Open button.
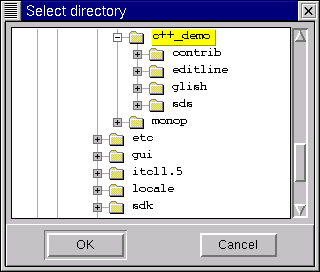
The Add Directory button allows you to add entire directories and their contents to your project.

Select the directory you want to add and click OK. You can add as many directories as you wish, but you must add them one at a time.
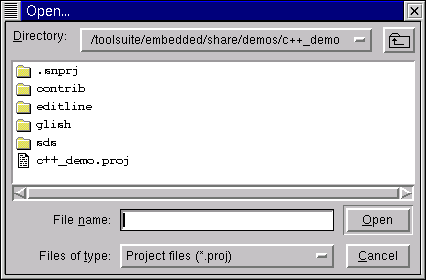
The Add Project button allows you to import another Source-Navigator project and all of the files it includes into your current project.

This is the same Open dialog as when you clicked on the Add Files button, except that Project files (*.proj) is chosen by default from the Files of type menu. To see all files in the directory, choose All files (*). Click on the project from which you want to import files.
Views show a partial set of project files. For example, one view might be set to show only database-specific files from a project, while another one shows the GUI components in the project. You may hide specific files in one view and show these hidden files in other views.
Enter the name of the new view in the View text box and click OK. This creates the new view and closes the Project Editor. The next time you open the Project Editor, this view will be the default view in the View selection box.
To select an existing view, click the downward arrow to the right of the View text box. A pulldown list of views appears. Select the view you wish to see.
The Hide button allows you to hide files from the current view, but does not delete them from the project or the file system. Hide files or directories by clicking on a file or directory in the file system tree view of the Project Editor, and click the Hide button.
A new folder named Hidden appears and the hidden files and directories are placed into this folder. To make the hidden items visible again, select the hidden file or directory and click the View button.
The Unload button allows you to remove files from a project, but not from your hard drive. To remove files from a project, select the files from the Project Editor window and click the Unload button.
The Statistics button allows you to view the number of symbols (such as classes, methods, and functions) in a file. In the Name text box, select a file in the Statistics button. The statistics for the file are displayed. Click Close to close the Statistics window.
When you're finished working with the Project Editor, click OK.
To close a project, from the File menu, select Close Project. Closing a project:
closes all tools used while working on the project or a project view.
brings up the Projects window, if no other projects are open.
To delete a project while using the Symbol Browser, from the File menu, select Delete Current Project. To delete a project from another browser, from the File menu, select Project -> Delete Current Project. The project file and other project database files will be deleted. All source files and directories remain unchanged.
As an alternative to using the Project Editor to select source code directories for the new project, you can collect directory names into a separate file and import this file into Source-Navigator. You can also use the find command to generate this list.
To import directories, start
Source-Navigator with the
import option. At the command line, type:
snedk -import filename
The project directory is the current working directory, and the file filename must contain directory names or filenames, one per line (the Include Browser uses the directory names). A sample file for import follows:
chk.hFor more information on using Source-Navigator from the command line, see Command Line Options.
|
| ||
|---|---|---|