Now that you are familiar with some basic concepts of [fleXive], we are ready to explore more features. The first tutorial application introduces
-
binary support in [fleXive] contents,
-
combined create/edit forms, as well as
-
a more sophisticated way of rendering results, like automatic preview images of contents.
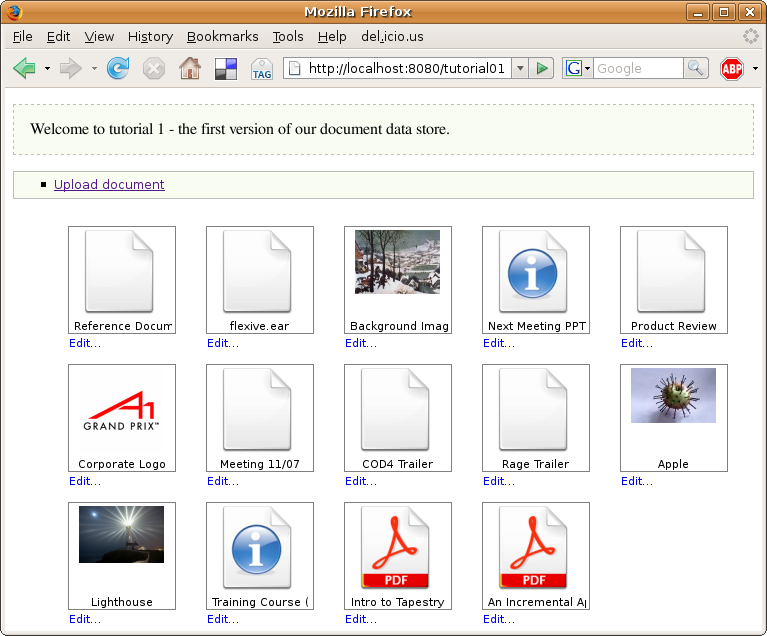
Our task for this tutorial is to create a centralized document store that allows us to store documents, images or videos and provides a web-based user interface for it. In the first tutorial we will implement the basic functionality, and then further refine and extend the features in following tutorials. Figure 3.1, “The document store application, version 1” shows the end result of the first tutorial, with the help of some stylesheets that can be found in the tutorial source tree.
First we create new project called
tutorial01-documentstore.
Use your local installation of the [fleXive] distribution as described in
the section called “Your first [fleXive] application”
to create a new project. The complete source code can be found
here.
We start by defining our data model used for storing documents. We assign the standard caption property
/caption
for document captions, and add a
Binary
property. We create the type in the
run-once script
resources/scripts/runonce/tutorial001.groovy:
                    /**
 * Initialization script for the tutorial01 application.
 *
 * @author Daniel Lichtenberger ([email protected]), UCS - unique computing solutions gmbh (http://www.ucs.at)
 * @version $Rev: 1106 $
 */

import com.flexive.shared.scripting.groovy.*
import com.flexive.shared.value.*
import com.flexive.shared.structure.*

new GroovyTypeBuilder().document01(
        label: new FxString(true, "Tutorial document 01"),
        usePermissions: false)
{
    // assign the root caption under /caption
    caption(assignment: "ROOT/CAPTION")

    // store the mandatory binary under /file
    file(dataType: FxDataType.Binary,
         multiplicity: FxMultiplicity.MULT_1_1,
         label: new FxString(true, "File"))
}
The most interesting parts of this tutorial are the overview and upload pages. On the first we display all uploaded document objects, the latter allows the user to upload new files or edit existing ones.
The index page of the application renders a link to an empty upload form for uploading new document, and also renders all document objects already uploaded. Note that in the first version of the tutorial, security is completely disabled, thus every user can see and edit all document objects in the system.
Similar to the
helloworld
example application, we iterate over the rows of the result data model using
<ui:repeat>.
But this time, we render the result using the
<fx:resultValue>
tag, which essentially renders read-only
<fx:fxValueInput>
components for more sophisticated output formatting.
For the document browser, we select four columns in our content query:
-
@pk, -
document01/file, -
caption, and -
created_at.
When we pass a value of the second column (document01/file) to the
<fx:resultValue>
component,
it actually renders an inline image that displays a preview of the uploaded file. For image
data types, this is a thumbnail, for other types like documents or presentations, it is
an icon corresponding to the document type.
So to render a list of thumbnail preview images, we write the following:
<ui:repeat var="row" value="#{tutorialBean.documents}">
    <fx:resultValue value="#{row[1]}"/>
</ui:repeat>
We can still write the result values as literal JSF-EL expressions when necessary, so for example to
add the caption after each image it would be sufficient to write
#{row[2]}. However, the
<fx:resultValue>
tag adds extra functionality like date formatting or support for inline HTML
properties (otherwise HTML contained in an
FxHTML
would be escaped by Facelets), so it's generally a good idea to use
<fx:resultValue>
for any result value rendered in the response.
Below each document object, we want to provide a link that opens the object in the
edit form. We could either pass the primary key selected in the first column through
a bean property, or pass
the content instance itself through the fxContentViewBean and supply it to the
<fx:content>
component.
JSF's
setPropertyActionListener
is a convenient way of setting bean properties when a command link or button is triggered.
The Edit link looks like this:
<h:commandLink action="edit" styleClass="editButton">
    <f:setPropertyActionListener target="#{fxContentViewBean.content}"
                                 value="#{fxSystemBean.content[row[0]]}"/>
    Edit...
</h:commandLink>
#{fxSystemBean.content[row[0]]}
returns the
FxContent
instance for the given primary key. Note that the JSF listener will only be fired
when the user actually clicks on the commandLink, thus the rather expensive load operation
will only be performed if the user clicks on the edit link.
Our
web/index.xhtml
lists all available documents and adds a link to the upload form.
                    <!DOCTYPE html PUBLIC "-//W3C//DTD XHTML 1.0 Transitional//EN"
        "http://www.w3.org/TR/xhtml1/DTD/xhtml1-transitional.dtd">
<html xmlns="http://www.w3.org/1999/xhtml"
      xmlns:ui="http://java.sun.com/jsf/facelets"
      xmlns:h="http://java.sun.com/jsf/html"
      xmlns:f="http://java.sun.com/jsf/core"
      xmlns:c="http://java.sun.com/jstl/core"
      xmlns:fx="http://www.flexive.com/jsf/core">
<head>
    <!-- Add flexive includes -->
    <fx:includes/>

    <!-- Add our own stylesheet for the result page -->
    <link rel="stylesheet" type="text/css" href="css/tutorial01.css"/>
</head>

<body>
<!-- Output JSF error or info messages here -->
<h:messages globalOnly="true"/>

<p class="message">
    Welcome to tutorial 1 - the first version of our document data store.
</p>

<!-- The main menu -->
<ul id="mainmenu">
    <li>
        <h:outputLink value="upload.xhtml">Upload document</h:outputLink>
    </li>
</ul>

<!-- Render all available document objects, provided by #{tutorialBean.documents} -->
<h:form id="frm">
    <ul class="documents">

        <!-- Iterate over all document objects -->
        <ui:repeat var="row" value="#{tutorialBean.documents}">
            <li>
                <!-- Render the file (preview image) -->
                <fx:resultValue id="preview" value="#{row[1]}"/>

                <!-- Render the document caption -->
                    <span class="caption">
                        <fx:resultValue id="caption" value="#{row[2]}"/>
                    </span>

                <!-- Add an edit button below the image -->
                <h:commandLink action="edit" styleClass="editButton">
                    <!--
                        Load the content instance of the current row and store it in
                        #{fxContentViewBean.content}. The edit page will then use this
                        content instance.
                        Note that this listener will only be fired when the user actually
                        clicks on the commandLink.
                    -->
                    <f:setPropertyActionListener target="#{fxContentViewBean.content}"
                                                 value="#{fxSystemBean.content[row[0]]}"/>
                    Edit...
                </h:commandLink>
            </li>
        </ui:repeat>
    </ul>
</h:form>

<p style="clear:both; padding-top:25px;"><h:outputLink
        onclick="window.open('http://wiki.flexive.org/confluence/display/FX/Generating+thumbnails', 'In_depth_explanation', 'width=950,height=600,left=50,top=200,scrollbars=yes,resizable=yes');"
        value="#">
    What happens on this page?
</h:outputLink>
</p>

</body>
</html>
The upload form allows both to create new document objects by uploading files and editing existing ones. It works exactly as the form for entering new blog posts in the helloworld tutorial, except that we specify an explicit content instance that may be set from an edit link on the overview page:
<fx:content typeName="document01"
                        content="#{fxContentViewBean.content}"
                        var="document">
When this page is opened through the "Upload" link on the front page (or by entering the URL to
/upload.xhtml
in the browser location bar),
#{fxContentViewBean.content}
evaluates to
null
and a new content instance of type
document01
will be initialized. Otherwise, the content instance from retrieved from the
fxContentViewBean will be edited. A call to
fxContentViewBean.save
creates or updates the content instance in the database.
The upload form renders two new input components:
-
a file upload form, and
-
a multilanguage input for the caption property.
For file uploads to work, you need to set the
enctype
attribute of the HTML form to
multipart/form-data:
<h:form enctype="multipart/form-data">
We then create the upload page under
web/upload.xhtml
and add a basic content editor for creating new documents. The input component
supports binary properties, but you have to set the form encoding to
multipart/form-data.
                        <!DOCTYPE html PUBLIC "-//W3C//DTD XHTML 1.0 Transitional//EN"
        "http://www.w3.org/TR/xhtml1/DTD/xhtml1-transitional.dtd">
<html xmlns="http://www.w3.org/1999/xhtml"
      xmlns:ui="http://java.sun.com/jsf/facelets"
      xmlns:h="http://java.sun.com/jsf/html"
      xmlns:f="http://java.sun.com/jsf/core"
      xmlns:c="http://java.sun.com/jstl/core"
      xmlns:fx="http://www.flexive.com/jsf/core">
<head>
    <!-- Add flexive includes -->
    <fx:includes/>

    <!-- Add our own stylesheet for the result page -->
    <link rel="stylesheet" type="text/css" href="css/tutorial01.css"/>
</head>

<body>

<h:messages globalOnly="true"/>

<h:form enctype="multipart/form-data">

    <ul id="mainmenu">
        <li>
            <h:outputLink value="index.xhtml">Return to overview</h:outputLink>
        </li>
    </ul>


    <!--
         Create a new content of type document01 or edit an existing content instance if set in fxContentViewBean.
    -->
    <fx:content typeName="document01" content="#{fxContentViewBean.content}" var="document">

        <fx:fieldSet legend="Document Upload">
            <!-- Render the input form -->
            <fx:value property="file"/>
            <fx:value property="caption"/>

            <!-- Render the submit button -->
            <fx:formRow>
                <h:commandButton action="#{fxContentViewBean.save}" value="Save">
                    <f:setPropertyActionListener target="#{fxContentViewBean.content}" value="#{document_content}"/>
                    <f:setPropertyActionListener target="#{fxContentViewBean.successMessage}"
                                                 value="Successfully saved the document."/>
                </h:commandButton>
            </fx:formRow>

        </fx:fieldSet>

    </fx:content>

</h:form>

<p><h:outputLink
        onclick="window.open('http://wiki.flexive.org/confluence/display/FX/Uploading+documents', 'In_depth_explanation', 'width=950,height=600,left=50,top=200,scrollbars=yes,resizable=yes');"
        value="#">
    What happens on this page?
</h:outputLink>
</p>

</body>
</html>
Like in the previous tutorial, we add a simple JSF managed bean that provides our search results.
                package com.flexive.examples.tutorial01;

import com.flexive.faces.model.FxResultSetDataModel;
import com.flexive.shared.exceptions.FxApplicationException;
import com.flexive.shared.search.FxResultSet;
import com.flexive.shared.search.SortDirection;
import com.flexive.shared.search.query.SqlQueryBuilder;

import javax.faces.model.DataModel;

/**
 * JSF managed bean for the tutorial01 application.
 *
 * @author Daniel Lichtenberger ([email protected]), UCS - unique computing solutions gmbh (http://www.ucs.at)
 * @version $Rev: 469 $
 */
public class Tutorial01Bean {
    private DataModel documents;

    public DataModel getDocuments() throws FxApplicationException {
        if (documents == null) {
            final FxResultSet result = new SqlQueryBuilder()
                    .select("@pk", "document01/file", "caption", "created_at")
                    .type("document01")
                    .orderBy("created_at", SortDirection.DESCENDING)
                    .getResult();
            documents = new FxResultSetDataModel(result);
        }
        return documents;
    }
}
To serve the image URLs rendered by
<fx:resultValue>
to the browser, we need a servlet providing those images. For this purpose, you have to
add the [fleXive] thumbnail servlet to your
web.xml.
<servlet>
    <servlet-name>Thumbnail</servlet-name>
    <servlet-class>com.flexive.war.servlet.ThumbnailServlet</servlet-class>
    <load-on-startup>1</load-on-startup>
</servlet>

<servlet-mapping>
    <servlet-name>Thumbnail</servlet-name>
    <url-pattern>/thumbnail/*</url-pattern>
</servlet-mapping>
The [fleXive] template project's
web.xml
already includes this mapping.
Finally, we have to register the data provider bean and provide navigation routes for
our buttons and links in the
faces-config.xml:
                    <?xml version="1.0" encoding="UTF-8"?>
<!DOCTYPE faces-config
        PUBLIC "-//Sun Microsystems, Inc.//DTD JavaServer Faces Config 1.0//EN"
        "http://java.sun.com/dtd/web-facesconfig_1_0.dtd">
<faces-config>
    <!-- Facelets View Handler Definition. Never remove this one. -->
    <application>
        <view-handler>
            com.sun.facelets.FaceletViewHandler
        </view-handler>
    </application>

    <!-- Define our managed bean -->
    <managed-bean>
        <managed-bean-name>tutorialBean</managed-bean-name>
        <managed-bean-class>com.flexive.examples.tutorial01.Tutorial01Bean</managed-bean-class>
        <managed-bean-scope>request</managed-bean-scope>
    </managed-bean>

    <!-- Return to overview page if upload was successful -->
    <navigation-rule>
        <from-view-id>/upload.xhtml</from-view-id>
        <navigation-case>
            <from-outcome>success</from-outcome>
            <to-view-id>/index.xhtml</to-view-id>
        </navigation-case>
    </navigation-rule>

    <!-- Open editor from index page -->
    <navigation-rule>
        <from-view-id>/index.xhtml</from-view-id>
        <navigation-case>
            <from-outcome>edit</from-outcome>
            <to-view-id>/upload.xhtml</to-view-id>
        </navigation-case>
    </navigation-rule>
</faces-config>
To compile and deploy the framework and the example application simply run
ant in the project directory (tutorial01-documentstore). If the compilation was successful,
you find your application packaged under
dist/tutorial01-documentstore.ear.
You can then deploy this EAR to your application server, assuming that you followed the
installation instructions.
If you already have a [fleXive] EAR deployed in this instance, be sure to undeploy it before
you deploy
tutorial01-documentstore.ear.
If you used the
Java-based installer, you can deploy and run the application with
ant deploy.jetty run.jetty.
If you need to setup or reset the database schema, update your database connection settings in
tutorial01-documentstore/database.properties
or
flexive-dist/database.properties
and run
ant db.create
in the corresponding directory.
After deploying the application, point your browser to http://localhost:8080/flexive/adm/ to open the administration GUI (default credentials: supervisor/supervisor), or http://localhost:8080/tutorial01-documentstore/ to open the application.