
")

The Fuse Services Framework samples include a demonstration implementation of a security token
service. The functionality of this sample security token service is limited: it supports
only the Issue operation and always returns a signed SAML token (which can
conform either to SAML 1.1 or SAML 2.0).
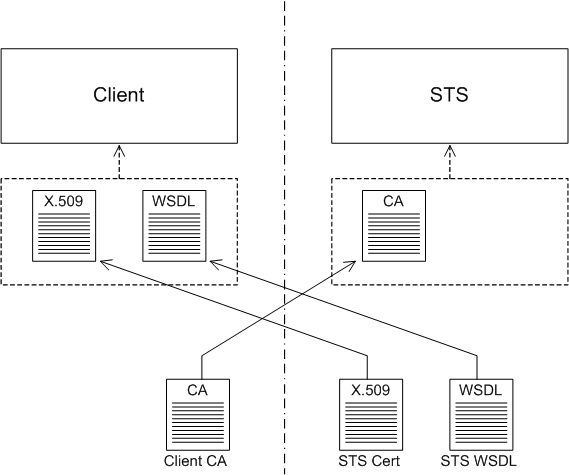
In general, before a client can invoke operations on a given STS, a certain amount of setup preparation is required, as illustrated in Figure 8.6. The STS must provide its own X.509 certificate, enabling the client to authenticate the STS and to confirm signatures made by the STS, and the STS must provide a copy of its WSDL contract, which is a standard requirement for contacting any Web service. Assuming the client identifies itself using an X.509 certificate, it is also necessary for the client to provide a copy of its trusted CA certificate to the STS.
The sample WS-Trust security token service is located in the following sample directory:
CxfInstallDir/samples/sts_issue_operationIn general, whenever you are integrating a WS client with a security token service, you will need to perform some or all of the following actions:
Install client's trusted CA certificate in STS—normally, the connection between the client and the STS would be secured using SSL/TLS. If the STS decides to authenticate the client using an X.509 certificate (as in this demonstration), the STS will be configured to require a client certificate during the SSL/TLS handshake. The STS must have a copy of the client's trusted CA certificate in order to verify the signature of the received client certificate.
![[Note]](imagesdb/note.gif)
Note Alternatively, an STS might be configured to authenticate the client using a mechanism such as UsernameToken credentials. In this case, an administrator would need to add the client's username/password to the STS's store of security data.
Install STS certificate in client—likewise, in order for the client to verify that it is talking to the authentic STS, you need to install the STS certificate (or the CA certificate that signed the STS certificate) into the client's trust store.
Install STS WSDL in client—just as with any other Web service, the client needs a copy of the STS's WSDL file in order to open a connection to the STS.
Customize address in STS WSDL—often enough (and also in this demonstration), the SOAP address advertised in a WSDL file does not correspond to the actual address that the Web service is listening on. Because the client reads the STS endpoint's address from the STS WSDL file, it is essential to make sure that this address is accurate.
Perform the following steps to configure the security token service:
Configure the Maven Jetty plug-in with a secure SSL port.
The result of building the
sts_issue_operationsample is a WAR file, which can then be deployed into any Web container. You can also deploy the WAR file into a Jetty container, which can conveniently be started up using the Maven Jetty plug-in. By default, however, the Jetty configuration in thests_issue_operationPOM file exposes an insecure HTTP port. To change the Jetty configuration to use a secure HTTPS port, edit thepom.xmlfile in thesamples/sts_issue_operationdirectory, adding theconnectorselement as shown in the following extract:<?xml version="1.0"?> <project ... > ... <build> ... <plugins> ... <plugin> <groupId>org.mortbay.jetty</groupId> <artifactId>maven-jetty-plugin</artifactId> <version>6.1.24</version> <configuration> <contextPath>/${project.build.finalName}</contextPath> <connectors> <connector implementation="org.mortbay.jetty.security.SslSocketConnector"> <port>8181</port> <keystore>src/main/resources/stsstore.jks</keystore> <password>stsspass</password> <keyPassword>stskpass</keyPassword> <truststore>src/main/resources/stsstore.jks</truststore> <trustPassword>stsspass</trustPassword> </connector> </connectors> </configuration> </plugin> </plugins> </build> </project>Note If you prefer to use Jetty version 7 or later, you should note that the package name for the
SslSocketConnectorclass has changed, because Jetty 7 is now hosted by the Eclipse foundation.Import the client's trusted CA certificate into the STS trust store file.
Copy the
cacert.pemfile from thesamples/wsdl_first_https/certsdirectory to thesamples/sts_issue_operation/src/main/resourcesdirectory. Install this CA cert into the STS's trust store,stsstore.jks, by opening a new command prompt, changing directory tosamples/sts_issue_operation/src/main/resources, and entering the following command:keytool -import -file cacert.pem -alias wibble_ca -keystore stsstore.jks -storepass stsspass
This command uses the Java
keytoolutility to install the client's CA certificate,cacert.pem, into the STS trust store,stsstore.jks, and assigns the certificate alias,wibble_ca, to identify the new entry in the trust store.![[Tip]](imagesdb/tip.gif)
Tip A convenient way of viewing and manipulating Java keystore files is to use the free Portecle tool, which implements a visual frontend to the
keystoreutility.Add the client's trusted CA to the list of trusted certificates in the STS.
The demonstration STS checks received certificates using its
CertificateVerifierclass. This class does not automatically trust all of the certificates present in the STS trust store,stsstore.jks, however. In order to permit authentication using the client's trusted CA, you must explicitly add the certificate alias to the certificate verifier's list of trusted certificates.Edit the
beans.xmlfile located in the following directory:CxfInstallDir/samples/sts_issue_operation/src/main/webapp/WEB-INFLook for the bean with the ID,
certificateVerifierConfig, and add thewibble_cacertificate alias to the list of trusted aliases, as shown in the following fragment:<beans ...> ... <bean id="certificateVerifierConfig" class="demo.sts.provider.cert.CertificateVerifierConfig"> <property name="storePath" value="/stsstore.jks"/> <property name="storePwd" value="stsspass"/> <!-- if false exception for self-signed cert will be thrown --> <property name="verifySelfSignedCert" value="true"/> <property name="trustCertAliases"> <list> <value>myclientkey</value> <value>wibble_ca</value> </list> </property> <property name="keySignAlias" value="mystskey"/> <property name="keySignPwd" value="stskpass"/> </bean> </beans>Install the STS certificate in the client.
Create a new
stsdirectory and a newsts/certsdirectory under thesamples/wsdl_first_httpsdirectory. Copy thestsstore.jksfile from this directory:CxfInstallDir/samples/sts_issue_operation/src/main/resources/To this directory:
CxfInstallDir/samples/wsdl_first_https/sts/certs/Install the STS WSDL in the client.
Create a new
sts/wsdldirectory under thesamples/wsdl_first_httpsdirectory. Copy all of the files (.wsdlfiles and.xsdfiles) from this directory:CxfInstallDir/samples/sts_issue_operation/src/main/webapp/WEB-INF/wsdl/To this directory:
CxfInstallDir/samples/wsdl_first_https/sts/wsdl/Customize the SOAP address in the client copy of the STS WSDL.
Edit the
ws-trust-1.4-service.wsdlfile from thewsdl_first_https/sts/wsdl/directory. Scroll down to the end of this file, where thewsdl:serviceelement is defined. Change the value of thelocationattribute in thesoap:addresselement as shown in the following fragment:<wsdl:definitions ... > ... <wsdl:service name="SecurityTokenServiceProvider"> <wsdl:port binding="tns:SecurityTokenServiceSOAP" name="SecurityTokenServiceSOAP"> <soap:address location="https://localhost:8181/sts/SecurityTokenService"/> </wsdl:port> </wsdl:service> </wsdl:definitions>The new address,
https://localhost:8181/sts/SecurityTokenService, is consistent with the Jetty container configuration, as specified in step 1.Note Don't forget to specify the secure protocol scheme,
https, instead ofhttpin this address.To build and run the STS server using Maven, open a new command prompt, change directory to
samples/sts_issue_operation/, and enter the following Maven command:mvn jetty:run
The first time that you run this command, Maven will build the project before running STS in the Jetty container.
 |  |  |
 |
