Importing textures
Do NOT import them in most cases
In most cases you don’t want images imported when dealing with 2D and GUI. Just copy them to the filesystem. Read the tutorial on Managing image files before continuing! For 3D, textures are always imported by the 3D scene importer, so importing those is only useful when importing a texture used for 3D that doesn’t come with the 3D scene (for example, in a shader). The flags and options are the same as here, so reading the rest of the document might help too.
OK, you might want to import them
So, if you have read the previous tutorial on the texture exporter, the texture importer gives you more fine-grained control on how textures are imported. If you want to change flags such as repeat, filter, mipmaps, fix edges, etc. *PER texture*, importing them is the best way to accomplish this (since you can’t save such flags in a standard image file).
Lack of MipMaps
Images in 3D hardware are scaled with a (bi)linear filter, but this method has limitations. When images are shrunk too much, two problems arise:
- Aliasing: Pixels are skipped too much, and the image shows discontinuities. This decreases quality.
- Cache Misses: Pixels being read are too far apart, so texture cache reads a lot more data than it should. This decreases performance.

To solve this, mipmaps are created. Mipmaps are versions of the image shrunk by half in both axis, recursively, until the image is 1 pixel of size. When the 3D hardware needs to shrink the image, it finds the largest mipmap it can scale from, and scales from there. This improves performance and image quality.

Godot automatically creates mipmaps upon load for standard image files. This process is time consuming (although not much) and makes load times a little worse. Pre-importing the textures allows the automatic generation of mipmaps.
Unwanted MipMaps
Remember the previous point about mipmaps? Yes, they are cool, but mobile GPUs only support them if the textures are in power of 2 dimensions (i.e. 256x256 or 512x128). In these platforms, Godot will stretch and enlarge the texture to the closest power of 2 size and then generate the mipmaps. This process takes more of a performance hit and it might degrade the quality a little more.
Because of this, there are some scenarios when it may be desirable to not use them, and just use a linear filter. One of them is when working with graphical user interfaces (GUIs). Usually they are made of large images and don’t stretch much. Even if the screen resolution is in a larger or smaller value than original art, the amount of stretch is not as much and the art can retain the quality. Pre-importing the textures also allows the disabling of mipmap generation.
Blending artifacts
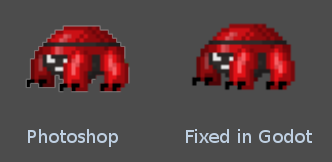
The blending equation used by applications like Photoshop is too complex for realtime. There are better approximations such as pre-multiplied alpha, but they impose more stress in the asset pipeline. In the end, we are left with textures that have artifacts in the edges, because apps such as Photoshop store white pixels in completely transparent areas. Such white pixels end up showing thanks to the texture filter.
Godot has an option to fix the edges of the image (by painting invisible pixels the same color as the visible neighbours):

However, this must be done every time the image changes. Pre-Importing the textures makes sure that every time the original file changes, this artifact is fixed upon automatic re-import.
Texture flags
Textures have flags. The user can choose for them to repeat or clamp to edges (when UVs exceed the 0,0,1,1 boundary). The magnifying filter can also be turned off (for a Minecraft-like effect). Such values can not be edited in standard file formats (png, jpg, etc.), but can be edited and saved in Godot .tex files. Then again, the user may not want to change the values every time the texture changes. Pre-Importing the textures also takes care of that.
Texture compression
Aside from the typical texture compression, which saves space on disk (.png, jpg, etc.), there are also texture compression formats that save space in memory (more specifically video memory. This allows to have much better looking textures in games without running out of memory, and decrease memory bandwidth when reading them so they are a big plus.
There are several video texture compression formats, none of which are standard. Apple uses PVRTC. PC GPUs, consoles and nVidia Android devices use S3TC (BC), other chipsets use other formats. OpenGL ES 3.0 standardized on ETC format, but we are still a few years away from that working everywhere.
Still, when using this option, Godot converts and compresses to the relevant format depending on the target platform (as long as the user pre-imported the texture and specified video ram compression!).
This kind of compression is often not desirable for many types of 2D games and UIs because it is lossy, creating visual artifacts. This is especially noticeable on games that use the trendy vectory social game artwork. However, the fact that it saves space and improves performance may make up for it.
The 3D scene importer always imports textures with this option turned on.
Atlases
Remember how mobile GPUs have this limitation of textures having to be in power of 2 sizes to be able to generate mimpmaps for optimum stretching? What if we have a lot of images in different random sizes? All will have to be scaled and mipmapped when loaded (using more CPU and memory) or when imported (taking more storage space). This is probably still OK, but there is a tool that can help improve this situation.
Atlases are big textures that fit a lot of small textures inside efficiently. Godot supports creating atlases in the importer, and the imported files are just small resources that reference a region of the bigger texture.
Atlases can be a nice solution to save some space on GUI or 2D artwork by packing everything together. The current importer is not as useful for 3D though (3D Atlases are created differently, and not all 3D models can use them).
As a small plus, atlases can decrease the amount of “state changes” when drawing. If a lot of objects that are drawn using several different textures are converted to an atlas, then the texture rebinds per object will go from dozens or hundreds to one. This will give the performance a small boost.
Artists use PSD
Still wondering whether to use the texture importer or not? Remember that in the end, artists will often use Photoshop anyway, so it may be wiser to just let the import subsystem to take care of importing and converting the PSD files instead of asking the artist to save a png and copy it to the project every time.
Texture importer
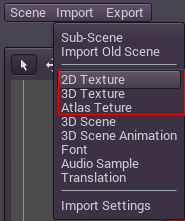
Finally! It’s time to take a look at the texture importer. There are 3 options in the import menu. They are pretty much (almost) the same dialog with a different set of defaults.

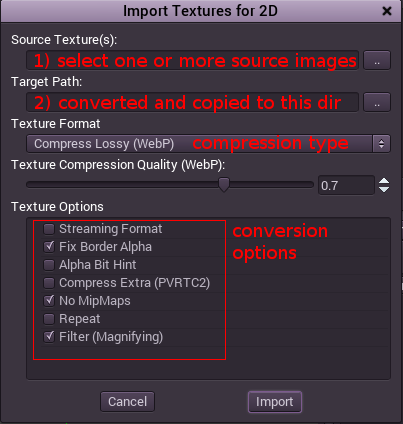
When selected, the texture import dialog will appear. This is the default one for 2D textures:

Each import option has a function, explained as follows:
Source texture(s)
One or more source images can be selected from the same folder (this importer can do batch-conversion). This can be from inside or outside the project.
Target path
A destination folder must be provided. It must be inside the project, as textures will be converted and saved to it. Extensions will be changed to .tex (Godot resource file for textures), but names will be kept.
Texture format
This combo allows to change the texture format (compression in this case):

Each of the four options described in this table together with their
advantages and disadvantages (  = Best,
  =Worst ):
| Uncompressed | Compress Lossless (PNG) | Compress Lossy (WebP) | Compress VRAM | |
|---|---|---|---|---|
| Description | Stored as raw pixels | Stored as PNG | Stored as WebP | Stored as S3TC/BC,PVRTC/ETC, depending on platform |
| Size on Disk |  Large Large |
 Small Small |
 Very Small Very Small |
 Small Small |
| Memory Usage |  Large Large |
 Large Large |
 Large Large |
 Small Small |
| Performance |  Normal Normal |
 Normal Normal |
 Normal Normal |
 Fast Fast |
| Quality Loss |  None None |
 None None |
 Slight Slight |
 Moderate Moderate |
| Load Time |  Normal Normal |
 Slow Slow |
 Slow Slow |
 Fast Fast |
Texture options
Provided are a small amount of options for fine grained import control:
- Streaming Format - This does nothing as of yet, but a texture format for streaming different mipmap levels is planned. Big engines have support for this.
- Fix Border Alpha - This will fix texture borders to avoid the white auras created by white invisible pixels (see the rant above).
- Alpha Bit Hint - Godot auto-detects if the texture needs alpha bit support for transparency (instead of full range), which is useful for compressed formats such as BC. This forces alpha to be 0 or 1.
- Compress Extra - Some VRAM compressions have alternate formats that compress more at the expense of quality (PVRTC2 for example). If this is ticked, texture will be smaller but look worse.
- No MipMaps - Force imported texture to NOT use mipmaps. This may be desirable in some cases for 2D (as explained in the rant above), though it’s NEVER desirable for 3D.
- Repeat - Texture will repeat when UV coordinates go beyond 1 and below 0. This is often desirable in 3D, but may generate artifacts in 2D.
- Filter - Enables linear filtering when a texture texel is larger than a screen pixel. This is usually turned on, unless it’s required for artistic purposes (Minecraft look, for example).