

This chapter introduces IPM screens, describes the main menu screen and option screen, and provides summaries of the menus and selections.
|
|
|
Note the following about IPM displays:
|
|
|
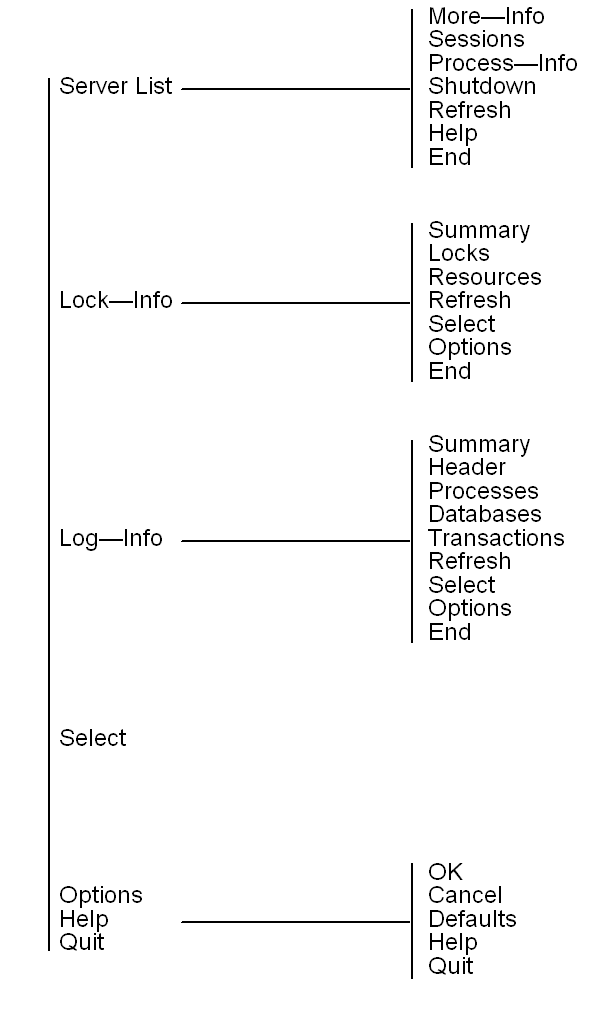
The following figure illustrates each selection that is accessible from the IPM Main Menu:
|
|
|
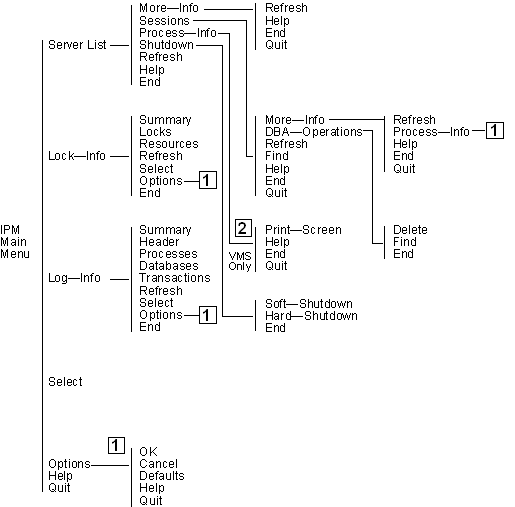
The following figure illustrates each selection that is accessible from the Server_List menus:
|
|
|
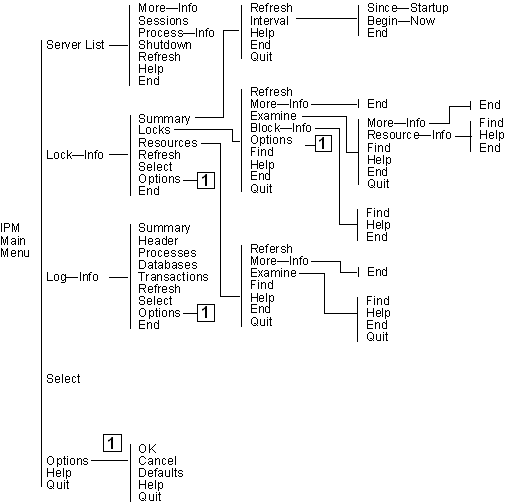
The following figure illustrates each selection that is available from the Lock_Info portion:
|
|
|
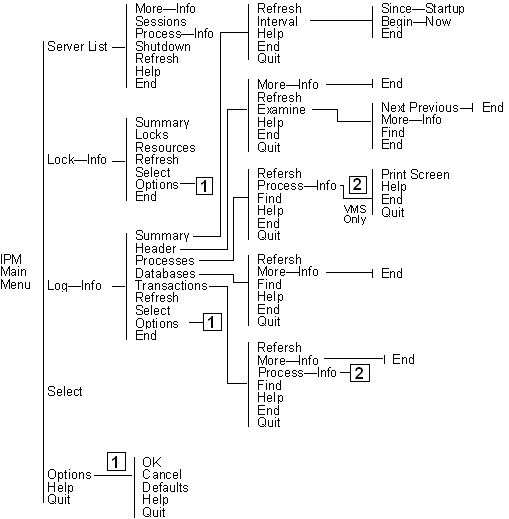
The following figure illustrates each selection that is available from the Log_Info portion:
|
|
|
When IPM is started, the Main Menu screen is displayed, as shown here:
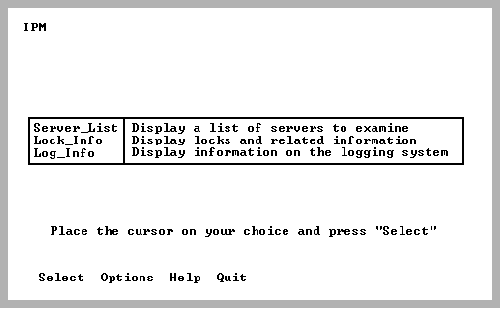
You select a given category in the Main Menu by using the up and down arrow keys.
The command line options specified at startup can be changed by selecting the Options menu item.
The Main Menu has the following options:
Displays the Server Information screens. This area displays a list of servers (that are registered with the Name Server). You can view session information, remove sessions, and shut down servers (provided you are a privileged user). Note that this area contains iinamu and iimonitor functionality. The server list is not available in IPM stand-alone mode (-s start-up option).
For more information on server monitoring information, see the chapter "Monitoring Server Information."
Displays a new set of menu items and choices to display information pertaining to the locking system. Locking system summaries, lock lists, and resources can be viewed. This area is where concurrency analysis and locking activity viewing is done.
For details on locking information, see the chapter "Monitoring Lock Information."
Displays a new set of menu items and choices to display information pertaining to the logging system. Logging system summaries, transaction lists, process, and database lists can be viewed. This area can be used to monitor transaction rates, log file activity, processes, and databases in the logging system.
For details on logging information, see the chapter "Monitoring Log Information."
|
|
|
The Main Menu has the following menu items:
Lets you view or set options that determine what resources are displayed on the Resource Display screen. Options include displaying resources:
IPM provides pop-up help for each option listing available choices.
For more information on the Option menu item, see Option Selection Screen.
Displays help screens
Exits IPM
|
|
|
The Option Selection screen allows the runtime options to be viewed and changed while IPM is running. This screen can be selected from the Main Menu, Lock List Display, or Resource Display screens.
These options can also be specified on the command line when IPM is invoked with the ipm command.
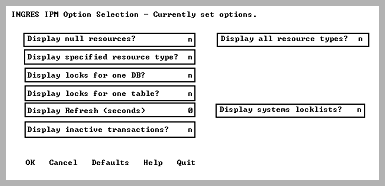
Some options determine which resources are displayed when the Resource Display screen is refreshed. By specifying appropriate options, you can display detailed resource locking information down to the page level or a summary display of what databases are currently open.
The Option Selection screen has the following options:
By default, IPM suppresses display of granted null resources. (Granted null relation locks show what tables were referenced during the database session, that is, a granted null lock on a table indicates that a query was run against that table. Granted null locks do not block any access to the resource they are granted on.)
N is the default unless a resource type is specified.
If this option is set to Y, IPM displays any resources that are granted null and that qualify, based on other specified options.
By default, IPM displays only database, table, and page resources. If this option is set to Y, all resource types are displayed.
By default, IPM displays database, open database, table, and page resources. If this option is set to Y, enter the resource you are searching in the Type to display field. Resource types of interest include:
Other resource types exist. For a full list of resource types, see Resource Type. To display a pop-up list, enter a (?) in the Type to Display field and press Return.
By default, IPM displays locks for all databases in the current installation. If this option is set to Y, enter the database in the Specify database field. To display a pop-up list, enter a (?) in the Specify database field and press Return.
By default, IPM displays locks for all tables. If this option is set to Y, enter the table name in the Specify a table name field. You must also set the Display resources for one DB field to Y.
By default, IPM displays snapshots of your installation. If this option is set to a number greater than zero, IPM automatically refreshes the display. Select a number n between 1 and 999 to specify autorefresh (auto update) every n seconds on the Locking System Summary, Logging System Summary, and Logging System Header Display screens.
On autorefreshable screens, the state is displayed in the upper right-hand corner as one of the two following states:
By default, IPM displays user lock lists only. A lock list with a status of NONPROTECT is usually a system lock list. If this option is set to Y, IPM also displays system lock lists.
By default, IPM displays active transactions only. A transaction with a status of INACTIVE is usually a system transaction and not displayed. User transactions that have issued only selects are INACTIVE. User transactions that have been committed but not journaled also have a status of INACTIVE. If this option is set to Y, IPM also displays inactive transactions.
|
|
|
To make changes to the Option Selection screen:
Your changes are saved.
Note: Some options are incompatible with other options. For example, do not specify the display of all resource types and also the display of table resource locks for a table, because a table resource lock type is a subset of all resource types. If any saved options are incompatible, IPM displays an error message.
The search is rerun with the new search criteria.
|
|
|
The Option Selection screen has the following menu items:
Saves the options that are shown and returns to the previous screen.
Ignores any changes made to the options and returns to the previous screen.
Resets all options to the state when the IPM Option Selection screen was entered and do not return to the previous screen. At this point, any changes to the options can be made.
Displays the help screens.
Exits IPM.