| Inkscape » Quick Start » A Hiking Club Logo - An Exercise in Paths |    |
|---|
We will use Inkscape to draw a logo for the Fuji Hiking and Mountaineering Club, as shown below. This tutorial will cover the use of text, importing a bitmap for use as a guide in drawing, and manipulation of paths.

The steps are:
Start Inkscape and set the drawing size.
Create the text for the logo.
Import a bitmap with the shape of Fuji mountain.
Convert the text to a path and manipulate that path.
Trace the Fuji mountain picture to obtain a path.
Trim the text to the mountain shape using Fuji mountain path.
Add snow to the mountain top.
Add finishing touches.
Procedure 1.3. Creating the Fuji Hiking and Mountaineering Club Logo
Set up the drawing.
To begin, start Inkscape.
Follow the instructions for setting the page size and grid spacing given in the Swedish flag example, but set drawing size to a width of 500 and a height of 300 pixels. Do not create a Grid.
Enter the text.
Select the Text Tool
![]() from the Tool Box
(keyboard shortcut
F8).
Click on the left side of the page to establish a starting point for the text.
You should see a blinking bar. Type the initials for the club “FHMC”;
the text should appear in a small size on the page.
from the Tool Box
(keyboard shortcut
F8).
Click on the left side of the page to establish a starting point for the text.
You should see a blinking bar. Type the initials for the club “FHMC”;
the text should appear in a small size on the page.
Adjust the text.
The text is too small and may not use the most suitable font. To change the attributes of the text, use the items in the Text Tool-Tool Controls.

With the text selected, choose a suitable font from the pull-down menu on the left. Nimbus Roman No9 L is a good freely available font with the wide serifs needed for the logo. Select the Bold style by clicking on the “B” in the bar, and set the Font size to 144. The changes to the text are shown immediately.
Finally, center the text near the bottom of the drawing by using the Select Tool and dragging the text down.

Import the guide for the mountain shape.
We'll use as a basis for the shape of Fuji San a bitmap tracing of the mountain. You could use any suitable drawing or picture of the mountain (in PNG, GIF, or JPEG format). You can download the same image used here from the book's website: http://tavmjong.free.fr/INKSCAPE/.
Import the bitmap using the Import dialog ( → (Ctrl+I)).
Adjust the bitmap.
The bitmap's image size doesn't match well with the text. The easiest way
to adjust the size is to select the image with the Select Tool
![]() (keyboard shortcut
F1).
When the image is selected, a set of double-headed arrows
appears around the bounding box (dotted line) of the image. Dragging
on the handles will scale the image. Dragging while holding down
the Ctrl key will keep the width to height
ratio constant. Dragging on a non-transparent part of the image
will move the whole image. Note that if you click on the image
twice with the Select Tool, the corner arrows change to
rotation arrows. Just click on the image one more time to
restore the scale arrows.
One can also use the
Arrow keys to move the image.
Note: You may want to decrease the zoom a bit
(3 when image selected) or widen the Inkscape
window before enlarging the image.
(keyboard shortcut
F1).
When the image is selected, a set of double-headed arrows
appears around the bounding box (dotted line) of the image. Dragging
on the handles will scale the image. Dragging while holding down
the Ctrl key will keep the width to height
ratio constant. Dragging on a non-transparent part of the image
will move the whole image. Note that if you click on the image
twice with the Select Tool, the corner arrows change to
rotation arrows. Just click on the image one more time to
restore the scale arrows.
One can also use the
Arrow keys to move the image.
Note: You may want to decrease the zoom a bit
(3 when image selected) or widen the Inkscape
window before enlarging the image.
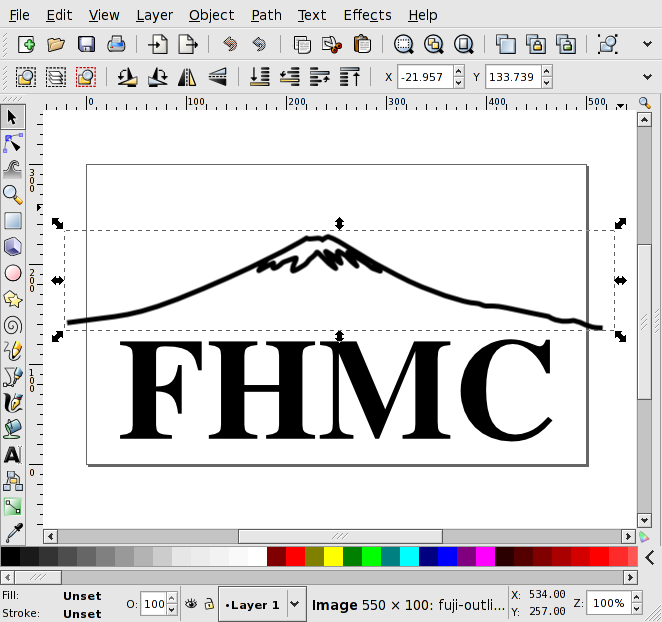
Drag on the corner arrows while holding down the shift key and drag the image until you are happy with the scale and placement. I have chosen to center the top of Fuji over the right side serif of the H.

Manipulate the text.
In this section, we will convert the text to a Path so we can alter the shape of the letters. The text needs to be extended upward, above the outline of the mountain so that we can clip it to match the shape of the mountain. We will also make a few additional cosmetic changes to the letters.
The text, stored as a text object, needs to be converted to a path object for editing. This process is not reversible and the text will lose its memory of being text. To convert the text to a path, select the text with the Select Tool and use the → (Shift+Ctrl+C) command.
Extend the text upward.
Extend the F and H up.
We'll start with extending the F and H. Select the
Node Tool
![]() (F2).
And click on the “text” if not already selected.
(F2).
And click on the “text” if not already selected.
The text is now surrounded by a series of small diamonds. These are the nodes of the path. They define places where the path changes direction or curvature. The path is edited by manipulating these nodes.
At this point, it is easier if you zoom in on the drawing. There are multiple ways to zoom. Using the Ctrl key with the scroll wheel of a scrolling mouse is one way. The drawing will zoom around the cursor position. Another way is to use the + or = key. In this case, the zoom is around the center of the viewable canvas. The scroll bars can be used to pan the drawing (i.e., change the viewable region).
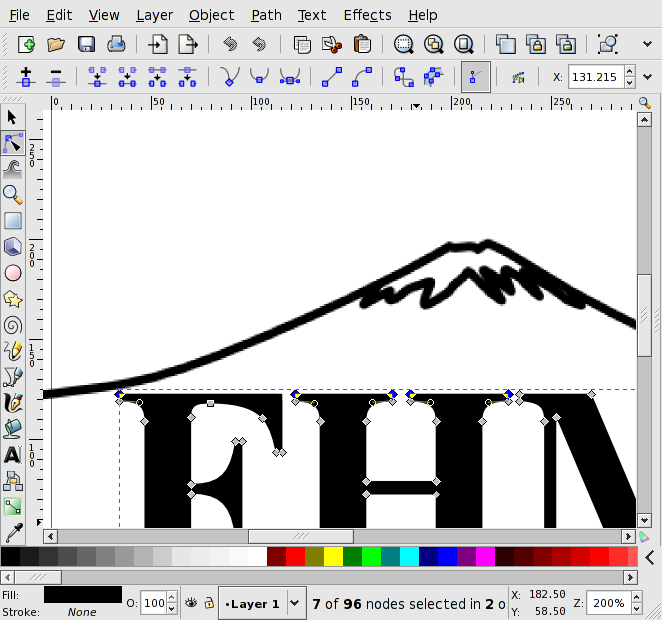
To select a node, click on it with the Node Tool. Holding the Shift key down allows nodes to be added (or removed) from the selection. One can also use a rubber-band selection technique to select multiple nodes at one time. To do this, click-drag from one point to another. All nodes within the box defined by the starting and stopping points will be selected. The click-drag must not begin on a node. The selected nodes will change from gray to blue and yellow when selected.
Select the top nodes of the F and of both sides of the H. A total of seven nodes are selected in this example (there are two on top of each other at the upper-right corner of the F). If you have chosen a different font you may have to select a different number.
Now click-drag on any of the selected nodes upward, holding the Ctrl key down to constrain the direction of the drag to vertical. Drag until all the selected nodes are above the outline of the mountain.

One problem that is immediately apparent is that the extended
parts hide part of the bitmap image. This problem can be
alleviated by temporarily removing the Fill
of the text objects. To do this, open the
Fill and Stroke dialog
( → (Shift+Ctrl+F)
or click on
![]() in the Command Bar). Select the Fill tab
and click on the
in the Command Bar). Select the Fill tab
and click on the
![]() icon (No paint) while the text is selected. If the text is
no longer visible, you will need to make the stroke
visible. In the Fill and Stroke dialog,
select the Stroke paint tab and click on
the
icon (No paint) while the text is selected. If the text is
no longer visible, you will need to make the stroke
visible. In the Fill and Stroke dialog,
select the Stroke paint tab and click on
the
![]() icon (Flat color) or
hold the Shift key down and click on one of
the colors in the Palette.
icon (Flat color) or
hold the Shift key down and click on one of
the colors in the Palette.
Extend the M.
Extending the M may be more difficult than extending the first two letters, it depends on the font selected. For Nimbus Roman No9 L, we need to add two extra nodes in order to preserve the shape of the stems of the M.
Use the Node Tool to select the four nodes at the top of the
M. Click on the
![]() icon (Insert New Node) in the Tool Controls.
This will add two nodes, each
halfway between the pairs of adjacent selected nodes. Click on
the background to deselect all the nodes, then click-drag the new
node on the left side to be above the rightmost node of the left
serif, as shown next.
icon (Insert New Node) in the Tool Controls.
This will add two nodes, each
halfway between the pairs of adjacent selected nodes. Click on
the background to deselect all the nodes, then click-drag the new
node on the left side to be above the rightmost node of the left
serif, as shown next.
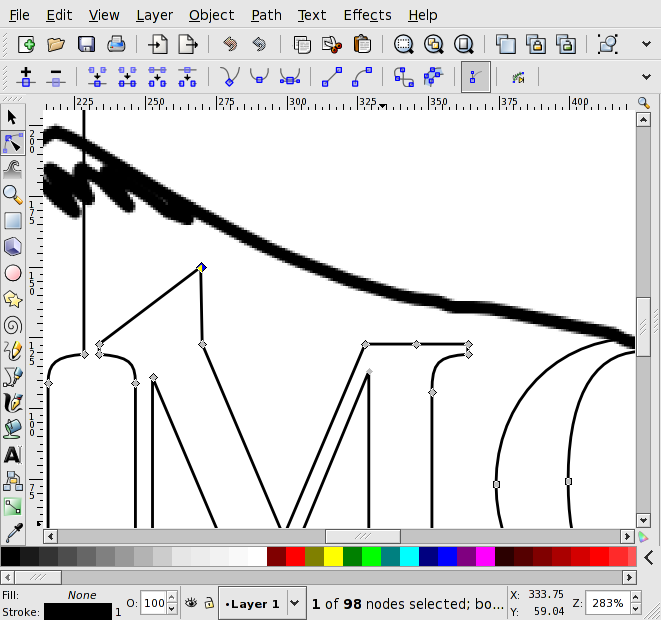
Do the equivalent for the new node on the right side.
Now select the four top nodes of the serifs (the two new nodes replacing two of the previous top nodes) and drag them up, holding the Ctrl key down to constrain their movement in the vertical direction. Move the nodes above the mountain.
Extend the C.
Extending the C also requires a bit of node manipulation. Select
the leftmost node and the top-center node of the C. Convert these
to Corner nodes by clicking on the
![]() icon in the Tool Controls. This will allow the path to have
an abrupt change in direction at the nodes.
Click on the
icon in the Tool Controls. This will allow the path to have
an abrupt change in direction at the nodes.
Click on the
![]() icon in the Tool Controls to convert the selected segment to a
line. Click on the background to deselect both nodes, then
click-drag the topmost node of the line to move it above the
lower node of the line, as shown next.
icon in the Tool Controls to convert the selected segment to a
line. Click on the background to deselect both nodes, then
click-drag the topmost node of the line to move it above the
lower node of the line, as shown next.
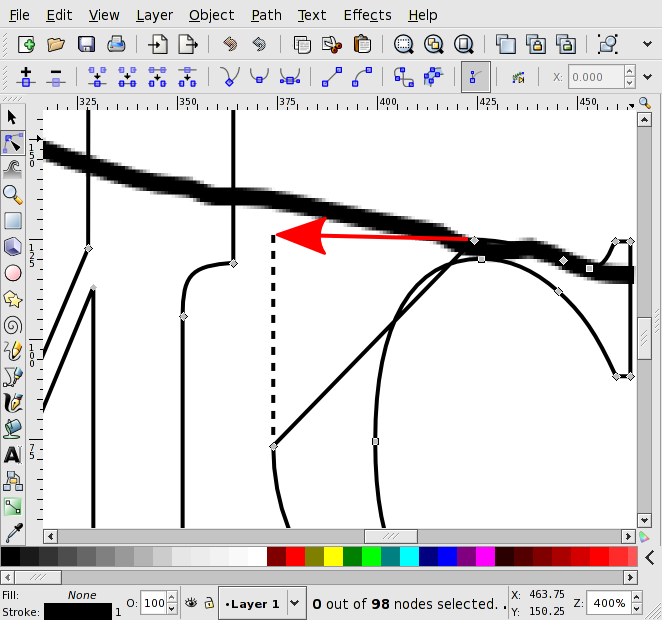
Select all the nodes along the top of the C and drag them above the mountain, again using the Ctrl key to constrain the movement in the vertical direction.
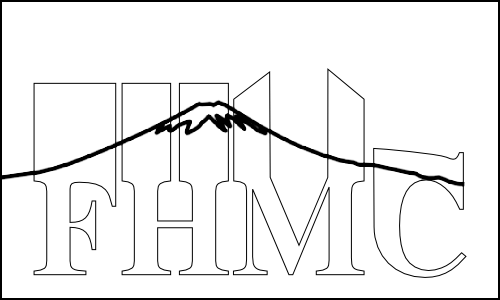
The text path should now look like this:
Adjust kerning.
The kerning of the text isn't quite right. The C is too far from the M. This could have been corrected while the text was still a Text object, but it would have been hard to get correct spacing without seeing the newly extended parts.
To move the C, use the Node Tool to select all the nodes in the C, then use the left and right Arrow keys to move the C until the gap between the C and M matches the gaps between the F and H, and the H and M. If the movement step is too large, use Alt+Arrow to make smaller movements.
Adjust the spacing between the other letters if needed.
Fill in the gap in the M.
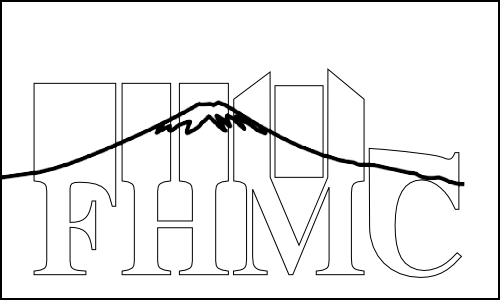
The gap between the two extensions of the M is a bit wide. To reduce the visual effect of the gap we will add a block in between.
Add the rectangle.
Select the Rectangle Tool
![]() (F4)
and click drag a rectangle between the
extensions of the M as shown below. Use the rectangle handles
to adjust the position.
(F4)
and click drag a rectangle between the
extensions of the M as shown below. Use the rectangle handles
to adjust the position.
Merge the rectangle with text.
For later steps, the rectangle object must be merged with the text path. Select with the Select Tool both the rectangle and the text path. Then use the command: → (Ctrl+K) to create one path out of the two. The rectangle object is automatically converted to a path object before the merge.
Trace the bitmap mountain to form a new path.
The top of the extended text will be trimmed with the shape of Fuji San. To do this, the bitmap image of the mountain must be converted to a path. But first, make any last-minute adjustments to the position of the mountain using the Select Tool.
Inkscape includes a tool to trace the bitmap automatically (Chapter 16, Tracing Bitmaps) but the path produced is too complicated for our use.
Instead, we will use the Freehand Tool
![]() (F6).
Starting at one end of the mountain, click-drag the pointer along the top
edge of the mountain to create a new path. When you reach the far end, loop
the path back to the starting point, as shown next.
(F6).
Starting at one end of the mountain, click-drag the pointer along the top
edge of the mountain to create a new path. When you reach the far end, loop
the path back to the starting point, as shown next.
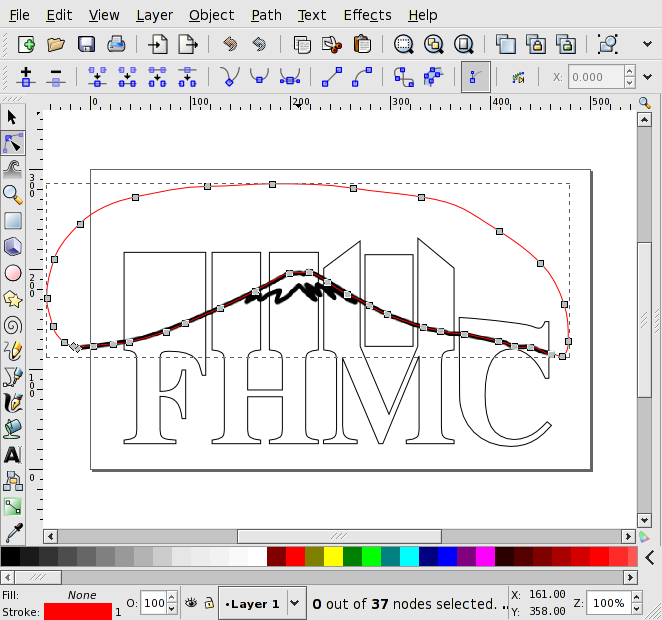
It is not important that the ends of the path meet exactly. It is important that the loop encloses all of the tops of the letters. The path can be tweaked by using the Node Tool to reposition any wayward nodes. It helps to make the path a different color using the Fill and Stroke dialog.
Trim the tops of the letters.
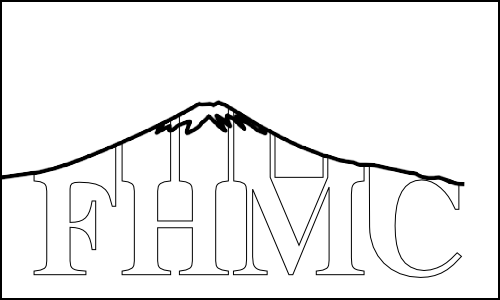
We'll use the Path Difference command to subtract the overlap between the mountain path and the text path from the text path. It is important that the mountain path be on top of the text path because this command subtracts the top path from the bottom path. As the mountain path was created after the text path, it should already be on top.
To do the path subtraction, select both the mountain path and the text path using the Select Tool (hold the Shift key down while selecting the second object) and then use the Path Difference command: → (Ctrl+-). The mountain path will disappear and the text path should look like below.
Adding the snow to the mountain top.
You could now delete the bitmap of Fuji San, change the fill of the text object to solid black, and call it a day, as shown next.

But it might look better if the logo included a snow cap.
To create a snow cap, zoom in on the bitmap image of the snow and the use the Freehand Tool to trace the snow, creating a loop as with the mountain top below.
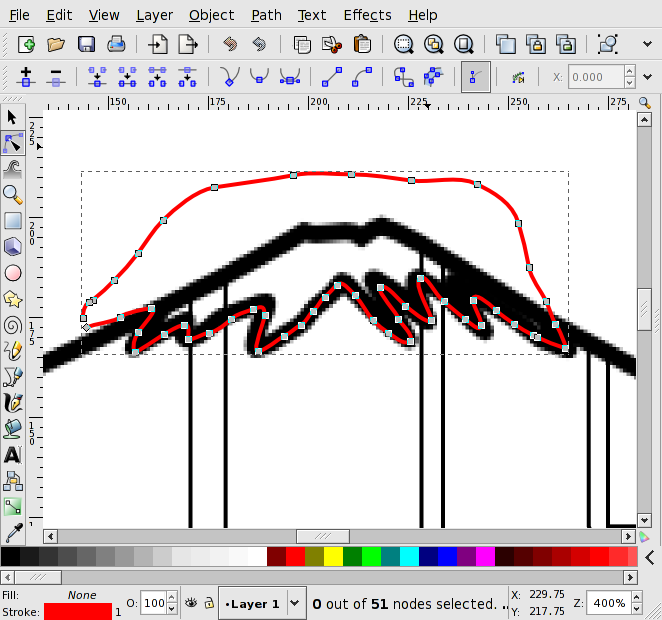
The next step is to create a copy of the text object, with which to cut
the snow path with. To create a copy, select the text and then click on
the Duplicate
![]() icon in the Command Bar
or use the menu entry
→ (Ctrl+D).
icon in the Command Bar
or use the menu entry
→ (Ctrl+D).
With the Shift key down, select the snow path. Both the duplicate text path and snow path should be selected. Use the Path Intersection command: → (Ctrl+*) to combine the two paths. The logo should look like:
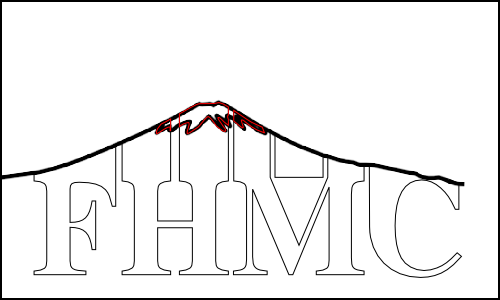
Finishing touches.
Delete the Fuji San bitmap
The bitmap is no longer needed. Delete it by selecting it and then using → (Delete) or Ctrl+X.
Correct Fill and Stroke.
Change the fill of the text object to black. Change the Fill of the snow object to white and the Stroke paint to black.
Widen the snow outline.
The snow outline looks a bit thin. To give it more definition, use the Stroke style tab of the Fill and Stroke dialog. Change the width to 3 pixels. The width of the text path must also be changed to 3 pixels to match.
The logo is now finished. Save your work as in the previous tutorials.

© 2005-2008 Tavmjong Bah. | Get the book. |