| Inkscape » Positioning and Transforming » Inkscape Coordinates |    |
|---|
Understanding the way Inkscape handles coordinates is necessary to be able to fully take advantage of the tools Inkscape has for positioning objects. When you open the main Inkscape window, Righelli are drawn by default at the top and left edges of the canvas (see la sezione chiamata «L'anatomia della finestra Inkscape»). The units of the Righelli are the same as the default units of the canvas. If you hover the pointer over a Righello, a descrizione will show the current unit. The default unit can be changed via the Proprietà del Documento dialog ( → (Shift+Ctrl+D)). Options for the coordinates system units are:
Conversion between the units is fairly straightforward: 1 inch = 1/12 ft = 2.54 cm = 25.4 mm = 0.0254 m = 6 pc = 72 pt. The pixel (px) unit is adjustable in the Preferenze di Inkscape dialog ( → (Shift+Ctrl+P)) under the Import/Export tab (Default export resolution). It is also equivalent to the User Unit in the SVG specification. Inkscape takes care of conversions when changing units. Note: Feet and meters are not SVG or CSS defined units.
Various Inkscape parameters can be set using independent units. For example, the default x scale can be set to millimeters, while the alignment Griglia can be defined in inches.
One confusing aspect is that Inkscape uses a different scale internally. On the canvas, the x and y coordinates increase as one moves right or up. Internally the y coordinate is flipped as per the SVG standard. Thus, (0, 0) is defined from the upper-left corner of the page region internally but at the bottom-left corner in the canvas window. The internal scale is fixed (by default) to 90 dpi. The internal scale is important if you wish to edit by hand an object using the Editor XML.
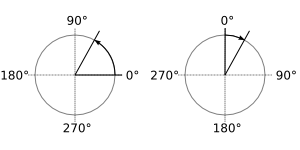
There are two competing camps for how angles should be defined. Fortunately for the peace, Inkscape supports both through the Compass-like display of angles option under the Steps tab in the Proprietà del Documento dialog ( → (Shift+Ctrl+D)).

© 2005-2008 Tavmjong Bah. | Get the book. |