| Inkscape » Positioning and Transforming » Transformations |    |
|---|
| Inkscape » Positioning and Transforming » Transformations | |
|---|
Objects can be moved, scaled, rotated, skewed, and flipped. Inkscape
provides a variety of ways to make these transformations. These
include: using the
mouse, the
keyboard, items in the
Tool Controls bar, the
Transform dialog, the
Paste Size commands, and the
XML Editor dialog.
Each method will be discussed in turn. Each method begins by
selecting an object or group of objects to be transformed. The
Strumento Selettore must be active for making transformations with the
mouse or keyboard. To activate, click on the
![]() icon in the Casella degli Strumenti or use the keyboard
shortcut (F1).
icon in the Casella degli Strumenti or use the keyboard
shortcut (F1).
There are a couple of things to note:
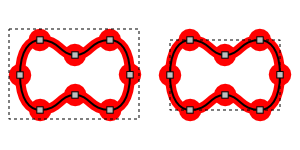
First, some operations use SVG pixels while some use Pixel schermo. The former is the scale used in the SVG file. It is fixed (by default) to 90 dpi. The latter refers to a pixel on the screen and changes as the zoom level changes.
Second, positions and dimensions are often with reference to the
quadro delimitatore. As of v0.46, one can choose between two definitions for the
quadro delimitatore in the Tools section of the
Preferenze di Inkscape dialog ( →
![]() Preferenze di Inkscape...
(Shift+Ctrl+P)). The Visual bounding
box includes the stroke width if the stroke is
visible. For example, a square 100 pixels to one side (between
corner nodes) will have a width of 102 pixels if the stroke width is
2 pixels. The Visual bounding box also includes
any Delimitatori and both the Contorno
Join and Cap styles are
assumed to be Round. The Geometric bounding
box mode uses only the nodes to determine the quadro delimitatore.
Preferenze di Inkscape...
(Shift+Ctrl+P)). The Visual bounding
box includes the stroke width if the stroke is
visible. For example, a square 100 pixels to one side (between
corner nodes) will have a width of 102 pixels if the stroke width is
2 pixels. The Visual bounding box also includes
any Delimitatori and both the Contorno
Join and Cap styles are
assumed to be Round. The Geometric bounding
box mode uses only the nodes to determine the quadro delimitatore.
Third, transformations do not change the underlying definition of regular shape objects or grouped objects, as discussed in the introduction of this chapter (an exception being simple transformations of Rectangle objects when the Store transformation parameter is set to Optimized).
Fourth, there are a number of options that can be toggled on and off in the Controlli Strumento when the Strumento Selettore is being used. The following are active when the icon is highlighted:
![]() Scale stroke width when object is scaled.
Scale stroke width when object is scaled.
![]() Scale radii of rounded corners for rectangles.
Scale radii of rounded corners for rectangles.
![]() Transform gradient along with object.
Transform gradient along with object.
![]() Transform patterns with object.
Transform patterns with object.
Fifth, rotation and skewing take place around a Centro di rotazione point. The point is indicated by a draggable «plus»-shaped handle that is viewable when using the Strumento Selettore in rotation or skewing mode. See below for details.
The Shift, Ctrl, and Alt keys can be used in combination:
Left Mouse Drag: Select (if not selected) and move object. Move selected object(s) if drag starts on any selected object.
Alt+Left Mouse Drag: Move selected object(s) regardless of where drag starts. Don't select object where drag began.
Ctrl+Left Mouse Drag: Move selected object(s) constrained to horizontal or vertical directions.
Shift+Left Mouse Drag: Temporarily disable snapping to Griglie or Linee Guida.
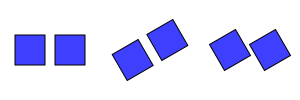
When an object or objects are first selected, eight double-headed arrows will appear in a rectangle around the selection. A Left Mouse Drag of any handle will rescale the selection. The corner arrows will scale both in the horizontal (x) and vertical (y) directions. The side arrows will scale in only one direction.

Updated for v0.46 (keyboard shortcut):
Clicking a second time on a selected object or using the keyboard shortcut Shift+S will change the direction of the double headed arrows. Now, a Left Mouse Drag of a handle will rotate the selection if used on a corner arrow, or skew the selection if used on a side arrow. Click again to revert to the scaling mode.
Rotation Center. Rotation takes place around the Centro di rotazione indicated by a «plus»-shaped handle. The handle (and thus the center of rotation) can be dragged. Dragging while holding the Ctrl down will restrict movement to the horizontal and vertical directions. The handle will snap to the edge of the quadro delimitatore or the center axis of the selection's quadro delimitatore. It will also snap to a Griglia or Linee Guida if snapping of nodes to those items is turned on. The movement of the Centro di rotazione handle can be undone (Ctrl+Z). Holding the Shift key down while click on the Centro di rotazione handle will restore the handle to the center of the quadro delimitatore. The Centro di rotazione is preserved when an object is moved, scaled, duplicated, cloned, or converted to a path. It is also preserved between editing sessions.
When multiple objects are selected, the Centro di rotazione of the first selected object will be used if it has been moved from its default position. Otherwise, the center of the quadro delimitatore of all selected objects will be used.
The Shift, Ctrl, and Alt keys can be used with the Left Mouse Drag. They can be used in combination when scaling, rotating, or skewing.
Ctrl: Preserve width to height ratio.
Shift: Rescale symmetrically, around center of selection.
Redefined in v0.46.
Alt: Restrict scaling up to an integer factor (2, 3, 4, ...) or down to a simple fraction (1/2, 1/3, 1/4, ...). Negative values are also allowed (i.e., mirroring object around quadro delimitatore edge).
Ctrl: Constrain a rotation or skew to a multiple of the Scatto di angolo di rotazione. Allows stretching in the orthogonal direction to a skew by a multiple of the width or height of the quadro delimitatore.
Shift: Keep opposite corner fixed for rotation or opposite side fixed for skew. (This is opposite of what happens for scaling.)
A selection may be moved, scaled, rotated, or flipped (but not
skewed) with the keyboard. For some key combinations, the size of
the transformation is determined by parameters
(e.g., Fattore di incremento) that can be set in the
Preferenze di Inkscape dialog
( →
![]() Preferenze di Inkscape...
(Shift+Ctrl+P))
under the Steps tab.
Preferenze di Inkscape...
(Shift+Ctrl+P))
under the Steps tab.
Arrow: Move selection by Fattore di incremento (2 SVG pixels by default).
Shift+Arrow: Move selection by ten times the Fattore di incremento.
Alt+Arrow: Move the selection one Pixel schermo.
Alt+Shift+Arrow: Move the selection ten Pixel schermo.
Scaling is around the center point of the quadro delimitatore.
., >: Scale up by Passo di scala (2 SVG pixels by default).
,, <: Scale down by Passo di scala (2 SVG pixels by default).
Ctrl+., Ctrl+>: Scale up to 200%.
Ctrl+,, Ctrl+<: Scale down to 50%.
Alt+., Alt+>: Scale up by one Pixel schermo. Scale factor = 1 screen pixel/distance from center of quadro delimitatore to farthest edge.
Alt+,, Alt+<: Scale down by one Pixel schermo.
Rotation is around the Centro di rotazione.
[: Rotate clockwise by Scatto di angolo di rotazione (15 degrees by default).
]: Rotate counter-clockwise by Scatto di angolo di rotazione (15 degrees by default).
Ctrl+[: Rotate clockwise by 90 degrees.
Ctrl+]: Rotate counter-clockwise by 90 degrees.
Alt+[: Rotate clockwise by one Pixel schermo (angle = arctan[ 1 Pixel schermo divided by the distance from the center to the corner point of the quadro delimitatore]).
Alt+]: Rotate counter-clockwise by one Pixel schermo.
Modified in v0.46.
Flip around center point of quadro delimitatore if in scaling mode or around horizontal/vertical line passing through Centro di rotazione if in rotation/skewing mode. These keys work when any tool is active.
H: Flip horizontally.
V: Flip vertically.
The Controlli Strumento contains a number of items for transforming an object when the Strumento Selettore is in use. An object can be translated using the X and Y entry boxes. An object can be stretched by using the width (W) and height (H) entry boxes. These quantities are specified in a unit of length determined by a selection box just to the right of the entry boxes. The ratio of the height and width can be locked by clicking on the lock icon so that changing one dimension automatically changes the other. There are also icons for rotating and flipping objects.
Objects can be moved, scaled, rotated, and skewed using the
Trasforma dialog ( →
![]() Trasforma...
(Shift+Ctrl+M)). There is a
different tab in the dialog for each of these transforms. In
addition, there is a Matrix tab that allows
the application of a Matrice di Trasformazione to a selection.
Trasforma...
(Shift+Ctrl+M)). There is a
different tab in the dialog for each of these transforms. In
addition, there is a Matrix tab that allows
the application of a Matrice di Trasformazione to a selection.
The Trasforma dialog contains an option to apply the chosen transformation to a selection as a group or to the individual objects within the selection. (This option has no effect for the Move and Matrix tabs.) The dialog also has a Clear button to reset the entered values to their default values.
Using the Move tab, you can translate an object.

An object will be translated relative to its current position if the Relative move box is checked. If the box is not checked, the lower-left corner of the objects quadro delimitatore will be moved to the given coordinate.
Modified (again) for v0.46.
Using the Scale tab, you can scale an object.

An object will be scaled relative to the center of its quadro delimitatore. The Scale proportionally option forces the width and height to scale by the same percentage. Note that a scale factor of 100% corresponds to leaving an object unchanged, in contrast to v0.45 where a factor of 0% left an object unchanged.
Using the Rotate tab, you can rotate an object.

An object will be rotated relative to Centro di rotazione. The direction of the rotation is positive in the counter-clockwise direction.
Using the Skew tab, you can skew an object.

You can skew in the horizontal and vertical directions separately. The skewing is relative to the center of the quadro delimitatore. The magnitude of the skew can be specified as a distance, percentage, or angle. In all cases, the skew is relative to the size of the quadro delimitatore.
Examples for a horizontal skew of a 100 by 50 px quadro delimitatore with the Centro di rotazione in the middle of the quadro delimitatore:
Distance of 20 px: The top edge of the box is moved 10 px (half of 20 px) to the right, the bottom 10 px to the left.
Percentage of 20%: The top edge is moved 5 px to the right (half of 20% of the height) to the right, the bottom 5 px to the left.
Angle of 30%: The top edge of the box is moved 14.4 px (tan(30°) × 50px × 0.5) to the left (angles are defined to be positive in the counter-clockwise direction), the bottom 14.4 px to the right.
Note: The center of the new quadro delimitatore is not necessarily at the center of the original quadro delimitatore if the skewed object was not a rectangle.
Using the Matrix tab, you can apply a generic transformation to an object.
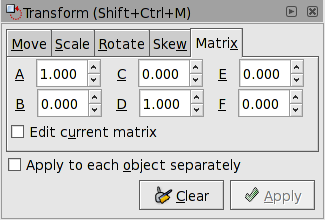
The transformation is described by a 3×3 Matrice di Trasformazione of which only the upper two rows are displayed and modifiable. The upper left 2×2 submatrix (A, B, C, and D) controls scaling, rotating, and skewing, while the upper right 1×2 submatrix (E and F) controls translations.
The tab includes the option Edit current matrix to select if the entered matrix should post-multiply the existing transformation matrix (option not selected) or if it should replace the current matrix (option selected).
There are two important points to note. First, the transformation matrix is with respect to the point (0, 0) in screen coordinates if not editing the current matrix. If editing the current matrix, the transformation is with respect to the User Coordinate System which, if an object is not in a Gruppo, is equivalent to the SVG coordinate system (Initial View Port) where the origin is at the top-left corner of the page. See the SVG standard for more details.
Second, Inkscape will modify the matrix and other parameters of an object internally so that the internal E and F terms are zero if the Store transformation parameter under the Transforms section in the Preferenze di Inkscape dialog is set to Optimized. This means, for example, that for a horizontal skew of a rectangle the internal height parameter may change. The displayed object will still look correct.
The commands in the → submenu can be used to scale a selection or the objects in a selection to match the width and/or height of a selection that is stored in the appunti. To use the commands, first copy (or cut) a selection with the desired dimension(s) to load the selection into the appunti. Then select the target object or objects and use one of the commands below.
The first three commands scale a selection as a whole to match the
clipboard while the last three commands scale each object to match
the clipboard.
Dimensions are determined by quadri delimitatori. The Scale ratio
lock (
![]() /
/
![]() )
located in the Strumento Selettore-Controlli Strumento controls how the width
and height transform in some cases.
)
located in the Strumento Selettore-Controlli Strumento controls how the width
and height transform in some cases.
→ → : The selection is scaled so its quadro delimitatore matches that of the selection in the appunti. Scaling is around the center of the selection's quadro delimitatore.
→ → : The selection is scaled so the width of its quadro delimitatore matches that of the width of selection in the appunti. The height is left alone if the Scale ratio lock is off; otherwise, the height is scaled in the same proportion as the width.
→ → : The selection is scaled so the height of its quadro delimitatore matches that of the height of selection in the appunti. The width is left alone if the Scale ratio lock is off; otherwise, the width is scaled in the same proportion as the height.
→ → : Each object in the selection is scaled so its quadro delimitatore matches that of the selection in the appunti. Scaling is around the center of each object's quadro delimitatore.
→ → : Each object in the selection is scaled so the width of its quadro delimitatore matches the width of the selection in the appunti. The heights are left alone if the Scale ratio lock is off; otherwise, the heights are scaled in the same proportion as the widths.
→ → : Each object in the selection is scaled so the height of its quadro delimitatore matches the height of the selection in the appunti. The widths are left alone if the Scale ratio lock is off; otherwise, the widths are scaled in the same proportion as the heights.
Full control over the transformation of an object is available through the
Editor XML dialog
( →
![]() Editor XML...
(Shift+Ctrl+X)).
Selecting an object in the document window will bring up the
object's attributes in the Editor XML dialog. Any transform an
object is subject to is described by the transform
attribute. A transform can be of type «translate», «scale»,
«rotate», «skewX», «skewY»,
or «matrix». In most cases, the transform
will be of the «matrix» type. A matrix entry contains
the Matrice di Trasformazione in the order (A, B, C, D, E, F) where
(ACE) is the first row of the matrix.
Editor XML...
(Shift+Ctrl+X)).
Selecting an object in the document window will bring up the
object's attributes in the Editor XML dialog. Any transform an
object is subject to is described by the transform
attribute. A transform can be of type «translate», «scale»,
«rotate», «skewX», «skewY»,
or «matrix». In most cases, the transform
will be of the «matrix» type. A matrix entry contains
the Matrice di Trasformazione in the order (A, B, C, D, E, F) where
(ACE) is the first row of the matrix.
One thing to note is that the matrix describes a transformation with respect to the User Coordinate System which, if an object is not in a Gruppo, is equivalent to the SVG coordinate system (Initial View Port) where the origin is at the top-left corner of the page (in contrast to the screen coordinate system where the origin is at the bottom-left of the page). See the SVG standard for more details.
| |  | |
| Inkscape Coordinates |  | Snapping |
© 2005-2008 Tavmjong Bah. | Get the book. |