The installation refers to version 2.5 of JGroups. Refer to the installation instructions that are shipped with JGroups for details.
Note that these instructions are also available in the JGroups distribution (INSTALL.HTML).
JGroups comes in a binary and a source version: the binary version is JGroups-2.x.x.bin.zip, the source version is JGroups-2.x.x.src.zip. The binary version contains the JGroups JAR file, plus a number of JARs needed by JGroups. The source version contains all source files, plus several JAR files needed by JGroups, e.g. ANT to build JGroups from source.
JGroups 2.5 requires JDK 5 or higher.
There is no JNI code present so it should run on all platforms.
If you want to generate HTML-based test reports from the unittests, then xalan.jar needs to be in the CLASSPATH (also available in the lib directory)
The binary version contains
jgroups-all.jar: the JGroups library including the demos
CREDITS: list of contributors
INSTALL.html: this file
commons-logging.jar
log4j.jar. This JAR is optional, for example if JDK logging is used, we don't need it.
Place the JAR files somewhere in your CLASSPATH, and you're ready to start using JGroups. If you want to use the JGroups JMS protocol (org.jgroups.protocols.JMS), then you will also need to place jms.jar somewhere in your CLASSPATH.
The source version consists of the following directories and files:
src: the sources
test: unit and stress tests
conf: configuration files needed by JGroups, plus default protocol stack definitions
doc: documentation
lib: various JARs needed to build and run JGroups:
Ant JARs: used to build JGroups. If you already have Ant installed, you won't need these files
jms.jar: JMS library. Needed only if you intend to run the org.jgroups.protocols.JMS protocol
junit.jar: to run the JUnit test cases
xalan.jar: to format the output of the JUnit tests using an XSLT converter to HTML
commons-logging.jar
log4j.jar
etc
Unzip the source distribution, e.g. unzip JGroups-2.x.x.src.zip. This will create the JGroups-2.x.x directory (root directory) under the current directory.
cd to the root directory
Modify build.properties if you want to use a Java compiler other than javac (e.g. jikes), or if you want to change the interface JGroups uses for sending and receiving messages
On UNIX systems use build.sh, on Windows build.bat: $> ./build.sh compile
This will compile all Java files (into the classes directory).
To generate the JARs: $> ./build.sh jar
This will generate the following JAR files in the dist directory:
jgroups-core.jar - the core JGroups libraries
jgroups-all.jar - the complete JGroups libraries including demos and unit tests
The CLASSPATH now has to be set accordingly: the following directories and/or JARs have to be included:
<JGroups rootdir>/classes
<JGroups rootdir>/conf
All needed JAR files in <JGroups rootdir>/lib . To build from sources, the two Ant JARs are required. To run unit tests, the JUnit (and possibly Xalan) JARs are needed.
To generate JavaDocs simple run $> ./build.sh javadoc and the Javadoc documentation will be generated in the dist/javadoc directory
Note that - if you already have Ant installed on your system - you do not need to use build.sh or build.bat, simply invoke ant on the build.xml file. To be able to invoked ant from any directory below the root directory, place ANT_ARGS="-find build.xml -emacs" into the .antrc file in your home directory.
For more details on Ant see http://jakarta.apache.org/ant/.
To see whether your system can find the JGroups classes, execute the following command:
java org.jgroups.Version
or (from JGroups 2.2.8 on)
java -jar jgroups-all.jar
You should see the following output (more or less) if the class is found:
            bela@dell /cygdrive/c/JGroups/dist
            $ java -jar jgroups-all.jar

            Version:        2.6.0 pre-alpha
            CVS:            $Id: installation.xml,v 1.5 2007/07/24 16:30:46 belaban Exp $
To test whether JGroups works okay on your machine, run the following command twice:
java org.jgroups.demos.Draw
2 whiteboard windows should appear as shown in Figure 2.1, “Screenshot of 2 Draw instances”.
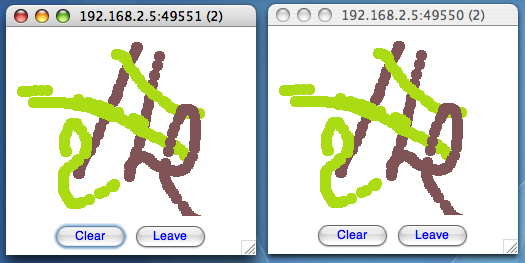
Both windows should show 2 in their title bars. This means that the two instances found each other and formed a group.
When drawing in one window, the second instance should also be updated. As the default group transport uses IP multicast, make sure that - if you want start the 2 instances in different subnets - IP multicast is enabled. If this is not the case, the 2 instances won't find each other and the sample won't work.
You can change the properties of the demo to for example use a different transport if multicast doesn't work (it should always work on the same machine). Please consult the documentation to see how to do this.
Sometimes there isn't a network connection (e.g. DSL modem is down), or we want to multicast only on the local machine. For this the loopback interface (typically lo) can be configured, e.g.
route add -net 224.0.0.0 netmask 240.0.0.0 dev lo
This means that all traffic directed to the 224.0.0.0 network will be sent to the loopback interface, which means it doesn't need any network to be running. Note that the 224.0.0.0 network is a placeholder for all multicast addresses in most UNIX implementations: it will catch all multicast traffic. This is an undocumented feature of /sbin/route and may not work across all UNIX flavors. The above instructions may also work for Windows systems, but this hasn't been tested. Note that not all systems allow multicast traffic to use the loopback interface.
Typical home networks have a gateway/firewall with 2 NICs: the first (eth0) is connected to the outside world (Internet Service Provider), the second (eth1) to the internal network, with the gateway firewalling/masquerading traffic between the internal and external networks. If no route for multicast traffic is added, the default will be to use the fdefault gateway, which will typically direct the multicast traffic towards the ISP. To prevent this (e.g. ISP drops multicast traffic, or latency is too high), we recommend to add a route for multicast traffic which goes to the internal network (e.g. eth1).
Make sure your machine is set up correctly for IP multicast. There are 2 test programs that can be used to detect this: McastReceiverTest and McastSenderTest. Start McastReceiverTest, e.g.
java org.jgroups.tests.McastReceiverTest -mcast_addr 224.10.10.10 -port 5555
Then start McastSenderTest:
java org.jgroups.tests.McastSenderTest -mcast_addr 224.10.10.10 -port 5555
If you want to bind to a specific network interface card (NIC), use -bind_addr 192.168.0.2, where 192.168.0.2 is the IP address of the NIC to which you want to bind. Use this parameter in both sender and receiver.
You should be able to type in the McastSenderTest window and see the output in the McastReceiverTest. If not, try to use -ttl 32 in the sender. If this still fails, consult a system administrator to help you setup IP multicast correctly. If you are the system administrator, look for another job :-)
Other means of getting help: there is a public forum on JIRA for questions. Also consider subscribing to the javagroups-users mailing list to discuss such and other problems.
In this case we have to use a sledgehammer (running only under JDK 1.4. and higher): we can enable the above sender and receiver test to use all available interfaces for sending and receiving. One of them will certainly be the right one... Start the receiver as follows:
java org.jgroups.tests.McastReceiverTest1_4 -mcast_addr 228.8.8.8 -use_all_interfaces
The multicast receiver uses the 1.4 functionality to list all available network interfaces and bind to all of them (including the loopback interface). This means that whichever interface a packet comes in on, we will receive it. Now start the sender:
java org.jgroups.tests.McastSenderTest1_4 -mcast_addr 228.8.8.8 -use_all_interfaces
The sender will also determine the available network interfaces and send each packet over all interfaces.
This test can be used to find out which network interface to bind to when previously no packets were received. E.g. when you see the following output in the receiver:
            bash-2.03$ java org.jgroups.tests.McastReceiverTest1_4 -mcast_addr 228.8.8.8 -bind_addr 192.168.168.4
            Socket=0.0.0.0/0.0.0.0:5555, bind interface=/192.168.168.4
            dd [sender=192.168.168.4:5555]
            dd [sender=192.168.168.1:5555]
            dd [sender=192.168.168.2:5555]
you know that you can bind to any of the 192.168.168.{1,2,4} interfaces to receive your multicast packets. In this case you would need to modify your protocol spec to include bind_addr=192.168.168.2 in UDP, e.g. "UDP(mcast_addr=228.8.8.8;bind_addr=192.168.168.2):..." .
Another source of problems might be the use of IPv6, and/or misconfiguration of /etc/hosts. If you communicate between an IPv4 and an IPv6 host, and they are not able to find each other, try the java.net.preferIP4Stack=true property, e.g.
java -Djava.net.preferIPv4Stack=true org.jgroups.demos.Draw -props file:/home/bela/udp.xml
JDK 1.4.1 uses IPv6 by default, although is has a dual stack, that is, it also supports IPv4. Here's more details on the subject.
There is a wiki which lists FAQs and their solutions at http://www.jboss.org/wiki/Wiki.jsp?page=JGroups. It is frequently updated and a useful companion to this user's guide.
If you think that you discovered a bug, submit a bug report on JIRA or send email to javagroups-developers if you're unsure about it. Please include the following information:
Version of JGroups (java org.jgroups.Version)
Platform (e.g. Solaris 8)
Version of JDK (e.g. JDK 1.4.2_07)
Stack trace. Use kill -3 PID on UNIX systems or CTRL-BREAK on windows machines
Small program that reproduces the bug