5. An Overview of the Mixxx Interface
Welcome to the Mixxx interface. This is where the magic happens. You are going to want to get very familiar with this interface because it is the main way to use Mixxx. In this chapter, we present the default interface of Mixxx and describe its elements, knobs and faders.
The Mixxx interface - Deere skin
This is the Deere skin. It is the default skin supplied with Mixxx. There are a variety of others skins included with Mixxx. You should explore them all to figure out which one you prefer. This section will focus on Deere only.
5.1. The Deck Sections
The deck section allows you to control everything relating to a virtual turntable deck. We are going to break this down into sections.
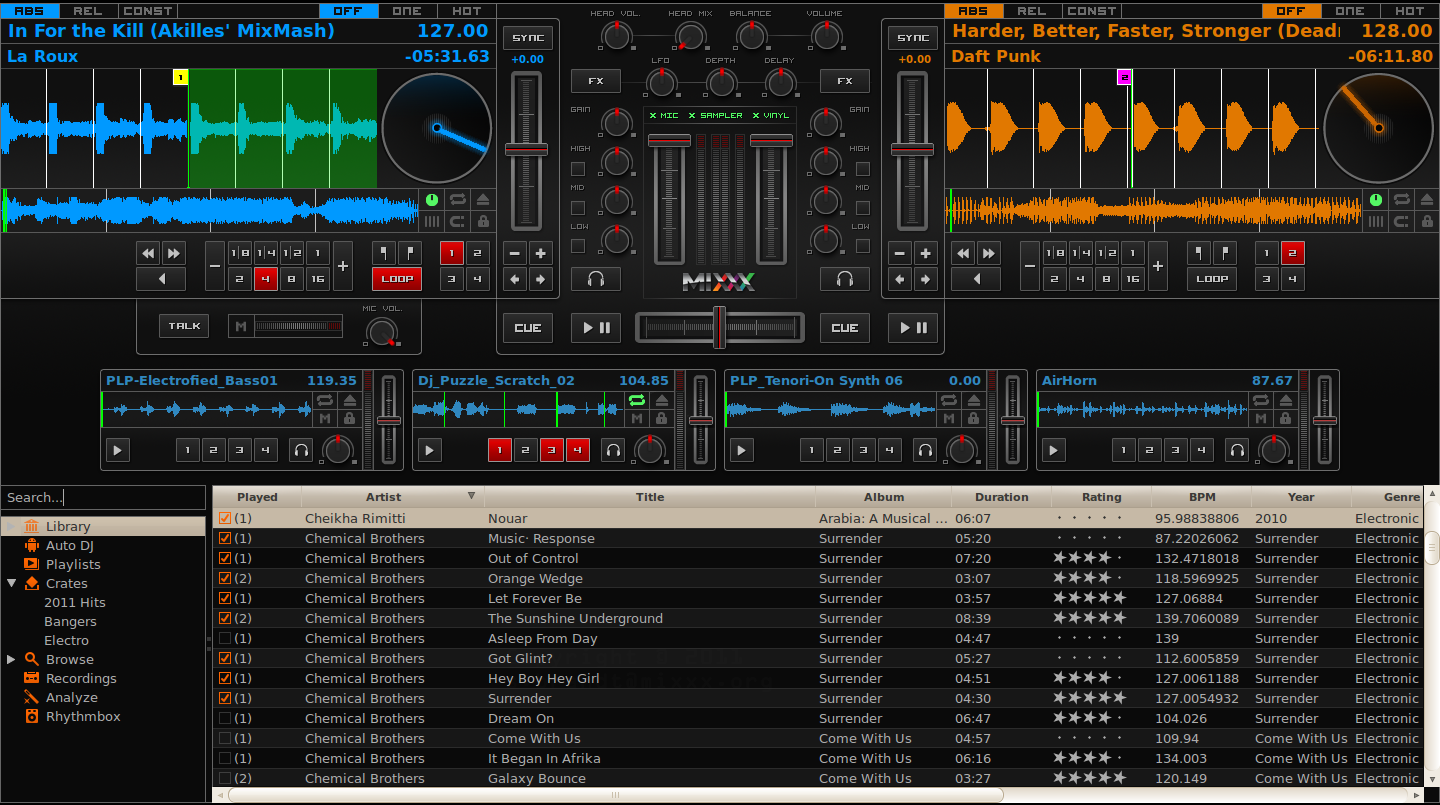
A deck
5.1.1. Track Information
The name of the loaded track is shown on top of each deck and the artist is listed below. The number at the top right is the effective BPM of the track. This is the detected BPM of the track, adjusted for the playback rate of the track. For example, if the track is normally 100 BPM, and it is playing at +5%, then the effective BPM will read 105 BPM. The number in the bottom right is the total elapsed time in the track or the total remaining time in the track. You can customize this in the Mixxx Preferences Interface section.

The track information section of the deck
Hint
Tap the BPM to set the BPM to the speed you are tapping.
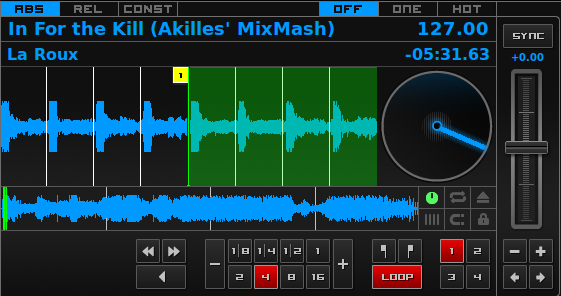
5.1.2. Rate Controls
Rate control
The rate controls allow you to change the rate at which tracks are played. This is very useful for beatmatching two tracks together in a mix. The slider adjusts the rate of the track. The percent that the track’s rate is sped up or slowed down is noted above the slider. At the center, it is +0.0%, which indicates no change. The range of this slider is customizable in the Mixxx Preferences Interface section.
The Sync button changes the rate of the track so that the BPM of the track matches that of the other deck. It also adjusts the phase of the track so that the two tracks’ beats are aligned.
The plus and minus buttons increase and decrease the rate, respectively. If right-clicked, they adjust the pitch in smaller steps. Similarly, the left and right arrow buttons are pitch bend buttons, and these adjust the pitch temporarily. These can act as either a fixed pitch bend or a ramping pitch bend. You can configure their functionality in the Mixxx Preferences Interface section.
5.1.3. Loop Controls and Hotcues

The looping, beatloop, hotcue, and fast-forward/rewind controls of the deck.
In this section, you can control loops, beatloops, hotcues and the playback speed. On the far left, you can fast-rewind, fast-forward, or reverse the deck, respectively.
The eight numbered buttons to the right of these buttons are the beatlooping controls. Clicking on any numbered button in this section will set a loop of that number of beats from the beat immediately following the current playback position. Clicking on the minus or plus button will either halve or double the length of the loop. Tapping the loop button toggles whether the loop is active or not.
Above the loop button are the in and out buttons, which allow you to manually set the loop-in and loop-out point. If the quantize mode is enabled (see The Waveform section), then the loop points will automatically snap to the nearest beat.
The hotcue section, the 4 numbers on the far right, are used to set and clear hotcues. Clicking on a numbered button will set a hotcue. A marker with the corresponding number will appear in the waveform with the same number as the button and the button will turn red to indicate that the hotcue is set. If the deck is playing, you can simply tap a hotcue to cause the deck to instantly jump back to the location of the hotcue. To clear a hotcue, right-click on the numbered button. If the quantize mode is enabled (see The Waveform section), then the hotcues will automatically snap to the nearest beat.
5.1.4. The Waveform
The waveform section of a deck allows you to visualize the audio changes that occur throughout the track. The larger, zoomed-in waveform is called the waveform overview, while the smaller, zoomed-out version of the waveform is called the waveform summary. The white lines on the waveform overview are called beat markers, and they indicate the locations of beats in the audio. The vertical line in the center of the waveform overview indicates the playback point of the deck. Clicking on either the waveform or the spinning vinyl widget allows you to scratch the track as if you were using vinyl or a MIDI controller.

The waveform overview and waveform summary of the deck
The six buttons at the bottom right allow you to configure the deck. Starting from the top-left and moving counterclockwise the buttons are as follows:
- Show/Hide Vinyl Widget
- Toggle Repeat Mode
- Eject Track
- Beat-grid Adjust
- Toggle Quantize Mode
- Toggle Keylock
5.1.4.1. Repeat Mode
If enabled, repeat mode will jump back to the beginning and continue playing when the track finishes.
5.1.4.2. Eject Track
Clicking this button ejects the track from the deck.
5.1.4.3. Beat-grid Adjust
Clicking this button adjusts the track beat-grid so that the current position is marked as a beat. This is useful if Mixxx was able to accurately detect the track’s BPM but failed to align the beat markers on the beats.
5.1.4.4. Toggle Quantize Mode
In this mode, all cues, hotcues, loops, and beatloops will be automatically adjusted (quantized) so that they begin on a beat.
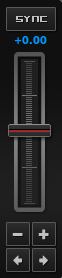
5.2. The Mixer Section
The mixer section allows you to control how the different decks and samplers are mixed together.
The mixer section
5.2.1. VU Meters and Channel Faders
In the center above the Mixxx logo are 4 VU meters. The two outer-most VU meters are for each deck, while the 2 inner-most VU meters are the left and right VU meters for the master output. The two large faders on either side of the VU meters are the deck volume faders. Adjusting these controls the volume of each deck.
Above the VU meters are the optional section expansion buttons. If you click on either “MIC”, “SAMPLER”, or “VINYL” then you will enable control sections for interacting with the microphone, samplers, and vinyl control respectively.
5.2.2. Headphone and Master Mix Controls
The top row of buttons control the headphones and master output. The head-mix knob allows you to customize how much of the master output you hear in your headphones. The head volume button adjusts your headphone volume. The balance knob allows you to adjust the balance (left / right orientation) of the master output. Finally, the volume knob adjusts the volume of the master output.
5.2.3. Equalizers and Gain Knobs
The low, mid, and high knobs allow you to change the filters of the audio. This allows you to selectively reduce or boost certain frequency ranges of the audio. The small boxes next to each knob are called kills and allow you to fully remove that frequency range.
Above these knobs, the gain knob allows you to adjust the gain of the deck. In general, you should adjust this knob so that at full-volume the deck’s audio is just at the peak of the center VU meters. This is so you can achieve the widest dynamic range for your track.
5.2.4. The PFL Button
The headphone button below the EQ knobs is called the pre-fader listen or PFL button. Selecting this button allows you to listen to the deck in your headphones.
5.2.5. Crossfader and Channel Volume

The crossfader section of the mixer
This section allows you control the playback of each deck and the fraction of each deck that is mixed into the master output. The play/pause buttons play or pause each deck. The cue button sets or jumps to a cue point. The large fader in the center is the crossfader. This allows you to adjust the proportion of the master mix which is made up by the decks and samplers on the left side and the decks and samplers on the right side. With the crossfader all the way to the left, you will only hear decks and samplers oriented towards the left. Similarly, with the crossfader all the way to the right you will only hear decks and samplers oriented towards the right.
5.3. The Sampler Section
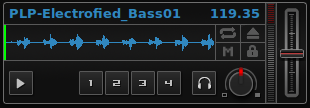
A sample deck
Samplers are miniature decks. They allow you to play short samples and jingles in your mix. They come with a small overview waveform and a limited number of controls. The title of the track and its BPM are displayed along the top row.
Hint
Tap the BPM to set the BPM to the speed you are tapping.
The numbered buttons are hotcues and work just like deck hotcues as described in Loop Controls and Hotcues. The headphone button is a PFL button and the knob to the right of it is a volume knob for the sampler. The fader on the far right controls the playback rate of the sampler, and the VU meter to the left of it visualizes the audio intensity of the sampler, allowing you to adjust it as necessary.
The 4 configure buttons (in clockwise order from the top left) are:
- Repeat: Enable repeat for the sample.
- Eject: Eject the track from this deck.
- Mix Orientation: M for Middle, L for Left, R for Right. Clicking cycles through all the options.
- Keylock: Enable or disable keylock for the sampler.