8. Vinyl Control
Vinyl control allows a user to manipulate the playback of a song in Mixxx using a real turntable as a controller. In effect, it simulates the sound and feel of having your digital music collection on vinyl. Many DJs prefer the tactile feel of vinyl, and vinyl control allows that feel to be preserved while retaining the benefits of using digital audio.
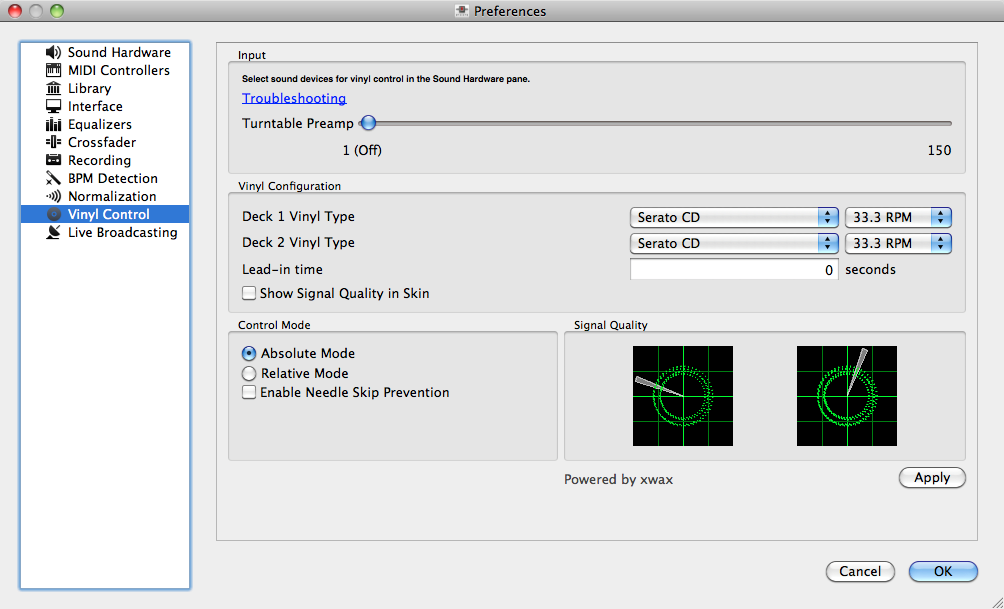
Mixxx preferences - Setting up vinyl control
You can configure vinyl control through the Vinyl Control pane in the preferences. More information about Mixxx’s vinyl control and supported hardware configurations is available on the vinyl control wiki page.
8.1. Input Device Selection
Mixxx can be controlled by up to 2 decks with either timecoded vinyl or timecoded CDs. In the Sound Hardware Input tab in the Mixxx Preferences, select the soundcard(s) which your decks are plugged into for Vinyl Control 1 and 2. In the channel selection drop-down menu, select the channel pairs corresponding to the plug on your soundcard that your deck(s) are plugged into.
Mixxx supports vinyl control input through a single soundcard with 4-channels of input (two stereo line-in jacks), or through two separate soundcards which each have 2-channels of input (a single stereo line-in jack). Vinyl control requires the use of stereo line-in jacks - Mono or microphone inputs will not work.
8.2. Turntable Input Preamp
Many turntables provide unamplified “phono level” output which must be boosted to a “line level” signal. Normally, a mixer provides this amplification, but if you’re plugging a turntable’s phono output directly into your soundcard, Mixxx can do the amplification. The “Turntable Input Preamp” slider allows you to adjust the level of preamplification applied to your decks’ signal.
However it is always preferable to use a proper phono preamplifier if you have one.
8.3. Vinyl Configuration
Several different types of timecoded media can be used to control Mixxx. Configure the “Vinyl Type” drop-down menu to match what type of timecoded vinyl or CD you are using on your decks.
The “Lead-in Time” setting allows you to set a dead-zone at the start of your vinyl or CD, where the time code will be ignored. This is useful in situations where the time code begins very close to the edge of a vinyl which can make back-cueing over the first beat in a song tricky to do without your turntable’s needle falling off the vinyl. Setting a lead-in time of 20 seconds or more helps alleviate this by giving you more room on the vinyl to cue with. It’s also useful when you’ve worn the grooves at the edge of a control record to the point that it no longer works reliably: you simply set the lead-in so that the start of the songs begin in good groove area. You can keep doing this until you run out of groove area, thereby decreasing your record replacement frequency.
8.4. Signal Quality
A successful vinyl control setup hinges on good signal quality. Many factors can affect signal quality, but the most important one is ensuring the volume level of your timecode signal is moderate. A signal that is too loud or too quiet will cause adverse performance, often characterized by a loss of position data causing absolute mode to behave like relative mode. For more information on improving signal quality and troubleshooting, please see the vinyl control wiki page.
Mixxx represents your timecode signal quality as a circular representation of the vinyl control audio signal itself. The two graphs correspond to your “Deck 1” and “Deck 2” input devices. If your vinyl signal is working, you should see a round, green circle drawn with two lines. This vinyl “doughnut” should be as circular as possible, and the lines should be clear with a minimum amount of fuzz. As the vinyl signal gets worse, you’ll see the color of the doughnut change from green to red. An otherwise good-looking doughnut that is solid red indicates an incorrect choice of vinyl control source. For example, maybe you selected side B of the Serato vinyl, but your record is on side A. Also, there should be a rotating radar sweep that represents the direction your record is spinning. If the radar sweep is going backwards, you probably have a wiring problem in your turntable. Try reversing the left and right inputs on your turntable. You may also have to rewire the headshell.
The doughnut should be about half the width of the graph. If the volume is too low or two high, the doughnut will be much smaller or much larger. The “Turntable Input Preamp” setting can be adjusted to boost the volume.
8.5. Control Mode
Mixxx has three control modes regardless of which control records you use.
“Absolute Mode” provides Mixxx with both pitch and position information from the timecode, and allows you to seek by needle dropping on your vinyl or seeking on your CDJ. Once a track is playing, Mixxx will not allow you to select Absolute mode. Otherwise, the track would suddenly jump to a new position. Make sure the record is stopped and then you’re free to select Absolute mode.
“Relative Mode” takes the position to be relative to your deck’s starting point, and only controls the pitch in Mixxx. It is not possible to seek using your deck in relative mode, with one exception. If you drop the needle in the “Lead-in Time” area (see “Vinyl Configuration” above), Mixxx will seek back to the beginning of the track.
“Constant Mode” is a special mode that is usually only activated when Mixxx needs to keep playing a track even if the vinyl control signal isn’t present. Constant mode is automatically enabled when the needle reaches the end of a vinyl control record, or if “Needle-skip Prevention” is enabled and a needle skip is detected.
“Needle-skip Prevention” allows Mixxx to detect and ignore small changes in needle position, such as when you’ve accidentally bumped your turntable. When Mixxx detects a needle skip, it will engage Constant mode and the vinyl indicator (normally a green rectangle) will become red. Needle-skip prevention can be advantageous in a live performance environment but the downside is that it can be accidentally enabled during scratching, causing your track to play forward regardless of the turntable’s pitch. Consequently, disabling needle-skip prevention is recommended for scratch performances.
8.6. Single Deck Control
If you only have one turntable, you can still use Mixxx to play your sets. In the Input tab of the Sound Hardware preference pane, use the same audio input for both Vinyl Control decks.
When mixing, you’ll have one track playing automatically while the other is controlled by the turntable. Start by enabling vinyl control on the first deck, and start mixing. When you’re ready to cue up the next record, just disable vinyl control on the first deck and enable it on the second deck. Playback will continue on the first deck without interruption. Cue up the second track and mix it in. When you’re ready to cue the first deck again, just toggle the second deck off and the first deck on again. Future versions of Mixxx will have a single button to toggle vinyl control between the two decks to make this transition easier.
8.7. End-Of-Record Mode
Sometimes the track you are playing is longer than the timecode area on your record. If the needle reaches the end of the vinyl timecode, Mixxx will enter a special “end-of-record” mode. When this happens, the vinyl indicator (usually a green rectangle) will blink orange as a warning. At the same time, Mixxx will automatically enable “Constant Mode,” and will ignore the turntable’s pitch. At this point the track will simply continue playing until the end. When you load a new track, End-Of-Record mode will be automatically disabled and Constant Mode turned off.
When you’re in End-Of-Record Mode and you want to still use the turntable for pitch control, simply lift the needle and place it anywhere in the main timecode area. Trust me, it’s ok, the track won’t stop playing. As soon as Mixxx detects that the needle has settled, it will automatically switch to Relative mode.
8.8. Cueing Modes
Mixxx has two optional cueing modes for vinyl control which only apply to “Relative Mode”. These modes are useful for quickly seeking to specific positions in a track without touching the laptop. Turntablists often need to find a break or a vocal sample, and cueing modes make these easy to find.
The first is just called “Cue”. In this mode, when you drop the needle on the record after the Cue point, Mixxx will seek to that cue point. In the second mode, “Hot Cue,” when the needle is dropped Mixxx will seek to the nearest hotcue point, working backwards. So if you have a hotcue at the one-minute mark, and another at the two-minute mark, you can drop the needle anywhere between one and two minutes and Mixxx will seek to the one-minute hotcue.
8.9. Control Track
Some vinyl control records have a special portion of grooves near the center of the record for selecting and loading tracks in the user interface. You can see these grooves because there is a gap between the main timecode area and the inner circle. Some control records have not been tested with Mixxx, and their control areas are not supported. Serato CV02 Vinyl and Traktor Vinyl MK1 are known to work. Serato CV02 CDs are known not to work.
Just drop the needle in the control area and let the record play forward or backward. The highlighted row in the library should move up or down. Simply lift the needle and drop it anywhere in the main timecode area to load the track.