Table of Contents
- 2.1. General Installation Guidance
- 2.2. Installing MySQL from Generic Binaries on Unix/Linux
- 2.3. Installing MySQL on Microsoft Windows
- 2.3.1. MySQL Installation Layout on Microsoft Windows
- 2.3.2. Choosing An Installation Package
- 2.3.3. Installing MySQL on Microsoft Windows Using MySQL Installer
- 2.3.4. Installing MySQL on Microsoft Windows Using a
noinstallZip Archive - 2.3.5. Troubleshooting a Microsoft Windows MySQL Server Installation
- 2.3.6. Upgrading MySQL on Windows
- 2.3.7. Windows Postinstallation Procedures
- 2.4. Installing MySQL on Mac OS X
- 2.5. Installing MySQL on Linux
- 2.6. Installing MySQL on Solaris and OpenSolaris
- 2.7. Installing MySQL on HP-UX
- 2.8. Installing MySQL on FreeBSD
- 2.9. Installing MySQL from Source
- 2.10. Postinstallation Setup and Testing
- 2.11. Upgrading or Downgrading MySQL
- 2.12. Environment Variables
- 2.13. Perl Installation Notes
This chapter describes how to obtain and install MySQL. A summary of the procedure follows and later sections provide the details. If you plan to upgrade an existing version of MySQL to a newer version rather than install MySQL for the first time, see Section 2.11.1, “Upgrading MySQL”, for information about upgrade procedures and about issues that you should consider before upgrading.
If you are interested in migrating to MySQL from another database system, you may wish to read Section B.8, “MySQL 5.6 FAQ: Migration”, which contains answers to some common questions concerning migration issues.
Determine whether MySQL runs and is supported on your platform.
Please note that not all platforms are equally suitable for running MySQL, and that not all platforms on which MySQL is known to run are officially supported by Oracle Corporation:
Choose which distribution to install.
Several versions of MySQL are available, and most are available in several distribution formats. You can choose from pre-packaged distributions containing binary (precompiled) programs or source code. When in doubt, use a binary distribution. We also provide public access to our current source tree for those who want to see our most recent developments and help us test new code. To determine which version and type of distribution you should use, see Section 2.1.2, “Choosing Which MySQL Distribution to Install”.
Download the distribution that you want to install.
For instructions, see Section 2.1.3, “How to Get MySQL”. To verify the integrity of the distribution, use the instructions in Section 2.1.4, “Verifying Package Integrity Using MD5 Checksums or
GnuPG”.Install the distribution.
To install MySQL from a binary distribution, use the instructions in Section 2.2, “Installing MySQL from Generic Binaries on Unix/Linux”.
To install MySQL from a source distribution or from the current development source tree, use the instructions in Section 2.9, “Installing MySQL from Source”.
Perform any necessary postinstallation setup.
After installing MySQL, read Section 2.10, “Postinstallation Setup and Testing”. This section contains important information about making sure the MySQL server is working properly. It also describes how to secure the initial MySQL user accounts, which have no passwords until you assign passwords. The section applies whether you install MySQL using a binary or source distribution.
If you want to run the MySQL benchmark scripts, Perl support for MySQL must be available. See Section 2.13, “Perl Installation Notes”.
Instructions for installing MySQL on different platforms and environments is available on a platform by platform basis:
Unix, Linux, FreeBSD
For instructions on installing MySQL on most Linux and Unix platforms using a generic binary (for example, a
.tar.gzpackage), see Section 2.2, “Installing MySQL from Generic Binaries on Unix/Linux”.For information on building MySQL entirely from the source code distributions or the source code repositories, see Section 2.9, “Installing MySQL from Source”
For specific platform help on installation, configuration, and building from source see the corresponding platform section:
Linux, including notes on distribution specific methods, see Section 2.5, “Installing MySQL on Linux”.
Solaris and OpenSolaris, including PKG and IPS formats, see Section 2.6, “Installing MySQL on Solaris and OpenSolaris”.
IBM AIX, see Section 2.6, “Installing MySQL on Solaris and OpenSolaris”.
Hewlett-Packard HP-UX, including the DEPOT package format, see Section 2.7, “Installing MySQL on HP-UX”.
FreeBSD, see Section 2.8, “Installing MySQL on FreeBSD”.
Microsoft Windows
For instructions on installing MySQL on Microsoft Windows, using either a Zipped binary or an MSI package, see Section 2.3, “Installing MySQL on Microsoft Windows”.
For details and instructions on building MySQL from source code using Microsoft Visual Studio, see Section 2.9, “Installing MySQL from Source”.
Mac OS X
For installation on Mac OS X, including using both the binary package and native PKG formats, see Section 2.4, “Installing MySQL on Mac OS X”.
For information on making use of the MySQL Startup Item to automatically start and stop MySQL, see Section 2.4.3, “Installing the MySQL Startup Item”.
For information on the MySQL Preference Pane, see Section 2.4.4, “Installing and Using the MySQL Preference Pane”.
IBM i5/OS
The immediately following sections contain the information necessary to choose, download, and verify your distribution. The instructions in later sections of the chapter describe how to install the distribution that you choose. For binary distributions, see the instructions at Section 2.2, “Installing MySQL from Generic Binaries on Unix/Linux” or the corresponding section for your platform if available. To build MySQL from source, use the instructions in Section 2.9, “Installing MySQL from Source”.
This section lists the operating systems on which MySQL Community Server is known to run.
Oracle Corporation does not necessarily provide official support for all the platforms listed in this section. For information about those platforms that are officially supported, see http://www.mysql.com/support/supportedplatforms.html on the MySQL Web site.
We use CMake, so it is possible to port MySQL to all modern systems that have a C++ compiler and a working implementation of POSIX threads. (Thread support is needed for the server. To compile only the client code, the only requirement is a C++ compiler.)
MySQL has been reported to compile successfully on the following combinations of operating system and thread package.
FreeBSD 5.x and up with native threads. See Section 2.8, “Installing MySQL on FreeBSD”.
HP-UX 11.x with the native threads. See Section 2.7, “Installing MySQL on HP-UX”.
Linux. Builds on all recent Linux distributions based on the 2.6 kernel. See Section 2.5, “Installing MySQL on Linux”.
Mac OS X. See Section 2.4, “Installing MySQL on Mac OS X”.
Solaris 2.8 on SPARC and x86, including support for native threads. See Section 2.6, “Installing MySQL on Solaris and OpenSolaris”.
Windows XP, Windows Vista, Windows Server 2003, and Windows Server 2008. See Section 2.3, “Installing MySQL on Microsoft Windows”.
MySQL has also been known to run on other systems in the past. See Section 2.1, “General Installation Guidance”. Some porting effort might be required for current versions of MySQL on these systems.
Not all platforms are equally well-suited for running MySQL. How well a certain platform is suited for a high-load mission-critical MySQL server is determined by the following factors:
General stability of the thread library. A platform may have an excellent reputation otherwise, but MySQL is only as stable as the thread library it calls, even if everything else is perfect.
The capability of the kernel and the thread library to take advantage of symmetric multi-processor (SMP) systems. In other words, when a process creates a thread, it should be possible for that thread to run on a CPU different from the original process.
The capability of the kernel and the thread library to run many threads that acquire and release a mutex over a short critical region frequently without excessive context switches. If the implementation of
pthread_mutex_lock()is too anxious to yield CPU time, this hurts MySQL tremendously. If this issue is not taken care of, adding extra CPUs actually makes MySQL slower.General file system stability and performance.
Table size. If your tables are large, performance is affected by the ability of the file system to deal with large files and dealing with them efficiently.
Our level of expertise here at Oracle Corporation with the platform. If we know a platform well, we enable platform-specific optimizations and fixes at compile time. We can also provide advice on configuring your system optimally for MySQL.
The amount of testing we have done internally for similar configurations.
The number of users that have run MySQL successfully on the platform in similar configurations. If this number is high, the likelihood of encountering platform-specific surprises is much smaller.
When preparing to install MySQL, you should decide which version to use. MySQL development occurs in several release series, and you can pick the one that best fits your needs. After deciding which version to install, you can choose a distribution format. Releases are available in binary or source format.
The first decision to make is whether you want to use a production (stable) release or a development release. In the MySQL development process, multiple release series co-exist, each at a different stage of maturity.
Production Releases
MySQL 5.5: Latest General Availability (Production) release
MySQL 5.1: Previous stable (production-quality) release
MySQL 5.0: Older stable release nearing the end of the product lifecycle
Development Release
MySQL 5.6: Current release under development (pre-Production)
MySQL 4.1, 4.0, and 3.23 are old releases that are no longer supported.
See http://www.mysql.com/about/legal/lifecycle/ for information about support policies and schedules.
Normally, if you are beginning to use MySQL for the first time or trying to port it to some system for which there is no binary distribution, use the most recent General Availability series listed in the preceding descriptions. All MySQL releases, even those from development series, are checked with the MySQL benchmarks and an extensive test suite before being issued.
If you are running an older system and want to upgrade, but do not want to take the chance of having a nonseamless upgrade, you should upgrade to the latest version in the same release series you are using (where only the last part of the version number is newer than yours). We have tried to fix only fatal bugs and make only small, relatively “safe” changes to that version.
If you want to use new features not present in the production release series, you can use a version from a development series. Be aware that development releases are not as stable as production releases.
We do not use a complete code freeze because this prevents us from making bugfixes and other fixes that must be done. We may add small things that should not affect anything that currently works in a production release. Naturally, relevant bugfixes from an earlier series propagate to later series.
If you want to use the very latest sources containing all current patches and bugfixes, you can use one of our source code repositories (see Section 2.9.3, “Installing MySQL from a Development Source Tree”). These are not “releases” as such, but are available as previews of the code on which future releases are to be based.
The naming scheme in MySQL 5.6 uses release names that consist of three numbers and a suffix; for example, mysql-5.6.1-m1. The numbers within the release name are interpreted as follows:
The first number (5) is the major version and describes the file format. All MySQL 5 releases have the same file format.
The second number (6) is the release level. Taken together, the major version and release level constitute the release series number.
The third number (1) is the version number within the release series. This is incremented for each new release. Usually you want the latest version for the series you have chosen.
For each minor update, the last number in the version string is incremented. When there are major new features or minor incompatibilities with previous versions, the second number in the version string is incremented. When the file format changes, the first number is increased.
Release names also include a suffix to indicates the stability level of the release. Releases within a series progress through a set of suffixes to indicate how the stability level improves. The possible suffixes are:
mN (for example, m1, m2, m3, ...) indicate a milestone number. MySQL development uses a milestone model, in which each milestone proceeds through a small number of versions with a tight focus on a small subset of thoroughly tested features. Following the releases for one milestone, development proceeds with another small number of releases that focuses on the next small set of features, also thoroughly tested. Features within milestone releases may be considered to be of pre-production quality.
rc indicates a Release Candidate. Release candidates are believed to be stable, having passed all of MySQL's internal testing, and with all known fatal runtime bugs fixed. However, the release has not been in widespread use long enough to know for sure that all bugs have been identified. Only minor fixes are added.
If there is no suffix, it indicates that the release is a General Availability (GA) or Production release. GA releases are stable, having successfully passed through all earlier release stages and are believed to be reliable, free of serious bugs, and suitable for use in production systems. Only critical bugfixes are applied to the release.
All releases of MySQL are run through our standard tests and benchmarks to ensure that they are relatively safe to use. Because the standard tests are extended over time to check for all previously found bugs, the test suite keeps getting better.
All releases have been tested at least with these tools:
An internal test suite. The
mysql-testdirectory contains an extensive set of test cases. We run these tests for every server binary. See Section 22.1.2, “The MySQL Test Suite”, for more information about this test suite.The MySQL benchmark suite. This suite runs a range of common queries. It is also a test to determine whether the latest batch of optimizations actually made the code faster. See Section 8.12.2, “The MySQL Benchmark Suite”.
We also perform additional integration and nonfunctional testing of the latest MySQL version in our internal production environment. Integration testing is done with different connectors, storage engines, replication modes, backup, partitioning, stored programs, and so forth in various combinations. Additional nonfunctional testing is done in areas of performance, concurrency, stress, high volume, upgrade and downgrade.
After choosing which version of MySQL to install, you should decide whether to use a binary distribution or a source distribution. In most cases, you should probably use a binary distribution, if one exists for your platform. Binary distributions are available in native format for many platforms, such as RPM files for Linux or PKG package installers for Mac OS X or Solaris. Distributions also are available as Zip archives or compressed tar files.
Reasons to choose a binary distribution include the following:
Binary distributions generally are easier to install than source distributions.
To satisfy different user requirements, we provide several servers in binary distributions. mysqld is an optimized server that is a smaller, faster binary. mysqld-debug is compiled with debugging support.
Each of these servers is compiled from the same source distribution, though with different configuration options. All native MySQL clients can connect to servers from either MySQL version.
Under some circumstances, you may be better off installing MySQL from a source distribution:
You want to install MySQL at some explicit location. The standard binary distributions are ready to run at any installation location, but you might require even more flexibility to place MySQL components where you want.
You want to configure mysqld to ensure that features are available that might not be included in the standard binary distributions. Here is a list of the most common extra options that you may want to use to ensure feature availability:
-DWITH_LIBWRAP=1for TCP wrappers support.-DWITH_ZLIB={system|bundled}for features that depend on compression-DWITH_DEBUG=1for debugging support
You want to configure mysqld without some features that are included in the standard binary distributions. For example, distributions normally are compiled with support for all character sets. If you want a smaller MySQL server, you can recompile it with support for only the character sets you need.
You want to use the latest sources from one of the Bazaar repositories to have access to all current bugfixes. For example, if you have found a bug and reported it to the MySQL development team, the bugfix is committed to the source repository and you can access it there. The bugfix does not appear in a release until a release actually is issued.
You want to read (or modify) the C and C++ code that makes up MySQL. For this purpose, you should get a source distribution, because the source code is always the ultimate manual.
Source distributions contain more tests and examples than binary distributions.
MySQL is evolving quite rapidly and we want to share new developments with other MySQL users. We try to produce a new release whenever we have new and useful features that others also seem to have a need for.
We also try to help users who request features that are easy to implement. We take note of what our licensed users want, and we especially take note of what our support customers want and try to help them in this regard.
No one is required to download a new release. The News section helps you determine whether the new release has something you really want. See Appendix D, MySQL Release Notes.
We use the following policy when updating MySQL:
Enterprise Server releases are meant to appear every 18 months, supplemented by quarterly service packs and monthly rapid updates. Community Server releases are meant to appear 2 to 3 times per year.
Releases are issued within each series. For each release, the last number in the version is one more than the previous release within the same series.
Binary distributions for some platforms are made by us for major releases. Other people may make binary distributions for other systems, but probably less frequently.
We make fixes available as soon as we have identified and corrected small or noncritical but annoying bugs. The fixes are available in source form immediately from our public Bazaar repositories, and are included in the next release.
If by any chance a security vulnerability or critical bug is found in a release, our policy is to fix it in a new release as soon as possible. (We would like other companies to do this, too!)
Check our downloads page at http://dev.mysql.com/downloads/ for information about the current version of MySQL and for downloading instructions. For a complete up-to-date list of MySQL download mirror sites, see http://dev.mysql.com/downloads/mirrors.html. You can also find information there about becoming a MySQL mirror site and how to report a bad or out-of-date mirror.
To obtain the latest development source, see Section 2.9.3, “Installing MySQL from a Development Source Tree”.
After you have downloaded the MySQL package that suits your needs and before you attempt to install it, you should make sure that it is intact and has not been tampered with. There are three means of integrity checking:
MD5 checksums
Cryptographic signatures using
GnuPG, the GNU Privacy GuardFor RPM packages, the built-in RPM integrity verification mechanism
The following sections describe how to use these methods.
If you notice that the MD5 checksum or GPG signatures do not match, first try to download the respective package one more time, perhaps from another mirror site.
After you have downloaded a MySQL package, you should make sure
that its MD5 checksum matches the one provided on the MySQL
download pages. Each package has an individual checksum that you
can verify with the following command, where
package_name is the name of the
package you downloaded:
shell> md5sum package_name
Example:
shell> md5sum mysql-standard-5.6.10-linux-i686.tar.gz
aaab65abbec64d5e907dcd41b8699945  mysql-standard-5.6.10-linux-i686.tar.gz
You should verify that the resulting checksum (the string of hexadecimal digits) matches the one displayed on the download page immediately below the respective package.
Make sure to verify the checksum of the archive
file (for example, the .zip or
.tar.gz file) and not of the files that
are contained inside of the archive.
Note that not all operating systems support the
md5sum command. On some, it is simply called
md5, and others do not ship it at all. On
Linux, it is part of the GNU Text
Utilities package, which is available for a wide
range of platforms. You can download the source code from
http://www.gnu.org/software/textutils/ as well.
If you have OpenSSL installed, you can use the command
openssl md5
package_name instead. A
Windows implementation of the md5 command
line utility is available from
http://www.fourmilab.ch/md5/.
winMd5Sum is a graphical MD5 checking tool
that can be obtained from
http://www.nullriver.com/index/products/winmd5sum.
Another method of verifying the integrity and authenticity of a package is to use cryptographic signatures. This is more reliable than using MD5 checksums, but requires more work.
We sign MySQL downloadable packages with GnuPG (GNU Privacy Guard). GnuPG is an Open Source alternative to the well-known Pretty Good Privacy (PGP) by Phil Zimmermann. See http://www.gnupg.org/ for more information about GnuPG and how to obtain and install it on your system. Most Linux distributions ship with GnuPG installed by default. For more information about GnuPG, see http://www.openpgp.org/.
To verify the signature for a specific package, you first need
to obtain a copy of our public GPG build key, which you can
download from http://pgp.mit.com/. The key that
you want to obtain is named
[email protected]. Alternatively,
you can cut and paste the key directly from the following text:
-----BEGIN PGP PUBLIC KEY BLOCK-----
Version: PGP Universal 2.9.1 (Build 347)

mQGiBD4+owwRBAC14GIfUfCyEDSIePvEW3SAFUdJBtoQHH/nJKZyQT7h9bPlUWC3
RODjQReyCITRrdwyrKUGku2FmeVGwn2u2WmDMNABLnpprWPkBdCk96+OmSLN9brZ
fw2vOUgCmYv2hW0hyDHuvYlQA/BThQoADgj8AW6/0Lo7V1W9/8VuHP0gQwCgvzV3
BqOxRznNCRCRxAuAuVztHRcEAJooQK1+iSiunZMYD1WufeXfshc57S/+yeJkegNW
hxwR9pRWVArNYJdDRT+rf2RUe3vpquKNQU/hnEIUHJRQqYHo8gTxvxXNQc7fJYLV
K2HtkrPbP72vwsEKMYhhr0eKCbtLGfls9krjJ6sBgACyP/Vb7hiPwxh6rDZ7ITnE
kYpXBACmWpP8NJTkamEnPCia2ZoOHODANwpUkP43I7jsDmgtobZX9qnrAXw+uNDI
QJEXM6FSbi0LLtZciNlYsafwAPEOMDKpMqAK6IyisNtPvaLd8lH0bPAnWqcyefep
rv0sxxqUEMcM3o7wwgfN83POkDasDbs3pjwPhxvhz6//62zQJ7Q2TXlTUUwgUmVs
ZWFzZSBFbmdpbmVlcmluZyA8bXlzcWwtYnVpbGRAb3NzLm9yYWNsZS5jb20+iGYE
ExECACYCGyMGCwkIBwMCBBUCCAMEFgIDAQIeAQIXgAUCTnc+KgUJE/sCFQAKCRCM
cY07UHLh9SbMAJ4l1+qBz2BZNSGCZwwA6YbhGPC7FwCgp8z5TzIw4YQuL5NGJ/sy
0oSazqmJASIEEAECAAwFAk53QS4FAwASdQAACgkQlxC4m8pXrXwJ8Qf/be/UO9mq
foc2sMyhwMpN4/fdBWwfLkA12FXQDOQMvwH9HsmEjnfUgYKXschZRi+DuHXe1P7l
8G2aQLubhBsQf9ejKvRFTzuWMQkdIq+6Koulxv6ofkCcv3d1xtO2W7nb5yxcpVBP
rRfGFGebJvZa58DymCNgyGtAU6AOz4veavNmI2+GIDQsY66+tYDvZ+CxwzdYu+HD
V9HmrJfc6deM0mnBn7SRjqzxJPgoTQhihTav6q/R5/2p5NvQ/H84OgS6GjosfGc2
duUDzCP/kheMRKfzuyKCOHQPtJuIj8++gfpHtEU7IDUX1So3c9n0PdpeBvclsDbp
RnCNxQWU4mBot7kCDQQ+PqMdEAgA7+GJfxbMdY4wslPnjH9rF4N2qfWsEN/lxaZo
JYc3a6M02WCnHl6ahT2/tBK2w1QI4YFteR47gCvtgb6O1JHffOo2HfLmRDRiRjd1
DTCHqeyX7CHhcghj/dNRlW2Z0l5QFEcmV9U0Vhp3aFfWC4Ujfs3LU+hkAWzE7zaD
5cH9J7yv/6xuZVw411x0h4UqsTcWMu0iM1BzELqX1DY7LwoPEb/O9Rkbf4fmLe11
EzIaCa4PqARXQZc4dhSinMt6K3X4BrRsKTfozBu74F47D8Ilbf5vSYHbuE5p/1oI
Dznkg/p8kW+3FxuWrycciqFTcNz215yyX39LXFnlLzKUb/F5GwADBQf+Lwqqa8CG
rRfsOAJxim63CHfty5mUc5rUSnTslGYEIOCR1BeQauyPZbPDsDD9MZ1ZaSafanFv
wFG6Llx9xkU7tzq+vKLoWkm4u5xf3vn55VjnSd1aQ9eQnUcXiL4cnBGoTbOWI39E
cyzgslzBdC++MPjcQTcA7p6JUVsP6oAB3FQWg54tuUo0Ec8bsM8b3Ev42LmuQT5N
dKHGwHsXTPtl0klk4bQk4OajHsiy1BMahpT27jWjJlMiJc+IWJ0mghkKHt926s/y
mfdf5HkdQ1cyvsz5tryVI3Fx78XeSYfQvuuwqp2H139pXGEkg0n6KdUOetdZWhe7
0YGNPw1yjWJT1IhUBBgRAgAMBQJOdz3tBQkT+wG4ABIHZUdQRwABAQkQjHGNO1By
4fUUmwCbBYr2+bBEn/L2BOcnw9Z/QFWuhRMAoKVgCFm5fadQ3Afi+UQlAcOphrnJ
=Eto8
-----END PGP PUBLIC KEY BLOCK-----
To import the build key into your personal public GPG keyring,
use gpg --import. For example, if you have
saved the key in a file named
mysql_pubkey.asc, the import command looks
like this:
shell> gpg --import mysql_pubkey.asc
gpg: key 5072E1F5: public key "MySQL Release Engineering
<[email protected]>" imported
gpg: Total number processed: 1
gpg:               imported: 1
gpg: no ultimately trusted keys found
You can also download the key from the public keyserver using
the public key id, 5072E1F5:
shell> gpg --recv-keys 5072E1F5
gpg: requesting key 5072E1F5 from hkp server keys.gnupg.net
gpg: key 5072E1F5: "MySQL Release Engineering <[email protected]>"
1 new user ID
gpg: key 5072E1F5: "MySQL Release Engineering <[email protected]>"
53 new signatures
gpg: no ultimately trusted keys found
gpg: Total number processed: 1
gpg:           new user IDs: 1
gpg:         new signatures: 53
If you want to import the key into your RPM configuration to validate RPM install packages, you should be able to import the key directly:
shell> rpm --import mysql_pubkey.asc
If you experience problems, try exporting the key from gpg and importing:
shell> gpg --export -a 5072e1f5 > 5072e1f5.asc
shell> rpm --import 5072e1f5.asc
Alternatively, rpm also supports loading the key directly from a URL, and you cas use this manual page:
shell> rpm --import http://dev.mysql.com/doc/refman/5.6/en/checking-gpg-signature.html
After you have downloaded and imported the public build key,
download your desired MySQL package and the corresponding
signature, which also is available from the download page. The
signature file has the same name as the distribution file with
an .asc extension, as shown by the examples
in the following table.
Table 2.1. MySQL Package and Signature Files
| File Type | File Name |
|---|---|
| Distribution file | mysql-standard-5.6.10-linux-i686.tar.gz |
| Signature file | mysql-standard-5.6.10-linux-i686.tar.gz.asc |
Make sure that both files are stored in the same directory and then run the following command to verify the signature for the distribution file:
shell> gpg --verify package_name.asc
Example:
shell> gpg --verify mysql-standard-5.6.10-linux-i686.tar.gz.asc
gpg: Signature made Tue 01 Feb 2011 02:38:30 AM CST using DSA key ID 5072E1F5
gpg: Good signature from "MySQL Release Engineering <[email protected]>"
The Good signature message indicates that
everything is all right. You can ignore any insecure
memory warning you might obtain.
See the GPG documentation for more information on how to work with public keys.
For RPM packages, there is no separate signature. RPM packages have a built-in GPG signature and MD5 checksum. You can verify a package by running the following command:
shell> rpm --checksig package_name.rpm
Example:
shell> rpm --checksig MySQL-server-5.6.10-0.glibc23.i386.rpm
MySQL-server-5.6.10-0.glibc23.i386.rpm: md5 gpg OK
If you are using RPM 4.1 and it complains about (GPG)
NOT OK (MISSING KEYS: GPG#5072e1f5), even though you
have imported the MySQL public build key into your own GPG
keyring, you need to import the key into the RPM keyring
first. RPM 4.1 no longer uses your personal GPG keyring (or
GPG itself). Rather, RPM maintains a separate keyring because
it is a system-wide application and a user's GPG public
keyring is a user-specific file. To import the MySQL public
key into the RPM keyring, first obtain the key as described in
Section 2.1.4.2, “Signature Checking Using GnuPG”. Then use
rpm --import to import the key. For
example, if you have saved the public key in a file named
mysql_pubkey.asc, import it using this
command:
shell> rpm --import mysql_pubkey.asc
If you need to obtain the MySQL public key, see
Section 2.1.4.2, “Signature Checking Using GnuPG”.
The installation layout differs for different installation types (for example, native packages, binary tarballs, and source tarballs), which can lead to confusion when managing different systems or using different installation sources. The individual layouts are given in the corresponding installation type or platform chapter, as described following. Note that the layout of installations from vendors other than Oracle may differ from these layouts.
In some cases, the compiler used to build MySQL affects the features available for use. The notes in this section apply for binary distributions provided by Oracle Corporation or that you compile yourself from source.
icc (Intel C++ Compiler) Builds
A server built with icc has these characteristics:
SSL support is not included.
Oracle provides a set of binary distributions of MySQL. These
include binary distributions in the form of compressed
tar files (files with a
.tar.gz extension) for a number of platforms,
as well as binaries in platform-specific package formats for
selected platforms.
This section covers the installation of MySQL from a compressed tar file binary distribution. For other platform-specific package formats, see the other platform-specific sections. For example, for Windows distributions, see Section 2.3, “Installing MySQL on Microsoft Windows”.
To obtain MySQL, see Section 2.1.3, “How to Get MySQL”.
MySQL compressed tar file binary distributions
have names of the form
mysql-,
where VERSION-OS.tar.gzVERSION5.6.10), and
OS indicates the type of operating system
for which the distribution is intended (for example,
pc-linux-i686 or winx64).
To install MySQL from a compressed tar file
binary distribution, your system must have GNU
gunzip to uncompress the distribution and a
reasonable tar to unpack it. If your
tar program supports the z
option, it can both uncompress and unpack the file.
GNU tar is known to work. The standard
tar provided with some operating systems is not
able to unpack the long file names in the MySQL distribution. You
should download and install GNU tar, or if
available, use a preinstalled version of GNU tar. Usually this is
available as gnutar, gtar, or
as tar within a GNU or Free Software directory,
such as /usr/sfw/bin or
/usr/local/bin. GNU tar is
available from http://www.gnu.org/software/tar/.
If you have previously installed MySQL using your operating system
native package management system, such as yum
or apt-get, you may experience problems
installing using a native binary. Make sure your previous MySQL
previous installation has been removed entirely (using your
package management system), and that any additional files, such as
old versions of your data files, have also been removed. You
should also check the existence of configuration files such as
/etc/my.cnf or the
/etc/mysql directory have been deleted.
If you run into problems and need to file a bug report, please use the instructions in Section 1.7, “How to Report Bugs or Problems”.
On Unix, to install a compressed tar file binary
distribution, unpack it at the installation location you choose
(typically /usr/local/mysql). This creates the
directories shown in the following table.
Table 2.2. MySQL Installation Layout for Generic Unix/Linux Binary Package
| Directory | Contents of Directory |
|---|---|
bin | Client programs and the mysqld server |
data | Log files, databases |
docs | Manual in Info format |
man | Unix manual pages |
include | Include (header) files |
lib | Libraries |
scripts | mysql_install_db |
share | Miscellaneous support files, including error messages, sample configuration files, SQL for database installation |
sql-bench | Benchmarks |
Debug versions of the mysqld binary are available as mysqld-debug. To compile your own debug version of MySQL from a source distribution, use the appropriate configuration options to enable debugging support. For more information on compiling from source, see Section 2.9, “Installing MySQL from Source”.
To install and use a MySQL binary distribution, the basic command sequence looks like this:
shell>groupadd mysqlshell>useradd -r -g mysql mysqlshell>cd /usr/localshell>tar zxvfshell>/path/to/mysql-VERSION-OS.tar.gzln -sshell>full-path-to-mysql-VERSION-OSmysqlcd mysqlshell>chown -R mysql .shell>chgrp -R mysql .shell>scripts/mysql_install_db --user=mysqlshell>chown -R root .shell>chown -R mysql data# Next command is optional shell>cp support-files/my-medium.cnf /etc/my.cnfshell>bin/mysqld_safe --user=mysql &# Next command is optional shell>cp support-files/mysql.server /etc/init.d/mysql.server
A more detailed version of the preceding description for installing a binary distribution follows.
This procedure assumes that you have root
(administrator) access to your system. Alternatively, you can
prefix each command using the sudo (Linux) or
pfexec (OpenSolaris) command.
The procedure does not set up any passwords for MySQL accounts. After following the procedure, proceed to Section 2.10, “Postinstallation Setup and Testing”.
Create a mysql User and Group
If your system does not already have a user and group for
mysqld to run as, you may need to create one. The
following commands add the mysql group and the
mysql user. You might want to call the user and
group something else instead of mysql. If so,
substitute the appropriate name in the following instructions. The
syntax for useradd and
groupadd may differ slightly on different
versions of Unix, or they may have different names such as
adduser and addgroup.
shell>groupadd mysqlshell>useradd -r -g mysql mysql
Because the user is required only for ownership purposes, not
login purposes, the useradd command uses the
-r option to create a user that does not have
login permissions to your server host. Omit this option to permit
logins for the user (or if your useradd does
not support the option).
Obtain and Unpack the Distribution
Pick the directory under which you want to unpack the distribution
and change location into it. The example here unpacks the
distribution under /usr/local. The
instructions, therefore, assume that you have permission to create
files and directories in /usr/local. If that
directory is protected, you must perform the installation as
root.
shell> cd /usr/local
Obtain a distribution file using the instructions in Section 2.1.3, “How to Get MySQL”. For a given release, binary distributions for all platforms are built from the same MySQL source distribution.
Unpack the distribution, which creates the installation directory.
Then create a symbolic link to that directory.
tar can uncompress and unpack the distribution if
it has z option support:
shell>tar zxvfshell>/path/to/mysql-VERSION-OS.tar.gzln -sfull-path-to-mysql-VERSION-OSmysql
The tar command creates a directory named
mysql-.
The VERSION-OSln command makes a symbolic link to that
directory. This enables you to refer more easily to the installation
directory as /usr/local/mysql.
If your tar does not have z
option support, use gunzip to unpack the
distribution and tar to unpack it. Replace the
preceding tar command with the following
alternative command to uncompress and extract the distribution:
shell> gunzip < /path/to/mysql-VERSION-OS.tar.gz | tar xvf -
Perform Postinstallation Setup
The remainder of the installation process involves setting up the configuration file, creating the core databases, and starting the MySQL server. For instructions, see Section 2.10, “Postinstallation Setup and Testing”.
The accounts that are listed in the MySQL grant tables initially have no passwords. After starting the server, you should set up passwords for them using the instructions in Section 2.10, “Postinstallation Setup and Testing”.
- 2.3.1. MySQL Installation Layout on Microsoft Windows
- 2.3.2. Choosing An Installation Package
- 2.3.3. Installing MySQL on Microsoft Windows Using MySQL Installer
- 2.3.4. Installing MySQL on Microsoft Windows Using a
noinstallZip Archive - 2.3.5. Troubleshooting a Microsoft Windows MySQL Server Installation
- 2.3.6. Upgrading MySQL on Windows
- 2.3.7. Windows Postinstallation Procedures
A native Windows distribution of MySQL has been available since version 3.21 and represents a sizable percentage of the daily downloads of MySQL. This section describes the process for installing MySQL on Windows.
If you are upgrading MySQL from an existing installation older than MySQL 4.1.5, you must first perform the procedure described in Section 2.3.6, “Upgrading MySQL on Windows”.
To run MySQL on Windows, you need the following:
A Windows operating system such as Windows XP, Windows Vista, Windows Server 2003, Windows Server 2008, or Windows 7. Both 32-bit and 64-bit versions are supported. See the supported platforms listing for a detailed list.
A Windows operating system permits you to run the MySQL server as a service. See Section 2.3.4.8, “Starting MySQL as a Windows Service”.
Generally, you should install MySQL on Windows using an account that has administrator rights. Otherwise, you may encounter problems with certain operations such as editing the
PATHenvironment variable or accessing the Service Control Manager. Once installed, MySQL does not need to be executed using a user with Administrator privileges.TCP/IP protocol support.
Enough space on the hard drive to unpack, install, and create the databases in accordance with your requirements (generally a minimum of 200 megabytes is recommended.)
For a list of limitations within the Windows version of MySQL, see Section E.10.5, “Windows Platform Limitations”.
There may also be other requirements, depending on how you plan to use MySQL:
If you plan to connect to the MySQL server using ODBC, you need a Connector/ODBC driver. See Section 21.1, “MySQL Connector/ODBC”.
If you plan to use MySQL server with ADO.NET applications, you need the Connector/Net driver. See Section 21.2, “MySQL Connector/Net”.
If you need tables with a size larger than 4GB, install MySQL on an NTFS or newer file system. Do not forget to use
MAX_ROWSandAVG_ROW_LENGTHwhen you create tables. See Section 13.1.14, “CREATE TABLESyntax”.
MySQL for Windows is available in several distribution formats:
Binary distributions are available that contain a setup program that installs everything you need so that you can start the server immediately. For details, see Section 2.3.2, “Choosing An Installation Package”.
Or the source distribution that contains all of the code and support files for building the executables using the Visual Studio compiler system.
Generally speaking, you should use a binary distribution that includes MySQL Installer. It is simpler to use than the others, and you do not require additional tools to get MySQL up and running. The MySQL Installer is used to both install and upgrade MySQL products, and includes a GUI interface to configure the MySQL Server during set up, which also creates a MySQL Server configuration file, starts the server, and configures the default user accounts.
Using virus scanning software such as Norton/Symantec Anti-Virus on directories containing MySQL data and temporary tables can cause issues, both in terms of the performance of MySQL and the virus-scanning software mis-identifying the contents of the files as containing spam. This is because of the fingerprinting mechanism used by the virus scanning software, and the way in which MySQL rapidly updates different files, which may be identified as a potential security risk.
After installing MySQL Server, it is recommended that you disable
virus scanning on the main directory
(datadir) being used to store
your MySQL table data. There is usually a system built into the
virus scanning software to enable certain directories to be
specifically ignored during virus scanning.
In addition, by default, MySQL creates temporary files in the
standard Windows temporary directory. To prevent the temporary
files also being scanned, you should configure a separate
temporary directory for MySQL temporary files and add this to the
virus scanning exclusion list. To do this, add a configuration
option for the tmpdir parameter to
your my.ini configuration file. For more
information, see Section 2.3.4.2, “Creating an Option File”.
The following section describes how to install MySQL on Windows
using a binary distribution. To use an installation package that
does not include an installer, follow the procedure described in
Section 2.3.4, “Installing MySQL on Microsoft Windows Using a
noinstall Zip Archive”. To install using a source
distribution, see Section 2.9, “Installing MySQL from Source”.
MySQL distributions for Windows can be downloaded from http://dev.mysql.com/downloads/. See Section 2.1.3, “How to Get MySQL”.
For MySQL 5.6 on Windows, the default installation
directory is C:\Program Files\MySQL\MySQL Server
5.6. Some Windows users prefer to install
in C:\mysql, the directory that formerly was
used as the default. However, the layout of the subdirectories
remains the same.
All of the files are located within this parent directory, using the structure shown in the following table.
Table 2.3. MySQL Installation Layout for Windows
| Directory | Contents of Directory |
|---|---|
bin | Client programs and the mysqld server |
C:\Documents and Settings\All Users\Application
Data\MySQL | Log files, databases (Windows XP, Windows Server 2003) |
C:\ProgramData\MySQL | Log files, databases (Windows 7, Windows Server 2008) |
examples | Example programs and scripts |
include | Include (header) files |
lib | Libraries |
scripts | Utility scripts |
share | Miscellaneous support files, including error messages, character set files, sample configuration files, SQL for database installation |
If you install MySQL using the MySQL Installer, this package creates and sets
up the data directory that the installed server will use, but also
creates a pristine “template” data directory named
data under the installation directory. After
an installation has been performed using this package, the
template data directory can be copied to set up additional MySQL
instances. See Section 5.4, “Running Multiple MySQL Instances on One Machine”.
For MySQL 5.6, there are installation package formats to choose from when installing MySQL on Windows:
MySQL Installer: This package has a file name similar to
mysql-installer-community-5.6.10-rc.0.msiand is recommended for most users. It is used to both install and upgrade the MySQL Server, along with other MySQL products such as the MySQL Notifier for Microsoft Windows.The Noinstall Archive: This package has a file name similar to
mysql-5.6.10-win32.zipand contains all the files found in the Complete install package, with the exception of the GUI. This package does not include an automated installer, and must be manually installed and configured.The source code: This package has a file name similar to
mysql-5.6.10.zipand contains the source code for compiling the MySQL Server on Windows.
Your choice of install package affects the installation process
you must follow. If you choose to use MySQL Installer, see
Section 2.3.3, “Installing MySQL on Microsoft Windows Using MySQL Installer”. If you choose to install a Noinstall
archive, see Section 2.3.4, “Installing MySQL on Microsoft Windows Using a
noinstall Zip Archive”.
MySQL Installer is an application that simplifies the installation and updating process for a wide range of MySQL products, including MySQL Notifier for Microsoft Windows, MySQL Workbench, and MySQL for Excel. From this central application, you can see which MySQL products are already installed, configure them, and update or remove them if necessary. The installer can also install plugins, documentation, tutorials, and example databases. The MySQL Installer is only available for Microsoft Windows, and includes both a GUI and command-line interface.
Download MySQL Installer at http://dev.mysql.com/downloads/installer/
The MySQL Installer Change History (Changelog) is located along with the main Changelog for MySQL. See Section D.9, “MySQL Installer Change History”.
MySQL Installer is compatible with pre-existing installations, and adds them to its list of installed components. And while the MySQL Installer is bundled with a specific version of MySQL Server, a single MySQL Installer instance can install and manage multiple MySQL Server versions. For example, a single MySQL Installer instance can install versions 5.1, 5.5, and 5.6. It can also manage both commercial and community versions of the MySQL Server.
MySQL Installer handles the initial configuration and setup of the applications. For example:
It will create MySQL Server connections in MySQL Workbench.
It creates the configuration file (
my.ini) that is used to configure the MySQL Server.It imports example databases.
It creates MySQL Server user accounts with configurable permissions based on general roles, such as DB Administrator, DB Designer, and Backup Admin. It optionally creates a Windows user named
MysqlSyswith limited privileges, which would then run the MySQL Server.This feature is only available during the initial installation of the MySQL Server, and not during future updates. User accounts may also be added with MySQL Workbench.
If the "Advanced Configuration" option is checked, then the Logging Options are also configured. This includes defining file paths for the error log, general log, slow query log (including the configuration of seconds it requires to execute a query), and the binary log.
MySQL Installer can optionally check for updated components and download them for you automatically.
After installation of the GUI version, the installer will have add its own Start Menu item under MySQL.
Files that are generated by MySQL Installer grant full permissions to the
user that executes MySQL Installer, including my.ini.
This does not apply to files and directories for specific
products such as the MySQL Server data directory in
ProgramData, that is owned by
SYSTEM.
After the installer itself has been installed and started, the following screen is displayed:
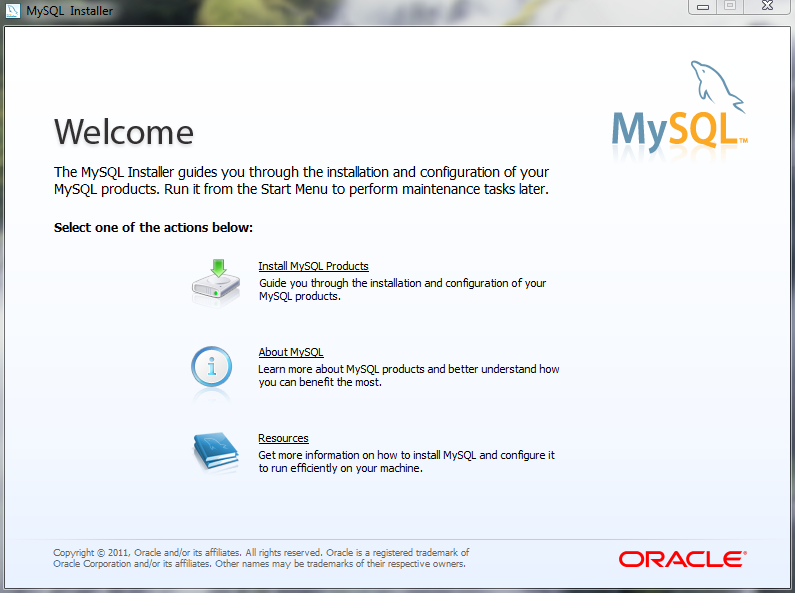
There are three main options:
Install MySQL Products - The Installation Wizard.
About MySQL - Learn about MySQL products and features.
Resources - Information to help install and configure MySQL.
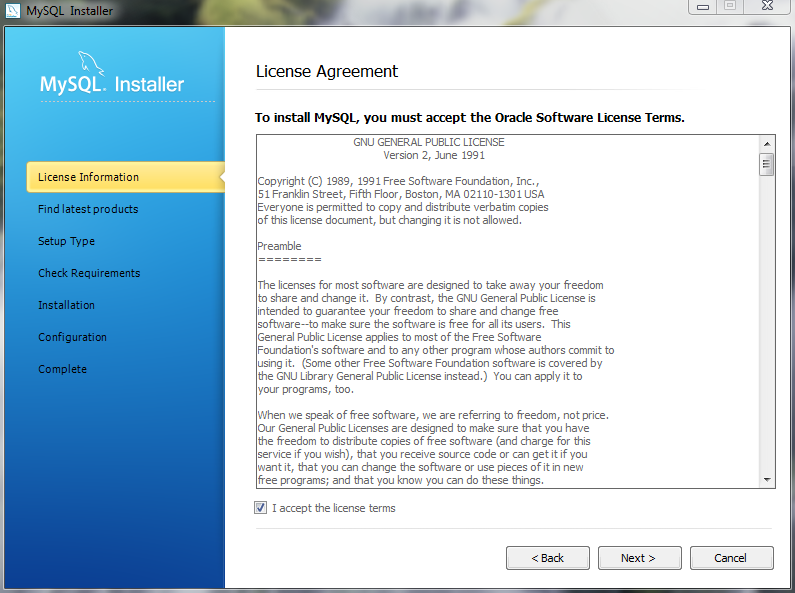
To Install MySQL Products after executing MySQL Installer for the first time, you must accept the license agreement before proceeding with the installation process.
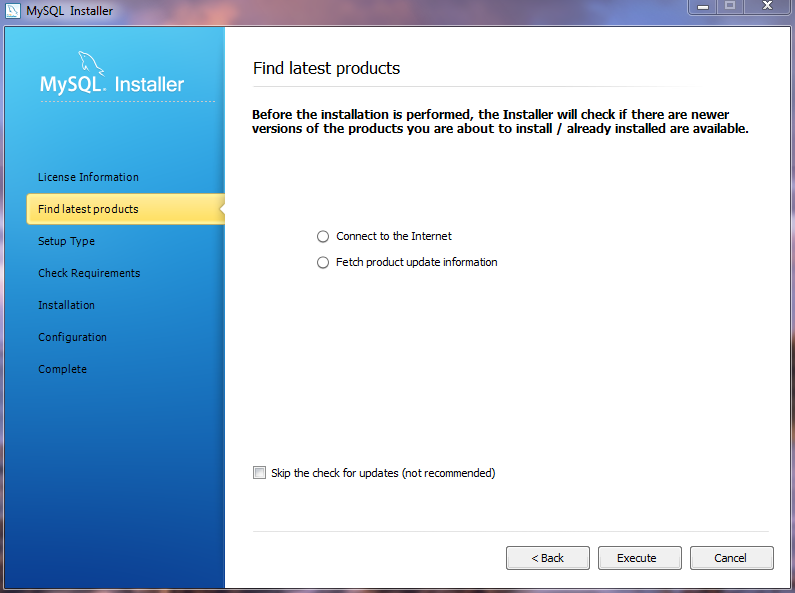
If you are connected to the Internet, then the Installer will
search for the latest MySQL components and add them to the
installation bundle. Click to complete this step, or otherwise check
the Skip checkbox and then
.
If you chose "Connect to the Internet," the next page will show the progress of MySQL Installer's search for available updates. When the search is complete (or if you opted to skip the search), you will be taken to the Choose Setup Type page:
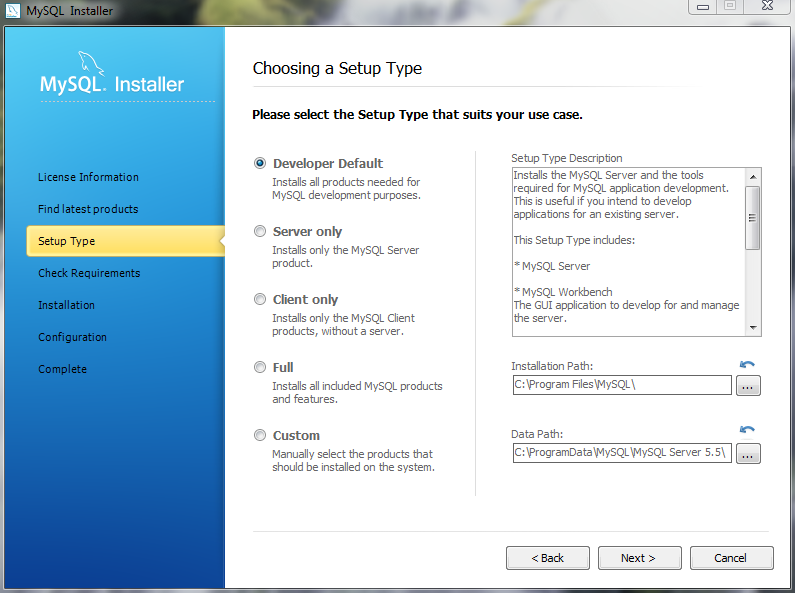
Each type contains a description, so read the Setup Type
Description to determine the option most compatible
with your preferences.
The Installation and Data paths are also defined here, and a caution flag will notify you if the data path you define already exists.
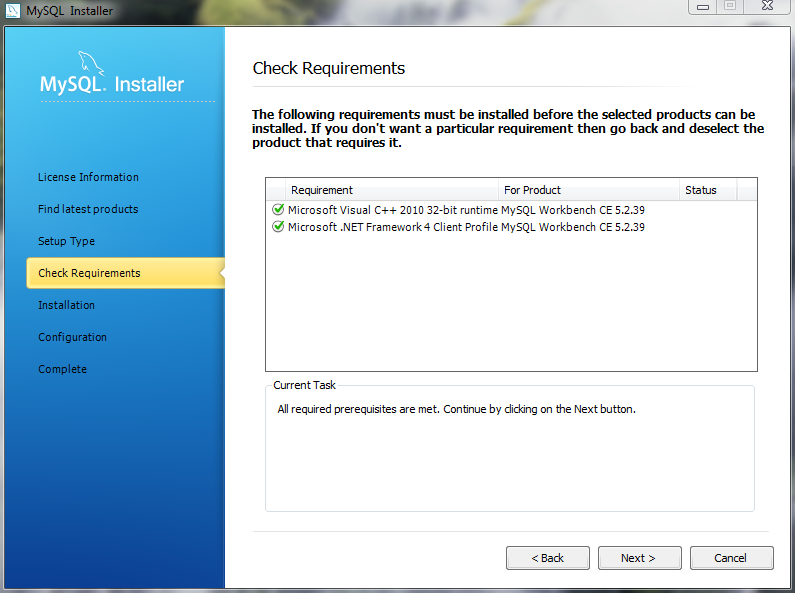
After you select a setup type, the MySQL Installer will check your system for the necessary external requirements and download then install missing components onto your system.
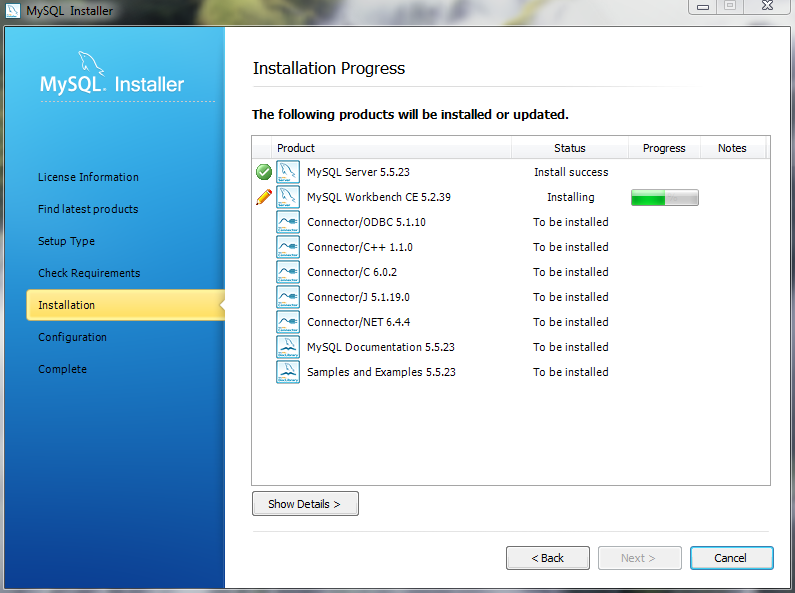
The next window lists the MySQL components that are scheduled to be installed:
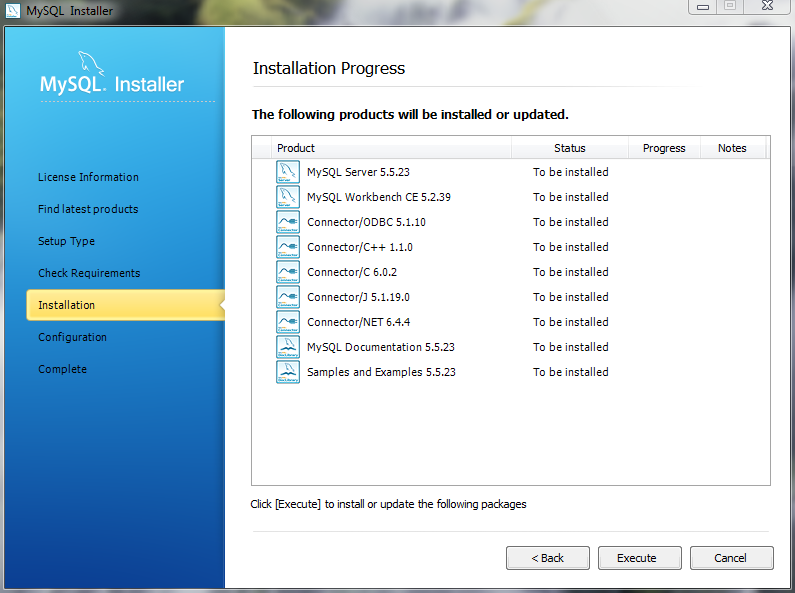
As components are installed, you'll see their status change from "to be installed" to "install success."
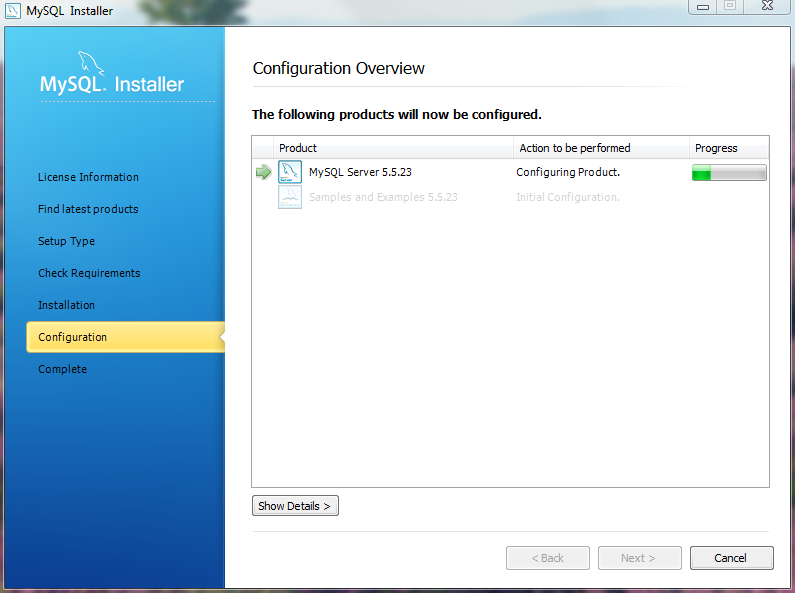
After all components are installed, the next step involves
configuring the products. The Configuration
Overview window displays the progress and then loads a
configuration window if it is required.
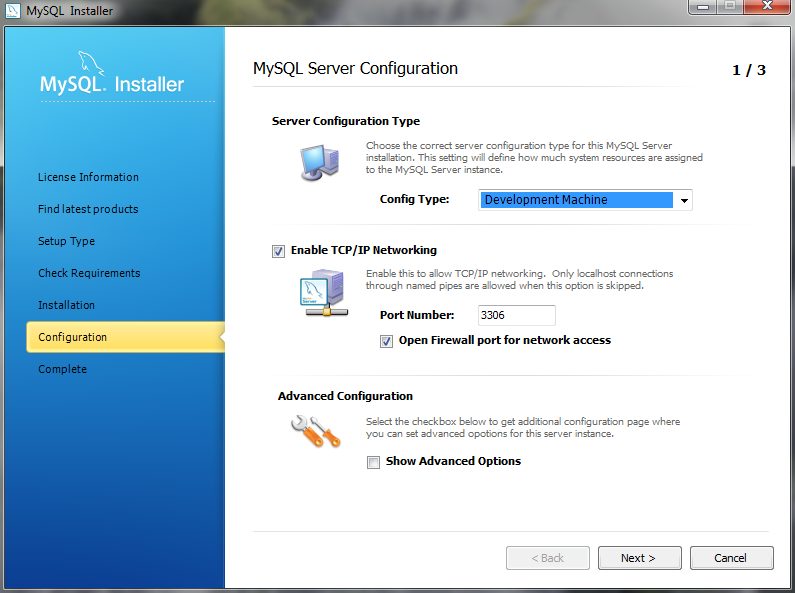
The ideal MySQL Server configuration depends on your intended use, as explained in the next window. Choose the description that most closely applies to your machine.
You may enable TCP/IP Networking here as otherwise only localhost connections are allowed.
Checking the "Advanced Configuration" option provides additional Logging Options to configure. This includes defining file paths for the error log, general log, slow query log (including the configuration of seconds it requires to execute a query), and the binary log.
Figure 2.9. MySQL Installer - MySQL Server Configuration: Define platform, networking, and logging options
Next, choose your account information. Defining a root password is required, whereas it's optional to create additional users. There are several different predefined user roles that each have different permission levels. For example, a "DB Admin" will have more privileges than a "DB Designer.".
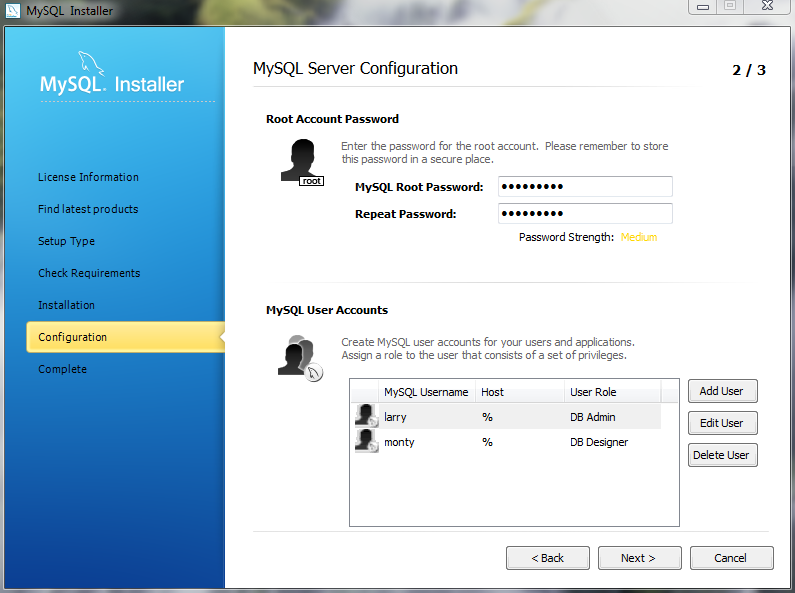
If the MySQL Server is already installed, then the
Current Root Password will also be needed.
Next, configure the Windows Service Details. This includes the name, whether MySQL Server should be loaded at startup, and how the Windows Service for MySQL Server will be run. Choosing MysqlSys User will create a MySQL Windows user with limited privileges that will run the MySQL Server.
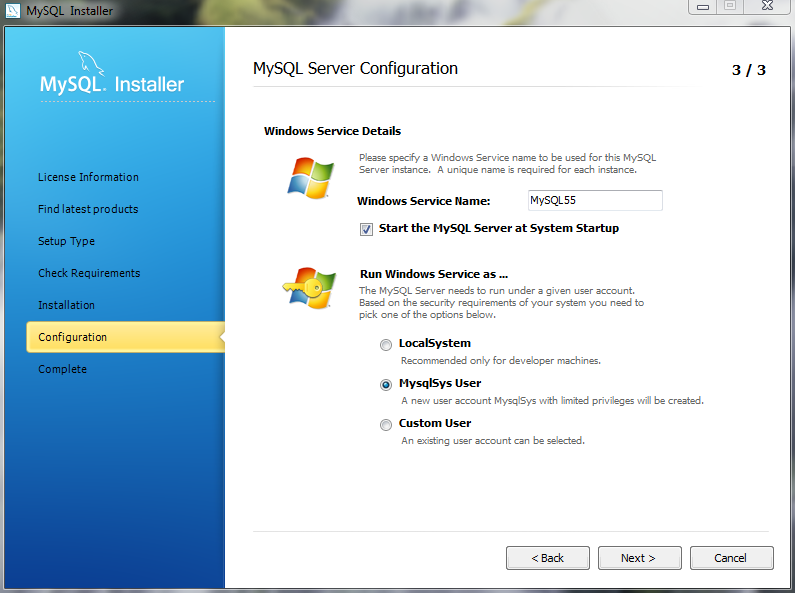
When configuring Run Windows Services as ... using a Custom User, the custom user must have privileges to log on to Windows as a service. And the button will be disabled until this user is given these user rights.
On Microsoft Windows 7, this is configured by loading the
Start Menu, Control Panel,
Administrative Tools, Local Security
Policy, Local Policies,
User Rights Assignment, then Log On
As A Service. Choose Add User or
Group here to add the custom user, and then
, to save.
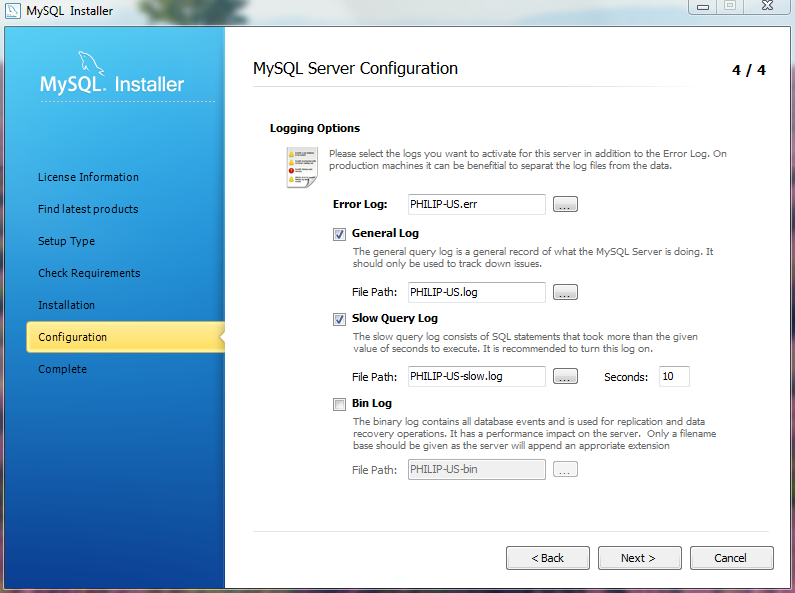
The final configuration step is available if the Advanced Configuration option was checked, and it includes configuration options related to log file names:
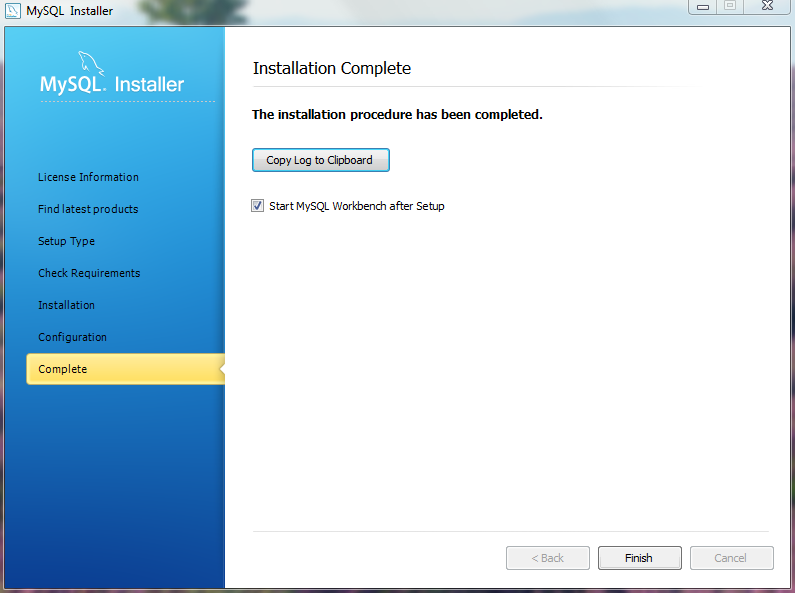
After the MySQL Installer configuration process is completed, you may save the installation log, and then load MySQL Workbench if the Start MySQL Workbench after Setup option is checked:
You can now open MySQL Installer from the Microsoft Windows Start menu under
the MySQL group, which will load the MySQL Installer
Maintenance Screen. This is used to add,
update, and remove features.
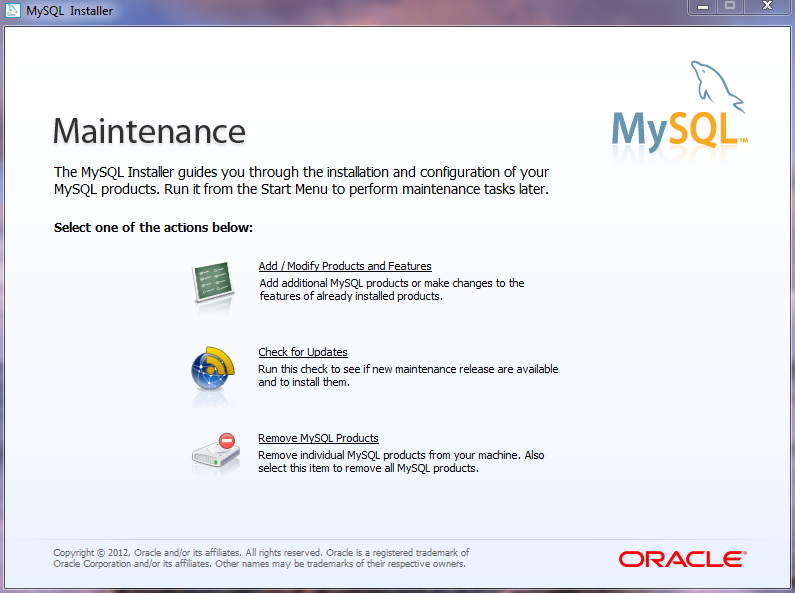
An Update Screen screen is shown if MySQL Installer is
used on a machine with older products installed, as opposed to
the Maintenance Screen shown above. However,
the functionality remains the same.
See also the MySQL Workbench documentation (http://dev.mysql.com/doc/workbench/en/).
MySQLInstallerConsole provides functionality
similar to the GUI version of MySQL Installer, but from the command-line. It
is installed when MySQL Installer is initially executed, and then available
within the MySQL Installer directory.
Typically that is in C:\Program Files (x86)\MySQL\MySQL
Installer\, and the console must be executed with
administrative privileges.
To use, invoke the Command Prompt with administrative privileges
by choosing ,
, then right-click on
and choose Run as
administrator. And from the command-line, optionally
change the directory to where
MySQLInstallerConsole is located:
C:\> cd "C:\Program Files (x86)\MySQL\MySQL Installer"
MySQLInstallerConsole supports the following options, which are specified on the command line:
Displays a help message with usage examples, and then exits.
C:\>
MySQLInstallerConsole--helpChecks for new products before any further action is taken. Disabled by default.
Skips the final pause when the program finishes. Otherwise, a "
Press Enter to continue." dialogue is generated. It is used in conjunction with other options.--catalog=catalog_name(or-c)Sets the default catalog. Use
--listto view a list of available catalogs.--type=installation_type(or-t)Sets the installation type.
The possible values for
installation_typeare: developer, server, client, full, and custom.The action being performed.
The possible values are: install, remove, upgrade, list, and status.
install: Installs a product or products, as defined by
--productsupgrade: Upgrades a product or products, as defined by
--products.remove: Removes a product or products, as defined by
--products.list: Lists the product manifest, both installed and available products.
status: Shows the status after another action is performed.
--product=product_name[:feature1],[feature2], [...] (or-p)Set the feature list of a product. Use
--listto view available products, or pass in--product=*(an asterisk) to install all available products.--config=product_name:passwd=root_password[;parameter1=value],[;parameter2=value], ...The configuration parameters for the most recently listed products.
--user=product_name:name=username,host:hostname,role=rolename,password=passwordor--user=product_name:name=username,host:hostname,role=rolename,tokens=tokensCreates a new user.
Requires: name, host, role, and the password or tokens. Tokens are separated by pipe ("|") characters.
- 2.3.4.1. Extracting the Install Archive
- 2.3.4.2. Creating an Option File
- 2.3.4.3. Selecting a MySQL Server Type
- 2.3.4.4. Starting the Server for the First Time
- 2.3.4.5. Starting MySQL from the Windows Command Line
- 2.3.4.6. MySQL Notifier for Microsoft Windows
- 2.3.4.7. Customizing the PATH for MySQL Tools
- 2.3.4.8. Starting MySQL as a Windows Service
- 2.3.4.9. Testing The MySQL Installation
Users who are installing from the Noinstall package can use the instructions in this section to manually install MySQL. The process for installing MySQL from a Zip archive is as follows:
Extract the archive to the desired install directory
Create an option file
Choose a MySQL server type
Start the MySQL server
Secure the default user accounts
This process is described in the sections that follow.
To install MySQL manually, do the following:
If you are upgrading from a previous version please refer to Section 2.3.6, “Upgrading MySQL on Windows”, before beginning the upgrade process.
Make sure that you are logged in as a user with administrator privileges.
Choose an installation location. Traditionally, the MySQL server is installed in
C:\mysql. The MySQL Installer installs MySQL underC:\Program Files\MySQL. If you do not install MySQL atC:\mysql, you must specify the path to the install directory during startup or in an option file. See Section 2.3.4.2, “Creating an Option File”.Extract the install archive to the chosen installation location using your preferred Zip archive tool. Some tools may extract the archive to a folder within your chosen installation location. If this occurs, you can move the contents of the subfolder into the chosen installation location.
If you need to specify startup options when you run the server, you can indicate them on the command line or place them in an option file. For options that are used every time the server starts, you may find it most convenient to use an option file to specify your MySQL configuration. This is particularly true under the following circumstances:
The installation or data directory locations are different from the default locations (
C:\Program Files\MySQL\MySQL Server 5.6andC:\Program Files\MySQL\MySQL Server 5.6\data).You need to tune the server settings, such as memory, cache, or InnoDB configuration information.
When the MySQL server starts on Windows, it looks for option
files in several locations, such as the Windows directory,
C:\, and the MySQL installation directory
(for the full list of locations, see
Section 4.2.3.3, “Using Option Files”). The Windows directory typically
is named something like C:\WINDOWS. You can
determine its exact location from the value of the
WINDIR environment variable using the
following command:
C:\> echo %WINDIR%
MySQL looks for options in each location first in the
my.ini file, and then in the
my.cnf file. However, to avoid confusion,
it is best if you use only one file. If your PC uses a boot
loader where C: is not the boot drive, your
only option is to use the my.ini file.
Whichever option file you use, it must be a plain text file.
When using the MySQL Installer to install MySQL Server, it will create
the my.ini at the default location. And
as of MySQL Server 5.5.27, the user running MySQL Installer is granted
full permissions to this new my.ini.
In other words, be sure that the MySQL Server user has
permission to read the my.ini file.
You can also make use of the example option files included with your MySQL distribution; see Section 5.1.2, “Server Configuration Defaults”.
An option file can be created and modified with any text editor,
such as Notepad. For example, if MySQL is installed in
E:\mysql and the data directory is in
E:\mydata\data, you can create an option
file containing a [mysqld] section to specify
values for the basedir and
datadir options:
[mysqld] # set basedir to your installation path basedir=E:/mysql # set datadir to the location of your data directory datadir=E:/mydata/data
Note that Windows path names are specified in option files using (forward) slashes rather than backslashes. If you do use backslashes, double them:
[mysqld] # set basedir to your installation path basedir=E:\\mysql # set datadir to the location of your data directory datadir=E:\\mydata\\data
The rules for use of backslash in option file values are given in Section 4.2.3.3, “Using Option Files”.
The data directory is located within the
AppData directory for the user running
MySQL.
If you would like to use a data directory in a different
location, you should copy the entire contents of the
data directory to the new location. For
example, if you want to use E:\mydata as
the data directory instead, you must do two things:
Move the entire
datadirectory and all of its contents from the default location (for exampleC:\Program Files\MySQL\MySQL Server 5.6\data) toE:\mydata.Use a
--datadiroption to specify the new data directory location each time you start the server.
The following table shows the available servers for Windows in MySQL 5.6.
| Binary | Description |
|---|---|
| mysqld | Optimized binary with named-pipe support |
| mysqld-debug | Like mysqld, but compiled with full debugging and automatic memory allocation checking |
All of the preceding binaries are optimized for modern Intel processors, but should work on any Intel i386-class or higher processor.
Each of the servers in a distribution support the same set of
storage engines. The SHOW ENGINES
statement displays which engines a given server supports.
All Windows MySQL 5.6 servers have support for symbolic linking of database directories.
MySQL supports TCP/IP on all Windows platforms. MySQL servers on Windows support named pipes as indicated in the following list. However, the default is to use TCP/IP regardless of platform. (Named pipes are slower than TCP/IP in many Windows configurations.)
Named pipes are enabled only if you start the server with the
--enable-named-pipe option. It is
necessary to use this option explicitly because some users have
experienced problems with shutting down the MySQL server when
named pipes were used.
This section gives a general overview of starting the MySQL server. The following sections provide more specific information for starting the MySQL server from the command line or as a Windows service.
The information here applies primarily if you installed MySQL
using the Noinstall version, or if you wish
to configure and test MySQL manually rather than with the GUI
tools.
The MySQL server will automatically start after using the MySQL Installer, and the MySQL Notifier for Microsoft Windows GUI can be used to start/stop/restart at any time.
The examples in these sections assume that MySQL is installed
under the default location of C:\Program
Files\MySQL\MySQL Server 5.6. Adjust the
path names shown in the examples if you have MySQL installed in
a different location.
Clients have two options. They can use TCP/IP, or they can use a named pipe if the server supports named-pipe connections.
MySQL for Windows also supports shared-memory connections if the
server is started with the
--shared-memory option. Clients
can connect through shared memory by using the
--protocol=MEMORY option.
For information about which server binary to run, see Section 2.3.4.3, “Selecting a MySQL Server Type”.
Testing is best done from a command prompt in a console window (or “DOS window”). In this way you can have the server display status messages in the window where they are easy to see. If something is wrong with your configuration, these messages make it easier for you to identify and fix any problems.
To start the server, enter this command:
C:\> "C:\Program Files\MySQL\MySQL Server 5.6\bin\mysqld" --console
For a server that includes InnoDB support,
you should see the messages similar to those following as it
starts (the path names and sizes may differ):
InnoDB: The first specified datafile c:\ibdata\ibdata1 did not exist: InnoDB: a new database to be created! InnoDB: Setting file c:\ibdata\ibdata1 size to 209715200 InnoDB: Database physically writes the file full: wait... InnoDB: Log file c:\iblogs\ib_logfile0 did not exist: new to be created InnoDB: Setting log file c:\iblogs\ib_logfile0 size to 31457280 InnoDB: Log file c:\iblogs\ib_logfile1 did not exist: new to be created InnoDB: Setting log file c:\iblogs\ib_logfile1 size to 31457280 InnoDB: Log file c:\iblogs\ib_logfile2 did not exist: new to be created InnoDB: Setting log file c:\iblogs\ib_logfile2 size to 31457280 InnoDB: Doublewrite buffer not found: creating new InnoDB: Doublewrite buffer created InnoDB: creating foreign key constraint system tables InnoDB: foreign key constraint system tables created 011024 10:58:25 InnoDB: Started
When the server finishes its startup sequence, you should see something like this, which indicates that the server is ready to service client connections:
mysqld: ready for connections Version: '5.6.10' socket: '' port: 3306
The server continues to write to the console any further diagnostic output it produces. You can open a new console window in which to run client programs.
If you omit the --console option,
the server writes diagnostic output to the error log in the data
directory (C:\Program Files\MySQL\MySQL Server
5.6\data by default). The error log is
the file with the .err extension, and may
be set using the --log-error
option.
The accounts that are listed in the MySQL grant tables initially have no passwords. After starting the server, you should set up passwords for them using the instructions in Section 2.10, “Postinstallation Setup and Testing”.
The MySQL server can be started manually from the command line. This can be done on any version of Windows.
The MySQL Notifier for Microsoft Windows GUI can also be used to start/stop/restart the MySQL server.
To start the mysqld server from the command line, you should start a console window (or “DOS window”) and enter this command:
C:\> "C:\Program Files\MySQL\MySQL Server 5.6\bin\mysqld"
The path to mysqld may vary depending on the install location of MySQL on your system.
You can stop the MySQL server by executing this command:
C:\> "C:\Program Files\MySQL\MySQL Server 5.6\bin\mysqladmin" -u root shutdown
If the MySQL root user account has a
password, you need to invoke mysqladmin
with the -p option and supply the password
when prompted.
This command invokes the MySQL administrative utility
mysqladmin to connect to the server and tell
it to shut down. The command connects as the MySQL
root user, which is the default
administrative account in the MySQL grant system. Note that
users in the MySQL grant system are wholly independent from any
login users under Windows.
If mysqld doesn't start, check the error log
to see whether the server wrote any messages there to indicate
the cause of the problem. By default, the error log is located
in the C:\Program Files\MySQL\MySQL Server
5.6\data directory. It is the file with
a suffix of .err, or may be specified by
passing in the --log-error
option. Alternatively, you can try to start the server as
mysqld --console; in this case, you may get
some useful information on the screen that may help solve the
problem.
The last option is to start mysqld with the
--standalone and
--debug options. In this case,
mysqld writes a log file
C:\mysqld.trace that should contain the
reason why mysqld doesn't start. See
MySQL Internals:
Porting to Other Systems.
Use mysqld --verbose --help to display all the options that mysqld supports.
The MySQL Notifier for Microsoft Windows is a tool that allows you to monitor and adjust the status of your local MySQL Server instances through an indicator that resides in the system tray. The MySQL Notifier for Microsoft Windows also gives quick access to several MySQL GUI tools (such as MySQL Workbench) through its context menu.
The MySQL Notifier for Microsoft Windows is installed by MySQL Installer, and (by default) will start-up when Microsoft Windows is started.
To install, download and execute the MySQL Installer, be sure the MySQL Notifier for Microsoft Windows product is selected, then proceed with the installation. See the MySQL Installer manual for additional details.
Visit the MySQL Notifier forum for additional MySQL Notifier for Microsoft Windows help and support.
Features include:
Start, Stop, and Restart instances of the MySQL Server.
Automatically detects (and adds) new MySQL Server services. These are listed under , and may also be configured.
The Tray icon changes, depending on the status. It's green if all monitored MySQL Server instances are running, or red if at least one service is stopped.
Links to other applications like MySQL Workbench, Windows Installer, and the MySQL Utilities. For example, choosing will load the MySQL Workbench Server Administration window for that particular instance.
If MySQL Workbench is also installed, then the and options are available.
The MySQL Notifier for Microsoft Windows resides in the system tray and provides visual status information for your MySQL Server instances. A green icon is displayed at the top left corner of the tray icon if the current MySQL Server is running, or a red icon if the service is stopped.
The MySQL Notifier for Microsoft Windows automatically adds discovered MySQL Services on the
local machine, and each service is saved and configurable. By
default, the Automatically add new services that match
this pattern option is enabled and set to
.*mysqld.*. Related Notifications
Options include being notified when new services are
either discovered or experience status changes, and are also enabled
by default. And uninstalling a service will also remove the service
from the MySQL Notifier for Microsoft Windows.
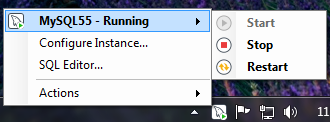
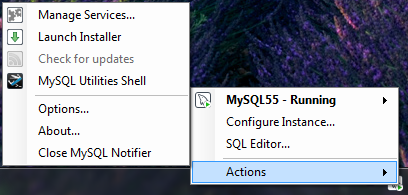
Clicking the system tray icon will reveal several options, as seen in the screenshots below:
The Service Instance menu is the main MySQL Notifier for Microsoft Windows window, and allows you to Stop, Start, and Restart the MySQL Server.
The menu actions include several links to external applications (if they are installed).
The main menu will not show the menu when there are no services being monitored by MySQL Notifier for Microsoft Windows.
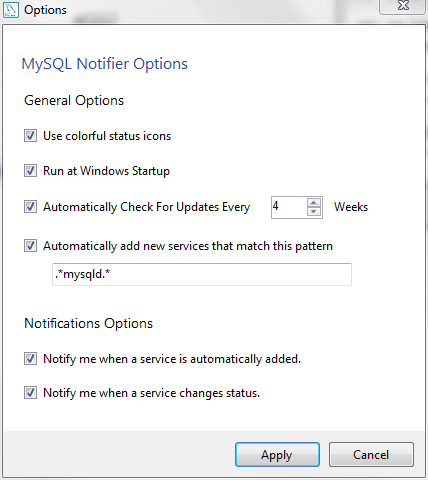
The , menu configures MySQL Notifier for Microsoft Windows and includes options to:
Use colorful status icons: Enables a colorful style of icons for the tray of the MySQL Notifier for Microsoft Windows.
Run at Windows Startup: Allows the application to be loaded when Microsoft Windows starts.
Automatically Check For Updates Every # Weeks: Checks for a new version of MySQL Notifier for Microsoft Windows, and runs this check every # weeks.
Automatically add new services that match this pattern: A custom regular expression that filters the monitored services, and also filters the list of the Microsoft Windows services for the Add New Service dialog.
Notify me when a service is automatically added: Will display a notification from the taskbar when a newly discovered service is added to the monitored services list.
Notify me when a service changes status: Will display a notification from the taskbar when a monitored service changes its status.
The , menu allows you to configure the monitored services.
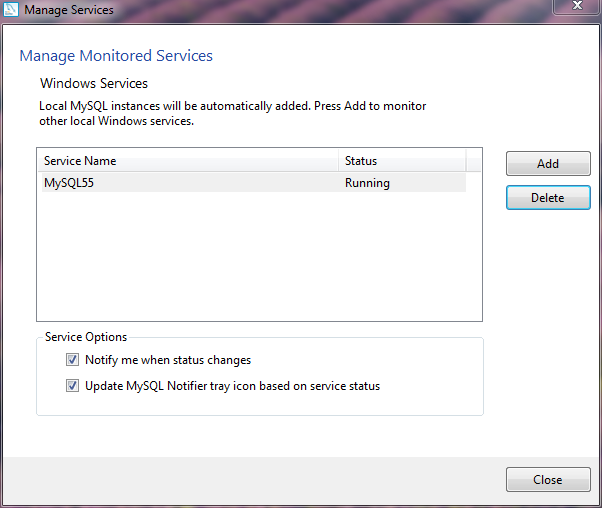
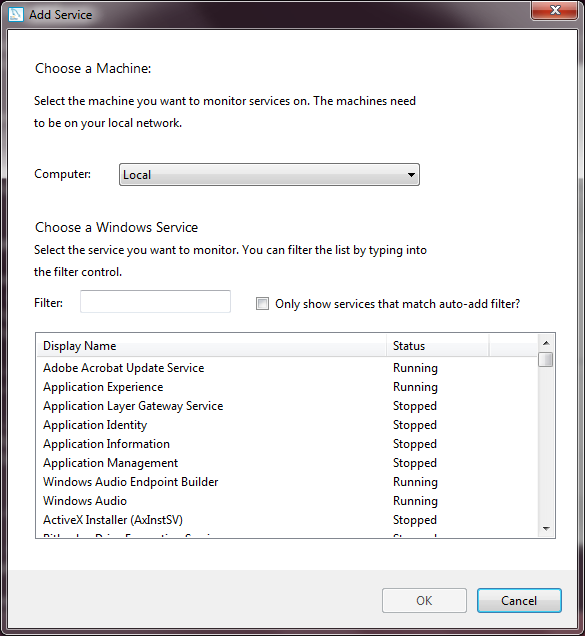
Adding a service (after clicking in the window) allows you to select a running Microsoft Windows service, and configure MySQL Notifier for Microsoft Windows to monitor it. Add a new service by clicking service name from the list, then to accept. Multiple services may be selected.
To make it easier to invoke MySQL programs, you can add the path
name of the MySQL bin directory to your
Windows system PATH environment variable:
On the Windows desktop, right-click the My Computer icon, and select .
Next select the tab from the menu that appears, and click the button.
Under System Variables, select , and then click the button. The dialogue should appear.
Place your cursor at the end of the text appearing in the space marked Variable Value. (Use the End key to ensure that your cursor is positioned at the very end of the text in this space.) Then enter the complete path name of your MySQL
bindirectory (for example,C:\Program Files\MySQL\MySQL Server 5.6\bin)NoteThere must be a semicolon separating this path from any values present in this field.
Dismiss this dialogue, and each dialogue in turn, by clicking until all of the dialogues that were opened have been dismissed. You should now be able to invoke any MySQL executable program by typing its name at the DOS prompt from any directory on the system, without having to supply the path. This includes the servers, the mysql client, and all MySQL command-line utilities such as mysqladmin and mysqldump.
You should not add the MySQL
bindirectory to your WindowsPATHif you are running multiple MySQL servers on the same machine.
You must exercise great care when editing your system
PATH by hand; accidental deletion or
modification of any portion of the existing
PATH value can leave you with a
malfunctioning or even unusable system.
On Windows, the recommended way to run MySQL is to install it as a Windows service, whereby MySQL starts and stops automatically when Windows starts and stops. A MySQL server installed as a service can also be controlled from the command line using NET commands, or with the graphical Services utility. Generally, to install MySQL as a Windows service you should be logged in using an account that has administrator rights.
The MySQL Notifier for Microsoft Windows GUI can also be used to monitor the status of the MySQL service.
The Services utility (the Windows Service Control Manager) can be found in the Windows Control Panel (under on Windows 2000, XP, Vista, and Server 2003). To avoid conflicts, it is advisable to close the Services utility while performing server installation or removal operations from the command line.
Before installing MySQL as a Windows service, you should first stop the current server if it is running by using the following command:
C:\>"C:\Program Files\MySQL\MySQL Server 5.6\bin\mysqladmin"-u root shutdown
If the MySQL root user account has a
password, you need to invoke mysqladmin
with the -p option and supply the password
when prompted.
This command invokes the MySQL administrative utility
mysqladmin to connect to the server and tell
it to shut down. The command connects as the MySQL
root user, which is the default
administrative account in the MySQL grant system. Note that
users in the MySQL grant system are wholly independent from any
login users under Windows.
Install the server as a service using this command:
C:\> "C:\Program Files\MySQL\MySQL Server 5.6\bin\mysqld" --install
The service-installation command does not start the server. Instructions for that are given later in this section.
To make it easier to invoke MySQL programs, you can add the path
name of the MySQL bin directory to your
Windows system PATH environment variable:
On the Windows desktop, right-click the My Computer icon, and select .
Next select the tab from the menu that appears, and click the button.
Under System Variables, select , and then click the button. The dialogue should appear.
Place your cursor at the end of the text appearing in the space marked Variable Value. (Use the End key to ensure that your cursor is positioned at the very end of the text in this space.) Then enter the complete path name of your MySQL
bindirectory (for example,C:\Program Files\MySQL\MySQL Server 5.6\bin), Note that there should be a semicolon separating this path from any values present in this field. Dismiss this dialogue, and each dialogue in turn, by clicking until all of the dialogues that were opened have been dismissed. You should now be able to invoke any MySQL executable program by typing its name at the DOS prompt from any directory on the system, without having to supply the path. This includes the servers, the mysql client, and all MySQL command-line utilities such as mysqladmin and mysqldump.You should not add the MySQL
bindirectory to your WindowsPATHif you are running multiple MySQL servers on the same machine.
You must exercise great care when editing your system
PATH by hand; accidental deletion or
modification of any portion of the existing
PATH value can leave you with a
malfunctioning or even unusable system.
The following additional arguments can be used when installing the service:
You can specify a service name immediately following the
--installoption. The default service name isMySQL.If a service name is given, it can be followed by a single option. By convention, this should be
--defaults-file=to specify the name of an option file from which the server should read options when it starts.file_nameThe use of a single option other than
--defaults-fileis possible but discouraged.--defaults-fileis more flexible because it enables you to specify multiple startup options for the server by placing them in the named option file.You can also specify a
--local-serviceoption following the service name. This causes the server to run using theLocalServiceWindows account that has limited system privileges. This account is available only for Windows XP or newer. If both--defaults-fileand--local-serviceare given following the service name, they can be in any order.
For a MySQL server that is installed as a Windows service, the following rules determine the service name and option files that the server uses:
If the service-installation command specifies no service name or the default service name (
MySQL) following the--installoption, the server uses the a service name ofMySQLand reads options from the[mysqld]group in the standard option files.If the service-installation command specifies a service name other than
MySQLfollowing the--installoption, the server uses that service name. It reads options from the[mysqld]group and the group that has the same name as the service in the standard option files. This enables you to use the[mysqld]group for options that should be used by all MySQL services, and an option group with the service name for use by the server installed with that service name.If the service-installation command specifies a
--defaults-fileoption after the service name, the server reads options the same way as described in the previous item, except that it reads options only from the the named file and ignores the standard option files.
As a more complex example, consider the following command:
C:\>"C:\Program Files\MySQL\MySQL Server 5.6\bin\mysqld"--install MySQL --defaults-file=C:\my-opts.cnf
Here, the default service name (MySQL) is
given after the --install option. If no
--defaults-file option had been
given, this command would have the effect of causing the server
to read the [mysqld] group from the standard
option files. However, because the
--defaults-file option is
present, the server reads options from the
[mysqld] option group, and only from the
named file.
You can also specify options as Start parameters in the Windows Services utility before you start the MySQL service.
Once a MySQL server has been installed as a service, Windows starts the service automatically whenever Windows starts. The service also can be started immediately from the Services utility, or by using a NET START MySQL command. The NET command is not case sensitive.
When run as a service, mysqld has no access
to a console window, so no messages can be seen there. If
mysqld does not start, check the error log to
see whether the server wrote any messages there to indicate the
cause of the problem. The error log is located in the MySQL data
directory (for example, C:\Program Files\MySQL\MySQL
Server 5.6\data). It is the file with a
suffix of .err.
When a MySQL server has been installed as a service, and the
service is running, Windows stops the service automatically when
Windows shuts down. The server also can be stopped manually by
using the Services utility, the NET
STOP MySQL command, or the mysqladmin
shutdown command.
You also have the choice of installing the server as a manual
service if you do not wish for the service to be started
automatically during the boot process. To do this, use the
--install-manual option rather than the
--install option:
C:\> "C:\Program Files\MySQL\MySQL Server 5.6\bin\mysqld" --install-manual
To remove a server that is installed as a service, first stop it
if it is running by executing NET STOP MySQL.
Then use the --remove option to
remove it:
C:\> "C:\Program Files\MySQL\MySQL Server 5.6\bin\mysqld" --remove
If mysqld is not running as a service, you can start it from the command line. For instructions, see Section 2.3.4.5, “Starting MySQL from the Windows Command Line”.
If you encounter difficulties during installation. see Section 2.3.5, “Troubleshooting a Microsoft Windows MySQL Server Installation”.
You can test whether the MySQL server is working by executing any of the following commands:
C:\>"C:\Program Files\MySQL\MySQL Server 5.6\bin\mysqlshow"C:\>"C:\Program Files\MySQL\MySQL Server 5.6\bin\mysqlshow" -u root mysqlC:\>"C:\Program Files\MySQL\MySQL Server 5.6\bin\mysqladmin" version status procC:\>"C:\Program Files\MySQL\MySQL Server 5.6\bin\mysql" test
If mysqld is slow to respond to TCP/IP
connections from client programs, there is probably a problem
with your DNS. In this case, start mysqld
with the --skip-name-resolve
option and use only localhost and IP
addresses in the Host column of the MySQL
grant tables.
You can force a MySQL client to use a named-pipe connection
rather than TCP/IP by specifying the
--pipe or
--protocol=PIPE option, or by
specifying . (period) as the host name. Use
the --socket option to specify
the name of the pipe if you do not want to use the default pipe
name.
Note that if you have set a password for the
root account, deleted the anonymous account,
or created a new user account, then you must use the appropriate
-u and -p options with the
commands shown above to connect with the MySQL Server. See
Section 4.2.2, “Connecting to the MySQL Server”.
For more information about mysqlshow, see Section 4.5.6, “mysqlshow — Display Database, Table, and Column Information”.
When installing and running MySQL for the first time, you may encounter certain errors that prevent the MySQL server from starting. This section helps you diagnose and correct some of these errors.
Your first resource when troubleshooting server issues is the
error log. The MySQL server
uses the error log to record information relevant to the error
that prevents the server from starting. The error log is located
in the data directory
specified in your my.ini file. The default
data directory location is C:\Program Files\MySQL\MySQL
Server 5.6\data, or
C:\ProgramData\Mysql on Windows 7 and Windows
Server 2008. The C:\ProgramData directory is
hidden by default. You need to change your folder options to see
the directory and contents. For more information on the error log
and understanding the content, see Section 5.2.2, “The Error Log”.
For information regarding possible errors, also consult the console messages displayed when the MySQL service is starting. Use the NET START MySQL command from the command line after installing mysqld as a service to see any error messages regarding the starting of the MySQL server as a service. See Section 2.3.4.8, “Starting MySQL as a Windows Service”.
The following examples show other common error messages you might encounter when installing MySQL and starting the server for the first time:
If the MySQL server cannot find the
mysqlprivileges database or other critical files, it displays these messages:System error 1067 has occurred. Fatal error: Can't open and lock privilege tables: Table 'mysql.user' doesn't exist
These messages often occur when the MySQL base or data directories are installed in different locations than the default locations (
C:\Program Files\MySQL\MySQL Server 5.6andC:\Program Files\MySQL\MySQL Server 5.6\data, respectively).This situation can occur when MySQL is upgraded and installed to a new location, but the configuration file is not updated to reflect the new location. In addition, old and new configuration files might conflict. Be sure to delete or rename any old configuration files when upgrading MySQL.
If you have installed MySQL to a directory other than
C:\Program Files\MySQL\MySQL Server 5.6, ensure that the MySQL server is aware of this through the use of a configuration (my.ini) file. Put themy.inifile in your Windows directory, typicallyC:\WINDOWS. To determine its exact location from the value of theWINDIRenvironment variable, issue the following command from the command prompt:C:\>
echo %WINDIR%You can create or modify an option file with any text editor, such as Notepad. For example, if MySQL is installed in
E:\mysqland the data directory isD:\MySQLdata, you can create the option file and set up a[mysqld]section to specify values for thebasediranddatadiroptions:[mysqld] # set basedir to your installation path basedir=E:/mysql # set datadir to the location of your data directory datadir=D:/MySQLdata
Note that Windows path names are specified in option files using (forward) slashes rather than backslashes. If you do use backslashes, double them:
[mysqld] # set basedir to your installation path basedir=C:\\Program Files\\MySQL\\MySQL Server 5.6 # set datadir to the location of your data directory datadir=D:\\MySQLdata
The rules for use of backslash in option file values are given in Section 4.2.3.3, “Using Option Files”.
If you change the
datadirvalue in your MySQL configuration file, you must move the contents of the existing MySQL data directory before restarting the MySQL server.If you reinstall or upgrade MySQL without first stopping and removing the existing MySQL service and install MySQL using the MySQL Installer, you might see this error:
Error: Cannot create Windows service for MySql. Error: 0
This occurs when the Configuration Wizard tries to install the service and finds an existing service with the same name.
One solution to this problem is to choose a service name other than
mysqlwhen using the configuration wizard. This enables the new service to be installed correctly, but leaves the outdated service in place. Although this is harmless, it is best to remove old services that are no longer in use.To permanently remove the old
mysqlservice, execute the following command as a user with administrative privileges, on the command line:C:\>
sc delete mysql[SC] DeleteService SUCCESSIf the
scutility is not available for your version of Windows, download thedelsrvutility from http://www.microsoft.com/windows2000/techinfo/reskit/tools/existing/delsrv-o.asp and use thedelsrv mysqlsyntax.
This section lists some of the steps to take when upgrading MySQL on Windows.
Review Section 2.11.1, “Upgrading MySQL”, for additional information on upgrading MySQL that is not specific to Windows.
Always back up your current MySQL installation before performing an upgrade. See Section 7.2, “Database Backup Methods”.
Download the latest Windows distribution of MySQL from http://dev.mysql.com/downloads/.
Before upgrading MySQL, stop the server. If the server is installed as a service, stop the service with the following command from the command prompt:
C:\>
NET STOP MySQLIf you are not running the MySQL server as a service, use mysqladmin to stop it. For example, before upgrading from MySQL 5.5 to 5.6, use mysqladmin from MySQL 5.5 as follows:
C:\>
"C:\Program Files\MySQL\MySQL Server 5.5\bin\mysqladmin" -u root shutdownNoteIf the MySQL
rootuser account has a password, invoke mysqladmin with the-poption and supply the password when prompted.Before upgrading to MySQL 5.6 from a version previous to 4.1.5, or from a version of MySQL installed from a Zip archive to a version of MySQL installed with the MySQL Installation Wizard, you must first manually remove the previous installation and MySQL service (if the server is installed as a service).
To remove the MySQL service, use the following command:
C:\>
C:\mysql\bin\mysqld --removeIf you do not remove the existing service, the MySQL Installation Wizard may fail to properly install the new MySQL service.
If you are using the MySQL Installer, start it as described in Section 2.3.3, “Installing MySQL on Microsoft Windows Using MySQL Installer”.
If you are installing MySQL from a Zip archive, extract the archive. You may either overwrite your existing MySQL installation (usually located at
C:\mysql), or install it into a different directory, such asC:\mysql5. Overwriting the existing installation is recommended.If you were running MySQL as a Windows service and you had to remove the service earlier in this procedure, reinstall the service. (See Section 2.3.4.8, “Starting MySQL as a Windows Service”.)
Restart the server. For example, use NET START MySQL if you run MySQL as a service, or invoke mysqld directly otherwise.
As Administrator, run mysql_upgrade to check your tables, attempt to repair them if necessary, and update your grant tables if they have changed so that you can take advantage of any new capabilities. See Section 4.4.7, “mysql_upgrade — Check and Upgrade MySQL Tables”.
If you encounter errors, see Section 2.3.5, “Troubleshooting a Microsoft Windows MySQL Server Installation”.
GUI tools exist that perform most of the tasks described below, including:
MySQL Installer: Used to install and upgrade MySQL products.
MySQL Workbench: Manages the MySQL server and edits SQL queries.
MySQL Notifier: Starts, stops, or restarts the MySQL server, and monitors its status.
MySQL for Excel: Edits MySQL data with Microsoft Excel.
On Windows, you need not create the data directory and the grant
tables. MySQL Windows distributions include the grant tables with
a set of preinitialized accounts in the mysql
database under the data directory. Regarding passwords, if you
installed MySQL using the MySQL Installer, you may have already assigned
passwords to the accounts. (See Section 2.3.3, “Installing MySQL on Microsoft Windows Using MySQL Installer”.) Otherwise,
use the password-assignment procedure given in
Section 2.10.2, “Securing the Initial MySQL Accounts”.
Before setting up passwords, you might want to try running some
client programs to make sure that you can connect to the server
and that it is operating properly. Make sure that the server is
running (see Section 2.3.4.4, “Starting the Server for the First Time”), and
then issue the following commands to verify that you can retrieve
information from the server. You may need to specify directory
different from C:\mysql\bin on the command
line. If you used the MySQL Installer, the default directory is
C:\Program Files\MySQL\MySQL Server
5.6, and the mysql and
mysqlshow client programs are in
C:\Program Files\MySQL\MySQL Server
5.6\bin. See Section 2.3.3, “Installing MySQL on Microsoft Windows Using MySQL Installer”, for
more information.
Use mysqlshow to see what databases exist:
C:\> C:\mysql\bin\mysqlshow
+--------------------+
| Databases |
+--------------------+
| information_schema |
| mysql |
| test |
+--------------------+
The list of installed databases may vary, but will always include
the minimum of mysql and
information_schema. In most cases, the
test database will also be installed
automatically.
The preceding command (and commands for other MySQL programs such
as mysql) may not work if the correct MySQL
account does not exist. For example, the program may fail with an
error, or you may not be able to view all databases. If you
installed using MySQL Installer, then the root user will
have been created automatically with the password you supplied. In
this case, you should use the -u root and
-p options. (You will also need to use the
-u root and -p options if you
have already secured the initial MySQL accounts.) With
-p, you will be prompted for the
root password. For example:
C:\>C:\mysql\bin\mysqlshow -u root -pEnter password:(enter root password here)+--------------------+ | Databases | +--------------------+ | information_schema | | mysql | | test | +--------------------+
If you specify a database name, mysqlshow displays a list of the tables within the database:
C:\> C:\mysql\bin\mysqlshow mysql
Database: mysql
+---------------------------+
| Tables |
+---------------------------+
| columns_priv |
| db |
| event |
| func |
| help_category |
| help_keyword |
| help_relation |
| help_topic |
| host |
| plugin |
| proc |
| procs_priv |
| servers |
| tables_priv |
| time_zone |
| time_zone_leap_second |
| time_zone_name |
| time_zone_transition |
| time_zone_transition_type |
| user |
+---------------------------+
Use the mysql program to select information
from a table in the mysql database:
C:\> C:\mysql\bin\mysql -e "SELECT Host,Db,User FROM mysql.db"
+------+--------+------+
| host | db | user |
+------+--------+------+
| % | test | |
| % | test_% | |
+------+--------+------+
For more information about mysqlshow and mysql, see Section 4.5.6, “mysqlshow — Display Database, Table, and Column Information”, and Section 4.5.1, “mysql — The MySQL Command-Line Tool”.
If you are running a version of Windows that supports services, you can set up the MySQL server to run automatically when Windows starts. See Section 2.3.4.8, “Starting MySQL as a Windows Service”.
MySQL for Mac OS X is available in a number of different forms:
Native Package Installer format, which uses the native Mac OS X installer to walk you through the installation of MySQL. For more information, see Section 2.4.2, “Installing MySQL on Mac OS X Using Native Packages”. You can use the package installer with Mac OS X 10.3 and later, and the package is available for both PowerPC and Intel architectures, and 32-bit and 64-bit architectures. There is no Universal Binary available using the package installation method. The user you use to perform the installation must have administrator privileges.
Tar package format, which uses a file packaged using the Unix tar and gzip commands. To use this method, you will need to open a Terminal window. You do not need administrator privileges using this method, as you can install the MySQL server anywhere using this method. For more information on using this method, you can use the generic instructions for using a tarball, Section 2.2, “Installing MySQL from Generic Binaries on Unix/Linux”.You can use the package installer with Mac OS X 10.3 and later, and available for both PowerPC and Intel architectures, and both 32-bit and 64-bit architectures. A Universal Binary, incorporating both Power PC and Intel architectures and 32-bit and 64-bit binaries is available.
In addition to the core installation, the Package Installer also includes Section 2.4.3, “Installing the MySQL Startup Item” and Section 2.4.4, “Installing and Using the MySQL Preference Pane”, both of which simplify the management of your installation.
Mac OS X server includes a version of MySQL as standard. If you want to use a more recent version than that supplied with the Mac OS X server release, you can make use of the package or tar formats. For more information on using the MySQL bundled with Mac OS X, see Section 2.4.5, “Using the Bundled MySQL on Mac OS X Server”.
For additional information on using MySQL on Mac OS X, see Section 2.4.1, “General Notes on Installing MySQL on Mac OS X”.
You should keep the following issues and notes in mind:
The default location for the MySQL Unix socket is different on Mac OS X and Mac OS X Server depending on the installation type you chose. The following table shows the default locations by installation type.
Table 2.4. MySQL Unix Socket Locations on Mac OS X by Installation Type
Installation Type Socket Location Package Installer from MySQL /tmp/mysql.sockTarball from MySQL /tmp/mysql.sockMySQL Bundled with Mac OS X Server /var/mysql/mysql.sockTo prevent issues, you should either change the configuration of the socket used within your application (for example, changing
php.ini), or you should configure the socket location using a MySQL configuration file and thesocketoption. For more information, see Section 5.1.3, “Server Command Options”.You may need (or want) to create a specific
mysqluser to own the MySQL directory and data. On Mac OS X 10.4 and lower you can do this by using the Netinfo Manager application, located within theUtilitiesfolder within theApplicationsfolder. On Mac OS X 10.5 and later you can do this through the Directory Utility. From Mac OS X 10.5 and later (including Mac OS X Server 10.5) themysqlshould already exist. For use in single user mode, an entry for_mysql(note the underscore prefix) should already exist within the system/etc/passwdfile.Due to a bug in the Mac OS X package installer, you may see this error message in the destination disk selection dialog:
You cannot install this software on this disk. (null)
If this error occurs, click the
Go Backbutton once to return to the previous screen. Then clickContinueto advance to the destination disk selection again, and you should be able to choose the destination disk correctly. We have reported this bug to Apple and it is investigating this problem.Because the MySQL package installer installs the MySQL contents into a version and platform specific directory, you can use this to upgrade and migrate your database between versions. You will need to either copy the
datadirectory from the old version to the new version, or alternatively specify an alternativedatadirvalue to set location of the data directory.You might want to add aliases to your shell's resource file to make it easier to access commonly used programs such as mysql and mysqladmin from the command line. The syntax for bash is:
alias mysql=/usr/local/mysql/bin/mysql alias mysqladmin=/usr/local/mysql/bin/mysqladmin
For tcsh, use:
alias mysql /usr/local/mysql/bin/mysql alias mysqladmin /usr/local/mysql/bin/mysqladmin
Even better, add
/usr/local/mysql/binto yourPATHenvironment variable. You can do this by modifying the appropriate startup file for your shell. For more information, see Section 4.2.1, “Invoking MySQL Programs”.After you have copied over the MySQL database files from the previous installation and have successfully started the new server, you should consider removing the old installation files to save disk space. Additionally, you should also remove older versions of the Package Receipt directories located in
/Library/Receipts/mysql-.VERSION.pkg
You can install MySQL on Mac OS X 10.3.x (“Panther”) or newer using a Mac OS X binary package in PKG format instead of the binary tarball distribution. Please note that older versions of Mac OS X (for example, 10.1.x or 10.2.x) are not supported by this package.
The package is located inside a disk image
(.dmg) file that you first need to mount by
double-clicking its icon in the Finder. It should then mount the
image and display its contents.
Before proceeding with the installation, be sure to stop all running MySQL server instances by using either the MySQL Manager Application (on Mac OS X Server) or mysqladmin shutdown on the command line.
When installing from the package version, you should also install the MySQL Preference Pane, which will enable you to control the startup and execution of your MySQL server from System Preferences. For more information, see Section 2.4.4, “Installing and Using the MySQL Preference Pane”.
When installing using the package installer, the files are
installed into a directory within /usr/local
matching the name of the installation version and platform. For
example, the installer file
mysql-5.1.39-osx10.5-x86_64.pkg installs
MySQL into /usr/local/mysql-5.1.39-osx10.5-x86_64
. The following table shows the layout of the
installation directory.
Table 2.5. MySQL Installation Layout on Mac OS X
| Directory | Contents of Directory |
|---|---|
bin | Client programs and the mysqld server |
data | Log files, databases |
docs | Manual in Info format |
include | Include (header) files |
lib | Libraries |
man | Unix manual pages |
mysql-test | MySQL test suite |
scripts | mysql_install_db |
share | Miscellaneous support files, including error messages, sample configuration files, SQL for database installation |
sql-bench | Benchmarks |
support-files | Scripts and sample configuration files |
/tmp/mysql.sock | Location of the MySQL Unix socket |
During the package installer process, a symbolic link from
/usr/local/mysql to the version/platform
specific directory created during installation will be created
automatically.
Download and open the MySQL package installer, which is provided on a disk image (
.dmg) that includes the main MySQL installation package, theMySQLStartupItem.pkginstallation package, and theMySQL.prefPane. Double-click the disk image to open it.Double-click the MySQL installer package. It will be named according to the version of MySQL you have downloaded. For example, if you have downloaded MySQL 5.1.39, double-click
mysql-5.1.39-osx10.5-x86.pkg.You will be presented with the opening installer dialog. Click to begin installation.
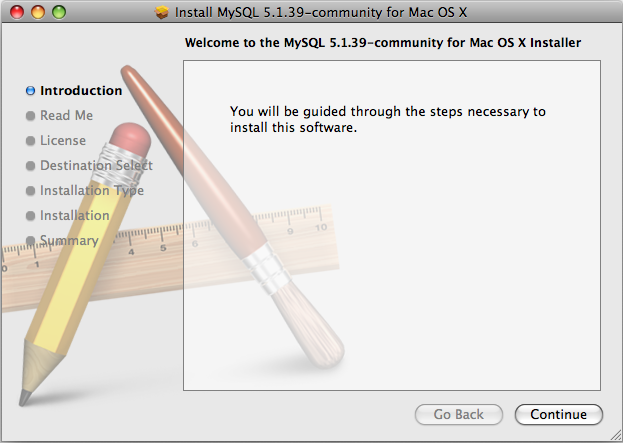
A copy of the installation instructions and other important information relevant to this installation are displayed. Click .
If you have downloaded the community version of MySQL, you will be shown a copy of the relevant GNU General Public License. Click .
Select the drive you want to use to install the MySQL Startup Item. The drive must have a valid, bootable, Mac OS X operating system installed. Click .
You will be asked to confirm the details of the installation, including the space required for the installation. To change the drive on which the startup item is installed, click either or . To install the startup item, click .
Once the installation has been completed successfully, you will be shown an Install Succeeded message.
For convenience, you may also want to install the startup item and preference pane. See Section 2.4.3, “Installing the MySQL Startup Item”, and Section 2.4.4, “Installing and Using the MySQL Preference Pane”.
The MySQL Installation Package includes a startup item that can be used to automatically start and stop MySQL.
To install the MySQL Startup Item:
Download and open the MySQL package installer, which is provided on a disk image (
.dmg) that includes the main MySQL installation package, theMySQLStartupItem.pkginstallation package, and theMySQL.prefPane. Double-click the disk image to open it.Double-click the
MySQLStartItem.pkgfile to start the installation process.You will be presented with the Install MySQL Startup Item dialog.
Click to continue the installation process.
A copy of the installation instructions and other important information relevant to this installation are displayed. Click .
Select the drive you want to use to install the MySQL Startup Item. The drive must have a valid, bootable, Mac OS X operating system installed. Click .
You will be asked to confirm the details of the installation. To change the drive on which the startup item is installed, click either or . To install the startup item, click .
Once the installation has been completed successfully, you will be shown an Install Succeeded message.
The Startup Item for MySQL is installed into
/Library/StartupItems/MySQLCOM. The Startup
Item installation adds a variable
MYSQLCOM=-YES- to the system configuration file
/etc/hostconfig. If you want to disable the
automatic startup of MySQL, change this variable to
MYSQLCOM=-NO-.
After the installation, you can start and stop MySQL by running the following commands in a terminal window. You must have administrator privileges to perform these tasks, and you may be prompted for your password.
If you have installed the Startup Item, use this command to start the server:
shell> sudo /Library/StartupItems/MySQLCOM/MySQLCOM start
If you have installed the Startup Item, use this command to stop the server:
shell> sudo /Library/StartupItems/MySQLCOM/MySQLCOM stop
The MySQL Package installer disk image also includes a custom MySQL Preference Pane that enables you to start, stop, and control automated startup during boot of your MySQL installation.
To install the MySQL Preference Pane:
Download and open the MySQL package installer package, which is provided on a disk image (
.dmg) that includes the main MySQL installation package, theMySQLStartupItem.pkginstallation package, and theMySQL.prefPane. Double-click the disk image to open it.Double-click the
MySQL.prefPane. The MySQL System Preferences will open.If this is the first time you have installed the preference pane, you will be asked to confirm installation and whether you want to install the preference pane for all users, or only the current user. To install the preference pane for all users you will need administrator privileges. If necessary, you will be prompted for the username and password for a user with administrator privileges.
If you already have the MySQL Preference Pane installed, you will be asked to confirm whether you want to overwrite the existing MySQL Preference Pane.
The MySQL Preference Pane only starts and stops MySQL installation installed from the MySQL package installation that have been installed in the default location.
Once the MySQL Preference Pane has been installed, you can control your MySQL server instance using the preference pane. To use the preference pane, open the System Preferences... from the Apple menu. Select the MySQL preference pane by clicking the MySQL logo within the Other section of the preference panes list.
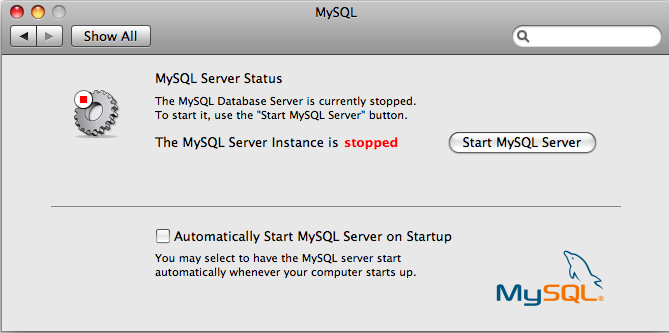
The MySQL Preference Pane shows the current status of the MySQL server, showing stopped (in red) if the server is not running and running (in green) if the server has already been started. The preference pane also shows the current setting for whether the MySQL server has been set to start automatically.
To start MySQL using the preference pane:
Click . You may be prompted for the username and password of a user with administrator privileges to start the MySQL server.
To stop MySQL using the preference pane:
Click . You may be prompted for the username and password of a user with administrator privileges to stop the MySQL server.
To automatically start the MySQL server when the system boots:
Check the check box next to Automatically Start MySQL Server on Startup.
To disable automatic MySQL server startup when the system boots:
Uncheck the check box next to Automatically Start MySQL Server on Startup.
You can close the System Preferences... window once you have completed your settings.
If you are running Mac OS X Server, a version of MySQL should already be installed. The following table shows the versions of MySQL that ship with Mac OS X Server versions.
Table 2.6. MySQL Versions Preinstalled with Mac OS X Server
| Mac OS X Server Version | MySQL Version |
|---|---|
| 10.2-10.2.2 | 3.23.51 |
| 10.2.3-10.2.6 | 3.23.53 |
| 10.3 | 4.0.14 |
| 10.3.2 | 4.0.16 |
| 10.4.0 | 4.1.10a |
| 10.5.0 | 5.0.45 |
| 10.6.0 | 5.0.82 |
The following table shows the installation layout of MySQL on Mac OS X Server.
Table 2.7. MySQL Directory Layout for Preinstalled MySQL Installations on Mac OS X Server
| Directory | Contents of Directory |
|---|---|
/usr/bin | Client programs |
/var/mysql | Log files, databases |
/usr/libexec | The mysqld server |
/usr/share/man | Unix manual pages |
/usr/share/mysql/mysql-test | MySQL test suite |
/usr/share/mysql | Miscellaneous support files, including error messages, character set files, sample configuration files, SQL for database installation |
/var/mysql/mysql.sock | Location of the MySQL Unix socket |
Additional Resources
For more information on managing the bundled MySQL instance in Mac OS X Server 10.5, see Mac OS X Server: Web Technologies Administration For Version 10.5 Leopard.
For more information on managing the bundled MySQL instance in Mac OS X Server 10.6, see Mac OS X Server: Web Technologies Administration Version 10.6 Snow Leopard.
The MySQL server bundled with Mac OS X Server does not include the MySQL client libraries and header files required to access and use MySQL from a third-party driver, such as Perl DBI or PHP. For more information on obtaining and installing MySQL libraries, see Mac OS X Server version 10.5: MySQL libraries available for download. Alternatively, you can ignore the bundled MySQL server and install MySQL from the package or tarball installation.
Linux supports a number of different solutions for installing MySQL. The recommended method is to use one of the distributions from Oracle. If you choose this method, there are three options available:
Installing from a generic binary package in
.tar.gzformat. See Section 2.2, “Installing MySQL from Generic Binaries on Unix/Linux” for more information.Extracting and compiling MySQL from a source distribution. For detailed instructions, see Section 2.9, “Installing MySQL from Source”.
Installing using a pre-compiled RPM package. For more information on using the RPM solution, see Section 2.5.1, “Installing MySQL from RPM Packages on Linux”.
As an alternative, you can use the native package manager within your Linux distribution to automatically download and install MySQL for you. Native package installations can take of the download and dependencies required to run MySQL, but the MySQL version will often be some way behind the currently available release. You will also normally be unable to install developmental releases, as these are not usually made available in the native repository. For more information on using the native package installers, see Section 2.5.2, “Installing MySQL on Linux using Native Package Manager”.
For many Linux installations, you will want to set up MySQL to be
started automatically when your machine starts. Many of the native
package installations perform this operation for you, but for
source, binary and RPM solutions you may need to set this up
separately. The required script, mysql.server,
can be found in the support-files directory
under the MySQL installation directory or in a MySQL source tree.
You can install it as /etc/init.d/mysql for
automatic MySQL startup and shutdown. See
Section 2.10.1.2, “Starting and Stopping MySQL Automatically”.
The recommended way to install MySQL on RPM-based Linux
distributions is by using the RPM packages. The RPMs that we
provide to the community should work on all versions of Linux that
support RPM packages and use glibc 2.3. To
obtain RPM packages, see Section 2.1.3, “How to Get MySQL”.
For non-RPM Linux distributions, you can install MySQL using a
.tar.gz package. See
Section 2.2, “Installing MySQL from Generic Binaries on Unix/Linux”.
Installations created from our Linux RPM distributions result in files under the following system directories.
Table 2.8. MySQL Installation Layout for Linux RPM
| Directory | Contents of Directory |
|---|---|
/usr/bin | Client programs and scripts |
/usr/sbin | The mysqld server |
/var/lib/mysql | Log files, databases |
/usr/share/info | Manual in Info format |
/usr/share/man | Unix manual pages |
/usr/include/mysql | Include (header) files |
/usr/lib/mysql | Libraries |
/usr/share/mysql | Miscellaneous support files, including error messages, character set files, sample configuration files, SQL for database installation |
/usr/share/sql-bench | Benchmarks |
RPM distributions of MySQL are also provided by other vendors. Be aware that they may differ from those built by us in features, capabilities, and conventions (including communication setup), and that the instructions in this manual do not necessarily apply to installing them. The vendor's instructions should be consulted instead. Because of these differences, RPM packages built by us check whether such RPMs built by other vendors are installed. If so, the RPM does not install and produces a message explaining this.
In most cases, you need to install only the
MySQL-server and
MySQL-client packages to get a functional MySQL
installation. The other packages are not required for a standard
installation.
As of MySQL 5.6.8, new RPM install operations (not upgrades)
invoke mysql_install_db with the
--random-passwords option that provides for more
secure MySQL installation. Invoking
mysql_install_db with
--random-passwords causes
it to assign a random password to the MySQL
root accounts, set the “password
expired” flag for those accounts, and remove the
anonymous-user MySQL accounts. It will be necessary after
installation to start the server, connect as
root using the password written to the
$HOME/.mysql.secret file, and assign a new
root password. Until this is done,
root cannot do anything else. This must be done
for each root account you intend to use. To
change the password, you can use the SET
PASSWORD statement (for example, with the
mysql client). You can also use
mysqladmin or
mysql_secure_installation. For additional
details, see Section 4.4.3, “mysql_install_db — Initialize MySQL Data Directory”. (Install
operations using RPMs for Unbreakable Linux Network are unaffected
because they do not use mysql_install_db.)
RPMs for MySQL Cluster.
Standard MySQL server RPMs built by MySQL do not provide support
for the NDBCLUSTER storage engine.
When upgrading a MySQL Cluster RPM installation, you must
upgrade all installed RPMs, including the
Server and Client RPMs.
For more information about installing MySQL Cluster from RPMs, see MySQL Cluster Installation.
For upgrades, if your installation was originally produced by installing multiple RPM packages, it is best to upgrade all the packages, not just some. For example, if you previously installed the server and client RPMs, do not upgrade just the server RPM.
If you get a dependency failure when trying to install MySQL
packages (for example, error: removing these packages
would break dependencies: libmysqlclient.so.10 is needed by
...), you should also install the
MySQL-shared-compat package, which includes the
shared libraries for older releases for backward compatibility.
The RPM packages shown in the following list are available. The
names shown here use a suffix of
.glibc23.i386.rpm, but particular packages
can have different suffixes, described later.
MySQL-server-VERSION.glibc23.i386.rpmThe MySQL server. You need this unless you only want to connect to a MySQL server running on another machine.
MySQL-client-VERSION.glibc23.i386.rpmThe standard MySQL client programs. You probably always want to install this package.
MySQL-devel-VERSION.glibc23.i386.rpmThe libraries and include files that are needed if you want to compile other MySQL clients, such as the Perl modules.
MySQL-shared-VERSION.glibc23.i386.rpmThis package contains the shared libraries (
libmysqlclient.so*) that certain languages and applications need to dynamically load and use MySQL. It contains single-threaded and thread-safe libraries.MySQL-shared-compat-VERSION.glibc23.i386.rpmThis package includes the shared libraries for older releases, but not the libraries for the current release. It contains single-threaded and thread-safe libraries. Install this package if you have applications installed that are dynamically linked against older versions of MySQL but you want to upgrade to the current version without breaking the library dependencies.
As of MySQL 5.6.5, the
MySQL-shared-compatRPM package enables users of Red Hat-providedmysql-*-5.1RPM packages to migrate to Oracle-providedMySQL-*-5.5packages.MySQL-shared-compatreplaces the Red Hatmysql-libspackage by replacinglibmysqlclient.sofiles of the latter package, thus satisfying dependencies of other packages onmysql-libs. This change affects only users of Red Hat (or Red Hat-compatible) RPM packages. Nothing is different for users of Oracle RPM packages.MySQL-embedded-VERSION.glibc23.i386.rpmThe embedded MySQL server library.
MySQL-test-VERSION.glibc23.i386.rpmThis package includes the MySQL test suite.
MySQL-VERSION.src.rpmThis contains the source code for all of the previous packages. It can also be used to rebuild the RPMs on other architectures (for example, Alpha or SPARC).
The suffix of RPM package names (following the
VERSION value) has the following
syntax:
.PLATFORM.CPU.rpm
The PLATFORM and
CPU values indicate the type of system
for which the package is built.
PLATFORM indicates the platform and
CPU indicates the processor type or
family.
All packages are dynamically linked against
glibc 2.3. The
PLATFORM value indicates whether the
package is platform independent or intended for a specific
platform, as shown in the following table.
Table 2.9. MySQL Linux Installation Packages
PLATFORM Value | Intended Use |
|---|---|
glibc23 | Platform independent, should run on any Linux distribution that supports
glibc 2.3 |
rhel4, rhel5 | Red Hat Enterprise Linux 4 or 5 |
el6 | Enterprise Linux 6 |
sles10, sles11 | SuSE Linux Enterprise Server 10 or 11 |
In MySQL 5.6, only glibc23
packages are available currently.
The CPU value indicates the processor
type or family for which the package is built.
Table 2.10. MySQL Installation Packages for Linux CPU Identifier
CPU Value | Intended Processor Type or Family |
|---|---|
i386, i586,
i686 | Pentium processor or better, 32 bit |
x86_64 | 64-bit x86 processor |
ia64 | Itanium (IA-64) processor |
To see all files in an RPM package (for example, a
MySQL-server RPM), run a command like this:
shell> rpm -qpl MySQL-server-VERSION.glibc23.i386.rpm
To perform a standard minimal installation, install the server and client RPMs:
shell>rpm -i MySQL-server-shell>VERSION.glibc23.i386.rpmrpm -i MySQL-client-VERSION.glibc23.i386.rpm
To install only the client programs, install just the client RPM:
shell> rpm -i MySQL-client-VERSION.glibc23.i386.rpm
RPM provides a feature to verify the integrity and authenticity of
packages before installing them. If you would like to learn more
about this feature, see
Section 2.1.4, “Verifying Package Integrity Using MD5 Checksums or
GnuPG”.
The server RPM places data under the
/var/lib/mysql directory. The RPM also
creates a login account for a user named mysql
(if one does not exist) to use for running the MySQL server, and
creates the appropriate entries in
/etc/init.d/ to start the server
automatically at boot time. (This means that if you have performed
a previous installation and have made changes to its startup
script, you may want to make a copy of the script so that you do
not lose it when you install a newer RPM.) See
Section 2.10.1.2, “Starting and Stopping MySQL Automatically”, for more information on how
MySQL can be started automatically on system startup.
In MySQL 5.6, during a new installation, the server boot scripts are installed, but the MySQL server is not started at the end of the installation, since the status of the server during an unattended installation is not known.
In MySQL 5.6, during an upgrade installation using the RPM packages, if the MySQL server is running when the upgrade occurs, the MySQL server is stopped, the upgrade occurs, and the MySQL server is restarted. If the MySQL server is not already running when the RPM upgrade occurs, the MySQL server is not started at the end of the installation.
If something goes wrong, you can find more information in the binary installation section. See Section 2.2, “Installing MySQL from Generic Binaries on Unix/Linux”.
The accounts that are listed in the MySQL grant tables initially have no passwords. After starting the server, you should set up passwords for them using the instructions in Section 2.10, “Postinstallation Setup and Testing”.
During RPM installation, a user named mysql and
a group named mysql are created on the system.
This is done using the useradd,
groupadd, and usermod
commands. Those commands require appropriate administrative
privileges, which is required for locally managed users and groups
(as listed in the /etc/passwd and
/etc/group files) by the RPM installation
process being run by root.
If you log in as the mysql user, you may find
that MySQL displays “Invalid (old?) table or database
name” errors that mention .mysqlgui,
lost+found, .mysqlgui,
.bash_history,
.fonts.cache-1,
.lesshst,
.mysql_history,
.profile, .viminfo, and
similar files created by MySQL or operating system utilities. You
can safely ignore these error messages or remove the files or
directories that cause them if you do not need them.
For nonlocal user management (LDAP, NIS, and so forth), the administrative tools may require additional authentication (such as a password), and will fail if the installing user does not provide this authentication. Even if they fail, the RPM installation will not abort but succeed, and this is intentional. If they failed, some of the intended transfer of ownership may be missing, and it is recommended that the system administrator then manually ensures some appropriate user and group exists and manually transfers ownership following the actions in the RPM spec file.
Many Linux distributions include a version of the MySQL server, client tools, and development components into the standard package management system built into distributions such as Fedora, Debian, Ubuntu, and Gentoo. This section provides basic instructions for installing MySQL using these systems.
Native package installations can take care of the download and dependencies required to run MySQL, but the MySQL version will often be some way behind the currently available release. You will also normally be unable to install developmental releases, as these are not usually made available in the native repository.
Distribution specific instructions are shown below:
Red Hat Linux, Fedora, CentOS
For Red Hat and similar distributions, the MySQL distribution is divided into a number of separate packages,
mysqlfor the client tools,mysql-serverfor the server and associated tools, andmysql-libsfor the libraries. The libraries are required if you want to provide connectivity from different languages and environments such as Perl, Python and others.To install, use the yum command to specify the packages that you want to install. For example:
root-shell> yum install mysql mysql-server mysql-libs mysql-server Loaded plugins: presto, refresh-packagekit Setting up Install Process Resolving Dependencies --> Running transaction check ---> Package mysql.x86_64 0:5.1.48-2.fc13 set to be updated ---> Package mysql-libs.x86_64 0:5.1.48-2.fc13 set to be updated ---> Package mysql-server.x86_64 0:5.1.48-2.fc13 set to be updated --> Processing Dependency: perl-DBD-MySQL for package: mysql-server-5.1.48-2.fc13.x86_64 --> Running transaction check ---> Package perl-DBD-MySQL.x86_64 0:4.017-1.fc13 set to be updated --> Finished Dependency Resolution Dependencies Resolved ================================================================================ Package Arch Version Repository Size ================================================================================ Installing: mysql x86_64 5.1.48-2.fc13 updates 889 k mysql-libs x86_64 5.1.48-2.fc13 updates 1.2 M mysql-server x86_64 5.1.48-2.fc13 updates 8.1 M Installing for dependencies: perl-DBD-MySQL x86_64 4.017-1.fc13 updates 136 k Transaction Summary ================================================================================ Install 4 Package(s) Upgrade 0 Package(s) Total download size: 10 M Installed size: 30 M Is this ok [y/N]: y Downloading Packages: Setting up and reading Presto delta metadata Processing delta metadata Package(s) data still to download: 10 M (1/4): mysql-5.1.48-2.fc13.x86_64.rpm | 889 kB 00:04 (2/4): mysql-libs-5.1.48-2.fc13.x86_64.rpm | 1.2 MB 00:06 (3/4): mysql-server-5.1.48-2.fc13.x86_64.rpm | 8.1 MB 00:40 (4/4): perl-DBD-MySQL-4.017-1.fc13.x86_64.rpm | 136 kB 00:00 -------------------------------------------------------------------------------- Total 201 kB/s | 10 MB 00:52 Running rpm_check_debug Running Transaction Test Transaction Test Succeeded Running Transaction Installing : mysql-libs-5.1.48-2.fc13.x86_64 1/4 Installing : mysql-5.1.48-2.fc13.x86_64 2/4 Installing : perl-DBD-MySQL-4.017-1.fc13.x86_64 3/4 Installing : mysql-server-5.1.48-2.fc13.x86_64 4/4 Installed: mysql.x86_64 0:5.1.48-2.fc13 mysql-libs.x86_64 0:5.1.48-2.fc13 mysql-server.x86_64 0:5.1.48-2.fc13 Dependency Installed: perl-DBD-MySQL.x86_64 0:4.017-1.fc13 Complete!
MySQL and the MySQL server should now be installed. A sample configuration file is installed into
/etc/my.cnf. An init script, to start and stop the server, will have been installed into/etc/init.d/mysqld. To start the MySQL server use service:root-shell> service mysqld start
To enable the server to be started and stopped automatically during boot, use chkconfig:
root-shell> chkconfig --levels 235 mysqld on
Which enables the MySQL server to be started (and stopped) automatically at the specified the run levels.
The database tables will have been automatically created for you, if they do not already exist. You should, however, run mysql_secure_installation to set the root passwords on your server.
Debian, Ubuntu, Kubuntu
On Debian and related distributions, there are two packages,
mysql-clientandmysql-server, for the client and server components respectively. You should specify an explicit version, for examplemysql-client-5.1, to ensure that you install the version of MySQL that you want.To download and install, including any dependencies, use the apt-get command, specifying the packages that you want to install.
NoteBefore installing, make sure that you update your
apt-getindex files to ensure you are downloading the latest available version.A sample installation of the MySQL packages might look like this (some sections trimmed for clarity):
root-shell> apt-get install mysql-client-5.1 mysql-server-5.1 Reading package lists... Done Building dependency tree Reading state information... Done The following packages were automatically installed and are no longer required: linux-headers-2.6.28-11 linux-headers-2.6.28-11-generic Use 'apt-get autoremove' to remove them. The following extra packages will be installed: bsd-mailx libdbd-mysql-perl libdbi-perl libhtml-template-perl libmysqlclient15off libmysqlclient16 libnet-daemon-perl libplrpc-perl mailx mysql-common postfix Suggested packages: dbishell libipc-sharedcache-perl tinyca procmail postfix-mysql postfix-pgsql postfix-ldap postfix-pcre sasl2-bin resolvconf postfix-cdb The following NEW packages will be installed bsd-mailx libdbd-mysql-perl libdbi-perl libhtml-template-perl libmysqlclient15off libmysqlclient16 libnet-daemon-perl libplrpc-perl mailx mysql-client-5.1 mysql-common mysql-server-5.1 postfix 0 upgraded, 13 newly installed, 0 to remove and 182 not upgraded. Need to get 1907kB/25.3MB of archives. After this operation, 59.5MB of additional disk space will be used. Do you want to continue [Y/n]? Y Get: 1 http://gb.archive.ubuntu.com jaunty-updates/main mysql-common 5.1.30really5.0.75-0ubuntu10.5 [63.6kB] Get: 2 http://gb.archive.ubuntu.com jaunty-updates/main libmysqlclient15off 5.1.30really5.0.75-0ubuntu10.5 [1843kB] Fetched 1907kB in 9s (205kB/s) Preconfiguring packages ... Selecting previously deselected package mysql-common. (Reading database ... 121260 files and directories currently installed.) ... Processing 1 added doc-base file(s)... Registering documents with scrollkeeper... Setting up libnet-daemon-perl (0.43-1) ... Setting up libplrpc-perl (0.2020-1) ... Setting up libdbi-perl (1.607-1) ... Setting up libmysqlclient15off (5.1.30really5.0.75-0ubuntu10.5) ... Setting up libdbd-mysql-perl (4.008-1) ... Setting up libmysqlclient16 (5.1.31-1ubuntu2) ... Setting up mysql-client-5.1 (5.1.31-1ubuntu2) ... Setting up mysql-server-5.1 (5.1.31-1ubuntu2) ... * Stopping MySQL database server mysqld ...done. 100825 11:46:15 InnoDB: Started; log sequence number 0 46409 100825 11:46:15 InnoDB: Starting shutdown... 100825 11:46:17 InnoDB: Shutdown completed; log sequence number 0 46409 100825 11:46:17 [Warning] Forcing shutdown of 1 plugins * Starting MySQL database server mysqld ...done. * Checking for corrupt, not cleanly closed and upgrade needing tables. ... Processing triggers for libc6 ... ldconfig deferred processing now taking place
NoteThe apt-get command will install a number of packages, including the MySQL server, in order to provide the typical tools and application environment. This can mean that you install a large number of packages in addition to the main MySQL package.
During installation, the initial database will be created, and you will be prompted for the MySQL root password (and confirmation). A configuration file will have been created in
/etc/mysql/my.cnf. An init script will have been created in/etc/init.d/mysql.The server will already be started. You can manually start and stop the server using:
root-shell> service mysql [start|stop]
The service will automatically be added to the 2, 3 and 4 run levels, with stop scripts in the single, shutdown and restart levels.
Gentoo Linux
As a source-based distribution, installing MySQL on Gentoo involves downloading the source, patching the Gentoo specifics, and then compiling the MySQL server and installing it. This process is handled automatically by the emerge command. Depending on the version of MySQL that you want to install, you may need to unmask the specific version that you want for your chosen platform.
The MySQL server and client tools are provided within a single package,
dev-db/mysql. You can obtain a list of the versions available to install by looking at the portage directory for the package:root-shell> ls /usr/portage/dev-db/mysql/mysql-5.1* mysql-5.1.39-r1.ebuild mysql-5.1.44-r1.ebuild mysql-5.1.44-r2.ebuild mysql-5.1.44-r3.ebuild mysql-5.1.44.ebuild mysql-5.1.45-r1.ebuild mysql-5.1.45.ebuild mysql-5.1.46.ebuild
To install a specific MySQL version, you must specify the entire atom. For example:
root-shell> emerge =dev-db/mysql-5.1.46
A simpler alternative is to use the
virtual/mysql-5.1package, which will install the latest version:root-shell> emerge =virtual/mysql-5.1
If the package is masked (because it is not tested or certified for the current platform), use the
ACCEPT_KEYWORDSenvironment variable. For example:root-shell> ACCEPT_KEYWORDS="~x86" emerge =virtual/mysql-5.1
After installation, you should create a new database using mysql_install_db, and set the password for the root user on MySQL. You can use the configuration interface to set the password and create the initial database:
root-shell> emerge --config =dev-db/mysql-5.1.46
A sample configuration file will have been created for you in
/etc/mysql/my.cnf, and an init script will have been created in/etc/init.d/mysql.To enable MySQL to start automatically at the normal (default) run levels, you can use:
root-shell> rc-update add mysql default
MySQL on Solaris and OpenSolaris is available in a number of different formats.
For information on installing using the native Solaris
PKGformat, see Section 2.6.1, “Installing MySQL on Solaris using a SolarisPKG”.On OpenSolaris, the standard package repositories include MySQL packages specially built for OpenSolaris that include entries for the Service Management Framework (SMF) to enable control of the installation using the SMF administration commands. For more information, see Section 2.6.2, “Installing MySQL on OpenSolaris using IPS”.
To use a standard
tarbinary installation, use the notes provided in Section 2.2, “Installing MySQL from Generic Binaries on Unix/Linux”. Check the notes and hints at the end of this section for Solaris specific notes that you may need before or after installation.
To obtain a binary MySQL distribution for Solaris in tarball or PKG format, http://dev.mysql.com/downloads/mysql/5.6.html.
Additional notes to be aware of when installing and using MySQL on Solaris:
If you want to use MySQL with the
mysqluser and group, use the groupadd and useradd commands:groupadd mysql useradd -g mysql mysql
If you install MySQL using a binary tarball distribution on Solaris, you may run into trouble even before you get the MySQL distribution unpacked, as the Solaris tar cannot handle long file names. This means that you may see errors when you try to unpack MySQL.
If this occurs, you must use GNU tar (gtar) to unpack the distribution. In Solaris 10 and OpenSolaris gtar is normally located in
/usr/sfw/bin/gtar, but may not be included in the default path definition.When using Solaris 10 for x86_64, you should mount any file systems on which you intend to store
InnoDBfiles with theforcedirectiooption. (By default mounting is done without this option.) Failing to do so will cause a significant drop in performance when using theInnoDBstorage engine on this platform.If you would like MySQL to start automatically, you can copy
support-files/mysql.serverto/etc/init.dand create a symbolic link to it named/etc/rc3.d/S99mysql.server.If too many processes try to connect very rapidly to mysqld, you should see this error in the MySQL log:
Error in accept: Protocol error
You might try starting the server with the
--back_log=50option as a workaround for this.To configure the generation of core files on Solaris you should use the coreadm command. Because of the security implications of generating a core on a
setuid()application, by default, Solaris does not support core files onsetuid()programs. However, you can modify this behavior using coreadm. If you enablesetuid()core files for the current user, they will be generated using the mode 600 and owned by the superuser.
You can install MySQL on Solaris and OpenSolaris using a binary package using the native Solaris PKG format instead of the binary tarball distribution.
To use this package, download the corresponding
mysql-VERSION-solaris10-PLATFORM.pkg.gz file,
then decompress it. For example:
shell> gunzip mysql-5.6.10-solaris10-x86_64.pkg.gz
To install a new package, use pkgadd and follow the onscreen prompts. You must have root privileges to perform this operation:
shell> pkgadd -d mysql-5.6.10-solaris10-x86_64.pkg
The following packages are available:
1 mysql MySQL Community Server (GPL)
(i86pc) 5.6.10
Select package(s) you wish to process (or 'all' to process
all packages). (default: all) [?,??,q]:
The PKG installer installs all of the files and
tools needed, and then initializes your database if one does not
exist. To complete the installation, you should set the root
password for MySQL as provided in the instructions at the end of
the installation. Alternatively, you can run the
mysql_secure_installation script that comes
with the installation.
The default installation directory is
/opt/mysql. You can only change the root path
of the installation when using pkgadd, which
can be used to install MySQL in a different Solaris zone. If you
need to install in a specific directory, use the binary
tar file.
The pkg installer copies a suitable startup
script for MySQL into /etc/init.d/mysql. To
enable MySQL to startup and shutdown automatically, you should
create a link between this file and the init script directories.
For example, to ensure safe startup and shutdown of MySQL you
could use the following commands to add the right links:
shell> ln /etc/init.d/mysql /etc/rc3.d/S91mysql shell> ln /etc/init.d/mysql /etc/rc0.d/K02mysql
To remove MySQL, the installed package name is
mysql. You can use this in combination with the
pkgrm command to remove the installation.
To upgrade when using the Solaris package file format, you must remove the existing installation before installing the updated package. Removal of the package does not delete the existing database information, only the server, binaries and support files. The typical upgrade sequence is therefore:
shell> mysqladmin shutdown
shell> pkgrm mysql
shell> pkgadd -d mysql-5.6.10-solaris10-x86_64.pkg
shell> mysqld_safe &
shell> mysql_upgrade
You should check the notes in Section 2.11, “Upgrading or Downgrading MySQL” before performing any upgrade.
OpenSolaris includes standard packages for MySQL in the core
repository. The MySQL packages are based on a specific release of
MySQL and updated periodically. For the latest release you must
use either the native Solaris PKG,
tar, or source installations. The native
OpenSolaris packages include SMF files so that you can easily
control your MySQL installation, including automatic startup and
recovery, using the native service management tools.
To install MySQL on OpenSolaris, use the pkg command. You will need to be logged in as root, or use the pfexec tool, as shown in the example below:
shell> pfexec pkg install SUNWmysql56
The package set installs three individual packages,
SUNWmysql56lib, which
contains the MySQL client libraries;
SUNWmysql56r which contains
the root components, including SMF and configuration files; and
SUNWmysql56u which contains
the scripts, binary tools and other files. You can install these
packages individually if you only need the corresponding
components.
The MySQL files are installed into /usr/mysql
which symbolic links for the sub directories
(bin, lib, etc.) to a
version specific directory. For MySQL 5.6, the full
installation is located in
/usr/mysql/5.6. The default data
directory is
/var/mysql/5.6/data. The
configuration file is installed in
/etc/mysql/5.6/my.cnf. This
layout permits multiple versions of MySQL to be installed, without
overwriting the data and binaries from other versions.
Once installed, you must run mysql_install_db to initialize the database, and use the mysql_secure_installation to secure your installation.
Using SMF to manage your MySQL installation
Once installed, you can start and stop your MySQL server using the
installed SMF configuration. The service name is
mysql, or if you have multiple versions
installed, you should use the full version name, for example
mysql:version_56. To start
and enable MySQL to be started at boot time:
shell> svcadm enable mysql
To disable MySQL from starting during boot time, and shut the MySQL server down if it is running, use:
shell> svcadm disable mysql
To restart MySQL, for example after a configuration file changes,
use the restart option:
shell> svcadm restart mysql
You can also use SMF to configure the data directory and enable full 64-bit mode. For example, to set the data directory used by MySQL:
shell> svccfg svc:> select mysql:version_56 svc:/application/database/mysql:version_56> setprop mysql/data=/data0/mysql
By default, the 32-bit binaries are used. To enable the 64-bit
server on 64-bit platforms, set the
enable_64bit parameter. For example:
svc:/application/database/mysql:version_56> setprop mysql/enable_64bit=1
You need to refresh the SMF after settings these options:
shell> svcadm refresh mysql
MySQL for HP-UX is available in a number of different forms:
Using a DEPOT distribution provided at http://dev.mysql.com/downloads/. Please read the general notes on HP-UX installation before continuing. For more information on DEPOT installations, see Section 2.7.2, “Installing MySQL on HP-UX using DEPOT”.
Using a binary tarball distribution provided at http://dev.mysql.com/downloads/. Please read the general notes on HP-UX installation before continuing. For more information on binary installations, see Section 2.2, “Installing MySQL from Generic Binaries on Unix/Linux”.
Some additional notes on installing and using MySQL on HP-UX:
If you install MySQL using a binary tarball distribution on HP-UX, you may run into trouble even before you get the MySQL distribution unpacked, as the HP-UX tar cannot handle long file names. This means that you may see errors when you try to unpack MySQL.
If this occurs, you must use GNU tar (gtar) to unpack the distribution.
Because of some critical bugs in the standard HP-UX libraries, you should install the following patches before trying to run MySQL on HP-UX 11.0:
PHKL_22840 Streams cumulative PHNE_22397 ARPA cumulative
This solves the problem of getting
EWOULDBLOCKfromrecv()andEBADFfromaccept()in threaded applications.
The HP-UX DEPOT format packages can be installed using the
swinstall command. You should install the
ncurses and zlib libraries
before installing the MySQL DEPOT package. You can use the free
software depothelper tool to install these
packages and any dependencies for you automatically.
To install using the MySQL DEPOT packages, follow this guide:
Download the MySQL DEPOT package from http://dev.mysql.com/downloads/. You must decompress the package before installation:
root-shell> gunzip mysql-5.1.48-hpux11.31-ia64-64bit.depot.gz
Install the DEPOT package using swinstall:
root-shell> swinstall -s
mysql-5.1.49-hpux11.31-ia64-64bit.depotMySQL will be installed into a directory matching the depot package name, within
/usr/local. For convenience, you may want to create a symbolic link to the installed directory, for example:root-shell> ln -s mysql-5.1.49-hpux11.31-ia64-64bit mysql
Your package is now installed. You should complete the configuration of MySQL by creating a user and group:
root-shell> /usr/sbin/groupadd mysql root-shell> /usr/sbin/useradd -g mysql -d /var/lib/mysql/ -s /bin/false mysql
Create the standard database using the new user/group you have created, and set the permissions:
root-shell> cd /usr/local/ root-shell> scripts/mysql_install_db --user=mysql root-shell> chown -R root . root-shell> chown -R mysql data
Finally, secure your new installation by setting the root passwords, and then start your MySQL server using the
mysqluser:root-shell> mysql_secure_installation root-shell> mysqld_safe --user=mysql &
This section provides information about installing MySQL on variants of FreeBSD Unix.
You can install MySQL on FreeBSD by using the binary distribution provided by Oracle. For more information, see Section 2.2, “Installing MySQL from Generic Binaries on Unix/Linux”.
The easiest (and preferred) way to install MySQL is to use the
mysql-server and mysql-client
ports available at http://www.freebsd.org/. Using
these ports gives you the following benefits:
A working MySQL with all optimizations enabled that are known to work on your version of FreeBSD.
Automatic configuration and build.
Startup scripts installed in
/usr/local/etc/rc.d.The ability to use
pkg_info -Lto see which files are installed.The ability to use
pkg_deleteto remove MySQL if you no longer want it on your machine.
The MySQL build process requires GNU make (gmake) to work. If GNU make is not available, you must install it first before compiling MySQL.
To install using the ports system:
# cd /usr/ports/databases/mysql51-server # make ... # cd /usr/ports/databases/mysql51-client # make ...
The standard port installation places the server into
/usr/local/libexec/mysqld, with the startup
script for the MySQL server placed in
/usr/local/etc/rc.d/mysql-server.
Some additional notes on the BSD implementation:
To remove MySQL after installation using the ports system:
# cd /usr/ports/databases/mysql51-server # make deinstall ... # cd /usr/ports/databases/mysql51-client # make deinstall ...
If you get problems with the current date in MySQL, setting the
TZvariable should help. See Section 2.12, “Environment Variables”.
Building MySQL from the source code enables you to customize build parameters, compiler optimizations, and installation location. For a list of systems on which MySQL is known to run, see Section 2.1.1, “Operating Systems Supported by MySQL Community Server”.
Before you proceed with an installation from source, check whether Oracle produces a precompiled binary distribution for your platform and whether it works for you. We put a great deal of effort into ensuring that our binaries are built with the best possible options for optimal performance. Instructions for installing binary distributions are available in Section 2.2, “Installing MySQL from Generic Binaries on Unix/Linux”.
Source Installation Methods
There are two methods for installing MySQL from source:
Use a standard MySQL source distribution. To obtain a standard distribution, see Section 2.1.3, “How to Get MySQL”. For instructions on building from a standard distribution, see Section 2.9.2, “Installing MySQL from a Standard Source Distribution”.
Standard distributions are available as compressed tar files, Zip archives, or RPM packages. Distribution files have names of the form
mysql-,VERSION.tar.gzmysql-, orVERSION.zipmysql-, whereVERSION.rpmVERSIONis a number like5.6.10. File names for source distributions can be distinguished from those for precompiled binary distributions in that source distribution names are generic and include no platform name, whereas binary distribution names include a platform name indicating the type of system for which the distribution is intended (for example,pc-linux-i686orwinx64).Use a MySQL development tree. Development trees have not necessarily received the same level of testing as standard release distributions, so this installation method is usually required only if you need the most recent code changes. For information on building from one of the development trees, see Section 2.9.3, “Installing MySQL from a Development Source Tree”.
Source Installation System Requirements
Installation of MySQL from source requires several development tools. Some of these tools are needed no matter whether you use a standard source distribution or a development source tree. Other tool requirements depend on which installation method you use.
To install MySQL from source, your system must have the following tools, regardless of installation method:
CMake, which is used as the build framework on all platforms. CMake can be downloaded from http://www.cmake.org.
A good make program. Although some platforms come with their own make implementations, it is highly recommended that you use GNU make 3.75 or newer. It may already be available on your system as gmake. GNU make is available from http://www.gnu.org/software/make/.
A working ANSI C++ compiler. GCC 4.2.1 or later, Sun Studio 10 or later, Visual Studio 2008 or later, and many current vendor-supplied compilers are known to work.
Perl is needed if you intend to run test scripts. Most Unix-like systems include Perl. On Windows, you can use a version such as ActiveState Perl.
To install MySQL from a standard source distribution, one of the following tools is required to unpack the distribution file:
For a
.tar.gzcompressed tar file: GNUgunzipto uncompress the distribution and a reasonable tar to unpack it. If your tar program supports thezoption, it can both uncompress and unpack the file.GNU tar is known to work. The standard tar provided with some operating systems is not able to unpack the long file names in the MySQL distribution. You should download and install GNU tar, or if available, use a preinstalled version of GNU tar. Usually this is available as gnutar, gtar, or as tar within a GNU or Free Software directory, such as
/usr/sfw/binor/usr/local/bin. GNU tar is available from http://www.gnu.org/software/tar/.For a
.zipZip archive: WinZip or another tool that can read.zipfiles.For an
.rpmRPM package: The rpmbuild program used to build the distribution unpacks it.
To install MySQL from a development source tree, the following additional tools are required:
To obtain the source tree, you must have Bazaar installed. The Bazaar VCS Web site has instructions for downloading and installing Bazaar on different platforms. Bazaar is supported on any platform that supports Python, and is therefore compatible with any Linux, Unix, Windows, or Mac OS X host.
bison is needed to generate
sql_yacc.ccfromsql_yacc.yyYou should use the latest version of bison where possible. Versions 1.75 and 2.1 are known to work. There have been reported problems with bison 1.875. If you experience problems, upgrade to a later, rather than earlier, version.bison is available from http://www.gnu.org/software/bison/.
bisonfor Windows can be downloaded from http://gnuwin32.sourceforge.net/packages/bison.htm. Download the package labeled “Complete package, excluding sources”. On Windows, the default location for bison is theC:\Program Files\GnuWin32directory. Some utilities may fail to find bison because of the space in the directory name. Also, Visual Studio may simply hang if there are spaces in the path. You can resolve these problems by installing into a directory that does not contain a space; for exampleC:\GnuWin32.On OpenSolaris and Solaris Express, m4 must be installed in addition to bison. m4 is available from http://www.gnu.org/software/m4/.
If you have to install any programs, modify your
PATH environment variable to include any
directories in which the programs are located. See
Section 4.2.4, “Setting Environment Variables”.
If you run into problems and need to file a bug report, please use the instructions in Section 1.7, “How to Report Bugs or Problems”.
By default, when you install MySQL after compiling it from source,
the installation step installs files under
/usr/local/mysql. The component locations
under the installation directory are the same as for binary
distributions. See Table 2.2, “MySQL Installation Layout for Generic Unix/Linux Binary Package”,
and Section 2.3.1, “MySQL Installation Layout on Microsoft Windows”. To configure
installation locations different from the defaults, use the
options described at
Section 2.9.4, “MySQL Source-Configuration Options”.
To install MySQL from a standard source distribution:
Verify that your system satisfies the tool requirements listed at Section 2.9, “Installing MySQL from Source”.
Obtain a distribution file using the instructions in Section 2.1.3, “How to Get MySQL”.
Configure, build, and install the distribution using the instructions in this section.
Perform postinstallation procedures using the instructions in Section 2.10, “Postinstallation Setup and Testing”.
In MySQL 5.6, CMake is used as the build framework on all platforms. The instructions given here should enable you to produce a working installation. For additional information on using CMake to build MySQL, see How to Build MySQL Server with CMake.
If you start from a source RPM, use the following command to make a binary RPM that you can install. If you do not have rpmbuild, use rpm instead.
shell> rpmbuild --rebuild --clean MySQL-VERSION.src.rpm
The result is one or more binary RPM packages that you install as indicated in Section 2.5.1, “Installing MySQL from RPM Packages on Linux”.
The sequence for installation from a compressed tar file or Zip archive source distribution is similar to the process for installing from a generic binary distribution (see Section 2.2, “Installing MySQL from Generic Binaries on Unix/Linux”), except that it is used on all platforms and includes steps to configure and compile the distribution. For example, with a compressed tar file source distribution on Unix, the basic installation command sequence looks like this:
# Preconfiguration setup shell>groupadd mysqlshell>useradd -r -g mysql mysql# Beginning of source-build specific instructions shell>tar zxvf mysql-shell>VERSION.tar.gzcd mysql-shell>VERSIONcmake .shell>makeshell>make install# End of source-build specific instructions # Postinstallation setup shell>cd /usr/local/mysqlshell>chown -R mysql .shell>chgrp -R mysql .shell>scripts/mysql_install_db --user=mysqlshell>chown -R root .shell>chown -R mysql data# Next command is optional shell>cp support-files/my-medium.cnf /etc/my.cnfshell>bin/mysqld_safe --user=mysql &# Next command is optional shell>cp support-files/mysql.server /etc/init.d/mysql.server
A more detailed version of the source-build specific instructions is shown following.
The procedure shown here does not set up any passwords for MySQL accounts. After following the procedure, proceed to Section 2.10, “Postinstallation Setup and Testing”, for postinstallation setup and testing.
Perform Preconfiguration Setup
On Unix, set up the mysql user and group that
will be used to run and execute the MySQL server and own the
database directory. For details, see
Creating a
mysql System User and Group, in
Section 2.2, “Installing MySQL from Generic Binaries on Unix/Linux”. Then perform the following
steps as the mysql user, except as noted.
Obtain and Unpack the Distribution
Pick the directory under which you want to unpack the distribution and change location into it.
Obtain a distribution file using the instructions in Section 2.1.3, “How to Get MySQL”.
Unpack the distribution into the current directory:
To unpack a compressed tar file, tar can uncompress and unpack the distribution if it has
zoption support:shell>
tar zxvf mysql-VERSION.tar.gzIf your tar does not have
zoption support, use gunzip to unpack the distribution and tar to unpack it:shell>
gunzip < mysql-VERSION.tar.gz | tar xvf -Alternatively, CMake can uncompress and unpack the distribution:
shell>
cmake -E tar zxvf mysql-VERSION.tar.gzTo unpack a Zip archive, use WinZip or another tool that can read
.zipfiles.
Unpacking the distribution file creates a directory named
mysql-.
VERSION
Configure the Distribution
Change location into the top-level directory of the unpacked distribution:
shell> cd mysql-VERSION
Configure the source directory. The minimum configuration command includes no options to override configuration defaults:
shell> cmake .
On Windows, specify the development environment. For example, the following commands configure MySQL for 32-bit or 64-bit builds, respectively:
shell>cmake . -G "Visual Studio 9 2008"shell>cmake . -G "Visual Studio 9 2008 Win64"
On Mac OS X, to use the Xcode IDE:
shell> cmake . -G Xcode
When you run cmake, you might want to add options to the command line. Here are some examples:
-DBUILD_CONFIG=mysql_release: Configure the source with the same build options used by Oracle to produce binary distributions for official MySQL releases.-DCMAKE_INSTALL_PREFIX=: Configure the distribution for installation under a particular location.dir_name-DCPACK_MONOLITHIC_INSTALL=1: Cause make package to generate a single installation file rather than multiple files.-DWITH_DEBUG=1: Build the distribution with debugging support.
For a more extensive list of options, see Section 2.9.4, “MySQL Source-Configuration Options”.
To list the configuration options, use one of the following commands:
shell>cmake . -L# overview shell>cmake . -LH# overview with help text shell>cmake . -LAH# all params with help text shell>ccmake .# interactive display
If CMake fails, you might need to reconfigure by running it again with different options. If you do reconfigure, take note of the following:
If CMake is run after it has previously been run, it may use information that was gathered during its previous invocation. This information is stored in
CMakeCache.txt. When CMake starts up, it looks for that file and reads its contents if it exists, on the assumption that the information is still correct. That assumption is invalid when you reconfigure.Each time you run CMake, you must run make again to recompile. However, you may want to remove old object files from previous builds first because they were compiled using different configuration options.
To prevent old object files or configuration information from being used, run these commands on Unix before re-running CMake:
shell>make cleanshell>rm CMakeCache.txt
Or, on Windows:
shell>devenv MySQL.sln /cleanshell>del CMakeCache.txt
If you build out of the source tree (as described later), the
CMakeCache.txt file and all built files are
in the build directory, so you can remove that directory to object
files and cached configuration information.
If you are going to send mail to a MySQL mailing list to ask for
configuration assistance, first check the files in the
CMakeFiles directory for useful information
about the failure. To file a bug report, please use the
instructions in Section 1.7, “How to Report Bugs or Problems”.
Build the Distribution
On Unix:
shell>makeshell>make VERBOSE=1
The second command sets VERBOSE to show the
commands for each compiled source.
Use gmake instead on systems where you are using GNU make and it has been installed as gmake.
On Windows:
shell> devenv MySQL.sln /build RelWithDebInfo
It is possible to build out of the source tree to keep the tree
clean. If the top-level source directory is named
mysql-src under your current working
directory, you can build in a directory named
build at the same level like this:
shell>mkdir buildshell>cd buildshell>cmake ../mysql-src
If you have gotten to the compilation stage, but the distribution
does not build, see Section 2.9.5, “Dealing with Problems Compiling MySQL”, for
help. If that does not solve the problem, please enter it into our
bugs database using the instructions given in
Section 1.7, “How to Report Bugs or Problems”. If you have installed the latest
versions of the required tools, and they crash trying to process
our configuration files, please report that also. However, if you
get a command not found error or a similar
problem for required tools, do not report it. Instead, make sure
that all the required tools are installed and that your
PATH variable is set correctly so that your
shell can find them.
Install the Distribution
On Unix:
shell> make install
This installs the files under the configured installation
directory (by default, /usr/local/mysql). You
might need to run the command as root.
To install in a specific directory, add a
DESTDIR parameter to the command line:
shell> make install DESTDIR="/opt/mysql"
Alternatively, generate installation package files that you can install where you like:
shell> make package
This operation produces one or more .tar.gz
files that can be installed like generic binary distribution
packages. See Section 2.2, “Installing MySQL from Generic Binaries on Unix/Linux”. If you run
CMake with
-DCPACK_MONOLITHIC_INSTALL=1, the
operation produces a single file. Otherwise, it produces multiple
files.
On Windows, generate the data directory, then create a
.zip archive installation package:
shell>devenv MySQL.sln /build RelWithDebInfo /project initial_databaseshell>devenv MySQL.sln /build RelWithDebInfo /project package
You can install the resulting .zip archive
where you like. See Section 2.3.4, “Installing MySQL on Microsoft Windows Using a
noinstall Zip Archive”.
Perform Postinstallation Setup
The remainder of the installation process involves setting up the configuration file, creating the core databases, and starting the MySQL server. For instructions, see Section 2.10, “Postinstallation Setup and Testing”.
The accounts that are listed in the MySQL grant tables initially have no passwords. After starting the server, you should set up passwords for them using the instructions in Section 2.10, “Postinstallation Setup and Testing”.
This section discusses how to install MySQL from the latest development source code. Development trees have not necessarily received the same level of testing as standard release distributions, so this installation method is usually required only if you need the most recent code changes. Do not use a development tree for production systems. If your goal is simply to get MySQL up and running on your system, you should use a standard release distribution (either a binary or source distribution). See Section 2.1.3, “How to Get MySQL”.
MySQL development projects are hosted on Launchpad. MySQL projects, including MySQL Server, MySQL Workbench, and others are available from the Oracle/MySQL Engineering page. For the repositories related only to MySQL Server, see the MySQL Server page.
To install MySQL from a development source tree, your system must satisfy the tool requirements listed at Section 2.9, “Installing MySQL from Source”, including the requirements for Bazaar and bison.
To create a local branch of the MySQL development tree on your machine, use this procedure:
To obtain a copy of the MySQL source code, you must create a new Bazaar branch. If you do not already have a Bazaar repository directory set up, you must initialize a new directory:
shell>
mkdir mysql-servershell>bzr init-repo --trees mysql-serverThis is a one-time operation.
Assuming that you have an initialized repository directory, you can branch from the public MySQL server repositories to create a local source tree. To create a branch of a specific version:
shell>
cd mysql-servershell>bzr branch lp:mysql-server/5.6 mysql-5.6This is a one-time operation per source tree. You can branch the source trees for several versions of MySQL under the
mysql-serverdirectory.The initial download will take some time to complete, depending on the speed of your connection. Please be patient. Once you have downloaded the first tree, additional trees should take significantly less time to download.
When building from the Bazaar branch, you may want to create a copy of your active branch so that you can make configuration and other changes without affecting the original branch contents. You can achieve this by branching from the original branch:
shell>
bzr branch mysql-5.6 mysql-5.6-buildTo obtain changes made after you have set up the branch initially, update it using the
pulloption periodically. Use this command in the top-level directory of the local copy:shell>
bzr pullTo examine the changeset comments for the tree, use the
logoption to bzr:shell> bzr log
You can also browse changesets, comments, and source code online at the Launchpad MySQL Server page.
If you see diffs (changes) or code that you have a question about, do not hesitate to send email to the MySQL
internalsmailing list. See Section 1.6.1, “MySQL Mailing Lists”. If you think you have a better idea on how to do something, send an email message to the list with a patch.
After you have the local branch, you can build MySQL server from the source code. For information, see Section 2.9.2, “Installing MySQL from a Standard Source Distribution”, except that you skip the part about obtaining and unpacking the distribution.
Be careful about installing a build from a distribution source
tree on a production machine. The installation command may
overwrite your live release installation. If you already have
MySQL installed and do not want to overwrite it, run
CMake with values for the
CMAKE_INSTALL_PREFIX,
MYSQL_TCP_PORT, and
MYSQL_UNIX_ADDR options different
from those used by your production server. For additional
information about preventing multiple servers from interfering
with each other, see Section 5.4, “Running Multiple MySQL Instances on One Machine”.
Play hard with your new installation. For example, try to make new features crash. Start by running make test. See Section 22.1.2, “The MySQL Test Suite”.
The CMake program provides a great deal of control over how you configure a MySQL source distribution. Typically, you do this using options on the CMake command line. For information about options supported by CMake, run either of these commands in the top-level source directory:
shell>cmake . -LHshell>ccmake .
You can also affect CMake using certain environment variables. See Section 2.12, “Environment Variables”.
The following table shows the available CMake
options. In the Default column,
PREFIX stands for the value of the
CMAKE_INSTALL_PREFIX option, which
specifies the installation base directory. This value is used as
the parent location for several of the installation
subdirectories.
Table 2.11. MySQL Source-Configuration Option Reference (CMake)
| Formats | Description | Default | Introduced | Removed |
|---|---|---|---|---|
BUILD_CONFIG | Use same build options as official releases | | ||
CMAKE_BUILD_TYPE | Type of build to produce | RelWithDebInfo | ||
CMAKE_INSTALL_PREFIX | Installation base directory | /usr/local/mysql | ||
COMPILATION_COMMENT | Comment about compilation environment | | ||
CPACK_MONOLITHIC_INSTALL | Whether package build produces single file | OFF | ||
DEFAULT_CHARSET | The default server character set | latin1 | ||
DEFAULT_COLLATION | The default server collation | latin1_swedish_ci | ||
ENABLE_DEBUG_SYNC | Whether to enable Debug Sync support | ON | ||
ENABLE_DOWNLOADS | Whether to download optional files | OFF | ||
ENABLE_DTRACE | Whether to include DTrace support | | ||
ENABLE_GCOV | Whether to include gcov support | | 5.6.3 | |
ENABLE_GPROF | Enable gprof (optimized Linux builds only) | OFF | 5.6.6 | |
ENABLED_LOCAL_INFILE | Whether to enable LOCAL for LOAD DATA INFILE | OFF | ||
ENABLED_PROFILING | Whether to enable query profiling code | ON | ||
INSTALL_BINDIR | User executables directory | PREFIX/bin | ||
INSTALL_DOCDIR | Documentation directory | PREFIX/docs | ||
INSTALL_DOCREADMEDIR | README file directory | PREFIX | ||
INSTALL_INCLUDEDIR | Header file directory | PREFIX/include | ||
INSTALL_INFODIR | Info file directory | PREFIX/docs | ||
INSTALL_LAYOUT | Select predefined installation layout | STANDALONE | ||
INSTALL_LIBDIR | Library file directory | PREFIX/lib | ||
INSTALL_MANDIR | Manual page directory | PREFIX/man | ||
INSTALL_MYSQLSHAREDIR | Shared data directory | PREFIX/share | ||
INSTALL_MYSQLTESTDIR | mysql-test directory | PREFIX/mysql-test | ||
INSTALL_PLUGINDIR | Plugin directory | PREFIX/lib/plugin | ||
INSTALL_SBINDIR | Server executable directory | PREFIX/bin | ||
INSTALL_SCRIPTDIR | Scripts directory | PREFIX/scripts | ||
INSTALL_SHAREDIR | aclocal/mysql.m4 installation directory | PREFIX/share | ||
INSTALL_SQLBENCHDIR | sql-bench directory | PREFIX | ||
INSTALL_SUPPORTFILESDIR | Extra support files directory | PREFIX/support-files | ||
MYSQL_DATADIR | Data directory | | ||
MYSQL_MAINTAINER_MODE | Whether to enable MySQL maintainer-specific development environment | OFF | ||
MYSQL_PROJECT_NAME | Windows/Mac OS X project name | 3306 | 5.6.5 | |
MYSQL_TCP_PORT | TCP/IP port number | 3306 | ||
MYSQL_UNIX_ADDR | Unix socket file | /tmp/mysql.sock | ||
ODBC_INCLUDES | ODBC includes directory | | ||
ODBC_LIB_DIR | ODBC library directory | | ||
SYSCONFDIR | Option file directory | | ||
WITH_DEBUG | Whether to include debugging support | OFF | ||
WITH_DEFAULT_COMPILER_OPTIONS | Whether to use default compiler options | ON | 5.6.6 | |
WITH_DEFAULT_FEATURE_SET | Whether to use default feature set | ON | 5.6.6 | |
WITH_EMBEDDED_SERVER | Whether to build embedded server | OFF | ||
WITH_xxx_STORAGE_ENGINE | Compile storage engine xxx statically into server | | ||
WITH_EXTRA_CHARSETS | Which extra character sets to include | all | ||
WITH_LIBWRAP | Whether to include libwrap (TCP wrappers) support | OFF | ||
WITH_READLINE | Use bundled readline | OFF | 5.6.5 | |
WITH_SSL | Type of SSL support | no | ||
WITH_UNIXODBC | Enable unixODBC support | OFF | ||
WITH_ZLIB | Type of zlib support | system | ||
WITHOUT_xxx_STORAGE_ENGINE | Exclude storage engine xxx from build | |
The following sections provide more information about CMake options.
For boolean options, the value may be specified as 1 or
ON to enable the option, or as 0 or
OFF to disable the option.
Many options configure compile-time defaults that can be
overridden at server startup. For example, the
CMAKE_INSTALL_PREFIX,
MYSQL_TCP_PORT, and
MYSQL_UNIX_ADDR options that
configure the default installation base directory location, TCP/IP
port number, and Unix socket file can be changed at server startup
with the --basedir,
--port, and
--socket options for
mysqld. Where applicable, configuration option
descriptions indicate the corresponding mysqld
startup option.
General Options
This option configures a source distribution with the same build options used by Oracle to produce binary distributions for official MySQL releases.
The type of build to produce:
RelWithDebInfo: Enable optimizations and generate debugging information. This is the default MySQL build type.Debug: Disable optimizations and generate debugging information. This build type is also used if theWITH_DEBUGoption is enabled. That is,-DWITH_DEBUG=1has the same effect as-DCMAKE_BUILD_TYPE=Debug.
-DCPACK_MONOLITHIC_INSTALL=boolThis option affects whether the make package operation produces multiple installation package files or a single file. If disabled, the operation produces multiple installation package files, which may be useful if you want to install only a subset of a full MySQL installation. If enabled, it produces a single file for installing everything.
Installation Layout Options
The CMAKE_INSTALL_PREFIX option
indicates the base installation directory. Other options with
names of the form
INSTALL_ that
indicate component locations are interpreted relative to the
prefix and their values are relative pathnames. Their values
should not include the prefix.
xxx
-DCMAKE_INSTALL_PREFIX=dir_nameThe installation base directory.
This value can be set at server startup with the
--basediroption.Where to install user programs.
Where to install documentation.
-DINSTALL_DOCREADMEDIR=dir_nameWhere to install
READMEfiles.Where to install header files.
Where to install Info files.
Select a predefined installation layout:
STANDALONE: Same layout as used for.tar.gzand.zippackages. This is the default.RPM: Layout similar to RPM packages.SVR4: Solaris package layout.DEB: DEB package layout (experimental).
You can select a predefined layout but modify individual component installation locations by specifying other options. For example:
shell>
cmake . -DINSTALL_LAYOUT=SVR4 -DMYSQL_DATADIR=/var/mysql/dataWhere to install library files.
Where to install manual pages.
-DINSTALL_MYSQLSHAREDIR=dir_nameWhere to install shared data files.
-DINSTALL_MYSQLTESTDIR=dir_nameWhere to install the
mysql-testdirectory.The location of the plugin directory.
This value can be set at server startup with the
--plugin_diroption.Where to install the mysqld server.
Where to install mysql_install_db.
Where to install
aclocal/mysql.m4.-DINSTALL_SQLBENCHDIR=dir_nameWhere to install the
sql-benchdirectory. To not install this directory, use an empty value (-DINSTALL_SQLBENCHDIR=).-DINSTALL_SUPPORTFILESDIR=dir_nameWhere to install extra support files.
The location of the MySQL data directory.
This value can be set at server startup with the
--datadiroption.The default
my.cnfoption file directory.This location cannot be set at server startup, but you can start the server with a given option file using the
--defaults-file=option, wherefile_namefile_nameis the full path name to the file.The location of the ODBC includes directory, and may be used while configuring Connector/ODBC.
The location of the ODBC library directory, and may be used while configuring Connector/ODBC.
Storage Engine Options
Storage engines are built as plugins. You can build a plugin as a
static module (compiled into the server) or a dynamic module
(built as a dynamic library that must be installed into the server
using the INSTALL PLUGIN statement
or the --plugin-load option before
it can be used). Some plugins might not support static or dynamic
building.
The MyISAM,
MERGE,
MEMORY, and
CSV engines are mandatory (always
compiled into the server) and need not be installed explicitly.
To compile a storage engine statically into the server, use
-DWITH_.
Some permissible engine_STORAGE_ENGINE=1engine values are
ARCHIVE, BLACKHOLE,
EXAMPLE, FEDERATED,
INNOBASE (InnoDB),
PARTITION (partitioning support), and
PERFSCHEMA (Performance Schema). Examples:
-DWITH_INNOBASE_STORAGE_ENGINE=1 -DWITH_ARCHIVE_STORAGE_ENGINE=1 -DWITH_BLACKHOLE_STORAGE_ENGINE=1 -DWITH_PERFSCHEMA_STORAGE_ENGINE=1
To exclude a storage engine from the build, use
-DWITHOUT_.
Examples:
engine_STORAGE_ENGINE=1
-DWITHOUT_EXAMPLE_STORAGE_ENGINE=1 -DWITHOUT_FEDERATED_STORAGE_ENGINE=1 -DWITHOUT_PARTITION_STORAGE_ENGINE=1
If neither
-DWITH_
nor
engine_STORAGE_ENGINE-DWITHOUT_
are specified for a given storage engine, the engine is built as a
shared module, or excluded if it cannot be built as a shared
module.
engine_STORAGE_ENGINE
Feature Options
A descriptive comment about the compilation environment.
-DDEFAULT_CHARSET=charset_nameThe server character set. By default, MySQL uses the
latin1(cp1252 West European) character set.charset_namemay be one ofbinary,armscii8,ascii,big5,cp1250,cp1251,cp1256,cp1257,cp850,cp852,cp866,cp932,dec8,eucjpms,euckr,gb2312,gbk,geostd8,greek,hebrew,hp8,keybcs2,koi8r,koi8u,latin1,latin2,latin5,latin7,macce,macroman,sjis,swe7,tis620,ucs2,ujis,utf8,utf8mb4,utf16,utf16le,utf32. The permissible character sets are listed in thecmake/character_sets.cmakefile as the value ofCHARSETS_AVAILABLE.This value can be set at server startup with the
--character_set_serveroption.-DDEFAULT_COLLATION=collation_nameThe server collation. By default, MySQL uses
latin1_swedish_ci. Use theSHOW COLLATIONstatement to determine which collations are available for each character set.This value can be set at server startup with the
--collation_serveroption.Whether to compile the Debug Sync facility into the server. This facility is used for testing and debugging. This option is enabled by default, but has no effect unless MySQL is configured with debugging enabled. If debugging is enabled and you want to disable Debug Sync, use
-DENABLE_DEBUG_SYNC=0.When compiled in, Debug Sync is disabled by default at runtime. To enable it, start mysqld with the
--debug-sync-timeout=option, whereNNis a timeout value greater than 0. (The default value is 0, which disables Debug Sync.)Nbecomes the default timeout for individual synchronization points.For a description of the Debug Sync facility and how to use synchronization points, see MySQL Internals: Test Synchronization.
Whether to download optional files. For example, with this option enabled, CMake downloads the Google Test distribution that is used by the test suite to run unit tests.
Whether to include support for DTrace probes. For information about DTrace, wee Section 5.5, “Tracing mysqld Using DTrace”
Whether to include gcov support (Linux only).
Whether to enable
gprof(optimized Linux builds only). This option was added in MySQL 5.6.6.Whether to enable
LOCALcapability in the client library forLOAD DATA INFILE.This option controls client-side
LOCALcapability, but the capability can be set on the server side at server startup with the--local-infileoption. See Section 6.1.6, “Security Issues withLOAD DATA LOCAL”.Whether to enable query profiling code (for the
SHOW PROFILEandSHOW PROFILESstatements).Whether to enable a MySQL maintainer-specific development environment. If enabled, this option causes compiler warnings to become errors.
For Windows or Mac OS X, the project name to incorporate into the project file name. This option was added in MySQL 5.6.5.
The port number on on which the server listens for TCP/IP connections. The default is 3306.
This value can be set at server startup with the
--portoption.The Unix socket file path on which the server listens for socket connections. This must be an absolute path name. The default is
/tmp/mysql.sock.This value can be set at server startup with the
--socketoption.Whether to include debugging support.
Configuring MySQL with debugging support enables you to use the
--debug="d,parser_debug"option when you start the server. This causes the Bison parser that is used to process SQL statements to dump a parser trace to the server's standard error output. Typically, this output is written to the error log.-DWITH_DEFAULT_COMPILER_OPTIONS=boolWhether to use the flags from
cmake/build_configurations/compiler_options.cmake. This option was added in MySQL 5.6.6.-DWITH_DEFAULT_FEATURE_SET=boolWhether to use the flags from
cmake/build_configurations/feature_set.cmake. This option was added in MySQL 5.6.6.Whether to build the
libmysqldembedded server library.Which extra character sets to include:
all: All character sets. This is the default.complex: Complex character sets.none: No extra character sets.
Whether to include
libwrap(TCP wrappers) support.Whether to use the
readlinelibrary bundled with the distribution. This option was removed in MySQL 5.6.5 becausereadlineis no longer bundled.The type of SSL support to include, if any:
no: No SSL support. This is the default before MySQL 5.6.6. As of 5.6.6, this is no longer a permitted value and the default isbundled.yes: Use the system SSL library if present, else the library bundled with the distribution.bundled: Use the SSL library bundled with the distribution. This is the default as of MySQL 5.6.6.system: Use the system SSL library.path_name: As of MySQL 5.6.7, it is permitted to specify the path name to the OpenSSL installation to use. This can be useful instead of a value ofsystemwhen CMake detects an older or incorrect installed OpenSSL version. (Another permitted way to do the same thing is to set theCMAKE_PREFIX_PATHoption topath_name.)
For information about using SSL support, see Section 6.3.8, “Using SSL for Secure Connections”.
Some features require that the server be built with compression library support, such as the
COMPRESS()andUNCOMPRESS()functions, and compression of the client/server protocol. TheWITH_ZLIBindicates the source ofzlibsupport:bundled: Use thezliblibrary bundled with the distribution.system: Use the systemzliblibrary. This is the default.
Enables unixODBC support, for Connector/ODBC.
Compiler Flags
To specify compiler flags, set the CFLAGS and
CXXFLAGS environment variables before running
CMake. Example:
shell>CFLAGS=-DDISABLE_GRANT_OPTIONSshell>CXXFLAGS=-DDISABLE_GRANT_OPTIONSshell>export CFLAGS CXXFLAGSshell>cmake [options]
The following flags control configuration features:
If this flag is defined, it causes the
--bootstrap,--skip-grant-tables, and--init-fileoptions for mysqld to be disabled.HAVE_EMBEDDED_PRIVILEGE_CONTROLBy default, authentication for connections to the embedded server is disabled. To enable connection authentication, define this flag.
The solution to many problems involves reconfiguring. If you do reconfigure, take note of the following:
If CMake is run after it has previously been run, it may use information that was gathered during its previous invocation. This information is stored in
CMakeCache.txt. When CMake starts up, it looks for that file and reads its contents if it exists, on the assumption that the information is still correct. That assumption is invalid when you reconfigure.Each time you run CMake, you must run make again to recompile. However, you may want to remove old object files from previous builds first because they were compiled using different configuration options.
To prevent old object files or configuration information from being used, run these commands on Unix before re-running CMake:
shell>make cleanshell>rm CMakeCache.txt
Or, on Windows:
shell>devenv MySQL.sln /cleanshell>del CMakeCache.txt
If you build out of the source tree, remove and recreate your build directory before re-running CMake. For instructions on building outside of the source tree, see How to Build MySQL Server with CMake.
On some systems, warnings may occur due to differences in system include files. The following list describes other problems that have been found to occur most often when compiling MySQL:
To define flags to be used by your C or C++ compilers, specify them using the
CFLAGSandCXXFLAGSenvironment variables. You can also specify the compiler names this way usingCCandCXX. For example:shell>
CC=gccshell>CFLAGS=-O3shell>CXX=g++shell>CXXFLAGS=-O3shell>export CC CFLAGS CXX CXXFLAGSTo see what flags you might need to specify, invoke mysql_config with the
--cflagsand--cxxflagsoptions.If compilation fails, check whether the
MYSQL_MAINTAINER_MODEoption is enabled. This mode causes compiler warnings to become errors, so disabling it may enable compilation to proceed.If your compile fails with errors such as any of the following, you must upgrade your version of make to GNU make:
make: Fatal error in reader: Makefile, line 18: Badly formed macro assignment
Or:
make: file `Makefile' line 18: Must be a separator (:
Or:
pthread.h: No such file or directory
Solaris and FreeBSD are known to have troublesome make programs.
GNU make 3.75 is known to work.
The
sql_yacc.ccfile is generated fromsql_yacc.yy. Normally, the build process does not need to createsql_yacc.ccbecause MySQL comes with a pregenerated copy. However, if you do need to re-create it, you might encounter this error:"sql_yacc.yy", line
xxxfatal: default action causes potential...This is a sign that your version of yacc is deficient. You probably need to install bison (the GNU version of yacc) and use that instead.
Versions of bison older than 1.75 may report this error:
sql_yacc.yy:#####: fatal error: maximum table size (32767) exceeded
The maximum table size is not actually exceeded; the error is caused by bugs in older versions of bison.
For information about acquiring or updating tools, see the system requirements in Section 2.9, “Installing MySQL from Source”.
Third-party tools that need to determine the MySQL version from
the MySQL source can read the VERSION file in
the top-level source directory. The file lists the pieces of the
version separately. For example, if the version is 5.5.8, the file
looks like this:
MYSQL_VERSION_MAJOR=5 MYSQL_VERSION_MINOR=5 MYSQL_VERSION_PATCH=8 MYSQL_VERSION_EXTRA=
If the source is not for a General Availability (GA) release, the
MYSQL_VERSION_EXTRA value will be nonempty. For
example, the value for a Release Candidate release would look like
this:
MYSQL_VERSION_EXTRA=rc
To construct a five-digit number from the version components, use this formula:
MYSQL_VERSION_MAJOR*10000 + MYSQL_VERSION_MINOR*100 + MYSQL_VERSION_PATCH
After installing MySQL, there are some issues that you should address. For example, on Unix, you should initialize the data directory and create the MySQL grant tables. On all platforms, an important security concern is that the initial accounts in the grant tables have no passwords. You should assign passwords to prevent unauthorized access to the MySQL server. Optionally, you can create time zone tables to enable recognition of named time zones.
The following sections include postinstallation procedures that are specific to Windows systems and to Unix systems. Another section, Section 2.10.1.3, “Starting and Troubleshooting the MySQL Server”, applies to all platforms; it describes what to do if you have trouble getting the server to start. Section 2.10.2, “Securing the Initial MySQL Accounts”, also applies to all platforms. You should follow its instructions to make sure that you have properly protected your MySQL accounts by assigning passwords to them.
When you are ready to create additional user accounts, you can find information on the MySQL access control system and account management in Section 6.2, “The MySQL Access Privilege System”, and Section 6.3, “MySQL User Account Management”.
After installing MySQL on Unix, you must initialize the grant tables, start the server, and make sure that the server works satisfactorily. You may also wish to arrange for the server to be started and stopped automatically when your system starts and stops. You should also assign passwords to the accounts in the grant tables.
On Unix, the grant tables are set up by the mysql_install_db program. For some installation methods, this program is run for you automatically if an existing database cannot be found.
If you install MySQL on Linux using RPM distributions, the server RPM runs mysql_install_db.
Using the native packaging system on many platforms, including Debian Linux, Ubuntu Linux, Gentoo Linux and others, the mysql_install_db command is run for you.
If you install MySQL on Mac OS X using a PKG distribution, the installer runs mysql_install_db.
For other platforms and installation types, including generic binary and source installs, you will need to run mysql_install_db yourself.
The following procedure describes how to initialize the grant tables (if that has not previously been done) and start the server. It also suggests some commands that you can use to test whether the server is accessible and working properly. For information about starting and stopping the server automatically, see Section 2.10.1.2, “Starting and Stopping MySQL Automatically”.
After you complete the procedure and have the server running, you should assign passwords to the accounts created by mysql_install_db and perhaps restrict access to test databases. For instructions, see Section 2.10.2, “Securing the Initial MySQL Accounts”.
In the examples shown here, the server runs under the user ID of
the mysql login account. This assumes that such
an account exists. Either create the account if it does not exist,
or substitute the name of a different existing login account that
you plan to use for running the server. For information about
creating the account, see
Creating a
mysql System User and Group, in
Section 2.2, “Installing MySQL from Generic Binaries on Unix/Linux”.
Change location into the top-level directory of your MySQL installation, represented here by
BASEDIR:shell>
cdBASEDIRBASEDIRis the installation directory for your MySQL instance. It is likely to be something like/usr/local/mysqlor/usr/local. The following steps assume that you have changed location to this directory.You will find several files and subdirectories in the
BASEDIRdirectory. The most important for installation purposes are thebinandscriptssubdirectories:The
bindirectory contains client programs and the server. You should add the full path name of this directory to yourPATHenvironment variable so that your shell finds the MySQL programs properly. See Section 2.12, “Environment Variables”.The
scriptsdirectory contains the mysql_install_db script used to initialize themysqldatabase containing the grant tables that store the server access permissions.
If necessary, ensure that the distribution contents are accessible to
mysql. If you installed the distribution asmysql, no further action is required. If you installed the distribution asroot, its contents will be owned byroot. Change its ownership tomysqlby executing the following commands asrootin the installation directory. The first command changes the owner attribute of the files to themysqluser. The second changes the group attribute to themysqlgroup.shell>
chown -R mysql .shell>chgrp -R mysql .If necessary, run the mysql_install_db program to set up the initial MySQL grant tables containing the privileges that determine how users are permitted to connect to the server. You will need to do this if you used a distribution type for which the installation procedure does not run the program for you.
shell>
scripts/mysql_install_db --user=mysqlTypically, mysql_install_db needs to be run only the first time you install MySQL, so you can skip this step if you are upgrading an existing installation, However, mysql_install_db does not overwrite any existing privilege tables, so it should be safe to run in any circumstances.
It might be necessary to specify other options such as
--basediror--datadirif mysql_install_db does not identify the correct locations for the installation directory or data directory. For example:shell>
scripts/mysql_install_db --user=mysql \--basedir=/opt/mysql/mysql \--datadir=/opt/mysql/mysql/dataThe mysql_install_db script creates the server's data directory with
mysqlas the owner. Under the data directory, it creates directories for themysqldatabase that holds the grant tables and thetestdatabase that you can use to test MySQL. The script also creates privilege table entries forrootand anonymous-user accounts. The accounts have no passwords initially. Section 2.10.2, “Securing the Initial MySQL Accounts”, describes the initial privileges. Briefly, these privileges permit the MySQLrootuser to do anything, and permit anybody to create or use databases with a name oftestor starting withtest_. See Section 6.2, “The MySQL Access Privilege System”, for a complete listing and description of the grant tables.For a more secure installation, invoke mysql_install_db with the
--random-passwordsoption. This causes it to assign a random password to the MySQLrootaccounts, set the “password expired” flag for those accounts, and remove the anonymous-user MySQL accounts. For additional details, see Section 4.4.3, “mysql_install_db — Initialize MySQL Data Directory”. (Install operations using RPMs for Unbreakable Linux Network are unaffected because they do not use mysql_install_db.)It is important to make sure that the database directories and files are owned by the
mysqllogin account so that the server has read and write access to them when you run it later. To ensure this if you run mysql_install_db asroot, include the--useroption as shown. Otherwise, you should execute the script while logged in asmysql, in which case you can omit the--useroption from the command.If you do not want to have the
testdatabase, you can remove it after starting the server, using the instructions in Section 2.10.2, “Securing the Initial MySQL Accounts”.If you have trouble with mysql_install_db at this point, see Section 2.10.1.1, “Problems Running mysql_install_db”.
Most of the MySQL installation can be owned by
rootif you like. The exception is that the data directory must be owned bymysql. To accomplish this, run the following commands asrootin the installation directory:shell>
chown -R root .shell>chown -R mysql dataIf the plugin directory (the directory named by the
plugin_dirsystem variable) is writable by the server, it may be possible for a user to write executable code to a file in the directory usingSELECT ... INTO DUMPFILE. This can be prevented by makingplugin_dirread only to the server or by setting--secure-file-privto a directory whereSELECTwrites can be made safely.If you installed MySQL using a source distribution, you may want to optionally copy one of the provided configuration files from the
support-filesdirectory into your/etcdirectory. There are different sample configuration files for different use cases, server types, and CPU and RAM configurations. If you want to use one of these standard files, you should copy it to/etc/my.cnf, or/etc/mysql/my.cnfand edit and check the configuration before starting your MySQL server for the first time.If you do not copy one of the standard configuration files, the MySQL server will be started with the default settings.
If you want MySQL to start automatically when you boot your machine, you can copy
support-files/mysql.serverto the location where your system has its startup files. More information can be found in themysql.serverscript itself, and in Section 2.10.1.2, “Starting and Stopping MySQL Automatically”.Start the MySQL server:
shell>
bin/mysqld_safe --user=mysql &It is important that the MySQL server be run using an unprivileged (non-
root) login account. To ensure this if you run mysqld_safe asroot, include the--useroption as shown. Otherwise, you should execute the script while logged in asmysql, in which case you can omit the--useroption from the command.For further instructions for running MySQL as an unprivileged user, see Section 6.1.5, “How to Run MySQL as a Normal User”.
If the command fails immediately and prints
mysqld ended, look for information in the error log (which by default is thehost_name.errIf you neglected to create the grant tables by running mysql_install_db before proceeding to this step, the following message appears in the error log file when you start the server:
mysqld: Can't find file: 'host.frm'
This error also occurs if you run mysql_install_db as
rootwithout the--useroption. Remove thedatadirectory and run mysql_install_db with the--useroption as described previously.If you have other problems starting the server, see Section 2.10.1.3, “Starting and Troubleshooting the MySQL Server”. For more information about mysqld_safe, see Section 4.3.2, “mysqld_safe — MySQL Server Startup Script”.
Use mysqladmin to verify that the server is running. The following commands provide simple tests to check whether the server is up and responding to connections:
shell>
bin/mysqladmin versionshell>bin/mysqladmin variablesThe output from mysqladmin version varies slightly depending on your platform and version of MySQL, but should be similar to that shown here:
shell>
bin/mysqladmin versionmysqladmin Ver 14.12 Distrib 5.6.10, for pc-linux-gnu on i686 ... Server version 5.6.10 Protocol version 10 Connection Localhost via UNIX socket UNIX socket /var/lib/mysql/mysql.sock Uptime: 14 days 5 hours 5 min 21 sec Threads: 1 Questions: 366 Slow queries: 0 Opens: 0 Flush tables: 1 Open tables: 19 Queries per second avg: 0.000To see what else you can do with mysqladmin, invoke it with the
--helpoption.Verify that you can shut down the server:
shell>
bin/mysqladmin -u root shutdownVerify that you can start the server again. Do this by using mysqld_safe or by invoking mysqld directly. For example:
shell>
bin/mysqld_safe --user=mysql &If mysqld_safe fails, see Section 2.10.1.3, “Starting and Troubleshooting the MySQL Server”.
Run some simple tests to verify that you can retrieve information from the server. The output should be similar to what is shown here:
shell>
bin/mysqlshow+--------------------+ | Databases | +--------------------+ | information_schema | | mysql | | test | +--------------------+ shell>bin/mysqlshow mysqlDatabase: mysql +---------------------------+ | Tables | +---------------------------+ | columns_priv | | db | | event | | func | | help_category | | help_keyword | | help_relation | | help_topic | | host | | plugin | | proc | | procs_priv | | servers | | tables_priv | | time_zone | | time_zone_leap_second | | time_zone_name | | time_zone_transition | | time_zone_transition_type | | user | +---------------------------+ shell>bin/mysql -e "SELECT Host,Db,User FROM db" mysql+------+--------+------+ | host | db | user | +------+--------+------+ | % | test | | | % | test_% | | +------+--------+------+There is a benchmark suite in the
sql-benchdirectory (under the MySQL installation directory) that you can use to compare how MySQL performs on different platforms. The benchmark suite is written in Perl. It requires the Perl DBI module that provides a database-independent interface to the various databases, and some other additional Perl modules:DBI DBD::mysql Data::Dumper Data::ShowTable
These modules can be obtained from CPAN (http://www.cpan.org/). See also Section 2.13.1, “Installing Perl on Unix”.
The
sql-bench/Resultsdirectory contains the results from many runs against different databases and platforms. To run all tests, execute these commands:shell>
cd sql-benchshell>perl run-all-testsIf you do not have the
sql-benchdirectory, you probably installed MySQL using RPM files other than the source RPM. (The source RPM includes thesql-benchbenchmark directory.) In this case, you must first install the benchmark suite before you can use it. There are separate benchmark RPM files namedmysql-bench-that contain benchmark code and data.VERSION.i386.rpmIf you have a source distribution, there are also tests in its
testssubdirectory that you can run. For example, to runauto_increment.tst, execute this command from the top-level directory of your source distribution:shell>
mysql -vvf test < ./tests/auto_increment.tstThe expected result of the test can be found in the
./tests/auto_increment.resfile.At this point, you should have the server running. However, none of the initial MySQL accounts have a password, and the server permits permissive access to test databases. To tighten security, follow the instructions in Section 2.10.2, “Securing the Initial MySQL Accounts”.
The MySQL 5.6 installation procedure creates time
zone tables in the mysql database but does not
populate them. To do so, use the instructions in
Section 10.6, “MySQL Server Time Zone Support”.
To make it more convenient to invoke programs installed in the
bin directory under the installation
directory, you can add that directory to your
PATH environment variable setting. That enables
you to run a program by typing only its name, not its entire path
name. See Section 4.2.4, “Setting Environment Variables”.
You can set up new accounts using the
bin/mysql_setpermission script if you install
the DBI and DBD::mysql Perl
modules. See Section 4.6.14, “mysql_setpermission — Interactively Set Permissions in Grant
Tables”. For Perl
module installation instructions, see
Section 2.13, “Perl Installation Notes”.
If you would like to use mysqlaccess and have
the MySQL distribution in some nonstandard location, you must
change the location where mysqlaccess expects
to find the mysql client. Edit the
bin/mysqlaccess script at approximately line
18. Search for a line that looks like this:
$MYSQL = '/usr/local/bin/mysql'; # path to mysql executable
Change the path to reflect the location where
mysql actually is stored on your system. If you
do not do this, a Broken pipe error will occur
when you run mysqlaccess.
The purpose of the mysql_install_db script is to generate new MySQL privilege tables. It does not overwrite existing MySQL privilege tables, and it does not affect any other data.
If you want to re-create your privilege tables, first stop the
mysqld server if it is running. Then rename
the mysql directory under the data
directory to save it, and then run
mysql_install_db. Suppose that your current
directory is the MySQL installation directory and that
mysql_install_db is located in the
bin directory and the data directory is
named data. To rename the
mysql database and re-run
mysql_install_db, use these commands.
shell>mv data/mysql data/mysql.oldshell>scripts/mysql_install_db --user=mysql
When you run mysql_install_db, you might encounter the following problems:
mysql_install_db fails to install the grant tables
You may find that mysql_install_db fails to install the grant tables and terminates after displaying the following messages:
Starting mysqld daemon with databases from XXXXXX mysqld ended
In this case, you should examine the error log file very carefully. The log should be located in the directory
XXXXXXnamed by the error message and should indicate why mysqld did not start. If you do not understand what happened, include the log when you post a bug report. See Section 1.7, “How to Report Bugs or Problems”.There is a mysqld process running
This indicates that the server is running, in which case the grant tables have probably been created already. If so, there is no need to run mysql_install_db at all because it needs to be run only once (when you install MySQL the first time).
Installing a second mysqld server does not work when one server is running
This can happen when you have an existing MySQL installation, but want to put a new installation in a different location. For example, you might have a production installation, but you want to create a second installation for testing purposes. Generally the problem that occurs when you try to run a second server is that it tries to use a network interface that is in use by the first server. In this case, you should see one of the following error messages:
Can't start server: Bind on TCP/IP port: Address already in use Can't start server: Bind on unix socket...
For instructions on setting up multiple servers, see Section 5.4, “Running Multiple MySQL Instances on One Machine”.
You do not have write access to the
/tmpdirectoryIf you do not have write access to create temporary files or a Unix socket file in the default location (the
/tmpdirectory) or theTMP_DIRenvironment variable, if it has been set, an error occurs when you run mysql_install_db or the mysqld server.You can specify different locations for the temporary directory and Unix socket file by executing these commands prior to starting mysql_install_db or mysqld, where
some_tmp_diris the full path name to some directory for which you have write permission:shell>
TMPDIR=/shell>some_tmp_dir/MYSQL_UNIX_PORT=/shell>some_tmp_dir/mysql.sockexport TMPDIR MYSQL_UNIX_PORTThen you should be able to run mysql_install_db and start the server with these commands:
shell>
scripts/mysql_install_db --user=mysqlshell>bin/mysqld_safe --user=mysql &If mysql_install_db is located in the
scriptsdirectory, modify the first command toscripts/mysql_install_db.See Section C.5.4.5, “How to Protect or Change the MySQL Unix Socket File”, and Section 2.12, “Environment Variables”.
There are some alternatives to running the mysql_install_db script provided in the MySQL distribution:
If you want the initial privileges to be different from the standard defaults, you can modify mysql_install_db before you run it. However, it is preferable to use
GRANTandREVOKEto change the privileges after the grant tables have been set up. In other words, you can run mysql_install_db, and then usemysql -u root mysqlto connect to the server as the MySQLrootuser so that you can issue the necessaryGRANTandREVOKEstatements.If you want to install MySQL on several machines with the same privileges, you can put the
GRANTandREVOKEstatements in a file and execute the file as a script usingmysqlafter running mysql_install_db. For example:shell>
scripts/mysql_install_db --user=mysqlshell>bin/mysql -u root < your_script_fileBy doing this, you can avoid having to issue the statements manually on each machine.
It is possible to re-create the grant tables completely after they have previously been created. You might want to do this if you are just learning how to use
GRANTandREVOKEand have made so many modifications after running mysql_install_db that you want to wipe out the tables and start over.To re-create the grant tables, remove all the
.frm,.MYI, and.MYDfiles in themysqldatabase directory. Then run the mysql_install_db script again.You can start mysqld manually using the
--skip-grant-tablesoption and add the privilege information yourself using mysql:shell>
bin/mysqld_safe --user=mysql --skip-grant-tables &shell>bin/mysql mysqlFrom mysql, manually execute the SQL commands contained in mysql_install_db. Make sure that you run mysqladmin flush-privileges or mysqladmin reload afterward to tell the server to reload the grant tables.
Note that by not using mysql_install_db, you not only have to populate the grant tables manually, you also have to create them first.
Generally, you start the mysqld server in one of these ways:
Invoke mysqld directly. This works on any platform.
Run the MySQL server as a Windows service. The service can be set to start the server automatically when Windows starts, or as a manual service that you start on request. For instructions, see Section 2.3.4.8, “Starting MySQL as a Windows Service”.
Invoke mysqld_safe, which tries to determine the proper options for mysqld and then runs it with those options. This script is used on Unix and Unix-like systems. See Section 4.3.2, “mysqld_safe — MySQL Server Startup Script”.
Invoke mysql.server. This script is used primarily at system startup and shutdown on systems that use System V-style run directories (that is,
/etc/init.dand run-level specific directories), where it usually is installed under the namemysql. The mysql.server script starts the server by invoking mysqld_safe. See Section 4.3.3, “mysql.server — MySQL Server Startup Script”.On Mac OS X, install a separate MySQL Startup Item package to enable the automatic startup of MySQL on system startup. The Startup Item starts the server by invoking mysql.server. See Section 2.4.3, “Installing the MySQL Startup Item”, for details. A MySQL Preference Pane also provides control for starting and stopping MySQL through the System Preferences, see Section 2.4.4, “Installing and Using the MySQL Preference Pane”.
Use the Solaris/OpenSolaris service management framework (SMF) system to initiate and control MySQL startup. For more information, see Section 2.6.2, “Installing MySQL on OpenSolaris using IPS”.
The mysqld_safe and mysql.server scripts, Windows server, Solaris/OpenSolaris SMF, and the Mac OS X Startup Item (or MySQL Preference Pane) can be used to start the server manually, or automatically at system startup time. mysql.server and the Startup Item also can be used to stop the server.
To start or stop the server manually using the
mysql.server script, invoke it with
start or stop arguments:
shell>mysql.server startshell>mysql.server stop
Before mysql.server starts the server, it
changes location to the MySQL installation directory, and then
invokes mysqld_safe. If you want the server
to run as some specific user, add an appropriate
user option to the
[mysqld] group of the
/etc/my.cnf option file, as shown later in
this section. (It is possible that you will need to edit
mysql.server if you've installed a binary
distribution of MySQL in a nonstandard location. Modify it to
change location into the proper directory before it runs
mysqld_safe. If you do this, your modified
version of mysql.server may be overwritten if
you upgrade MySQL in the future, so you should make a copy of
your edited version that you can reinstall.)
mysql.server stop stops the server by sending a signal to it. You can also stop the server manually by executing mysqladmin shutdown.
To start and stop MySQL automatically on your server, you need
to add start and stop commands to the appropriate places in your
/etc/rc* files.
If you use the Linux server RPM package
(MySQL-server-),
or a native Linux package installation, the
mysql.server script may be installed in the
VERSION.rpm/etc/init.d directory with the name
mysql. See
Section 2.5.1, “Installing MySQL from RPM Packages on Linux”, for more information
on the Linux RPM packages.
Some vendors provide RPM packages that install a startup script under a different name such as mysqld.
If you install MySQL from a source distribution or using a
binary distribution format that does not install
mysql.server automatically, you can install
it manually. The script can be found in the
support-files directory under the MySQL
installation directory or in a MySQL source tree.
To install mysql.server manually, copy it to
the /etc/init.d directory with the name
mysql, and then make it executable. Do this
by changing location into the appropriate directory where
mysql.server is located and executing these
commands:
shell>cp mysql.server /etc/init.d/mysqlshell>chmod +x /etc/init.d/mysql
Older Red Hat systems use the
/etc/rc.d/init.d directory rather than
/etc/init.d. Adjust the preceding
commands accordingly. Alternatively, first create
/etc/init.d as a symbolic link that
points to /etc/rc.d/init.d:
shell>cd /etcshell>ln -s rc.d/init.d .
After installing the script, the commands needed to activate it to run at system startup depend on your operating system. On Linux, you can use chkconfig:
shell> chkconfig --add mysql
On some Linux systems, the following command also seems to be necessary to fully enable the mysql script:
shell> chkconfig --level 345 mysql on
On FreeBSD, startup scripts generally should go in
/usr/local/etc/rc.d/. The
rc(8) manual page states that scripts in this
directory are executed only if their basename matches the
*.sh shell file name pattern. Any other files
or directories present within the directory are silently
ignored. In other words, on FreeBSD, you should install the
mysql.server script as
/usr/local/etc/rc.d/mysql.server.sh to
enable automatic startup.
As an alternative to the preceding setup, some operating systems
also use /etc/rc.local or
/etc/init.d/boot.local to start additional
services on startup. To start up MySQL using this method, you
could append a command like the one following to the appropriate
startup file:
/bin/sh -c 'cd /usr/local/mysql; ./bin/mysqld_safe --user=mysql &'
For other systems, consult your operating system documentation to see how to install startup scripts.
You can add options for mysql.server in a
global /etc/my.cnf file. A typical
/etc/my.cnf file might look like this:
[mysqld] datadir=/usr/local/mysql/var socket=/var/tmp/mysql.sock port=3306 user=mysql [mysql.server] basedir=/usr/local/mysql
The mysql.server script supports the
following options: basedir,
datadir, and pid-file. If
specified, they must be placed in an option
file, not on the command line. mysql.server
supports only start and
stop as command-line arguments.
The following table shows which option groups the server and each startup script read from option files.
Table 2.12. MySQL Startup scripts and supported server option groups
| Script | Option Groups |
|---|---|
| mysqld | [mysqld], [server],
[mysqld- |
| mysqld_safe | [mysqld], [server],
[mysqld_safe] |
| mysql.server | [mysqld], [mysql.server],
[server] |
[mysqld-
means that groups with names like
major_version][mysqld-5.5] and
[mysqld-5.6] are read by servers
having versions 5.5.x, 5.6.x, and so
forth. This feature can be used to specify options that can be
read only by servers within a given release series.
For backward compatibility, mysql.server also
reads the [mysql_server] group and
mysqld_safe also reads the
[safe_mysqld] group. However, you should
update your option files to use the
[mysql.server] and
[mysqld_safe] groups instead when using MySQL
5.6.
For more information on MySQL configuration files and their structure and contents, see Section 4.2.3.3, “Using Option Files”.
This section provides troubleshooting suggestions for problems starting the server on Unix. If you are using Windows, see Section 2.3.5, “Troubleshooting a Microsoft Windows MySQL Server Installation”.
If you have problems starting the server, here are some things to try:
Check the error log to see why the server does not start. Log files are located in the data directory (typically
C:\Program Files\MySQL\MySQL Server 5.6\dataon Windows,/usr/local/mysql/datafor a Unix binary distribution, and/usr/local/varfor a Unix source distribution). Look in the data directory for files with names of the formhost_name.errhost_name.loghost_nameis the name of your server host. Then examine the last few lines of these files. On Unix, usetailto display them:shell>
tailshell>host_name.errtailhost_name.logSpecify any special options needed by the storage engines you are using. You can create a
my.cnffile and specify startup options for the engines that you plan to use. If you are going to use storage engines that support transactional tables (InnoDB,NDB), be sure that you have them configured the way you want before starting the server. If you are usingInnoDBtables, see Section 14.2.1.2, “ConfiguringInnoDB” for guidelines and Section 14.2.7, “InnoDBStartup Options and System Variables” for option syntax.Although storage engines use default values for options that you omit, Oracle recommends that you review the available options and specify explicit values for any options whose defaults are not appropriate for your installation.
Make sure that the server knows where to find the data directory. The mysqld server uses this directory as its current directory. This is where it expects to find databases and where it expects to write log files. The server also writes the pid (process ID) file in the data directory.
The default data directory location is hardcoded when the server is compiled. To determine what the default path settings are, invoke mysqld with the
--verboseand--helpoptions. If the data directory is located somewhere else on your system, specify that location with the--datadiroption to mysqld or mysqld_safe, on the command line or in an option file. Otherwise, the server will not work properly. As an alternative to the--datadiroption, you can specify mysqld the location of the base directory under which MySQL is installed with the--basedir, and mysqld looks for thedatadirectory there.To check the effect of specifying path options, invoke mysqld with those options followed by the
--verboseand--helpoptions. For example, if you change location into the directory where mysqld is installed and then run the following command, it shows the effect of starting the server with a base directory of/usr/local:shell>
./mysqld --basedir=/usr/local --verbose --helpYou can specify other options such as
--datadiras well, but--verboseand--helpmust be the last options.Once you determine the path settings you want, start the server without
--verboseand--help.If mysqld is currently running, you can find out what path settings it is using by executing this command:
shell>
mysqladmin variablesOr:
shell>
mysqladmin -hhost_namevariableshost_nameis the name of the MySQL server host.Make sure that the server can access the data directory. The ownership and permissions of the data directory and its contents must allow the server to read and modify them.
If you get
Errcode 13(which meansPermission denied) when starting mysqld, this means that the privileges of the data directory or its contents do not permit server access. In this case, you change the permissions for the involved files and directories so that the server has the right to use them. You can also start the server asroot, but this raises security issues and should be avoided.On Unix, change location into the data directory and check the ownership of the data directory and its contents to make sure the server has access. For example, if the data directory is
/usr/local/mysql/var, use this command:shell>
ls -la /usr/local/mysql/varIf the data directory or its files or subdirectories are not owned by the login account that you use for running the server, change their ownership to that account. If the account is named
mysql, use these commands:shell>
chown -R mysql /usr/local/mysql/varshell>chgrp -R mysql /usr/local/mysql/varEven with correct ownership, MySQL might fail to start up if there is other security software running on your system that manages application access to various parts of the file system. In this case, reconfigure that software to enable mysqld to access the directories it uses during normal operation.
Verify that the network interfaces the server wants to use are available.
If either of the following errors occur, it means that some other program (perhaps another mysqld server) is using the TCP/IP port or Unix socket file that mysqld is trying to use:
Can't start server: Bind on TCP/IP port: Address already in use Can't start server: Bind on unix socket...
Use ps to determine whether you have another mysqld server running. If so, shut down the server before starting mysqld again. (If another server is running, and you really want to run multiple servers, you can find information about how to do so in Section 5.4, “Running Multiple MySQL Instances on One Machine”.)
If no other server is running, execute the command
telnet. (The default MySQL port number is 3306.) Then press Enter a couple of times. If you do not get an error message likeyour_host_nametcp_ip_port_numbertelnet: Unable to connect to remote host: Connection refused, some other program is using the TCP/IP port that mysqld is trying to use. Track down what program this is and disable it, or tell mysqld to listen to a different port with the--portoption. In this case, specify the same non-default port number for client programs when connecting to the server using TCP/IP.Another reason the port might be inaccessible is that you have a firewall running that blocks connections to it. If so, modify the firewall settings to permit access to the port.
If the server starts but you cannot connect to it, make sure that you have an entry in
/etc/hoststhat looks like this:127.0.0.1 localhost
If you cannot get mysqld to start, try to make a trace file to find the problem by using the
--debugoption. See MySQL Internals: Porting to Other Systems.
Part of the MySQL installation process is to set up the
mysql database that contains the grant tables:
Windows distributions contain preinitialized grant tables.
On Unix, the mysql_install_db program populates the grant tables. Some installation methods run this program for you. Others require that you execute it manually. For details, see Section 2.10.1, “Unix Postinstallation Procedures”.
The mysql.user grant table defines the initial
MySQL user accounts and their access privileges:
Some accounts have the user name
root. These are superuser accounts that have all privileges and can do anything. The initialrootaccount passwords are empty, so anyone can connect to the MySQL server asrootwithout a password and be granted all privileges.On Windows,
rootaccounts are created that permit connections from the local host only. Connections can be made by specifying the host namelocalhost, the IP address127.0.0.1, or the IPv6 address::1. If the user selects the Enable root access from remote machines option during installation, the Windows installer creates anotherrootaccount that permits connections from any host.On Unix, each
rootaccount permits connections from the local host. Connections can be made by specifying the host namelocalhost, the IP address127.0.0.1, the IPv6 address::1, or the actual host name or IP address.
An attempt to connect to the host
127.0.0.1normally resolves to thelocalhostaccount. However, this fails if the server is run with the--skip-name-resolveoption, so the127.0.0.1account is useful in that case. The::1account is used for IPv6 connections.Some accounts are for anonymous users. These have an empty user name. The anonymous accounts have no password, so anyone can use them to connect to the MySQL server.
On Windows, there is one anonymous account that permits connections from the local host. Connections can be made by specifying a host name of
localhost.On Unix, each anonymous account permits connections from the local host. Connections can be made by specifying a host name of
localhostfor one of the accounts, or the actual host name or IP address for the other.
To display which accounts exist in the
mysql.user table and check whether their
passwords are empty, use the following statement:
mysql> SELECT User, Host, Password FROM mysql.user;
+------+--------------------+----------+
| User | Host | Password |
+------+--------------------+----------+
| root | localhost | |
| root | myhost.example.com | |
| root | 127.0.0.1 | |
| root | ::1 | |
| | localhost | |
| | myhost.example.com | |
+------+--------------------+----------+
This output indicates that there are several
root and anonymous-user accounts, none of which
have passwords. The output might differ on your system, but the
presence of accounts with empty passwords means that your MySQL
installation is unprotected until you do something about it:
You should assign a password to each MySQL
rootaccount.If you want to prevent clients from connecting as anonymous users without a password, you should either assign a password to each anonymous account or else remove the accounts.
In addition, the mysql.db table contains rows
that permit all accounts to access the test
database and other databases with names that start with
test_. This is true even for accounts that
otherwise have no special privileges such as the default anonymous
accounts. This is convenient for testing but inadvisable on
production servers. Administrators who want database access
restricted only to accounts that have permissions granted
explicitly for that purpose should remove these
mysql.db table rows.
The following instructions describe how to set up passwords for
the initial MySQL accounts, first for the root
accounts, then for the anonymous accounts. The instructions also
cover how to remove the anonymous accounts, should you prefer not
to permit anonymous access at all, and describe how to remove
permissive access to test databases. Replace
newpwd in the examples with the
password that you want to use. Replace
host_name with the name of the server
host. You can determine this name from the output of the preceding
SELECT statement. For the output
shown, host_name is
myhost.example.com.
For additional information about setting passwords, see
Section 6.3.5, “Assigning Account Passwords”. If you forget your
root password after setting it, see
Section C.5.4.1, “How to Reset the Root Password”.
You might want to defer setting the passwords until later, to avoid the need to specify them while you perform additional setup or testing. However, be sure to set them before using your installation for production purposes.
To set up additional accounts, see Section 6.3.2, “Adding User Accounts”.
Assigning root Account Passwords
The root account passwords can be set several
ways. The following discussion demonstrates three methods:
Use the
SET PASSWORDstatementUse the
UPDATEstatementUse the mysqladmin command-line client program
To assign passwords using SET
PASSWORD, connect to the server as
root and issue a SET
PASSWORD statement for each root
account listed in the mysql.user table. Be sure
to encrypt the password using the
PASSWORD() function.
For Windows, do this:
shell>mysql -u rootmysql>SET PASSWORD FOR 'root'@'localhost' = PASSWORD('mysql>newpwd');SET PASSWORD FOR 'root'@'127.0.0.1' = PASSWORD('mysql>newpwd');SET PASSWORD FOR 'root'@'::1' = PASSWORD('mysql>newpwd');SET PASSWORD FOR 'root'@'%' = PASSWORD('newpwd');
The last statement is unnecessary if the
mysql.user table has no root
account with a host value of %.
For Unix, do this:
shell>mysql -u rootmysql>SET PASSWORD FOR 'root'@'localhost' = PASSWORD('mysql>newpwd');SET PASSWORD FOR 'root'@'127.0.0.1' = PASSWORD('mysql>newpwd');SET PASSWORD FOR 'root'@'::1' = PASSWORD('mysql>newpwd');SET PASSWORD FOR 'root'@'host_name' = PASSWORD('newpwd');
You can also use a single statement that assigns a password to all
root accounts by using
UPDATE to modify the
mysql.user table directly. This method works on
any platform:
shell>mysql -u rootmysql>UPDATE mysql.user SET Password = PASSWORD('->newpwd')WHERE User = 'root';mysql>FLUSH PRIVILEGES;
The FLUSH statement causes the
server to reread the grant tables. Without it, the password change
remains unnoticed by the server until you restart it.
To assign passwords to the root accounts using
mysqladmin, execute the following commands:
shell>mysqladmin -u root password "shell>newpwd"mysqladmin -u root -hhost_namepassword "newpwd"
Those commands apply both to Windows and to Unix. The double quotation marks around the password are not always necessary, but you should use them if the password contains spaces or other characters that are special to your command interpreter.
The mysqladmin method of setting the
root account passwords does not work for the
'root'@'127.0.0.1' or
'root'@'::1' account. Use the
SET PASSWORD method shown earlier.
After the root passwords have been set, you
must supply the appropriate password whenever you connect as
root to the server. For example, to shut down
the server with mysqladmin, use this command:
shell>mysqladmin -u root -p shutdownEnter password:(enter root password here)
Assigning Anonymous Account Passwords
The mysql commands in the following
instructions include a -p option based on the
assumption that you have set the root account
passwords using the preceding instructions and must specify that
password when connecting to the server.
To assign passwords to the anonymous accounts, connect to the
server as root, then use either
SET PASSWORD or
UPDATE. Be sure to encrypt the
password using the PASSWORD()
function.
To use SET PASSWORD on Windows, do
this:
shell>mysql -u root -pEnter password:(enter root password here)mysql>SET PASSWORD FOR ''@'localhost' = PASSWORD('newpwd');
To use SET PASSWORD on Unix, do
this:
shell>mysql -u root -pEnter password:(enter root password here)mysql>SET PASSWORD FOR ''@'localhost' = PASSWORD('mysql>newpwd');SET PASSWORD FOR ''@'host_name' = PASSWORD('newpwd');
To set the anonymous-user account passwords with a single
UPDATE statement, do this (on any
platform):
shell>mysql -u root -pEnter password:(enter root password here)mysql>UPDATE mysql.user SET Password = PASSWORD('->newpwd')WHERE User = '';mysql>FLUSH PRIVILEGES;
The FLUSH statement causes the
server to reread the grant tables. Without it, the password change
remains unnoticed by the server until you restart it.
Removing Anonymous Accounts
If you prefer to remove any anonymous accounts rather than assigning them passwords, do so as follows on Windows:
shell>mysql -u root -pEnter password:(enter root password here)mysql>DROP USER ''@'localhost';
On Unix, remove the anonymous accounts like this:
shell>mysql -u root -pEnter password:(enter root password here)mysql>DROP USER ''@'localhost';mysql>DROP USER ''@'host_name';
Securing Test Databases
By default, the mysql.db table contains rows
that permit access by any user to the test
database and other databases with names that start with
test_. (These rows have an empty
User column value, which for access-checking
purposes matches any user name.) This means that such databases
can be used even by accounts that otherwise possess no privileges.
If you want to remove any-user access to test databases, do so as
follows:
shell>mysql -u root -pEnter password:(enter root password here)mysql>DELETE FROM mysql.db WHERE Db LIKE 'test%';mysql>FLUSH PRIVILEGES;
The FLUSH statement causes the
server to reread the grant tables. Without it, the privilege
change remains unnoticed by the server until you restart it.
With the preceding change, only users who have global database
privileges or privileges granted explicitly for the
test database can use it. However, if you do
not want the database to exist at all, drop it:
mysql> DROP DATABASE test;
On Windows, you can also perform the process described in this section during installation with MySQL Installer (see Section 2.3.3, “Installing MySQL on Microsoft Windows Using MySQL Installer”). On other platforms, the MySQL distribution includes mysql_secure_installation, a command-line utility that automates much of the process of securing a MySQL installation. And MySQL Workbench is available on all platforms, and also offers the ability to manage user accounts (see Chapter 24, MySQL Workbench ).
This section describes the steps to upgrade or downgrade a MySQL installation.
Upgrading is a common procedure, as you pick up bug fixes within the same MySQL release series or significant features between major MySQL releases. You perform this procedure first on some test systems to make sure everything works smoothly, and then on the production systems.
Downgrading is less common. Typically, you undo an upgrade because of some compatibility or performance issue that occurs on a production system, and was not uncovered during initial upgrade verification on the test systems. As with the upgrade procedure, perform and verify the downgrade procedure on some test systems first, before using it on a production system.
As a general rule, to upgrade from one release series to another, go to the next series rather than skipping a series. To upgrade from a release series previous to MySQL 5.5, upgrade to each successive release series in turn until you have reached MySQL 5.5, and then proceed with the upgrade to MySQL 5.6. For example, if you currently are running MySQL 5.1 and wish to upgrade to a newer series, upgrade to MySQL 5.5 first before upgrading to 5.6, and so forth. For information on upgrading to MySQL 5.5, see the MySQL 5.5 Reference Manual.
To upgrade to MySQL 5.6, use the items in the following checklist as a guide:
Before any upgrade, back up your databases, including the
mysqldatabase that contains the grant tables. See Section 7.2, “Database Backup Methods”.Read all the notes in Section 2.11.1.1, “Upgrading from MySQL 5.5 to 5.6”. These notes enable you to identify upgrade issues that apply to your current MySQL installation. Some incompatibilities discussed in that section require your attention before upgrading. Others require some action after upgrading.
Read Appendix D, MySQL Release Notes as well, which provides information about features that are new in MySQL 5.6 or differ from those found in earlier MySQL releases.
After upgrading to a new version of MySQL, run mysql_upgrade (see Section 4.4.7, “mysql_upgrade — Check and Upgrade MySQL Tables”). This program checks your tables, and attempts to repair them if necessary. It also updates your grant tables to make sure that they have the current structure so that you can take advantage of any new capabilities. (Some releases of MySQL introduce changes to the structure of the grant tables to add new privileges or features.)
mysql_upgrade does not upgrade the contents of the help tables. For upgrade instructions, see Section 5.1.10, “Server-Side Help”.
mysql_upgrade should not be used when the server is running with
--gtid-mode=ON, since it may make changes in nontransactional system tables in themysqldatabase, many of which areMyISAMand cannot be changed to use a different storage engine. See GTID mode and mysql_upgrade.If you run MySQL Server on Windows, see Section 2.3.6, “Upgrading MySQL on Windows”.
If you use replication, see Section 16.4.3, “Upgrading a Replication Setup”, for information on upgrading your replication setup.
If you upgrade an installation originally produced by installing multiple RPM packages, it is best to upgrade all the packages, not just some. For example, if you previously installed the server and client RPMs, do not upgrade just the server RPM.
If you have created a user-defined function (UDF) with a given name and upgrade MySQL to a version that implements a new built-in function with the same name, the UDF becomes inaccessible. To correct this, use
DROP
          FUNCTION
to drop the UDF, and then useCREATE FUNCTIONto re-create the UDF with a different nonconflicting name. The same is true if the new version of MySQL implements a built-in function with the same name as an existing stored function. See Section 9.2.4, “Function Name Parsing and Resolution”, for the rules describing how the server interprets references to different kinds of functions.
For upgrades between versions of a MySQL release series that has reached General Availability status, you can move the MySQL format files and data files between different versions on systems with the same architecture. For upgrades to a version of a MySQL release series that is in development status, that is not necessarily true. Use of development releases is at your own risk.
If you are cautious about using new versions, you can always rename your old mysqld before installing a newer one. For example, if you are using a version of MySQL 5.5 and want to upgrade to 5.6, rename your current server from mysqld to mysqld-5.5. If your new mysqld then does something unexpected, you can simply shut it down and restart with your old mysqld.
If problems occur, such as that the new mysqld
server does not start or that you cannot connect without a
password, verify that you do not have an old
my.cnf file from your previous installation.
You can check this with the
--print-defaults option (for
example, mysqld --print-defaults). If this
command displays anything other than the program name, you have an
active my.cnf file that affects server or
client operation.
If, after an upgrade, you experience problems with compiled client
programs, such as Commands out of sync or
unexpected core dumps, you probably have used old header or
library files when compiling your programs. In this case, check
the date for your mysql.h file and
libmysqlclient.a library to verify that they
are from the new MySQL distribution. If not, recompile your
programs with the new headers and libraries. Recompilation might
also be necessary for programs compiled against the shared client
library if the library major version number has changed (for
example from libmysqlclient.so.15 to
libmysqlclient.so.16.
If your MySQL installation contains a large amount of data that
might take a long time to convert after an in-place upgrade, you
might find it useful to create a “dummy” database
instance for assessing what conversions might be needed and the
work involved to perform them. Make a copy of your MySQL instance
that contains a full copy of the mysql
database, plus all other databases without data. Run your upgrade
procedure on this dummy instance to see what actions might be
needed so that you can better evaluate the work involved when
performing actual data conversion on your original database
instance.
It is a good idea to rebuild and reinstall the Perl
DBD::mysql module whenever you install a new
release of MySQL. The same applies to other MySQL interfaces as
well, such as PHP mysql extensions and the
Python MySQLdb module.
Beginning with MySQL 5.6.6, several MySQL Server parameters have defaults that differ from previous releases. See the notes regarding these changes later in this section, particularly regarding overriding them to preserve backward compatibility if that is a concern.
It is good practice to back up your data before installing any new version of software. Although MySQL works very hard to ensure a high level of quality, protect your data by making a backup.
To upgrade to 5.6 from any previous version,
MySQL recommends that you dump your tables with
mysqldump before upgrading and reload the
dump file after upgrading. Use the
--all-databases option to
include all databases in the dump. If your databases include
stored programs, use the
--routines and
--events options as well.
In general, do the following when upgrading from MySQL 5.5 to 5.6:
Read all the items in these sections to see whether any of them might affect your applications:
Section 2.11.1, “Upgrading MySQL”, has general update information.
The items in the change lists provided later in this section enable you to identify upgrade issues that apply to your current MySQL installation. Some incompatibilities discussed there require your attention before upgrading. Others should be dealt with after upgrading.
The MySQL 5.6 change history describes significant new features you can use in 5.6 or that differ from those found in earlier MySQL releases. Some of these changes may result in incompatibilities. See Appendix D, MySQL Release Notes.
Note particularly any changes that are marked Known issue or Incompatible change. These incompatibilities with earlier versions of MySQL may require your attention before you upgrade. Our aim is to avoid these changes, but occasionally they are necessary to correct problems that would be worse than an incompatibility between releases. If any upgrade issue applicable to your installation involves an incompatibility that requires special handling, follow the instructions given in the incompatibility description. Sometimes this involves dumping and reloading tables, or use of a statement such as
CHECK TABLEorREPAIR TABLE.For dump and reload instructions, see Section 2.11.4, “Rebuilding or Repairing Tables or Indexes”. Any procedure that involves
REPAIR TABLEwith theUSE_FRMoption must be done before upgrading. Use of this statement with a version of MySQL different from the one used to create the table (that is, using it after upgrading) may damage the table. See Section 13.7.2.5, “REPAIR TABLESyntax”.Before upgrading to a new version of MySQL, Section 2.11.3, “Checking Whether Tables or Indexes Must Be Rebuilt”, to see whether changes to table formats or to character sets or collations were made between your current version of MySQL and the version to which you are upgrading. If so and these changes result in an incompatibility between MySQL versions, you will need to upgrade the affected tables using the instructions in Section 2.11.4, “Rebuilding or Repairing Tables or Indexes”.
After upgrading to a new version of MySQL, run mysql_upgrade (see Section 4.4.7, “mysql_upgrade — Check and Upgrade MySQL Tables”). This program checks your tables, and attempts to repair them if necessary. It also updates your grant tables to make sure that they have the current structure so that you can take advantage of any new capabilities. (Some releases of MySQL introduce changes to the structure of the grant tables to add new privileges or features.)
mysql_upgrade does not upgrade the contents of the help tables. For upgrade instructions, see Section 5.1.10, “Server-Side Help”.
If you run MySQL Server on Windows, see Section 2.3.6, “Upgrading MySQL on Windows”.
If you use replication, see Section 16.4.3, “Upgrading a Replication Setup”, for information on upgrading your replication setup.
If your MySQL installation contains a large amount of data that
might take a long time to convert after an in-place upgrade, you
might find it useful to create a “dummy” database
instance for assessing what conversions might be needed and the
work involved to perform them. Make a copy of your MySQL
instance that contains a full copy of the
mysql database, plus all other databases
without data. Run your upgrade procedure on this dummy instance
to see what actions might be needed so that you can better
evaluate the work involved when performing actual data
conversion on your original database instance.
Read all the items in the following sections to see whether any of them might affect your applications:
Configuration Changes
Beginning with MySQL 5.6.6, several MySQL Server parameters have defaults that differ from previous releases. The motivation for these changes is to provide better out-of-box performance and to reduce the need for the database administrator to change settings manually. These changes are subject to possible revision in future releases as we gain feedback.
In some cases, a parameter has a different static default value. In other cases, the server autosizes a parameter at startup using a formula based on other related parameters or server host configuration, rather than using a static value. For example, the setting for
back_lognow is its previous default of 50, adjusted up by an amount proportional to the value ofmax_connections. The idea behind autosizing is that when the server has information available to make a decision about a parameter setting likely to be better than a fixed default, it will.The following table summarizes changes to defaults. Any of these can be overridden by specifying an explicit value at server startup.
Parameter Old Default New Default back_log50 Autosized using max_connectionsbinlog_checksumNONECRC32--binlog-row-event-max-size1024 8192 flush_time1800 (on Windows) 0 innodb_autoextend_increment8 64 innodb_buffer_pool_instances1 8 (platform dependent) innodb_checksum_algorithmINNODBCRC32innodb_concurrency_tickets500 5000 innodb_file_per_table01innodb_old_blocks_time0 1000 innodb_open_files300 Autosized using innodb_file_per_table,table_open_cacheinnodb_stats_on_metadataONOFFjoin_buffer_size128KB 256KB max_allowed_packet1MB 4MB max_connect_errors10 100 sync_master_info0 10000 sync_relay_log0 10000 sync_relay_log_info0 10000 With regard to compatibility with previous releases, the most important changes are:
innodb_file_per_tableis enabled (previously disabled).innodb_checksum_algorithmisCRC32(previouslyINNODB).binlog_checksumisCRC32(previouslyNONE).
Therefore, if you are upgrading an existing MySQL installation, have not already changed the values of these parameters from their previous defaults, and backward compatibility is a concern, you may want to explicitly set these parameters to their previous defaults. For example, put these lines in the server option file:
[mysqld]
innodb_file_per_table=0
innodb_checksum_algorithm=INNODB
binlog_checksum=NONE
Those settings preserve compatibility as follows:
With the new default of
innodb_file_per_tableenabled,ALTER TABLEoperations following an upgrade will moveInnoDBtables that are in the system tablespace to individual.ibdfiles. Usinginnodb_file_per_table=0will prevent this from happening.Setting
innodb_checksum_algorithm=INNODBpermits binary downgrades after upgrading to this release. With a setting ofCRC32, InnoDB would use checksumming that older MySQL versions cannot use.With
binlog_checksum=NONE, the server can be used as a replication master without causing failure of older slaves that do not understand binary log checksums.
Server Changes
Incompatible change: As of MySQL 5.6, the full-text stopword file is loaded and searched using
latin1ifcharacter_set_serverisucs2,utf16,utf16le, orutf32. If any table was created withFULLTEXTindexes while the server character set wasucs2,utf16,utf16le, orutf32, repair it using this statement:REPAIR TABLE
tbl_nameQUICK;
SQL Changes
Some keywords may be reserved in MySQL 5.6 that were not reserved in MySQL 5.5. See Section 9.3, “Reserved Words”.
The
YEAR(2)data type has certain issues that you should consider before choosing to use it. As of MySQL 5.6.6,YEAR(2)is deprecated.YEAR(2)columns in existing tables are treated as before, butYEAR(2)in new or altered tables are converted toYEAR(4). For more information, see Section 11.3.4, “YEAR(2)Limitations and Migrating toYEAR(4)”.As of MySQL 5.6.6, it is explicitly disallowed to assign the value
DEFAULTto stored procedure or function parameters or stored program local variables (for example with aSETstatement). This was not previously supported, or documented as permitted, but is flagged as an incompatible change in case existing code inadvertantly used this construct. It remains permissible to assignvar_name= DEFAULTDEFAULTto system variables, as before, but assigningDEFAULTto parameters or local variables now results in a syntax error.After an upgrade to MySQL 5.6.6 or later, existing stored programs that use this construct produce a syntax error when invoked. If a mysqldump file from 5.6.5 or earlier is loaded into 5.6.6 or later, the load operation fails and affected stored program definitions must be changed.
In MySQL, the
TIMESTAMPdata type differs in nonstandard ways from other data types:TIMESTAMPcolumns not explicitly declared with theNULLattribute are assigned theNOT NULLattribute. (Columns of other data types, if not explicitly declared asNOT NULL, permitNULLvalues.) Setting such a column toNULLsets it to the current timestamp.The first
TIMESTAMPcolumn in a table, if not declared with theNULLattribute or an explicitDEFAULTorON UPDATEclause, is automatically assigned theDEFAULT CURRENT_TIMESTAMPandON UPDATE CURRENT_TIMESTAMPattributes.TIMESTAMPcolumns following the first one, if not declared with theNULLattribute or an explicitDEFAULTclause, are automatically assignedDEFAULT '0000-00-00 00:00:00'(the “zero” timestamp). For inserted rows that specify no explicit value for such a column, the column is assigned'0000-00-00 00:00:00'and no warning occurs.
Those nonstandard behaviors remain the default for
TIMESTAMPbut as of MySQL 5.6.6 are deprecated and this warning appears at startup:[Warning] TIMESTAMP with implicit DEFAULT value is deprecated. Please use --explicit_defaults_for_timestamp server option (see documentation for more details).
As indicated by the warning, to turn off the nonstandard behaviors, enable the new
explicit_defaults_for_timestampsystem variable at server startup. With this variable enabled, the server handlesTIMESTAMPas follows instead:TIMESTAMPcolumns not explicitly declared asNOT NULLpermitNULLvalues. Setting such a column toNULLsets it toNULL, not the current timestamp.No
TIMESTAMPcolumn is assigned theDEFAULT CURRENT_TIMESTAMPorON UPDATE CURRENT_TIMESTAMPattributes automatically. Those attributes must be explicitly specified.TIMESTAMPcolumns declared asNOT NULLand without an explicitDEFAULTclause are treated as having no default value. For inserted rows that specify no explicit value for such a column, the result depends on the SQL mode. If strict SQL mode is enabled, an error occurs. If strict SQL mode is not enabled, the column is assigned the implicit default of'0000-00-00 00:00:00'and a warning occurs. This is similar to how MySQL treats other temporal types such asDATETIME.
To upgrade servers used for replication, upgrade the slaves first, then the master. Replication between the master and its slaves should work provided that all use the same value of
explicit_defaults_for_timestamp:Bring down the slaves, upgrade them, configure them with the desired value of
explicit_defaults_for_timestamp, and bring them back up.The slaves will recognize from the format of the binary logs received from the master that the master is older (predates the introduction of
explicit_defaults_for_timestamp) and that operations onTIMESTAMPcolumns coming from the master use the oldTIMESTAMPbehavior.Bring down the master, upgrade it, and configure it with the same
explicit_defaults_for_timestampvalue used on the slaves, and bring it back up.
This section describes what to do to downgrade to an older MySQL version, in the unlikely case that the previous version worked better than the new one.
To downgrade within the same release series (for example, from
5.5.13 to 5.5.12), typically you just
install the new binaries on top of the old ones and do not make
any changes to the databases. There are exceptions for some
features that are introduced partway through the development cycle
for a release, such as InnoDB support for small
page sizes and FULLTEXT indexes, introduced in
MySQL 5.6.4. As always, it is a good idea to make a backup
beforehand, in case a downgrade fails and leaves the instance in
an unusable state.
The following items form a checklist of things to do whenever you perform a downgrade:
Read the upgrading section for the release series from which you are downgrading to be sure that it does not have any features you really need. See Section 2.11.1, “Upgrading MySQL”.
If there is a downgrading section for that version, read that as well.
To see which new features were added between the version to which you are downgrading and your current version, see the change logs (Appendix D, MySQL Release Notes).
Check Section 2.11.3, “Checking Whether Tables or Indexes Must Be Rebuilt”, to see whether changes to table formats or to character sets or collations were made between your current version of MySQL and the version to which you are downgrading. If so and these changes result in an incompatibility between MySQL versions, you will need to downgrade the affected tables using the instructions in Section 2.11.4, “Rebuilding or Repairing Tables or Indexes”.
In most cases, you can move the MySQL format files and data files between different versions on the same architecture as long as you stay within versions for the same release series of MySQL.
If you downgrade from one release series to another, there may be incompatibilities in table storage formats. In this case, use mysqldump to dump your tables before downgrading. After downgrading, reload the dump file using mysql or mysqlimport to re-create your tables. For examples, see Section 2.11.5, “Copying MySQL Databases to Another Machine”.
A typical symptom of a downward-incompatible table format change when you downgrade is that you cannot open tables. In that case, use the following procedure:
Stop the older MySQL server that you are downgrading to.
Restart the newer MySQL server you are downgrading from.
Dump any tables that were inaccessible to the older server by using mysqldump to create a dump file.
Stop the newer MySQL server and restart the older one.
Reload the dump file into the older server. Your tables should be accessible.
If system tables in the mysql database changed,
downgrading might introduce some loss of functionality or require
some adjustments. Here are some examples:
Trigger creation requires the
TRIGGERprivilege as of MySQL 5.1. In MySQL 5.0, there is noTRIGGERprivilege andSUPERis required instead. If you downgrade from MySQL 5.1 to 5.0, you will need to give theSUPERprivilege to those accounts that had theTRIGGERprivilege in 5.1.Triggers were added in MySQL 5.0, so if you downgrade from 5.0 to 4.1, you cannot use triggers at all.
The
mysql.proc.commentcolumn definition changed between MySQL 5.1 and 5.5. After a downgrade from 5.5 to 5.1, this table is seen as corrupt and in need of repair. To workaround this problem, execute mysql_upgrade from the version of MySQL to which you downgraded.
When downgrading to MySQL 5.5 from MySQL 5.6, keep in mind the following issues relating to features found in MySQL 5.6, but not in MySQL 5.5:
InnoDB
InnoDBsearch indexes (with a type ofFULLTEXT), introduced in MySQL 5.6.4, are not compatible with earlier versions of MySQL, including earlier releases in the 5.6 series. Drop such indexes before performing a downgrade.InnoDBsmall page sizes specified by theinnodb_page_sizeconfiguration option, introduced in MySQL 5.6.4, are not compatible with earlier versions of MySQL, including earlier releases in the 5.6 series. Dump allInnoDBtables in instances that use a smallerInnoDBpage size, drop the tables, and re-create and reload them after the downgrade.
Replication
As of MySQL 5.6, the
relay-log.infofile contains a line count and a replication delay value, so the file format differs from that in older versions. See Section 16.2.2.2, “Slave Status Logs”. If you downgrade a slave server to a version older than MySQL 5.6, the older server will not read the file correctly. To address this, modify the file in a text editor to delete the initial line containing the number of lines.
A binary upgrade or downgrade is one that installs one version of MySQL “in place” over an existing version, without dumping and reloading tables:
Stop the server for the existing version if it is running.
Install a different version of MySQL. This is an upgrade if the new version is higher than the original version, a downgrade if the version is lower.
Start the server for the new version.
In many cases, the tables from the previous version of MySQL can be used without problem by the new version. However, sometimes changes occur that require tables or table indexes to be rebuilt, as described in this section. If you have tables that are affected by any of the issues described here, rebuild the tables or indexes as necessary using the instructions given in Section 2.11.4, “Rebuilding or Repairing Tables or Indexes”.
Table Incompatibilities
After a binary upgrade to MySQL 5.1 from a MySQL 5.0 installation
that contains ARCHIVE tables,
accessing those tables causes the server to crash, even if you
have run mysql_upgrade or
CHECK TABLE ... FOR
      UPGRADE
. To work around this problem, use
mysqldump to dump all
ARCHIVE tables before upgrading, and
reload them into MySQL 5.1 after upgrading. The same problem
occurs for binary downgrades from MySQL 5.1 to 5.0.
The upgrade problem is fixed in MySQL 5.6.4: The server can open
ARCHIVE tables created in MySQL 5.0.
However, it remains the recommended upgrade procedure to dump 5.0
ARCHIVE tables before upgrading and
reload them after upgrading.
Index Incompatibilities
In MySQL 5.6.3, the length limit for index prefix keys is
increased from 767 bytes to 3072 bytes, for
InnoDB tables using
ROW_FORMAT=DYNAMIC or
ROW_FORMAT=COMPRESSED. See
Section 14.2.8, “Limits on InnoDB Tables” for details. This change is
also backported to MySQL 5.5.14. If you downgrade from one of
these releases or higher, to an earlier release with a lower
length limit, the index prefix keys could be truncated at 767
bytes or the downgrade could fail. This issue could only occur if
the configuration option
innodb_large_prefix was enabled
on the server being downgraded.
If you perform a binary upgrade without dumping and reloading
tables, you cannot upgrade directly from MySQL 4.1 to 5.1 or
higher. This occurs due to an incompatible change in the
MyISAM table index format in MySQL 5.0. Upgrade
from MySQL 4.1 to 5.0 and repair all MyISAM
tables. Then upgrade from MySQL 5.0 to 5.1 and check and repair
your tables.
Modifications to the handling of character sets or collations might change the character sort order, which causes the ordering of entries in any index that uses an affected character set or collation to be incorrect. Such changes result in several possible problems:
Comparison results that differ from previous results
Inability to find some index values due to misordered index entries
Misordered
ORDER BYresultsTables that
CHECK TABLEreports as being in need of repair
The solution to these problems is to rebuild any indexes that use an affected character set or collation, either by dropping and re-creating the indexes, or by dumping and reloading the entire table. In some cases, it is possible to alter affected columns to use a different collation. For information about rebuilding indexes, see Section 2.11.4, “Rebuilding or Repairing Tables or Indexes”.
To check whether a table has indexes that must be rebuilt, consult the following list. It indicates which versions of MySQL introduced character set or collation changes that require indexes to be rebuilt. Each entry indicates the version in which the change occurred and the character sets or collations that the change affects. If the change is associated with a particular bug report, the bug number is given.
The list applies both for binary upgrades and downgrades. For example, Bug #27877 was fixed in MySQL 5.1.24 and 5.4.0, so it applies to upgrades from versions older than 5.1.24 to 5.1.24 or newer, and to downgrades from 5.1.24 or newer to versions older than 5.1.24.
In many cases, you can use
CHECK TABLE ... FOR
      UPGRADE
to identify tables for which index rebuilding is
required. It will report this message:
Table upgrade required.
Please do "REPAIR TABLE `tbl_name`" or dump/reload to fix it!
In these cases, you can also use mysqlcheck
--check-upgrade or mysql_upgrade,
which execute CHECK TABLE. However,
the use of CHECK TABLE applies only
after upgrades, not downgrades. Also, CHECK
TABLE is not applicable to all storage engines. For
details about which storage engines CHECK
TABLE supports, see Section 13.7.2.2, “CHECK TABLE Syntax”.
These changes cause index rebuilding to be necessary:
MySQL 5.1.24, 5.4.0 (Bug #27877)
Affects indexes that use the
utf8_general_ciorucs2_general_cicollation for columns that contain'ß'LATIN SMALL LETTER SHARP S (German). The bug fix corrected an error in the original collations but introduced an incompatibility such that'ß'compares equal to characters with which it previously compared different.Affected tables can be detected by
CHECK TABLE ... FOR UPGRADEas of MySQL 5.1.30, 5.4.0 (see Bug #40053).A workaround for this issue is implemented as of MySQL 5.1.62, 5.5.21, and 5.6.5. The workaround involves altering affected columns to use the
utf8_general_mysql500_cianducs2_general_mysql500_cicollations, which preserve the original pre-5.1.24 ordering ofutf8_general_cianducs2_general_ci.MySQL 5.0.48, 5.1.23 (Bug #27562)
Affects indexes that use the
ascii_general_cicollation for columns that contain any of these characters:'`'GRAVE ACCENT,'['LEFT SQUARE BRACKET,'\'REVERSE SOLIDUS,']'RIGHT SQUARE BRACKET,'~'TILDEAffected tables can be detected by
CHECK TABLE ... FOR UPGRADEas of MySQL 5.1.29, 5.4.0 (see Bug #39585).MySQL 5.0.48, 5.1.21 (Bug #29461)
Affects indexes for columns that use any of these character sets:
eucjpms,euc_kr,gb2312,latin7,macce,ujisAffected tables can be detected by
CHECK TABLE ...
          FOR UPGRADE
as of MySQL 5.1.29, 5.4.0 (see Bug #39585).
This section describes how to rebuild a table, following changes
to MySQL such as how data types or character sets are handled. For
example, an error in a collation might have been corrected,
requiring a table rebuild to update the indexes for character
columns that use the collation. (For examples, see
Section 2.11.3, “Checking Whether Tables or Indexes Must Be Rebuilt”.) You might
also need to repair or upgrade a table, as indicated by a table
check operation such as that performed by CHECK
TABLE, mysqlcheck, or
mysql_upgrade.
Methods for rebuilding a table include dumping and reloading it,
or using ALTER TABLE or
REPAIR TABLE.
If you are rebuilding tables because a different version of MySQL will not handle them after a binary (in-place) upgrade or downgrade, you must use the dump-and-reload method. Dump the tables before upgrading or downgrading using your original version of MySQL. Then reload the tables after upgrading or downgrading.
If you use the dump-and-reload method of rebuilding tables only for the purpose of rebuilding indexes, you can perform the dump either before or after upgrading or downgrading. Reloading still must be done afterward.
To rebuild a table by dumping and reloading it, use mysqldump to create a dump file and mysql to reload the file:
shell>mysqldumpshell>db_namet1 > dump.sqlmysqldb_name< dump.sql
To rebuild all the tables in a single database, specify the database name without any following table name:
shell>mysqldumpshell>db_name> dump.sqlmysqldb_name< dump.sql
To rebuild all tables in all databases, use the
--all-databases option:
shell>mysqldump --all-databases > dump.sqlshell>mysql < dump.sql
To rebuild a table with ALTER
TABLE, use a “null” alteration; that is, an
ALTER TABLE statement that
“changes” the table to use the storage engine that it
already has. For example, if t1 is a
MyISAM table, use this statement:
mysql> ALTER TABLE t1 ENGINE = MyISAM;
If you are not sure which storage engine to specify in the
ALTER TABLE statement, use
SHOW CREATE TABLE to display the
table definition.
If you must rebuild a table because a table checking operation
indicates that the table is corrupt or needs an upgrade, you can
use REPAIR TABLE if that statement
supports the table's storage engine. For example, to repair a
MyISAM table, use this statement:
mysql> REPAIR TABLE t1;
For storage engines such as InnoDB that
REPAIR TABLE does not support, use
mysqldump to create a dump file and
mysql to reload the file, as described earlier.
For specifics about which storage engines
REPAIR TABLE supports, see
Section 13.7.2.5, “REPAIR TABLE Syntax”.
mysqlcheck --repair provides command-line
access to the REPAIR TABLE
statement. This can be a more convenient means of repairing tables
because you can use the
--databases or
--all-databases option to
repair all tables in specific databases or all databases,
respectively:
shell>mysqlcheck --repair --databasesshell>db_name...mysqlcheck --repair --all-databases
For incompatibilities introduced in MySQL 5.1.24 by the fix for
Bug #27877 that corrected the utf8_general_ci
and ucs2_general_ci collations, a workaround is
implemented as of MySQL 5.1.62, 5.5.21, and 5.6.5. Upgrade to one
of those versions, then convert each affected table using one of
the following methods. In each case, the workaround altering
affected columns to use the
utf8_general_mysql500_ci and
ucs2_general_mysql500_ci collations, which
preserve the original pre-5.1.24 ordering of
utf8_general_ci and
ucs2_general_ci.
To convert an affected table after a binary upgrade that leaves the table files in place, alter the table to use the new collation. Suppose that the table
t1contains one or more problematicutf8columns. To convert the table at the table level, use a statement like this:ALTER TABLE t1 CONVERT TO CHARACTER SET utf8 COLLATE utf8_general_mysql500_ci;
To apply the change on a column-specific basis, use a statement like this (be sure to repeat the column definition as originally specified except for the
COLLATEclause):ALTER TABLE t1 MODIFY c1 CHAR(N) CHARACTER SET utf8 COLLATE utf8_general_mysql500_ci;
To upgrade the table using a dump and reload procedure, dump the table using mysqldump, modify the
CREATE TABLEstatement in the dump file to use the new collation, and reload the table.
After making the appropriate changes, CHECK
TABLE should report no error.
You can copy the .frm,
.MYI, and .MYD files for
MyISAM tables between different architectures
that support the same floating-point format. (MySQL takes care of
any byte-swapping issues.) See
Section 14.3, “The MyISAM Storage Engine”.
In cases where you need to transfer databases between different architectures, you can use mysqldump to create a file containing SQL statements. You can then transfer the file to the other machine and feed it as input to the mysql client.
Use mysqldump --help to see what options are available.
The easiest (although not the fastest) way to move a database between two machines is to run the following commands on the machine on which the database is located:
shell>mysqladmin -h 'shell>other_hostname' createdb_namemysqldumpdb_name| mysql -h 'other_hostname'db_name
If you want to copy a database from a remote machine over a slow network, you can use these commands:
shell>mysqladmin createshell>db_namemysqldump -h 'other_hostname' --compressdb_name| mysqldb_name
You can also store the dump in a file, transfer the file to the target machine, and then load the file into the database there. For example, you can dump a database to a compressed file on the source machine like this:
shell> mysqldump --quick db_name | gzip > db_name.gz
Transfer the file containing the database contents to the target machine and run these commands there:
shell>mysqladmin createshell>db_namegunzip <db_name.gz | mysqldb_name
You can also use mysqldump and
mysqlimport to transfer the database. For large
tables, this is much faster than simply using
mysqldump. In the following commands,
DUMPDIR represents the full path name
of the directory you use to store the output from
mysqldump.
First, create the directory for the output files and dump the database:
shell>mkdirshell>DUMPDIRmysqldump --tab=DUMPDIRdb_name
Then transfer the files in the DUMPDIR
directory to some corresponding directory on the target machine
and load the files into MySQL there:
shell>mysqladmin createshell>db_name# create databasecatshell>DUMPDIR/*.sql | mysqldb_name# create tables in databasemysqlimportdb_nameDUMPDIR/*.txt # load data into tables
Do not forget to copy the mysql database
because that is where the grant tables are stored. You might have
to run commands as the MySQL root user on the
new machine until you have the mysql database
in place.
After you import the mysql database on the new
machine, execute mysqladmin flush-privileges so
that the server reloads the grant table information.
This section lists all the environment variables that are used directly or indirectly by MySQL. Most of these can also be found in other places in this manual.
Note that any options on the command line take precedence over values specified in option files and environment variables, and values in option files take precedence over values in environment variables.
In many cases, it is preferable to use an option file instead of environment variables to modify the behavior of MySQL. See Section 4.2.3.3, “Using Option Files”.
| Variable | Description |
|---|---|
CXX | The name of your C++ compiler (for running CMake). |
CC | The name of your C compiler (for running CMake). |
CFLAGS | Flags for your C compiler (for running CMake). |
CXXFLAGS | Flags for your C++ compiler (for running CMake). |
DBI_USER | The default user name for Perl DBI. |
DBI_TRACE | Trace options for Perl DBI. |
HOME | The default path for the mysql history file is
$HOME/.mysql_history. |
LD_RUN_PATH | Used to specify the location of libmysqlclient.so. |
LIBMYSQL_ENABLE_CLEARTEXT_PLUGIN | Enable mysql_clear_password authentication plugin;
see Section 6.3.6.3, “The Cleartext Client-Side Authentication Plugin”. |
MYSQL_DEBUG | Debug trace options when debugging. |
MYSQL_GROUP_SUFFIX | Option group suffix value (like specifying
--defaults-group-suffix). |
MYSQL_HISTFILE | The path to the mysql history file. If this variable
is set, its value overrides the default for
$HOME/.mysql_history. |
MYSQL_HISTIGNORE | Patterns specifying statements not to log to
$HOME/.mysql_history. |
MYSQL_HOME | The path to the directory in which the server-specific
my.cnf file resides. |
MYSQL_HOST | The default host name used by the mysql command-line client. |
MYSQL_PS1 | The command prompt to use in the mysql command-line client. |
MYSQL_PWD | The default password when connecting to mysqld. Note that using this is insecure. See Section 6.1.2.1, “End-User Guidelines for Password Security”. |
MYSQL_TCP_PORT | The default TCP/IP port number. |
MYSQL_TEST_LOGIN_FILE | The name of the .mylogin.cnf login file. |
MYSQL_UNIX_PORT | The default Unix socket file name; used for connections to
localhost. |
PATH | Used by the shell to find MySQL programs. |
TMPDIR | The directory where temporary files are created. |
TZ | This should be set to your local time zone. See Section C.5.4.6, “Time Zone Problems”. |
UMASK | The user-file creation mode when creating files. See note following table. |
UMASK_DIR | The user-directory creation mode when creating directories. See note following table. |
USER | The default user name on Windows when connecting to mysqld. |
For information about the mysql history file, see Section 4.5.1.3, “mysql History File”.
MYSQL_TEST_LOGIN_FILE is the path name of the
login file (the file created by
mysql_config_editor). If not set, the default
value is %APPDATA%\MySQL\.mylogin.cnf directory
on Windows and $HOME/.mylogin.cnf on
non-Windows systems. See Section 4.6.6, “mysql_config_editor — MySQL Configuration Utility”.
The UMASK and UMASK_DIR
variables, despite their names, are used as modes, not masks:
If
UMASKis set, mysqld uses($UMASK | 0600)as the mode for file creation, so that newly created files have a mode in the range from 0600 to 0666 (all values octal).If
UMASK_DIRis set, mysqld uses($UMASK_DIR | 0700)as the base mode for directory creation, which then is AND-ed with~(~$UMASK & 0666), so that newly created directories have a mode in the range from 0700 to 0777 (all values octal). The AND operation may remove read and write permissions from the directory mode, but not execute permissions.
MySQL assumes that the value for UMASK or
UMASK_DIR is in octal if it starts with a zero.
The Perl DBI module provides a generic interface
for database access. You can write a DBI script
that works with many different database engines without change. To
use DBI, you must install the
DBI module, as well as a DataBase Driver (DBD)
module for each type of database server you want to access. For
MySQL, this driver is the DBD::mysql module.
Perl, and the DBD::MySQL module for
DBI must be installed if you want to run the
MySQL benchmark scripts; see Section 8.12.2, “The MySQL Benchmark Suite”.
Perl support is not included with MySQL distributions. You can obtain the necessary modules from http://search.cpan.org for Unix, or by using the ActiveState ppm program on Windows. The following sections describe how to do this.
The DBI/DBD interface requires
Perl 5.6.0, and 5.6.1 or later is preferred. DBI does not
work if you have an older version of Perl. You should use
DBD::mysql 4.009 or higher. Although earlier
versions are available, they do not support the full functionality
of MySQL 5.6.
MySQL Perl support requires that you have installed MySQL client programming support (libraries and header files). Most installation methods install the necessary files. If you install MySQL from RPM files on Linux, be sure to install the developer RPM as well. The client programs are in the client RPM, but client programming support is in the developer RPM.
The files you need for Perl support can be obtained from the CPAN (Comprehensive Perl Archive Network) at http://search.cpan.org.
The easiest way to install Perl modules on Unix is to use the
CPAN module. For example:
shell>perl -MCPAN -e shellcpan>install DBIcpan>install DBD::mysql
The DBD::mysql installation runs a number of
tests. These tests attempt to connect to the local MySQL server
using the default user name and password. (The default user name
is your login name on Unix, and ODBC on
Windows. The default password is “no password.”) If
you cannot connect to the server with those values (for example,
if your account has a password), the tests fail. You can use
force install DBD::mysql to ignore the failed
tests.
DBI requires the
Data::Dumper module. It may be installed; if
not, you should install it before installing
DBI.
It is also possible to download the module distributions in the form of compressed tar archives and build the modules manually. For example, to unpack and build a DBI distribution, use a procedure such as this:
Unpack the distribution into the current directory:
shell>
gunzip < DBI-VERSION.tar.gz | tar xvf -This command creates a directory named
DBI-.VERSIONChange location into the top-level directory of the unpacked distribution:
shell>
cd DBI-VERSIONBuild the distribution and compile everything:
shell>
perl Makefile.PLshell>makeshell>make testshell>make install
The make test command is important because it
verifies that the module is working. Note that when you run that
command during the DBD::mysql installation to
exercise the interface code, the MySQL server must be running or
the test fails.
It is a good idea to rebuild and reinstall the
DBD::mysql distribution whenever you install a
new release of MySQL. This ensures that the latest versions of the
MySQL client libraries are installed correctly.
If you do not have access rights to install Perl modules in the system directory or if you want to install local Perl modules, the following reference may be useful: http://servers.digitaldaze.com/extensions/perl/modules.html#modules
Look under the heading “Installing New Modules that Require Locally Installed Modules.”
On Windows, you should do the following to install the MySQL
DBD module with ActiveState Perl:
Get ActiveState Perl from http://www.activestate.com/Products/ActivePerl/ and install it.
Open a console window.
If necessary, set the
HTTP_proxyvariable. For example, you might try a setting like this:C:\>
set HTTP_proxy=my.proxy.com:3128Start the PPM program:
C:\>
C:\perl\bin\ppm.plIf you have not previously done so, install
DBI:ppm>
install DBIIf this succeeds, run the following command:
ppm>
install DBD-mysql
This procedure should work with ActiveState Perl 5.6 or newer.
If you cannot get the procedure to work, you should install the ODBC driver instead and connect to the MySQL server through ODBC:
use DBI;
$dbh= DBI->connect("DBI:ODBC:$dsn",$user,$password) ||
die "Got error $DBI::errstr when connecting to $dsn\n";
If Perl reports that it cannot find the
../mysql/mysql.so module, the problem is
probably that Perl cannot locate the
libmysqlclient.so shared library. You should
be able to fix this problem by one of the following methods:
Copy
libmysqlclient.soto the directory where your other shared libraries are located (probably/usr/libor/lib).Modify the
-Loptions used to compileDBD::mysqlto reflect the actual location oflibmysqlclient.so.On Linux, you can add the path name of the directory where
libmysqlclient.sois located to the/etc/ld.so.conffile.Add the path name of the directory where
libmysqlclient.sois located to theLD_RUN_PATHenvironment variable. Some systems useLD_LIBRARY_PATHinstead.
Note that you may also need to modify the -L
options if there are other libraries that the linker fails to
find. For example, if the linker cannot find
libc because it is in /lib
and the link command specifies -L/usr/lib, change
the -L option to -L/lib or add
-L/lib to the existing link command.
If you get the following errors from
DBD::mysql, you are probably using
gcc (or using an old binary compiled with
gcc):
/usr/bin/perl: can't resolve symbol '__moddi3'
/usr/bin/perl: can't resolve symbol '__divdi3'
Add -L/usr/lib/gcc-lib/... -lgcc to the link
command when the mysql.so library gets built
(check the output from make for
mysql.so when you compile the Perl client).
The -L option should specify the path name of the
directory where libgcc.a is located on your
system.
Another cause of this problem may be that Perl and MySQL are not both compiled with gcc. In this case, you can solve the mismatch by compiling both with gcc.
You may see the following error from DBD::mysql
when you run the tests:
t/00base............install_driver(mysql) failed:
Can't load '../blib/arch/auto/DBD/mysql/mysql.so' for module DBD::mysql:
../blib/arch/auto/DBD/mysql/mysql.so: undefined symbol:
uncompress at /usr/lib/perl5/5.00503/i586-linux/DynaLoader.pm line 169.
This means that you need to include the -lz
compression library on the link line. That can be done by changing
the following line in the file
lib/DBD/mysql/Install.pm:
$sysliblist .= " -lm";
Change that line to:
$sysliblist .= " -lm -lz";
After this, you must run make realclean and then proceed with the installation from the beginning.