Requirements
Software Needed for this Tutorial
Before you begin, you need to install the following software on your computer:
- Java Standard Development Kit (JDK) version 5.0 or 6.0
- NetBeans IDE 6.0 with Mobility pack
Note: You can deploy this project using the Sun Java Wireless Toolkit emulator included with the Mobility Pack. No further software is necessary to follow the basic concepts presented in this tutorial. However, if you need to deploy to additional platforms, we recommended that you download the appropriate emulators that you are targeting. Here are some of the most popular CLDC/MIDP device platforms available:
- Nokia Series 40 SDKs for Symbian OS (download)
- Nokia Series 60 SDKs for Symbian OS (download)
- Sony Ericsson SDK 2.2.4 for the Java ME platform (download)
- Motorola Java ME SDK v6.4 for Motorola OS Products (download)
If you are new to NetBeans Mobility Pack or Java ME development, it is recommended that you go through the NetBeans Mobility Pack 6.0 for CLDC Quick Start Guide before continuing this tutorial. This guide includes a section on adding and registering platform emulators.
Setting Up the Application
This example uses a simple game called Ball Shot to demonstrate how to target device abilities to resolve device fragmentation issues.
- Download the BallShotGame.zip project
- Unzip the project and place the contents in your IDE's
project_homedirectory.
For further instructions about importing mobility projects to the IDE please see the Mobility Project Import Guide.
Creating Custom Configurations
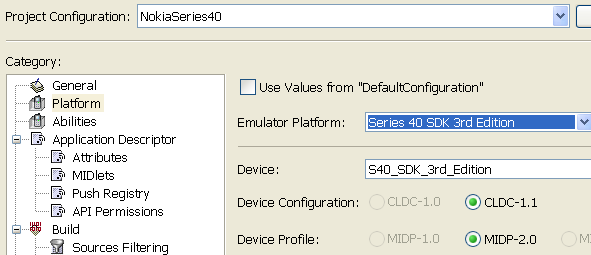
One tactic for resolving device fragmentation issues is based on NetBeans use of project configurations. This enables you to create one set of source code and customize it for each mobile device you are targeting. Remember to keep your configurations congruent so that the emulator platform and target device correspond to the Project configuration you are creating. In the below example the Nokia Series 40 is the target configuration.

Creating Project Configurations
- Choose File > Open Project (Ctrl-Shift-O). Navigate to the folder where the unzipped and installed SingleCotopiaGameBallShot project folder is located.
- Right-click on the SingleCotopiaGameBallShot project node and select Properties.
- Click the Manage Configurations button at the top of the page. This opens the Manage Configurations dialog.
- Click Add and then type the desired name for your configuration and press OK.
- Repeat the previous step for the other emulators you want to deploy to.
Creating Abilities
Abilities are device attributes such as screen size, color depth, API support, and audio support. Creating an ability in a project enables you to associate it with one or more project configurations that support a specific attribute or set of attributes. If you need to modify, remove or add configurations later on, simply associate the configuration with an ability to implement the change. The configuration is then automatically associated with any code block that is associated with the ability.
- Right-click on the SingleCotopiaGameBallShot project node and choose Properties.
- Choose the Abilities page from the Category menu tree.
- From the Project Configuration dropdown menu, choose the configuration the ability you are defining is associated to.
- If necessary, uncheck the box labeled
Use Values from Default Configuration. - Click the Add button.
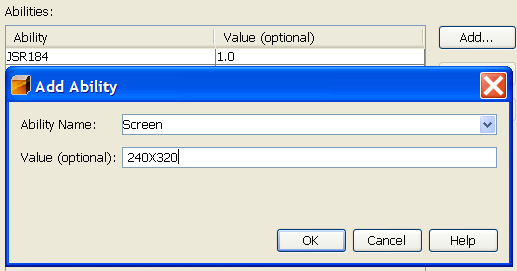
- In the New Ability dialog, enter a name for the ability such as
screenor click the edit button if thescreenability exists already - Enter a value for the ability. In this example put 240x320. Additional abilities can be configured and targeted to other variables such as color depth or audio support. Click Ok to close the New Ability dialog. The ability is now associated with the selected project configuration.

You can associate the ability with other configurations by choosing a different configuration from the Project Configuration menu and clicking the Add button.
Adding Configuration-Specific Code with Preprocessor Blocks
Preprocessor blocks enable you to create, manage and track code that is specific to one or more project configurations or abilities. The code is enabled (or disabled) only for the configurations or abilities you identify. One of the most practical attributes to target on mobile devices is screen size. A useful reference site for screen sizes, color depth, API support and other features is the Jbenchmark site.
- In the BallShotImageCreator.java Editor window, right-click on the source code line where BallShotImageCreator is instantiated (public BallShotImageCreator() { .
- Right-click on the line and choose Preprocessor Blocks > Create If/Else Block. In the Available Items box scroll down and choose the previously defined ability
screen. - On the line
//#if screen, add the following:== "240x320" - The code marked by the
//#ifpreprocessor directive is deployed whenever the active configuration matches the directive value. The code encased by the//#elsepreprocessor directive is used whenever the active configuration does not match the value of the preprocessor. In other words, the emulator displays the 22 pixel balls if the active platform has 240x320 ability. The//#endifpreprocessor directive completes the preprocessor block. Here's an example written for this game for a range of popular screen sizes:
   //#if screen == "128x128"
   //# 			ballWidth = 10;
   //#elif screen == "176x182"
   //# 			ballWidth = 16;
   //#elif screen == "176x208"
   //# 			ballWidth = 16;
   //#elif screen == "240x320"
                   ballWidth = 22;
	//#endif
Running the Ball Shot Game on an Emulator
- Choose Run > Run Main Project.
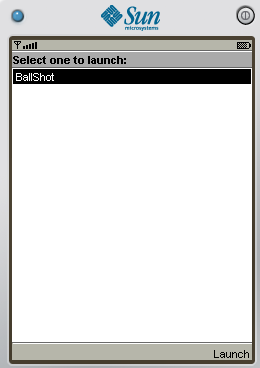
- Once the emulator starts, it should display the following menu.
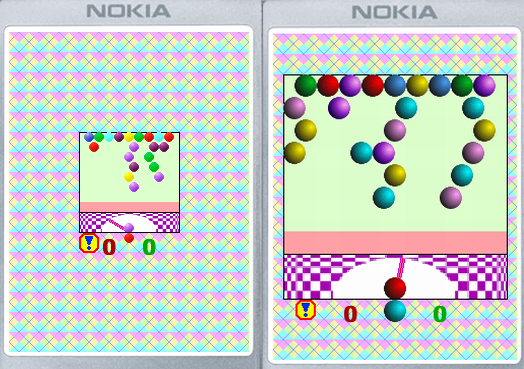
- Click the main button on the emulator to start the game. The emulator shows you the following screen. For comparison we've included a screen shot of what the game looks like without the preprocessor directives. Note that the images that are too small in relation to the emulator screen.


Summary
This article demonstrated how to use the Mobility Pack to target mobile device attributes to eliminate device fragmentation problems using custom configurations and preprocessor code targeting device abilities. Unfortunately, not every device fragmentation problem can be addressed using these methods, but these examples show that there are ways to mitigate the impact of them when developing for mobile devices.