NetBeans Property Editor Tutorial

This tutorial shows techniques for using property editors in
NetBeans, including providing custom editors and custom inplace editors. Specifically,
the following will be covered:
- Providing your own property editor for an individual Node
- Creating a custom editor
- Creating a custom inplace editor
- Registering a custom property editor globally
Getting Started
This tutorial is intended as a follow-on to these preceding tutorials, and its
code is based on the code from them:
If you have not yet done these tutorials, it is recommended to do them first.
To download the completed sample, click here.
In the previous tutorial you covered creating
Nodes with sets of Propertys that could be displayed
in the property sheet.
Custom Property Editors
Often you may have a property for which either the standard property editor is not
sufficient, or the property type is a class for which there is no standard
property editor. NetBeans IDE contains classes for many common Swing
types, but every possible need cannot be covered by a set of generic property
editors.
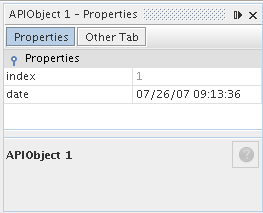
You'll pick up where you left off in the previous tutorial, with the class MyNode,
which wraps an APIObject object, and offers a read-only property for
its index property and a read/write one for its date
property.
Creating a Property Editor
The basics of creating a property editor are pretty simple. The JavaBeans API
offers a base class, PropertyEditorSupport, which covers most of
the basics, and can be used to create a simple property editor with little work.
Property editors serve two purposes: Converting values to and from strings
for display in the property sheet, and validating new values when they are set.
To start out, you will create a property editor which simply provides and accepts a differently
formatted date.
- Right click the
org.myorg.myeditor package, and choose
New > Java Class. In the wizard, name the class DatePropertyEditor.
- In the code editor, change the class signature to extend
PropertyEditorSupport:
public class DatePropertyEditor extends PropertyEditorSupport {
- Implement
setAsText() and getAsText() as follows:
public String getAsText() {
    Date d = (Date) getValue();
    if (d == null) {
        return "No Date Set";
    }
    return new SimpleDateFormat("MM/dd/yy HH:mm:ss").format(d);
}

public void setAsText(String s) {
    try {
        setValue (new SimpleDateFormat("MM/dd/yy HH:mm:ss").parse(s));
    } catch (ParseException pe) {
        IllegalArgumentException iae = new IllegalArgumentException ("Could not parse date");
        throw iae;
    }
}
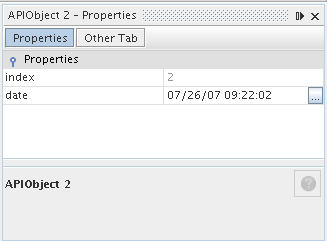
- Open
MyNode in the code editor. Change the line that
declares dateProperty so that the variable is declared as
PropertySupport.Reflection rather than Property.
You will be calling a method specific to PropertySupport.Reflection:
PropertySupport.Reflection dateProp = new PropertySupport.Reflection(obj, Date.class, "date");
- Insert a new line after that line:
dateProp.setPropertyEditorClass(DatePropertyEditor.class);
- Run the module suite, use File > Open Editor to open your editor
component, and note the new format of the Date property, as shown here:
Creating a Custom Editor
Another basic feature of standard java.beans.PropertyEditors is
the ability to have a "custom editor", which usually appears in a
dialog when you click a "..." button beside the property in the
property sheet.
Going into the details of implementing such an editor is out of scope for
this tutorial, but here are the basics:
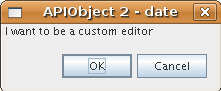
- Implement the following two methods on
DatePropertyEditor:
public Component getCustomEditor() {
    return new JLabel ("I want to be a custom editor");
}

public boolean supportsCustomEditor() {
    return true;
}
- Run the suite, and now you have a "..." button beside the
property in the property sheet, as shown below:
Click it, and your JLabel appears:
If you were doing this for real, you would create a JPanel, and embed some
sort of calendar and/or clock component to make it easy to set the
properties; the code necessary to do it right would be a distraction here.
- Remove the above two methods before continuing.
Creating a Custom Inplace Editor
What would be really useful is to have a better date editor embedded in the
property sheet itself. NetBeans has an API that makes this possible. It
involves a bit of code, but the result is worth it.
Since the SwingLabs project on
java.net produces a nice date picker component, you will simply reuse that.
So the first thing you need to do is to get SwingX into NetBeans.
- Download
swingx.jar from the
the SwingLabs site (for licensing
reasons it cannot be kept in NetBeans CVS).
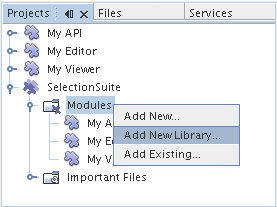
- Expand the SelectionSuite, right-click the Modules node, and choose Add New Library,
as shown here:
- Browse for
swingx.jar, which you just downloaded. Click Next.
- Click Next again, notice that the code name base will be org.jdesktop.swingx,
and then click Finish.
- Right click the My Editor project node in the Projects tab in the
main window, and choose Properties.
- In the Libraries page, click the Add Dependency button, and add a dependency
on your new swingx-wrapper library wrapper module.
Now you are ready to make use of the date picker. This will involve implementing
a couple of NetBeans-specific interfaces:
- ExPropertyEditor—a property editor interface through which the
property sheet can pass an "environment" (
PropertyEnv)
object that gives the editor access to the Property object it
is editing and more.
- InplaceEditor.Factory—an interface for objects that own an
InplaceEditor
- InplaceEditor—an interface that allows a custom component to be
provided for display in the property sheet.
You will implement InplaceEditor.Factory and ExPropertyEditor
directly on DatePropertyEditor, and then create an InplaceEditor
nested class:
- Change the signature of
DatePropertyEditor as follows:
public class DatePropertyEditor extends PropertyEditorSupport implements ExPropertyEditor, InplaceEditor.Factory {
- As in earlier examples, press Ctrl-Shift-I to Fix Imports and then
use the "Implement All Abstract Methods" to cause the missing methods to
be added.
- Add the following methods to
DatePropertyEditor:
public void attachEnv(PropertyEnv env) {
    env.registerInplaceEditorFactory(this);
}

private InplaceEditor ed = null;

public InplaceEditor getInplaceEditor() {
    if (ed == null) {
        ed = new Inplace();
    }
    return ed;
}
- Now you need to implement the
InplaceEditor itself. This will be
an object that owns a swingx JXDatePicker component, and some
plumbing methods to set up its value, and dispose of resources when it is no
longer in use.
It requires a bit of code, but it's all quite straightforward. Just
create Inplace as
a static nested class inside DatePropertyEditor:
    private static class Inplace implements InplaceEditor {

        private final JXDatePicker picker = new JXDatePicker();
        private PropertyEditor editor = null;

        public void connect(PropertyEditor propertyEditor, PropertyEnv env) {
            editor = propertyEditor;
            reset();
        }

        public JComponent getComponent() {
            return picker;
        }

        public void clear() {
            //avoid memory leaks:
            editor = null;
            model = null;
        }

        public Object getValue() {
            return picker.getDate();
        }

        public void setValue(Object object) {
            picker.setDate ((Date) object);
        }

        public boolean supportsTextEntry() {
            return true;
        }

        public void reset() {
            Date d = (Date) editor.getValue();
            if (d != null) {
                picker.setDate(d);
            }
        }

        public KeyStroke[] getKeyStrokes() {
            return new KeyStroke[0];
        }

        public PropertyEditor getPropertyEditor() {
            return editor;
        }

        public PropertyModel getPropertyModel() {
            return model;
        }

        private PropertyModel model;
        public void setPropertyModel(PropertyModel propertyModel) {
            this.model = propertyModel;
        }

        public boolean isKnownComponent(Component component) {
            return component == picker || picker.isAncestorOf(component);
        }

        public void addActionListener(ActionListener actionListener) {
           //do nothing - not needed for this component
        }

        public void removeActionListener(ActionListener actionListener) {
           //do nothing - not needed for this component
        }
    }
- If you haven't already, press Ctrl-Shift-I to Fix Imports.
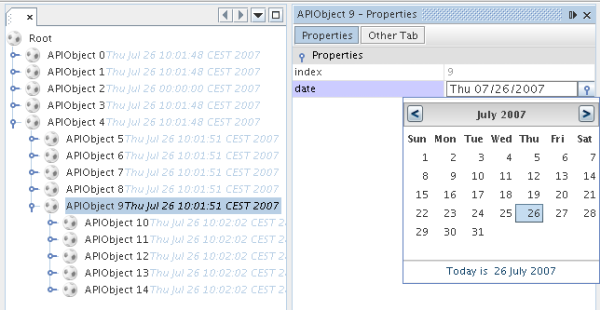
- Run the suite again, use File > Open Editor to open your
editor (really it's not much of an editor anymore), select an instance
of
MyNode and click the value of the date property in
the property sheet. Notice that the date picker popup appears, and
behaves exactly as it should, as shown below:
Registering DatePropertyEditor Globally
Often it is useful to register a property editor to be used for all properties
of a given type. Indeed, your DatePropertyEditor is generally
useful for any property of the type java.util.Date. While usefulness
is not the primary determinant of whether such a property editor should be
registered, if your application or module will regularly deal with Date properties,
it might be useful to do so.
Here is how to register DatePropertyEditor
so that any property of the type java.util.Date will use DatePropertyEditor
in the property sheet:
- Right click the My Editor project, and choose Properties
from the popup menu.
- On the Libraries page of the project properties dialog, click Add Dependency—you
need to add a dependency on the Module System API so you can subclass
ModuleInstall
to run some code on startup.Type ModuleInstall. The
dialog should auto-select "Module System API". Press Enter or click OK
to add the dependency on the Modules API from the My Editor module.
- Right click the
org.myorg.myeditor package in the My Editor
project and choose New > File/Folder. Under the NetBeans Module Development
category, select Module Installer. Click Finish. A
subclass of org.openide.modules.ModuleInstall will be created for
you—this class contains code that will run during startup.
- Implement the
restored() method, which is run during startup,
as follows:
public void restored() {
    PropertyEditorManager.registerEditor(Date.class, DatePropertyEditor.class);
}
This code will register DatePropertyEditor as the default editor
for all properties of the type java.util.Date throughout the system.
- Press Ctrl-Shift-I to Fix Imports.
Remember, you should only do this if you really need to—ModuleInstall
classes slow down application startup, because they mean more code has to run
during startup. So where possible they should be avoided. If you do need to
register a lot of property editors, though, it may make sense to aggregate them
in a single module that registers them during startup.
If the type you want to provide a property editor for is in your module, it may
be preferable to place the registration code in a static block that will be
invoked when that class is loaded, e.g.
public class Foo {
    static {
         PropertyEditorManager.registerEditor(Foo.class, FooEditor.class);
    }
    //...
Caveat: If you are not sure your property editor
will be used during a typical session, a better technique may be to use
PropertyEditorManager.setEditorSearchPath(), adding your package
to the array of packages returned by
PropertyEditorManager.getEditorSearchPath(). The above code will
cause FooEditor.class to be loaded into memory—this is paying
a price of about 1K of memory for something that will not be used. For one
or two property editors, this is probably acceptable; for more, it is preferable
to aggregate all of your property editors into one package, name the classes
appropriately and register that package is being on the search path. For
more information on registering property editors, see the javadoc for
PropertyEditorManager.
Using PropertyPanel
While you won't cover it in great detail, it is worth mentioning that the property
sheet is not the only place that Node.Property objects are useful;
there is also a convenient UI class in the org.openide.explorer.PropertySheet
class called PropertyPanel. It's function is to display one property,
much as it is displayed in the property sheet, providing an editor field and a
custom editor button, or you have called
somePropertyPanel.setPreferences(PropertyPanel.PREF_CUSTOM_EDITOR),
it will display the custom editor for a Property. It is useful as
a convenient way to get an appropriate UI component for editing any getter/setter
pair for which there is a property editor.