Quick Start Guide to the XSLT Designer
Contributed by Dmitry Markovski,
updated by Vince Genovese
December 2007
Contents
Overview
In this tutorial you become acquainted with the XSLT Designer included in NetBeans IDE 6.0. The XSLT Designer is used to develop, deploy and test XSL Transformation Services.
An XSL Transformation Service acts as a web service. It receives messages from an external client, transforms the messages in accordance with an XSL stylesheet, and either sends the messages back to the originator or forwards them to another web service.
In this tutorial you create a simple XSL Transformation Service that receives a message, transforms it, and sends it back to the calling web service.
Prerequisites
This tutorial assumes that you have some basic knowledge of, or programming experience with, the NetBeans IDE.
System Requirements
This tutorial assumes that your system meets the requirements specified in the System Requirements section of the NetBeans IDE 6.0 Release Notes.
Software Needed for the Tutorial
Before you begin, install the following software on your computer: NetBeans IDE 6.0, with the SOA Pack and GlassFish V2 Application Server, which are required for this tutorial.
Configuring the Tutorial Environment
This tutorial requires that the GlassFish V2 Application Server, which includes the JBI runtime, has been installed with NetBeans IDE 6.0. Perform the following steps to confirm that GlassFish V2 Application Server is installed with NetBeans IDE 6.0 and that the JBI runtime contains the XSLT Service Engine and Transform Shared Library required for this tutorial:
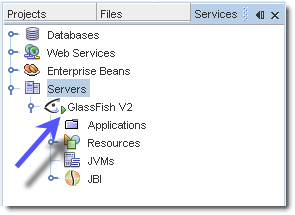
- Open the Services window.
- Expand the Servers node.
-
Right-click the GlassFish V2 node and choose Start form the pop-up menu.
If the Start option is not available and there is a green “badge” next to the GlassFish V2 node, the server is already running.
-
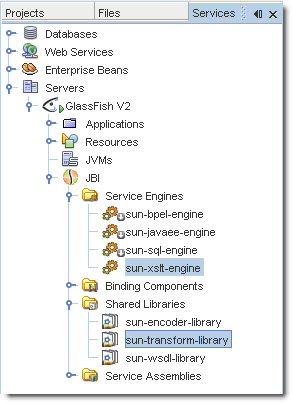
After the server is started, expand the GlassFish V2 > JBI node. Then expand both the Service Engines node and the Shared Libraries node to verify that the XSLT Service Engine and Transform Shared Library are installed.
Creating the XSLT Module Project
An XSL Transformation Service is created within an XSLT Module project.
To create a new XSLT Module Project:
- From the IDE's main menu, choose File > New Project.
- Under Categories select SOA.
- Under Projects, select XSLT Module.
-
Click Next.

- In the Project Name field, type HelloXSLTransformation.
-
Modify the project location, or accept the default.

- Click Finish.
-
The Projects window now contains the HelloXSLTransformation project node.

Next you create two XML Schema (.xsd) files, a web service description (.wsdl) file and an XSL stylesheet (.xsl) file. To run an XSL Transformation Service, you need at least one XML Schema, one WSDL file and one XSL stylesheet. For the purpose of this tutorial, you create two XML Schemas.
Creating XML Schemas
You will create two XML Schemas: HelloXSLTIncoming.xsd and HelloXSLTOutgoing.xsd. You use the former as the basis for the incoming message and the latter as the basis for the outgoing message.
To create the XML Schema for the incoming message:
- In the Projects window, right-click the HelloXSLTransformation > Transformation Files node and choose New > XML Schema.
- In the File Name field, type HelloXSLTIncoming.
-
Click Finish. A new node—HelloXSLTIncoming.xsd—appears under the Transformation Files node in your HelloXSLTransformation project and the new Schema opens in the XML Schema Editor.

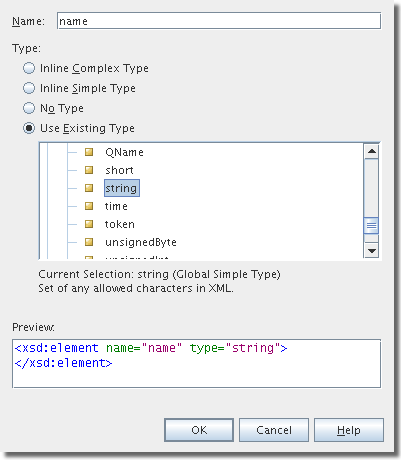
- In the first column of the Schema view, right-click Elements and choose Add Element from the pop-up menu. The Add Element dialog box opens.
- In the Name field, type name.
- Under Type, select the Use Existing Type radio button.
- Expand the Built-in Types node and select string.
-
Click OK.
-
To view the source of the Schema you created, click the Source button on the XML Schema Editor toolbar. You should see the following code:
<?xml version="1.0" encoding="UTF-8"?>
<xsd:schema xmlns:xsd="http://www.w3.org/2001/XMLSchema"
            targetNamespace="http://xml.netbeans.org/schema/HelloXSLTIncoming"
            xmlns:tns="http://xml.netbeans.org/schema/HelloXSLTIncoming"
            elementFormDefault="qualified">
    <xsd:element name="name" type="xsd:string"></xsd:element>
</xsd:schema>
To create the XML Schema for the outgoing message:
- In the Projects window, right-click the HelloXSLTransformation > Transformation Files node and choose New > XML Schema.
- In the File Name field, type HelloXSLTOutgoing.
- Click Finish. A new node—HelloXSLTOutgoing.xsd—appears under the Transformation Files node in your HelloXSLTransformation project and the new Schema opens in the XML Schema Editor.
- In the first column of the Schema view, right-click Elements and choose Add Element from the pop-up menu. The Element dialog box opens.
- In the Name field, type greeting.
- Under Type, select the Use Existing Type radio button.
- Expand the Built-in Types node and select string.
- Click OK.
-
To view the source of the Schema you created, click the Source button on the XML Schema Editor toolbar. You should see the following code:
<?xml version="1.0" encoding="UTF-8"?> <xsd:schema xmlns:xsd="http://www.w3.org/2001/XMLSchema" targetNamespace="http://xml.netbeans.org/schema/HelloXSLTOutgoing" xmlns:tns="http://xml.netbeans.org/schema/HelloXSLTOutgoing" elementFormDefault="qualified"> <xsd:element name="greeting" type="xsd:string"></xsd:element> </xsd:schema> - Click the Save All button on the toolbar.
You should see two Schema files listed under the Transformation Files node in your HelloXSLTransformation project.

Note: The XML Schema Editor is not the subject of this tutorial. For detailed information on the XML Schema Editor, see Getting Started With XML Schema Tools.
Creating a WSDL File
Next you create a web service description file defining the web interface of our XSL Transformation Service.
To create a WSDL file:
- In the Projects window, right-click the HelloXSLTransformation > Transformation Files node and choose New > WSDL Document.
- In the File Name field, type HelloXSLTWSDL, then click Next.
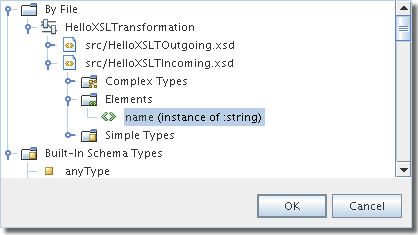
- Under Input, in the Element Or Type column, click the ellipsis (...) button. The Select Element Or Type dialog box opens.
-
Select By File > HelloXSLTransformation > src/HelloXSLTIncoming.xsd > Elements > name and click OK.
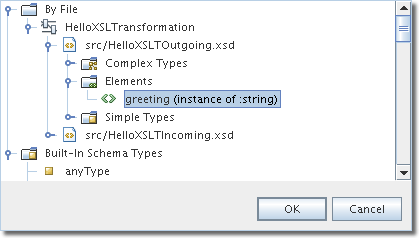
- Under Output, in the Element Or Type column, click the ellipsis (...) button. The Select Element Or Type dialog box opens.
-
Select By File > HelloXSLTransformation > src/HelloXSLTOutgoing.xsd > Elements > greeting and click OK.
- Click Next.
- In the Binding Type Field, select SOAP.
- Under Binding Subtype, select Document Literal, then click Finish.
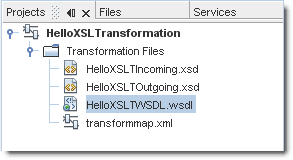
You should see the HelloXSLTWSDL.wsdl file listed under the Transformation Files node in your HelloXSLTransformation project.
Note: Creating and Editing WSDL files is not the subject of this tutorial. For detailed information, see Developer Guide to the WSDL Editor.
Creating an XSL Stylesheet
An XSL stylesheet is an XML file that contains instructions about transforming the incoming message into the outgoing message.
To create an XSL stylesheet:
- In the Projects window, right-click the HelloXSLTransformation > Transformation Files node and choose New > XSLT Service.
- Under Service Type, select Request-Reply Service. Click Next.
- Notice that HelloXSLTWSDL.wsdl is selected in the Web Service drop-down list. Click Next.
-
In the XSL File field, type HelloXSLTService. Click Finish.
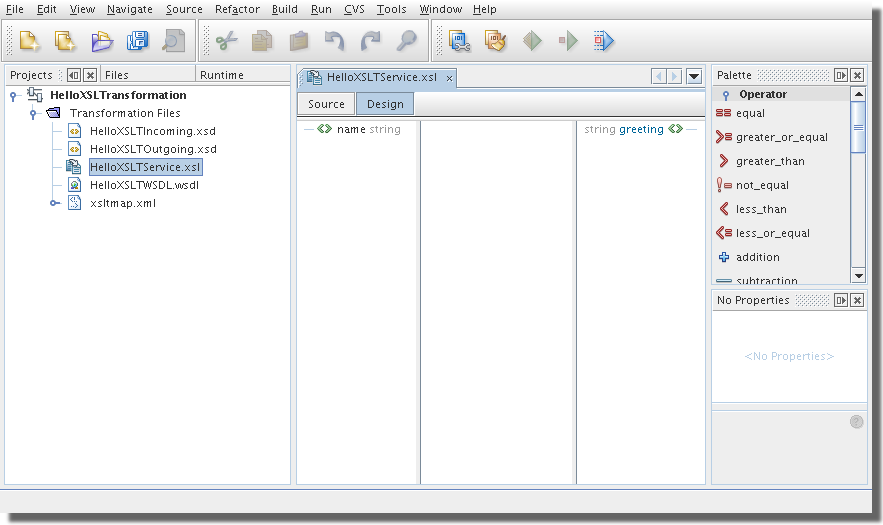
The HelloXSLTService.xsl node appears under the Transformation Files node in your HelloXSLTransformation project. The HelloXSLTService.xsl file opens in the Design view of the XSL Transformation Editor. The Design view Palette opens on the right.
-
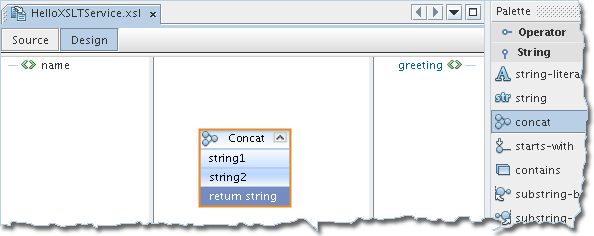
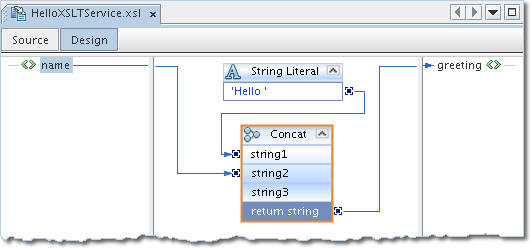
In the Palette, expand the String section and drag the concat function onto the Transformations pane of the XSLT Design view.
- In the Palette, under the String section, select the string-literal function and drag it to the Transformations pane. Double-click the return string field to make it editable and type Hello (with a space at the end).
-
Drag the handle on the right side of the Hello field to the handle on the left side of the string1 row in the Concat function. An arrow snaps in place to indicate the flow.
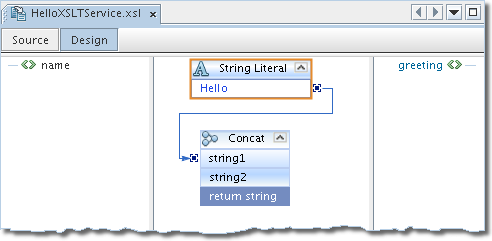
- Select the name element in the Source tree pane on the left, and drag the handle to the string2 row in the Concat function.
-
Drag the return string handle to the greeting element in the Destination tree pane on the right. The Design view should now resemble the following:
-
Click the Source button on the Design view toolbar. You should see the following code:
<xsl:stylesheet xmlns:xsl="http://www.w3.org/1999/XSL/Transform" version="1.0" xmlns:ns1="http://xml.netbeans.org/schema/HelloXSLTIncoming" xmlns:ns="http://xml.netbeans.org/schema/HelloXSLTOutgoing"> <xsl:template match="/"> <xsl:element name="ns:greeting"> <xsl:value-of select="concat('Hello ', /ns1:name)"/> </xsl:element> </xsl:template> </xsl:stylesheet> - Click the Save All button on the toolbar.
Creating and Deploying the Composite Application
An XSLT project is not directly deployable. You must first add an XSLT project as a JBI module to a Composite Application project before you can deploy the Composite Application project. Deploying the project makes the service assembly available to the application server, thus allowing its service units to be run.
To create a Composite Application:
- Choose File > New Project from the main menu.
- Under Categories, select SOA.
- Under Projects, select Composite Application. Click Next.
- In the Project Name field, type HelloXSLTCAP.
- Specify a project location or accept the default.
- Click Finish.
-
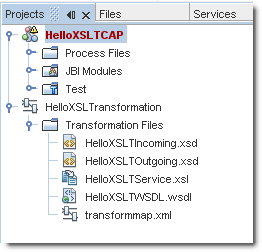
The Projects window now contains the HelloXSLTCAP project node.
To add a JBI module:
- Right-click the HelloXSLTCAP node and choose Add JBI Module from the pop-up menu.
-
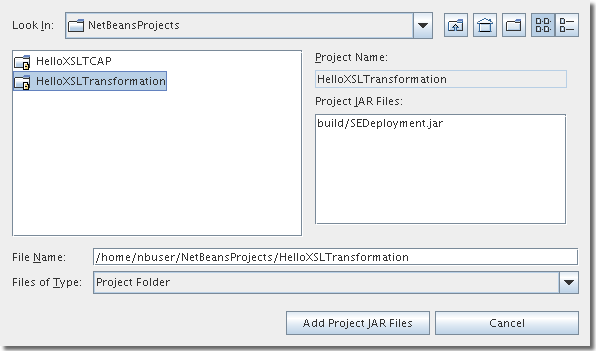
Select the HelloXSLTransformation project and click Add Project Jar Files.
-
To verify that the JBI module has been added, expand HelloXSLTCAP > JBI Modules.
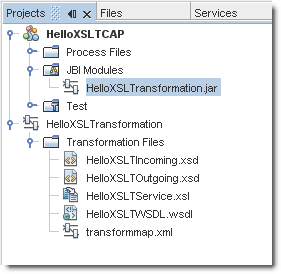
To deploy the HelloXSLTCAP Composite Application:
-
In the Projects window, right-click the HelloXSLTCAP node and choose Deploy Project from the pop-up menu.
Note: If the Warning - Select Server dialog box appears, select Sun Java System Application Server 9 and click OK. - In the Output window that opens in the lower part of the IDE, watch for the BUILD SUCCESSFUL message.
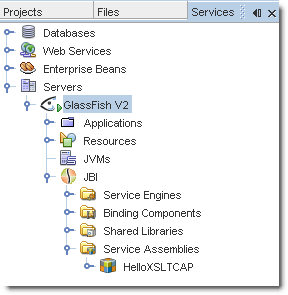
-
To verify that the project has been deployed, expand Sun Java System Application Server 9 > JBI > Service Assemblies in the Runtime window. You should see the HelloXSLTCAP node.
Performing a Test Run of the XSL Transformation Service
Testing an XSL Transformation Service means sending a message that the Service is expecting and receiving, in this case, a reply message.
Before we can perform the testing, we must create a test case.
To create a test case:
- In the Projects window, expand the HelloXSLTCAP node and right-click the Test node.
- From the pop-up menu, select New Test Case.
- In the Test Case Name field, type JohnSmith. Click Next.
- Under Select the WSDL Document, expand HelloXSLTransformation - XSLT Process Files and select HelloXSLTWSDL.wsdl. Click Next.
- Under Select the Operation to Test, expand HelloXSLTWSDLBinding and select HelloXSLTWSDLOperation. Click Finish.
-
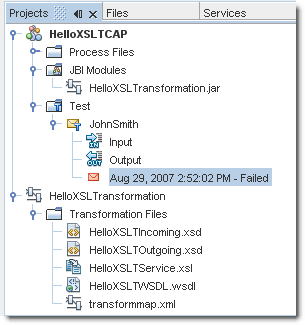
The JohnSmith node appears under HelloXSLTCAP > Test and the input message file—Input.xml—opens in the editor.
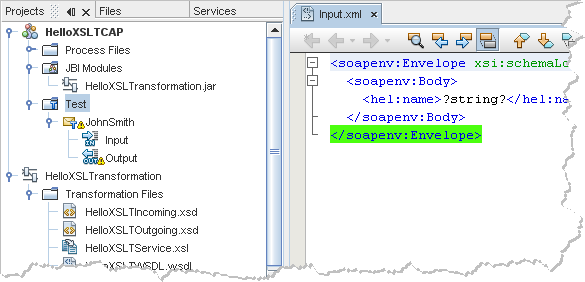
-
In the Input.xml, modify the
<hel:name>?string?</hel:name>line to<hel:name>John Smith</hel:name>The Input.xml file should be:<soapenv:Envelope xsi:schemaLocation="http://schemas.xmlsoap.org/soap/envelope/ http://schemas.xmlsoap.org/soap/envelope/" xmlns:xsi="http://www.w3.org/2001/XMLSchema-instance" xmlns:xsd="http://www.w3.org/2001/XMLSchema" xmlns:soapenv="http://schemas.xmlsoap.org/soap/envelope/" xmlns:hel="http://xml.netbeans.org/schema/HelloXSLTIncoming"> <soapenv:Body> <hel:name>John Smith</hel:name> </soapenv:Body> </soapenv:Envelope> - Click the Save All button on the toolbar.
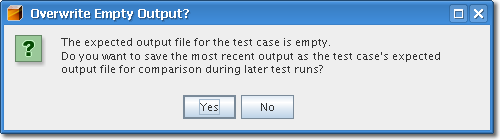
The Output node under the test case node refers to the expected reply message that is used for comparison with the actual reply messages. Before we run the test for the first time, the Output.xml file is empty. We will populate it with the content of the reply message (provided that it is what we expect).
To run the test:
-
Right-click the JohnSmith node and select Run. Notice that the test fails and the following dialog box appears:
-
Click Yes. Notice that the failed test node appears below the Output node.
-
Double-click the failed test node to see the message that the XSL Transformation Service sent back:
<?xml version="1.0" encoding="UTF-8"?>
<SOAP-ENV:Envelope xmlns:SOAP-ENV="http://schemas.xmlsoap.org/soap/envelope/" xmlns:xsd="http://www.w3.org/2001/XMLSchema" xmlns:xsi="http://www.w3.org/2001/XMLSchema-instance" xsi:schemaLocation="http://schemas.xmlsoap.org/soap/envelope/ http://schemas.xmlsoap.org/soap/envelope/" xmlns:ns="http://xml.netbeans.org/schema/HelloXSLTOutgoing">
        <SOAP-ENV:Header/>
        <SOAP-ENV:Body>
                <ns:greeting xmlns:ns="http://xml.netbeans.org/schema/HelloXSLTOutgoing">Hello John Smith</ns:greeting>
        </SOAP-ENV:Body>
</SOAP-ENV:Envelope>
Notice the line<ns:greeting xmlns:ns="http://xml.netbeans.org/schema/HelloXSLTOutgoing">Hello John Smith</ns:greeting>The XSL Transformation Service received the name, concatenated it with the string 'Hello' and sent the reply message. -
Run the test again. The test is marked as passed.

Congratulations! You have successfully created, deployed and tested an XSL Transformation Service.
Next Step
Now that you have successfully created the Request-Reply XSL Transformation Service, continue with the Service Bridge type.