| December, 2007 [Revision number: V6.0] |
In this tutorial, you use the NetBeans IDE to create and run a simple web application, Hello Web. The example application asks you to input a name and then displays a message that uses that name. At first, you implement this page with an input field. Then you replace the input field with a drop-down list from which the user can choose a name. The drop-down list is populated with names from a database table. |
Expected duration: 25 minutes
Contents |
|
This tutorial works with the following technologies and resources
| JavaServer Faces Components/ Java EE Platform |
||||
| Travel Database (installed) | ||||
* To take advantage of NetBeans IDE 6.0's Java EE 5 capabilities, use an application server that is fully compliant with the Java EE 5 specification, such as the Sun Java System Application Server 9 (GlassFish Project).
If you are using MySQL, see the FAQ How do I enable the sample Travel database for MySQL in NetBeans IDE 6.0 for appropriate instructions.
This tutorial has been tailored for use with the GlassFish v2 Application Server. If you are using a different server, consult the Release Notes and FAQs for known problems and workarounds. For detailed information about the supported servers and Java EE platform, see the Release Notes.
Before you proceed, make sure you review the requirements in this section.
Before you begin, you need to install the following software on your computer:
HelloWeb and click Next.Select the Visual Web JavaServer Faces framework and click Finish
Your project appears with the initial page (Page1) open in the Visual Designer.
To begin, you design a page like the one shown in the following figure.
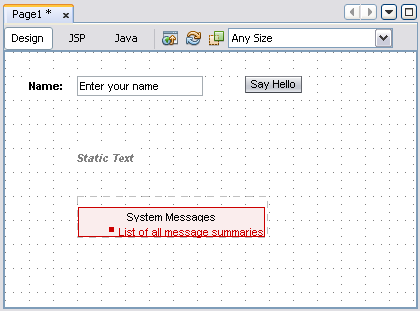 Figure 1: Page1 Design
 |
In the Properties window, type Hello Web in the Title property's text box as shown in the following figure.
The Title property's value appears in the browser's title bar when this page (or project) is deployed.
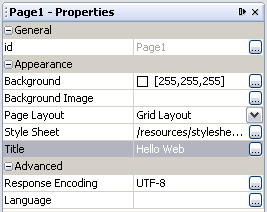 Figure 2: Page Properties in the Properties Window
 |
Tip: You can access a component's properties in the Properties windows by selecting the component in either the Visual Designer or the Navigator window. To open the Navigator window, select Window > Navigating > Navigator.
You access a page's properties by clicking on a blank spot on the page.If the Basic node in the Palette window is not expanded, expand it now.
All the components that you use in this example are in the Basic section of the Palette.
If the Palette is not visible, choose Window > Palette to display it.Drag a Label component from the Basic section of the Palette to the
left side of the page in the Visual Designer, type Name: and
press Enter.
Note that the component snaps to the grid on the page. Also
note that the value of the text property in the Properties window changes to Name:.
Enter Your Name, and press Enter.id property of the Text Field
from textField1 to nameField.Select the Label component and Ctrl-Shift-Drag from the Label component to the Text Field component.
Note that thefor property for the Label component is
now set to nameField.Say Hello, and press
Enter.id property from button1
to helloButton.id property from staticText1
to helloText.Drag a Message Group component onto an out-of-the-way spot on the page, such as under the Static Text component.
Adding a Message Group component, which displays runtime errors among other types of messages, is useful for diagnosing programming errors.In the Editing toolbar, click JSP to switch to the JavaServer Pages (JSP) Source Editor.
Scan through the code and note how the changes that you made in the Properties window are saved. When a page is first displayed in the browser, the page appears exactly as indicated by the tags in the JSP page. If your page bean has code that changes the property values, such changes appear only on requests where the page is submitted and subsequently redisplayed.Hello entered-name. You do this by adding an event
handler that the application calls whenever the button is clicked. This event handler
sets the Static Text component's text property to a "hello" message and then causes
the page to be redisplayed so that the text appears.Double-click the Button component.
The Editing Area switches to the Java Editor and shows the page bean for Page1. The button's event handler,helloButton_action, has been added to
the page bean.Replace the body of the helloButton_action method with the following
lines of code (shown in bold). Then press Alt-Shift-F to reformat the code.
| Code Example 1: helloButton_action() Code |
    public String helloButton_action() {
        String name = (String)nameField.getText();
        helloText.setText("Hello, " + name + "!");
        return null;
|
The first line in bold gets the value of the text property for the
nameField Text Field component using the getText method. That
value is an object of type Object, which needs to be a string, so
it is cast to a String object. Then the object is assigned to the
name variable.
text property
for the helloText Static Text component. This value contains the name that
the user entered into the nameField Text Field component.
For example, if the user enters Fred,
this line of code sets the Static Text component's text property
to Hello, Fred!In the Java Editor, ensure that your Java code does not contain any errors.
Errors are indicated by red underlines or red boxes along the left side of the code. Your project will not build if there are errors in the code.
Tip: Hold the cursor over the red box on the left side of the code to see a description of the error.Click the Run Main Project button ![]() .
.
Enter your name in the text field and click Say Hello.
"Hello your name" is then displayed below.The browser submits the form to the web server, which calls your web application.
The application executes the button action method, updates the page elements, rerenders
the same page with the changed data, and sends the page back to the web browser.
The following figure is the result if the name submitted is Gus Townsend.
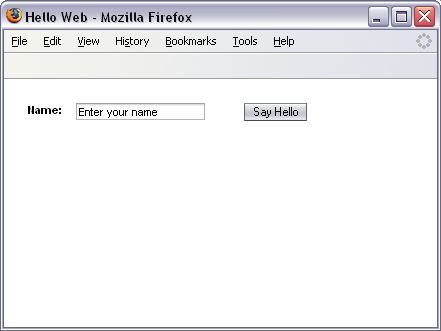 Figure 3: Hello Web, With
Result
Figure 3: Hello Web, With
Result |
The remainder of this tutorial shows how to use a Drop Down List component
instead of a Text Field to get user input, as shown in the following figure. This
Drop Down List component gets its list of choices from the bundled PERSON
database table.
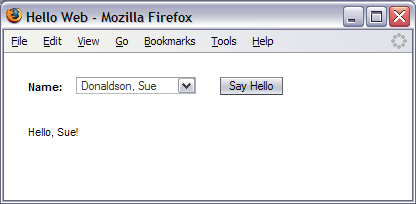 Figure 4: : Hello Web, Final Version
 |
nameField Text Field component
and choose Delete from the pop-up menu.
Drag a Drop Down List component from the Basic section of the Palette onto your page in the Visual Designer. Move the component into the area where the Text Field component was.
Notice, as shown in the following figure, that the Navigator window shows a
dropDown1 component and a dropDown1DefaultOptions object.
The Drop Down List component's items property
identifies the object that contains the choices in the list.
When you add a Drop Down List component to the page, the IDE creates a
Default Options object (dropDown1DefaultOptions)
and sets this object as the value of the Drop Down List
component's items property. Only the Drop Down List component is visible in the Visual Designer. The Default Options object merely supplies the choices that appear in the list. Later in this tutorial, you modify the Drop Down List
component to obtain its choices from a different source.
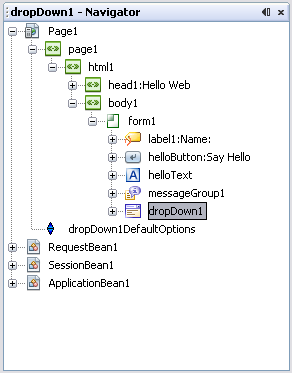 Figure 5: Components in the Navigator Window
 |
id to nameDropDown.
Select the Label component and Ctrl-Shift-Drag from the Label component to the Drop Down List component.
Note that thefor property for the Label component is now nameDropDown.
In the Services window, expand the Databases node and check if the Travel database is connected.
If the jdbc node for the TRAVEL database's badge is broken and you cannot expand the node, the IDE is not connected to the database. To connect to the TRAVEL database, right-click the jdbc node for TRAVEL and choose Connect from the pop-up menu. Entertravel for the Password, select Remember Password During This Session, and click OK. If you do not see a jdbc node for the TRAVEL database, see the
NetBeans Installation Instructions for information about making the database available to the IDE.Expand the TRAVEL database's Tables node.
Under Tables, you see nodes for each table in the database, such as CARRENTAL and FLIGHT. The following figure shows the Runtime window with the Tables node expanded.
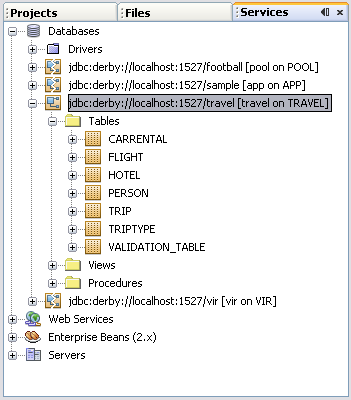 Figure 6: Services Window
 |
Drag PERSON from the Services window and drop it on the Drop Down List.
The display on the list changes from item 1 to abc, indicating
that the list is displaying bound data and that the data
being displayed is of the type String.
personRowSet property to SessionBean1.
Right-click the Drop Down List and choose Bind to Data from the pop-up menu. The Bind to Data dialog box appears, as shown in the following figure.
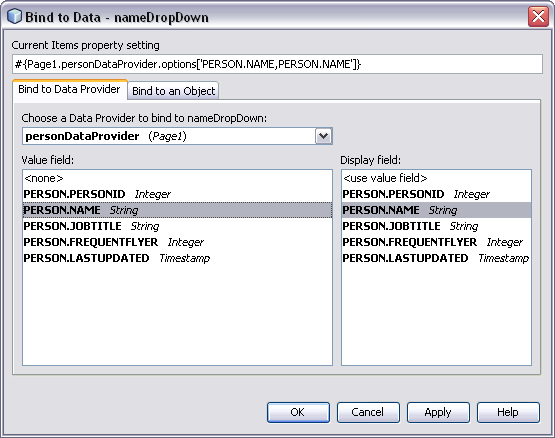 Figure 7: Binding Data to
the Drop Down List
Figure 7: Binding Data to
the Drop Down List |
PERSON.NAME, leave the Display field set to PERSON.NAME, and click OK.In the Visual Designer, double-click the Button component.
The Editing Area switches to the Java Editor and moves to thehelloButton_action
method.Replace the body of the helloButton_action method with the following
code (shown in bold).
| Code Example 2: helloButton_action Replacement Code |
    public String helloButton_action() {
        String name = (String)nameDropDown.getSelected();
        String splitnames[] = name.split(",");
        helloText.setText("Hello, " + splitnames[1] + "!");
return null; |
The first line uses the getSelected method to get the current value
of the Drop Down List, which is the currently selected name in the list.
Because data is stored in the database as lastname, firstname, the
string must be modified before it is displayed. Otherwise, the application will
print "Hello, lastname, firstname!" The second line uses the split
method to split the string into an array, using the comma as a delimiter. The
first item in the array (at position 0) contains the last name, and position 1
contains the first name.
In the third line, the text property for the Static Text component
is set to a value that includes the first name.
Add the following code to the prerender method. This code sets
the first item in the list as the default selection.
| Code Sample 3: prerender Method Code |
    public void prerender() {
        // If no selection, set default selection
        if (nameDropDown.getSelected() == null) {
            personDataProvider.cursorFirst();
            nameDropDown.setSelected
                    ((String)personDataProvider.getValue("person.name"));
        }
    }
|
Click the Run Main Project button.
The IDE builds and deploys the application and displays the page in the web browser.Select a name from the list and click Say Hello.
The browser sends the Drop Down List component's selected value to the server, and the server executes the button'shelloButton_action method.
Try It. A Listbox component is similar to a Drop Down List component.
Try replacing the Drop Down List component with a Listbox component. In this application,
the Listbox component's multiple property must not be checked, because only one
item can be selected at a time. Remember to bind the Listbox to the database table
and to change the helloButton_action method to get the Listbox's
selected value.
Try It. Using steps that are similar to the ones that you have learned in this tutorial, try building a web application that has a Drop Down List component that shows all the DESCRIPTION values in the TRIPTYPE table. When a user clicks a Show Type Id button, have the page display the trip type's TRIPTYPEID. To do this, you must bind the Drop Down List component's Display field to TRIPTYPE.DESCRIPTION and the component's Value field to TRIPTYPE.TRIPTYPEID.
See Also: