
One of the virtues of running instances in a virtualized environment is that it opens up new opportunities for security controls that are not typically available when deploying onto bare metal. There are several technologies that can be applied to the virtualization stack that bring improved information assurance for cloud tenants.
Deployers or users of OpenStack with strong security requirements may want to consider deploying these technologies. Not all are applicable in every situation, indeed in some cases technologies may be ruled out for use in a cloud because of prescriptive business requirements. Similarly some technologies inspect instance data such as run state which may be undesirable to the users of the system.
In this chapter we explore these technologies and describe the situations where they can be used to enhance security for instances or underlying instances. We also seek to highlight where privacy concerns may exist. These include data pass through, introspection, or providing a source of entropy. In this section we highlight the following additional security services:
Entropy to Instances
Scheduling Instances to Nodes
Trusted Images
Instance Migrations
We consider entropy to refer to the quality and source of random data that is available to an instance. Cryptographic technologies typically rely heavily on randomness, requiring a high quality pool of entropy to draw from. It is typically hard for a virtual machine to get enough entropy to support these operations. Entropy starvation can manifest in instances as something seemingly unrelated for example, slow boot times because the instance is waiting for ssh key generation. Entropy starvation may also motivate users to employ poor quality entropy sources from within the instance, making applications running in the cloud less secure overall.
Fortunately, a cloud architect may address these issues by providing a high quality source of entropy to the cloud instances. This can be done by having enough hardware random number generators (HRNG) in the cloud to support the instances. In this case, "enough" is somewhat domain specific. For everyday operations, a modern HRNG is likely to produce enough entropy to support 50-100 compute nodes. High bandwidth HRNGs, such as the RdRand instruction available with Intel Ivy Bridge and newer processors could potentially handle more nodes. For a given cloud, an architect needs to understand the application requirements to ensure that sufficient entropy is available.
Once the entropy is available in the cloud, the next step is getting that entropy into the instances. Tools such as the entropy gathering daemon (EGD) provide a way to fairly and securely distribute entropy through a distributed system. Support exists for using the EGD as an entropy source for LibVirt.
Compute support for these features is not generally available, but it would only require a moderate amount of work for implementors to integrate this functionality.
Before an instance is created, a host for the image instantiation must be selected. This selection is performed by the nova-scheduler which determines how to dispatch compute and volume requests.
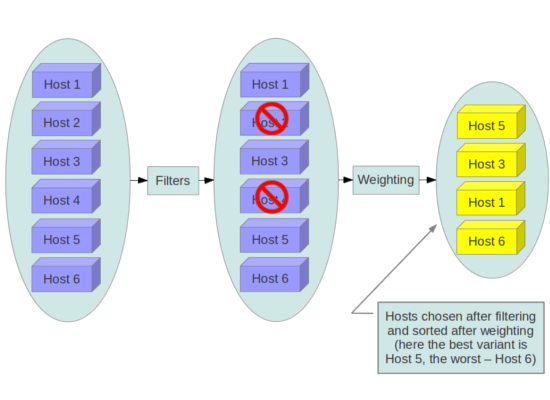
The filter scheduler is the default scheduler for OpenStack Compute, although other schedulers exist (see the section Scheduling in the OpenStack Configuration Reference). The filter scheduler works in collaboration with 'filters' to decide where an instance should be started. This process of host selection allows administrators to fulfill many different security requirements. Depending on the cloud deployment type for example, one could choose to have tenant instances reside on the same hosts whenever possible if data isolation was a primary concern, conversely one could attempt to have instances for a tenant reside on as many different hosts as possible for availability or fault tolerance reasons. The following diagram demonstrates how the filter scheduler works:
The use of scheduler filters may be used to segregate customers, data, or even discard machines of the cloud that cannot be attested as secure. This generally applies to all OpenStack projects offering a scheduler. When building a cloud, you may choose to implement scheduling filters for a variety of security-related purposes.
Below we highlight a few of the filters that may be useful in a security context, depending on your requirements, the full set of filter documentation is documented in the Filter Scheduler section of the OpenStack Configuration Reference.
Tenant Driven Whole Host Reservation
There currently exists a blueprint for whole host reservation - This would allow a tenant to exclusively reserve hosts for only it's instances, incurring extra costs.
While not a filter in themselves, host aggregates allow administrators to assign key-value pairs to groups of machines. This allows cloud administrators, not users, to partition up their compute host resources. Each node can have multiple aggregates (see the Host Aggregates section of the OpenStack Configuration Reference for more information on creating and managing aggregates).
Isolates tenants to specific host aggregates. If a host is in an aggregate that has the metadata key filter_tenant_id it will only create instances from that tenant (or list of tenants). A host can be in multiple aggregates. If a host does not belong to an aggregate with the metadata key, it can create instances from all tenants.
Schedule the instance on a different host from a set of instances. To take advantage of this filter, the requester must pass a scheduler hint, using different_host as the key and a list of instance uuids as the value. This filter is the opposite of the SameHostFilter.
The GroupAntiAffinityFilter ensures that each instance in a group is on a different host. To take advantage of this filter, the requester must pass a scheduler hint, using group as the key and a list of instance uuids as the value.
There exists a scheduler filter which integrates with the Open Attestation Project (OATS) to define scheduler behavior according to the attestation of PCRs received from a system using Intel TXT.
It is unclear if this feature is compatible with AMD's similar SEM, although the OpenAttestation agent relies on the vendor-agnostic TrouSerS library.
With regards to images, users will be working with pre-installed images or images that they upload themselves. In both cases, users will want to ensure that the image they are ultimately running has not been tampered with. This requires some source of truth such as a checksum for the known good version of an image as well as verification of the running image. This section describes the current best practices around image handling, while also calling out some of the existing gaps in this space.
The OpenStack Documentation provides guidance on how to create and upload an image to Glance. Additionally it is assumed that you have a process by which you install and harden operating systems. Thus, the following items will provide additional guidance on how to ensure your images are built securely prior to upload. There are a variety of options for obtaining images. Each has specific steps that help validate the image's provenance.
The first option is to obtain boot media from a trusted source.
mkdir -p /tmp/download_directorycd /tmp/download_directory

wget http://mirror.anl.gov/pub/ubuntu-iso/CDs/precise/ubuntu-12.04.2-server-amd64.iso
wget http://mirror.anl.gov/pub/ubuntu-iso/CDs/precise/SHA256SUMS
wget http://mirror.anl.gov/pub/ubuntu-iso/CDs/precise/SHA256SUMS.gpg
gpg --keyserver hkp://keyserver.ubuntu.com --recv-keys 0xFBB75451
gpg --verify SHA256SUMS.gpg SHA256SUMSsha256sum -c SHA256SUMS 2>&1 | grep OK
The second option is to use the OpenStack Virtual Machine Image Guide. In this case, you will want to follow your organizations OS hardening guidelines or those provided by a trusted third-party such as the RHEL6 STIG.
The final option is to use an automated image builder. The following example uses the Oz image builder. The OpenStack community has recently created a newer tool worth investigating: disk-image-builder. We have not evaluated this tool from a security perspective.
Example of RHEL 6 CCE-26976-1 which will help implement NIST 800-53 Section AC-19(d) in Oz.
<template>
<name>centos64</name>
<os>
  <name>RHEL-6</name>
  <version>4</version>
  <arch>x86_64</arch>
  <install type='iso'>
  <iso>http://trusted_local_iso_mirror/isos/x86_64/RHEL-6.4-x86_64-bin-DVD1.iso</iso>
  </install>
  <rootpw>CHANGE THIS TO YOUR ROOT PASSWORD</rootpw>
</os>
<description>RHEL 6.4 x86_64</description>
<repositories>
  <repository name='epel-6'>
    <url>http://download.fedoraproject.org/pub/epel/6/$basearch</url>
    <signed>no</signed>
  </repository>
</repositories>
<packages>
  <package name='epel-release'/>
  <package name='cloud-utils'/>
  <package name='cloud-init'/>
</packages>
<commands>
  <command name='update'>
  yum update
  yum clean all
  sed -i '/^HWADDR/d' /etc/sysconfig/network-scripts/ifcfg-eth0
  echo -n > /etc/udev/rules.d/70-persistent-net.rules
  echo -n > /lib/udev/rules.d/75-persistent-net-generator.rules
  chkconfig --level 0123456 autofs off
  service autofs stop
  </command>
</commands>
</template>
Note, it is the recommendation of this guide to shy away from the manual image building process as it is complex and prone to error. Further, using an automated system like Oz or disk-image-builder for image building, or a configuration management utility like Chef or Puppet for post boot image hardening gives you the ability to produce a consistent image as well as track compliance of your base image to its respective hardening guidelines over time.
If subscribing to a public cloud service, you should check with the cloud provider for an outline of the process used to produce their default images. If the provider allows you to upload your own images, you will want to ensure that you are able to verify that your image was not modified before you spin it up. To do this, refer to the following section on Image Provenance.
Unfortunately, it is not currently possible to force Compute to validate an image hash immediately prior to starting an instance. To understand the situation, we begin with a brief overview of how images are handled around the time of image launch.
Images come from the glance service to the nova service on a node. This transfer should be protected by running over SSL. Once the image is on the node, it is verified with a basic checksum and then it's disk is expanded based on the size of the instance being launched. If, at a later time, the same image is launched with the same instance size on this node, it will be launched from the same expanded image. Since this expanded image is not re-verified before launching, it could be tampered with and the user would not have any way of knowing, beyond a manual inspection of the files in the resulting image.
We hope that future versions of Compute and/or the Image Service will offer support for validating the image hash before each instance launch. An alternative option that would be even more powerful would be allow users to sign an image and then have the signature validated when the instance is launched.
OpenStack and the underlying virtualization layers provide for the live migration of images between OpenStack nodes allowing you to seamlessly perform rolling upgrades of your OpenStack compute nodes without instance downtime. However, live migrations also come with their fair share of risk. To understand the risks involved, it is important to first understand how a live migration works. The following are the high level steps preformed during a live migration.
Start instance on destination host
Transfer memory
Stop the guest & sync disks
Transfer state
Start the guest
At various stages of the live migration process the contents of an instances run time memory and disk are transmitted over the network in plain text. Thus there are several risks that need to be addressed when using live migration. The following in-exhaustive list details some of these risks:
Denial of Service (DoS) : If something fails during the migration process, the instance could be lost.
Data Exposure : Memory or disk transfers must be handled securely.
Data Manipulation : If memory or disk transfers are not handled securely, then an attacker could manipulate user data during the migration.
Code Injection : If memory or disk transfers are not handled securely, then an attacker could manipulate executables, either on disk or in memory, during the migration.
There are several methods to mitigate some of the risk associated with live migrations, the following list details some of these:
Disable Live Migration
Isolated Migration Network
Encrypted Live Migration
At this time, live migration is enabled in OpenStack by default. Live migrations can be disabled by adding the following lines to the nova policy.json file:
"compute_extension:admin_actions:migrate": "!",
"compute_extension:admin_actions:migrateLive": "!",
As a general practice, live migration traffic should be restricted to the management security domain. Indeed live migration traffic, due to its plain text nature and the fact that you are transferring the contents of disk and memory of a running instance, it is recommended you further separate live migration traffic onto a dedicated network. Isolating the traffic to a dedicated network can reduce the risk of exposure.
If your use case involves keeping live migration enabled, then libvirtd can provide tunneled, encrypted live migrations. That said, this feature is not currently exposed in OpenStack Dashboard, nor the nova-client commands and can only be accessed through manual configuration of libvirtd. Encrypted live migration modifies the live migration process by first copying the instance data from the running hypervisor to libvirtd. From there an encrypted tunnel is created between the libvirtd processes on both hosts. Finally, the destination libvirtd process copies the instance back to the underlying hypervisor.
