User Management
The OpenStack Dashboard provides a graphical interface to manage users. This section describes user management with the Dashboard.
You can also manage projects, users, and roles from the command-line clients.
In addition, many sites write custom tools for local needs to enforce local policies and provide levels of self-service to users that are not currently available with packaged tools.
Creating New Users
To create a user, you need the following information:
- Username
- Description
- Email address
- Password
- Primary project
- Role
- Enabled
Username and email address are self-explanatory, though your site may have local conventions you should observe. The primary project is simply the first project the user is associated with and must exist prior to creating the user. Role is almost always going to be “member.” Out of the box, OpenStack comes with two roles defined:
- member
- A typical user
- admin
- An administrative super user, which has full permissions across all projects and should be used with great care
It is possible to define other roles, but doing so is uncommon.
Once you’ve gathered this information, creating the user in the dashboard is just another web form similar to what we’ve seen before and can be found by clicking the Users link in the Identity navigation bar and then clicking the Create User button at the top right.
Modifying users is also done from this Users page. If you have a large number of users, this page can get quite crowded. The Filter search box at the top of the page can be used to limit the users listing. A form very similar to the user creation dialog can be pulled up by selecting Edit from the actions drop-down menu at the end of the line for the user you are modifying.
Associating Users with Projects
Many sites run with users being associated with only one project. This is a more conservative and simpler choice both for administration and for users. Administratively, if a user reports a problem with an instance or quota, it is obvious which project this relates to. Users needn’t worry about what project they are acting in if they are only in one project. However, note that, by default, any user can affect the resources of any other user within their project. It is also possible to associate users with multiple projects if that makes sense for your organization.
Associating existing users with an additional project or removing them from an older project is done from the Projects page of the dashboard by selecting Manage Members from the Actions column, as shown in the screenshot below.
From this view, you can do a number of useful things, as well as a few dangerous ones.
The first column of this form, named All Users, includes a list of all the users in your cloud who are not already associated with this project. The second column shows all the users who are. These lists can be quite long, but they can be limited by typing a substring of the username you are looking for in the filter field at the top of the column.
From here, click the + icon to add users to the project. Click the - to remove them.
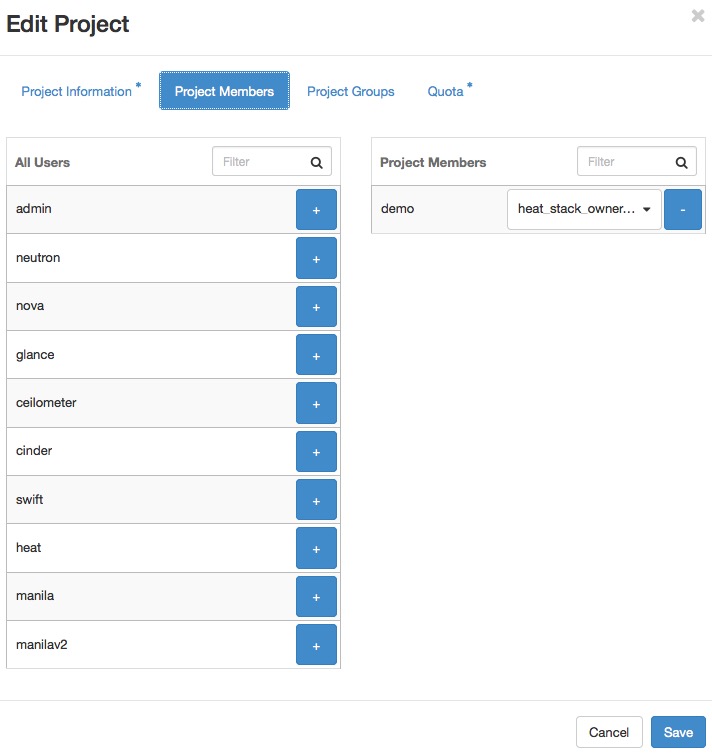
The dangerous possibility comes with the ability to change member roles.
This is the dropdown list below the username in the
Project Members list. In virtually all cases,
this value should be set to Member. This example purposefully
shows an administrative user where this value is admin.
Warning
The admin is global, not per project, so granting a user the admin
role in any project gives the user administrative rights across the
whole cloud.
Typical use is to only create administrative users in a single project, by convention the admin project, which is created by default during cloud setup. If your administrative users also use the cloud to launch and manage instances, it is strongly recommended that you use separate user accounts for administrative access and normal operations and that they be in distinct projects.
Customizing Authorization
The default authorization settings allow administrative users only to create resources on behalf of a different project. OpenStack handles two kinds of authorization policies:
- Operation based
- Policies specify access criteria for specific operations, possibly with fine-grained control over specific attributes.
- Resource based
- Whether access to a specific resource might be granted or not according to the permissions configured for the resource (currently available only for the network resource). The actual authorization policies enforced in an OpenStack service vary from deployment to deployment.
The policy engine reads entries from the policy.json file. The
actual location of this file might vary from distribution to
distribution: for nova, it is typically in /etc/nova/policy.json.
You can update entries while the system is running, and you do not have
to restart services. Currently, the only way to update such policies is
to edit the policy file.
The OpenStack service’s policy engine matches a policy directly. A rule
indicates evaluation of the elements of such policies. For instance, in
a compute:create: "rule:admin_or_owner" statement, the policy is
compute:create, and the rule is admin_or_owner.
Policies are triggered by an OpenStack policy engine whenever one of
them matches an OpenStack API operation or a specific attribute being
used in a given operation. For instance, the engine tests the
create:compute policy every time a user sends a
POST /v2/{tenant_id}/servers request to the OpenStack Compute API
server. Policies can be also related to specific API extensions. For instance, if a user needs an extension like
compute_extension:rescue, the attributes defined by the provider
extensions trigger the rule test for that operation.
An authorization policy can be composed by one or more rules. If more rules are specified, evaluation policy is successful if any of the rules evaluates successfully; if an API operation matches multiple policies, then all the policies must evaluate successfully. Also, authorization rules are recursive. Once a rule is matched, the rule(s) can be resolved to another rule, until a terminal rule is reached. These are the rules defined:
- Role-based rules
- Evaluate successfully if the user submitting the request has the
specified role. For instance,
"role:admin"is successful if the user submitting the request is an administrator. - Field-based rules
- Evaluate successfully if a field of the resource specified in the
current request matches a specific value. For instance,
"field:networks:shared=True"is successful if the attribute shared of the network resource is set totrue. - Generic rules
- Compare an attribute in the resource with an attribute extracted
from the user’s security credentials and evaluates successfully if
the comparison is successful. For instance,
"tenant_id:%(tenant_id)s"is successful if the tenant identifier in the resource is equal to the tenant identifier of the user submitting the request.
Here are snippets of the default nova policy.json file:
{
        "context_is_admin":  "role:admin",
        "admin_or_owner":  "is_admin:True", "project_id:%(project_id)s", ~~~~(1)~~~~
        "default": "rule:admin_or_owner", ~~~~(2)~~~~
        "compute:create": "",
        "compute:create:attach_network": "",
        "compute:create:attach_volume": "",
        "compute:get_all": "",
        "admin_api": "is_admin:True",
        "compute_extension:accounts": "rule:admin_api",
        "compute_extension:admin_actions": "rule:admin_api",
        "compute_extension:admin_actions:pause": "rule:admin_or_owner",
        "compute_extension:admin_actions:unpause": "rule:admin_or_owner",
        ...
        "compute_extension:admin_actions:migrate": "rule:admin_api",
        "compute_extension:aggregates": "rule:admin_api",
        "compute_extension:certificates": "",
        ...
        "compute_extension:flavorextraspecs": "",
        "compute_extension:flavormanage": "rule:admin_api", ~~~~(3)~~~~
}
- Shows a rule that evaluates successfully if the current user is an administrator or the owner of the resource specified in the request (tenant identifier is equal).
- Shows the default policy, which is always evaluated if an API
operation does not match any of the policies in
policy.json. - Shows a policy restricting the ability to manipulate flavors to administrators using the Admin API only.
In some cases, some operations should be restricted to administrators only. Therefore, as a further example, let us consider how this sample policy file could be modified in a scenario where we enable users to create their own flavors:
"compute_extension:flavormanage": "",
Users Who Disrupt Other Users
Users on your cloud can disrupt other users, sometimes intentionally and maliciously and other times by accident. Understanding the situation allows you to make a better decision on how to handle the disruption.
For example, a group of users have instances that are utilizing a large amount of compute resources for very compute-intensive tasks. This is driving the load up on compute nodes and affecting other users. In this situation, review your user use cases. You may find that high compute scenarios are common, and should then plan for proper segregation in your cloud, such as host aggregation or regions.
Another example is a user consuming a very large amount of bandwidth. Again, the key is to understand what the user is doing. If she naturally needs a high amount of bandwidth, you might have to limit her transmission rate as to not affect other users or move her to an area with more bandwidth available. On the other hand, maybe her instance has been hacked and is part of a botnet launching DDOS attacks. Resolution of this issue is the same as though any other server on your network has been hacked. Contact the user and give her time to respond. If she doesn’t respond, shut down the instance.
A final example is if a user is hammering cloud resources repeatedly. Contact the user and learn what he is trying to do. Maybe he doesn’t understand that what he’s doing is inappropriate, or maybe there is an issue with the resource he is trying to access that is causing his requests to queue or lag.

Except where otherwise noted, this document is licensed under Creative Commons Attribution 3.0 License. See all OpenStack Legal Documents.