To receive Orders into Inventory, select the "Enter Receipt" option. The following screen will appear:
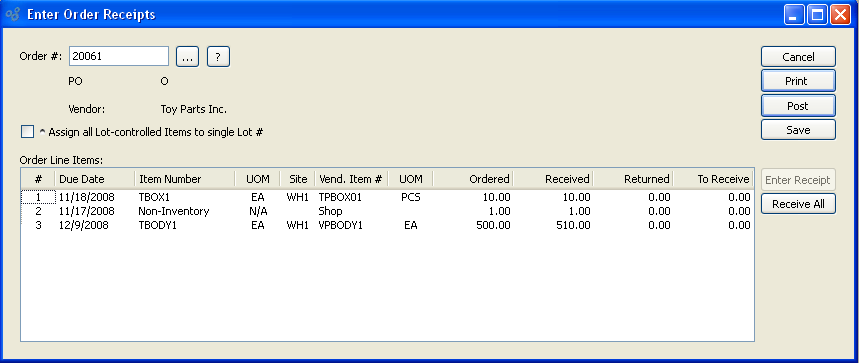
When receiving an Order, you are presented with the following options:
- Order #
Enter the Order Number of the Purchase Order, Transfer Order or Sales Return whose Line Item(s) you want to receive into Inventory. The browse button located to the right of the field leads to a searchable list of Purchase Orders available for receiving. This option will be disabled if a Transfer Order is specified.
- Assign all Lot Controlled Items to single Lot #
Select if you want all the Lot-controlled Items in a Receiving session to be assigned the same Lot Number. Lot Numbers are assigned when Receipt(s) are posted. This option applies to Lot-controlled Items only. There is no impact on received Items which are not Lot-controlled. For perishable Items, you will also be given the opportunity to enter an expiration date. Expiration dates apply only to Item Sites marked as perishable.
- Order line Items
Display lists Order Line Items available for receipt confirmation.
Tip
Before a Purchase Order can be received successfully, A/P Account Assignments for the specified Vendor must be in place.
To the far right of the screen, the following buttons are available:
- CANCEL
Closes the screen without entering a Receipt, returning you to the application desktop.
Select to print the paperwork associated with the specified Order.
- POST
Select this button to post the Receipt quantity to Inventory.
- SAVE
Select this button to save the Receipt quantity for posting at a later time. Saved Receipts may be posted later from the List Unposted Receipts screen.
- ENTER RECEIPT
Highlight a Line Item, then select this button to reach the Receipt detail screen. Double-clicking on a Line Item will also bring you to the Receipt entry screen. This option will be disabled if a Transfer Order is specified.
- RECEIVE ALL
Select to receive all Line Items simultaneously.
Note
If the Item you are receiving is a Multiple Location Control (MLC) Item, you will be prompted to specify the Location you want to distribute the stock to.
To enter Receipt details, highlight a Line Item and select the ENTER RECEIPT button. The following screen will appear:
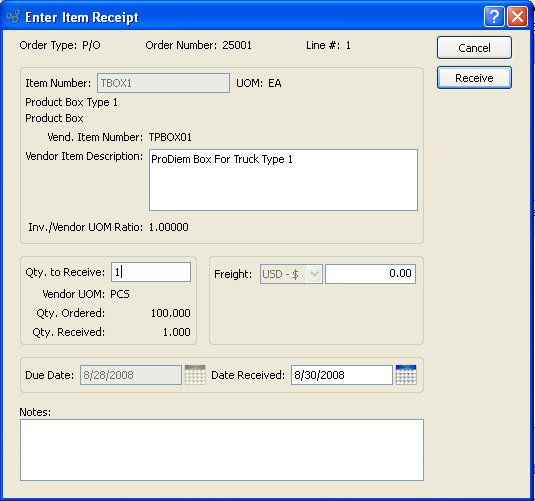
When entering Receipt details, you are presented with the following options:
- Order Type
Displays whether receipts is for a Purchase Order (P/O), Transfer Order (T/O) or Return (R/A).
- Order Number
Displays the Purchase Order Number specified on the previous screen.
- Line #
Displays the line number for the specified Purchase Order Item.
- Item Number
Displays the Item Number for the Purchase Order Item.
- UOM
Inventory Unit of Measure.
- Vend. Item Number
Displays the Vendor's Item number for the specified Item.
- Vendor Item Description
Displays Vendor's description of specified Item.
- Inv./Vendor UOM Ratio
Displays the ratio between Inventory and Vendor Units of Measure.
- Qty. to Receive
Specify the Line Item quantity you want to receive into Inventory. Depending on how your system is configured, you may or may not be allowed to receive more than the quantity ordered.
- Vendor UOM
-
Displays the Vendor's Item UOM for the specified Item.
Note
This is the unit of measure the items should be received in. They will be converted to the inventory unit of measure based on the ration displayed beside Inv./Vendor UOM Ratio.
- Qty. Ordered
Displays the quantity ordered of the specified Item
- Qty. Received
Displays the quantity received of the specified Item.
- Freight
If Line Item freight charges were specified when the Line Item was created, then those charges will automatically appear here. If you receive a partial quantity and decrease the Freight amount accordingly, the system will automatically show the remaining Freight balance due when you go to receive the remaining quantity.
- Due Date
Displays the date the Item is due to be received.
- Date Received
Enter the date you want the receiving transaction to be posted to the General Ledger. By default, receipts will be posted on the current day. However, this feature gives you the option to post transactions on an alternate date.
- Notes
This is a scrolling text field with word-wrapping for entering Notes related Items being received into Inventory.
To the far right of the screen, the following buttons are available:
- CANCEL
Closes the screen without receiving any of the Line Item quantity.
- RECEIVE
Select to receive the specified Line Item quantity.