The utilities featured in this section are designed for updating several of the controls required for the effective management of Inventory. To access this section, select the "Update Item Controls" option.
The basic formula the system uses to determine the ABC classification of Items is to multiply the volume of transactions for an Item during a specified period by the Item Costs for the Item. Those Items having the greatest transaction value are considered Class "A" Items. Those Items having the least transaction value are considered Class "C" Items. Items may be grouped into ABC classes on a Site-by-Site basis, using any percentages you want.
For example, let\qs say you want to do a 70-20-10 split—where A = 70% of the value for a period, B = 20%, and C = 10%. In this scenario, you would open the "Update ABC Class" screen shown below and enter the following values:
- Class A Cutoff
70
- Class B Cutoff
90
The remaining Items having the lowest percentage of the value (10%) would be assigned to the Class "C." By contrast, if you wanted to do a 50-30-20 split, you would enter the following values:
- Class A Cutoff
50
- Class B Cutoff
80
The remaining Items having the lowest percentage of the value (20%) would be assigned to the Class "C."
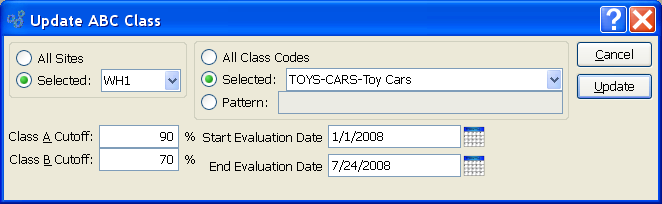
To update the ABC classification for Item Sites within a given Site and Class Code, select the "ABC Class" option. The following screen will appear:
Note
Updating ABC Class values across multiple Sites simultaneously can lead to inaccuracies in your data—especially if ABC values are calculated differently in different Sites. For this reason, it may make more sense to update ABC Classes on a Site-by-Site basis.
When calculating the ABC class of Item Sites within a given Site and Class Code, you are presented with the following options:
- All Sites
Select to update ABC Classes in all Sites.
- Selected
Specify Site where ABC Classes are to be updated.
- All Class Codes
Select to update ABC Classes for all Class Codes.
- Selected
Specify Class Code whose ABC Class you want to update.
- Pattern
Enter a Class Code pattern to select a range of Class Codes. Refine your search using Regular Expressions.
- Class A Cutoff %
Allows you to set the cutoff percentage for Class A Items.
- Class B Cutoff %
Allows you to set the cutoff percentage for Class B Items.
- Evaluation Start Date
Date entered determines the day from which the value will be calculated.
- Evaluation End Date
Date entered determines the day at which the value will stop being calculated.
To the far right of the screen, the following buttons are available:
- CANCEL
Closes the screen without updating Order Number, returning you to the application desktop.
- UPDATE
Updates the Order Number, using the specified parameters.
To update the frequency of scheduled Cycle Counts, select the "Cycle Count Frequency" option. The following screen will appear:
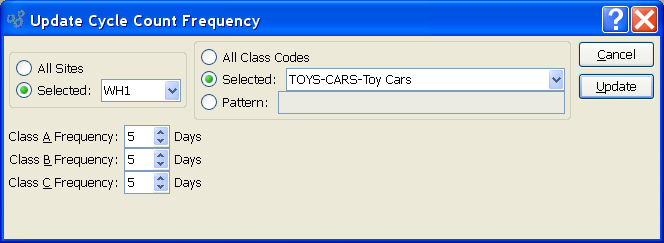
When updating Cycle Count frequency, you are presented with the following options:
- All Sites
Select to update Cycle Count frequency for all Sites.
- Selected
Specify Site where Cycle Count frequency is to be updated.
- All Class Codes
Select to update Cycle Count frequency for all Class Codes.
- Selected
Specify Class Code whose Cycle Count frequency you want to update.
- Pattern
Enter a Class Code pattern to select a range of Class Codes. Refine your search using Regular Expressions.
- Class A Frequency (Days)
Select a number using the arrow buttons, or manually enter a value up to a maximum of 999. Value entered specifies how frequently you want to perform Cycle Counts for the specified Class designation.
- Class B Frequency (Days)
Select a number using the arrow buttons, or manually enter a value up to a maximum of 999. Value entered specifies how frequently you want to perform Cycle Counts for the specified Class designation.
- Class C Frequency (Days)
Select a number using the arrow buttons, or manually enter a value up to a maximum of 999. Value entered specifies how frequently you want to perform Cycle Counts for the specified Class designation.
To the far right of the screen, the following buttons are available:
- CANCEL
Closes the screen without updating the Cycle Count frequency, returning you to the application desktop.
- UPDATE
Updates the Cycle Count frequency, using the specified parameters.
To update the Lead Times associated with Item Sites, select the "Item Site Lead Times" option. The following screen will appear:
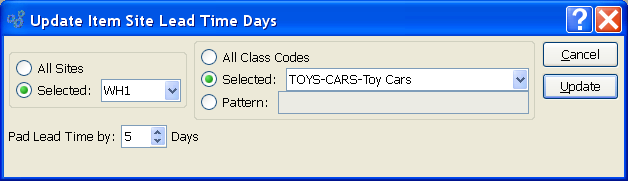
When updating Item Site Lead Times, you are presented with the following options:
- All Sites
Select to update Item Site Lead Times for all Sites.
- Selected
Specify Site where Item Site Lead Times are to be updated.
- All Class Codes
Select to update Item Site Lead Times for all Class Codes.
- Selected
Specify Class Code whose Item Site Lead Times you want to update.
- Pattern
Enter a Class Code pattern to select a range of Class Codes. Refine your search using Regular Expressions.
- Pad Lead Time by (Days)
-
Select a number using the arrow buttons, or manually enter a value up to a maximum of 99. Value entered specifies the number of days you want to pad Item Site Lead times by. The following formulas describe how Lead Times for different Item Types are handled:
-
Manufactured and Job Items: The utility first scans the Bill of Materials for the Item and finds the component Item having the longest lead time. It then scans the Bill of Operations for the Item and finds the Operation having the latest execution day. Finally it performs the following calculation:
Longest Component Item Lead Time + Execution Day + Pad Days = New Item Site Lead Time
-
Purchased Items (with Item Source): The utility scans any Item Sources and finds the longest Lead Time. Then if performs the following calculation:
Longest Item Source Lead Time + Pad Days = New Item Site Lead Time
-
All Others: The utility does the following calculation:
Pad Days = New Item Site Lead Time
-
To the far right of the screen, the following buttons are available:
- CANCEL
Closes the screen without updating Item Site Lead Times, returning you to the application desktop.
- UPDATE
Updates the Item Site Lead Times, using the specified parameters.
Update Reorder Levels section.
To update Reorder Levels by Item, select the "Reorder Level by Item" option. The following screen will appear:
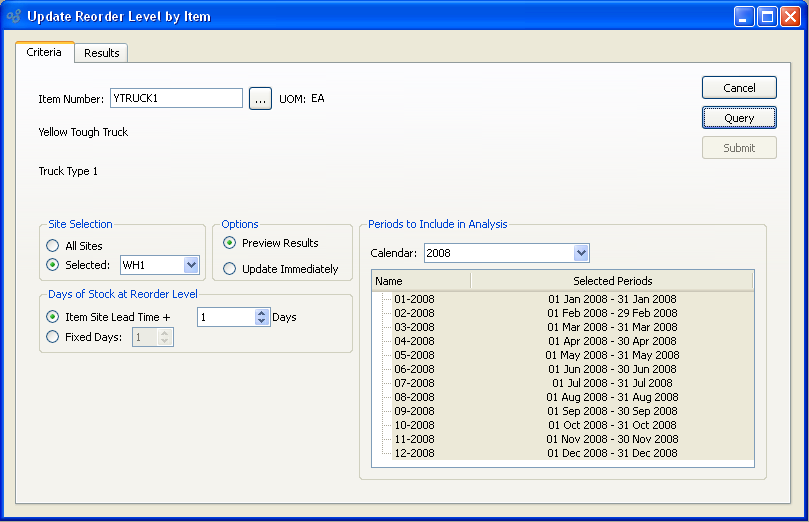
When updating Reorder Levels by Item, you are presented with the following options:
- Item Number
Enter the Item Number of the Item whose Reorder Level you want to update. The browse button located to the right of the field leads to a searchable list of make and buy items.
- Description
Inventory Item Description.
- UOM
Inventory Unit of Measure.
- Site Selection
-
Select what sites you want to query.
- All Sites
Select to update Reorder Levels by Item for all Sites.
- Selected
Specify Site where Reorder Levels by Item are to be updated.
- Options
-
Select whether you would prefer to review results of analysis before updating reorder levels or update immediately.
- Preview Results
Review Results of Analysis prior to updating reorder levels.
- Update Immediately
Update reorder levels without previewing Analysis first.
- Days of Stock at Reorder Level
-
Specify number of days using one of the following options:
- Item Site Lead Time +
Select a number using the arrow buttons, or manually enter a value up to a maximum of 99. Average daily usage calculated using selected Calendar periods will be multiplied by this value to determine Reorder Level.
- Fixed Days
Select a number using the arrow buttons, or manually enter a value up to a maximum of 999. Average daily usage calculated using selected Calendar periods will be multiplied by this value to determine Reorder Level.
- Periods to Include in Analysis
-
Specify the periods to include in the analysis using the following Calendar options:
- Calendar
Select the Calendar you want to use for the analysis.
- Name/Selected Periods
Select as many periods as you want to include in the analysis. Selected periods correspond to Calendar specified in the "Calendar" field. Select individual periods or groups of periods together. To select an individual period, highlight the period using your mouse button. The period is now selected. To select a sequence of periods, highlight the first in the sequence using your mouse button. Then, holding down the SHIFT key on your keyboard, highlight the last period in the sequence. The entire sequence is now selected. To select periods that are out of sequence (e.g., January, April, July, October), highlight the first period in the group. Then, holding down the CTRL key on your keyboard, highlight the next period you want to select. Continue highlighting periods with the CTRL key depressed until all desired periods are selected. The entire group is now selected.
To the far right of the screen, the following buttons are available:
- CANCEL
Closes the screen without updating Reorder Levels by Item, returning you to the application desktop.
- QUERY
Queries Reorder Levels by Item, using the specified parameters.
- SUBMIT
Select to submit requested action to the Batch Manager for processing.
To view Results of query, select the "Results" tab. The following screen will appear:
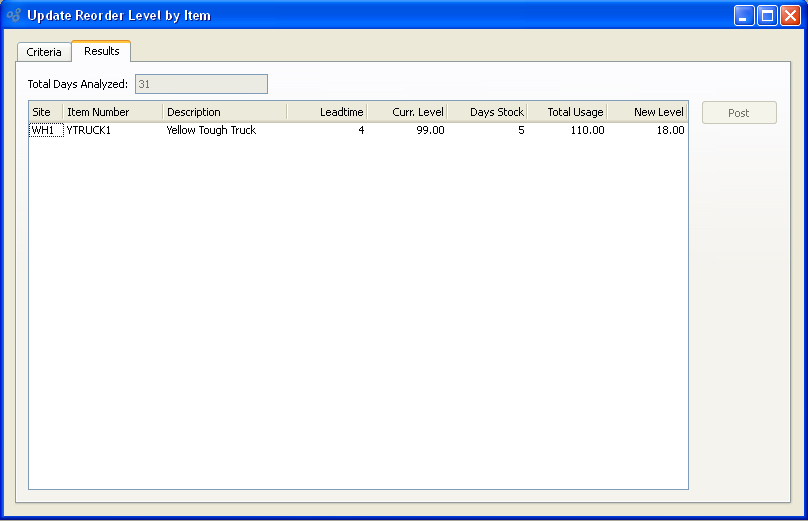
Upon selecting Results a list of Analysis results will appear on the screen.
- Total Days Analyzed
Shows how many days were analyzed in your Analysis
To the far right of the screen the following buttons are listed:
- POST
Posts new reorder levels for line items selected.
To update Reorder Levels by Planner Code, select the "Reorder Levels by Planner Code" option. The following screen will appear:
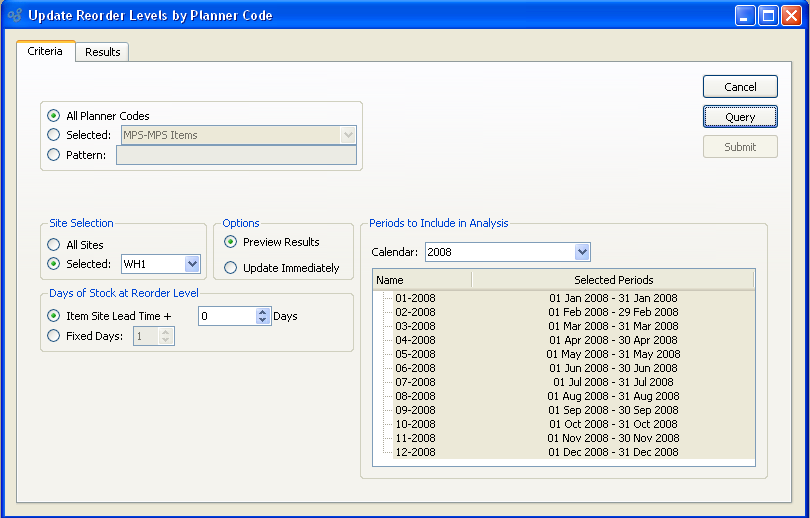
When updating Reorder Levels by Planner Code, you are presented with the following options:
- All Planner Codes
Select to update Reorder Levels for all Planner Codes.
- Selected
Specify Planner Code whose Reorder Levels you want to update.
- Pattern
Enter a Planner Code pattern to select a range of Planner Codes. Refine your search using Regular Expressions.
- Site Selection
-
Select what sites you want to query.
- All Sites
Select to update Reorder Levels by Planner Code for all Sites.
- Selected
Specify Site where Reorder Levels by Planner Code are to be updated.
- Options
-
Select whether you would prefer to review results of analysis before updating reorder levels or update immediately.
- Preview Results
Review Results of Analysis prior to updating reorder levels.
- Update Immediately
Update reorder levels without previewing Analysis first.
- Days of Stock at Reorder Level
-
Specify number of days using one of the following options:
- Item Site Lead Time +
Select a number using the arrow buttons, or manually enter a value up to a maximum of 99. Average daily usage calculated using selected Calendar periods will be multiplied by this value to determine Reorder Level.
- Fixed Days
Select a number using the arrow buttons, or manually enter a value up to a maximum of 999. Average daily usage calculated using selected Calendar periods will be multiplied by this value to determine Reorder Level.
- Periods to Include in Analysis
-
Specify the periods to include in the analysis using the following Calendar options:
- Calendar
Select the Calendar you want to use for the analysis.
- Name/Selected Periods
Select as many periods as you want to include in the analysis. Selected periods correspond to Calendar specified in the "Calendar" field. Select individual periods or groups of periods together. To select an individual period, highlight the period using your mouse button. The period is now selected. To select a sequence of periods, highlight the first in the sequence using your mouse button. Then, holding down the SHIFT key on your keyboard, highlight the last period in the sequence. The entire sequence is now selected. To select periods that are out of sequence (e.g., January, April, July, October), highlight the first period in the group. Then, holding down the CTRL key on your keyboard, highlight the next period you want to select. Continue highlighting periods with the CTRL key depressed until all desired periods are selected. The entire group is now selected.
To the far right of the screen, the following buttons are available:
- CANCEL
Closes the screen without updating Reorder Levels by Planner Code, returning you to the application desktop.
- QUERY
Queries Reorder Levels by Planner Code, using the specified parameters.
- SUBMIT
Select to submit requested action to the Batch Manager for processing.
To view Results of query, select the "Results" tab. The following screen will appear:
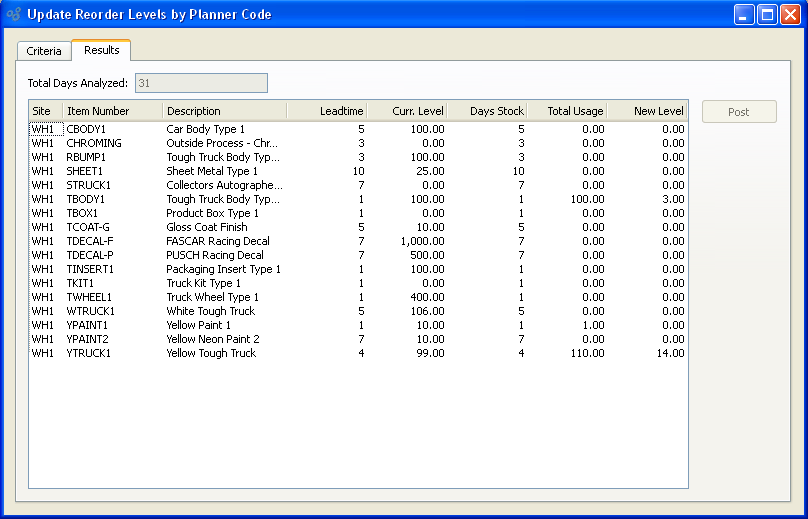
Upon selecting Results a list of Analysis results will appear on the screen.
- Total Days Analyzed
Shows how many days were analyzed in your Analysis
To the far right of the screen the following buttons are listed:
- POST
Posts new reorder levels for line items selected.
To update Reorder Levels by Class Code, select the "Reorder Levels by Class Code" option. The following screen will appear:
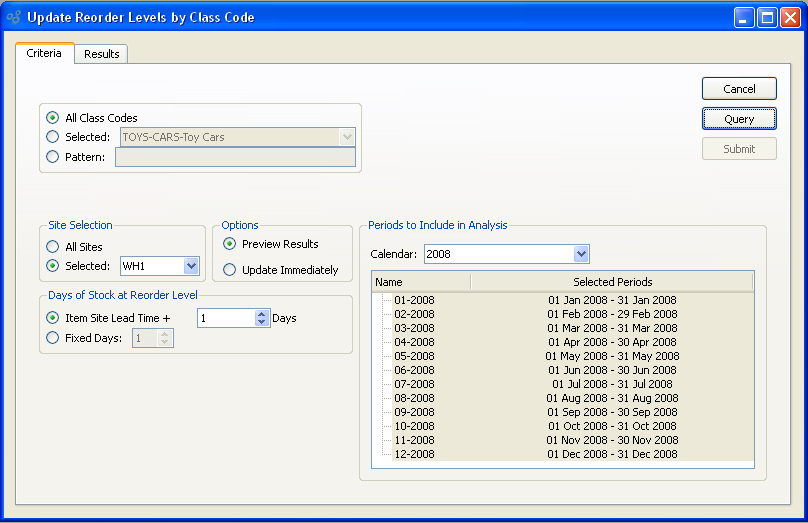
When updating Reorder Levels by Class Code, you are presented with the following options:
- All Class Codes
Select to update Reorder Levels for all Class Codes.
- Selected
Specify Class Code whose Reorder Levels you want to update.
- Pattern
Enter a Class Code pattern to select a range of Class Codes. Refine your search using Regular Expressions.
- Site Selection
-
Select what sites you want to query.
- All Sites
Select to update Reorder Levels by Class Code for all Sites.
- Selected
Specify Site where Reorder Levels by Class Code are to be updated.
- Options
-
Select whether you would prefer to review results of analysis before updating reorder levels or update immediately.
- Preview Results
Review Results of Analysis prior to updating reorder levels.
- Update Immediately
Update reorder levels without previewing Analysis first.
- Days of Stock at Reorder Level
-
Specify number of days using one of the following options:
- Item Site Lead Time +
Select a number using the arrow buttons, or manually enter a value up to a maximum of 99. Average daily usage calculated using selected Calendar periods will be multiplied by this value to determine Reorder Level.
- Fixed Days
Select a number using the arrow buttons, or manually enter a value up to a maximum of 999. Average daily usage calculated using selected Calendar periods will be multiplied by this value to determine Reorder Level.
- Periods to Include in Analysis
-
Specify the periods to include in the analysis using the following Calendar options:
- Calendar
Select the Calendar you want to use for the analysis.
- Name/Selected Periods
Select as many periods as you want to include in the analysis. Selected periods correspond to Calendar specified in the "Calendar" field. Select individual periods or groups of periods together. To select an individual period, highlight the period using your mouse button. The period is now selected. To select a sequence of periods, highlight the first in the sequence using your mouse button. Then, holding down the SHIFT key on your keyboard, highlight the last period in the sequence. The entire sequence is now selected. To select periods that are out of sequence (e.g., January, April, July, October), highlight the first period in the group. Then, holding down the CTRL key on your keyboard, highlight the next period you want to select. Continue highlighting periods with the CTRL key depressed until all desired periods are selected. The entire group is now selected.
To the far right of the screen, the following buttons are available:
- CANCEL
Closes the screen without updating Reorder Levels by Class Code, returning you to the application desktop.
- QUERY
Queries Reorder Levels by Class Code, using the specified parameters.
- SUBMIT
Select to submit requested action to the Batch Manager for processing.
To view Results of query, select the "Results" tab. The following screen will appear:
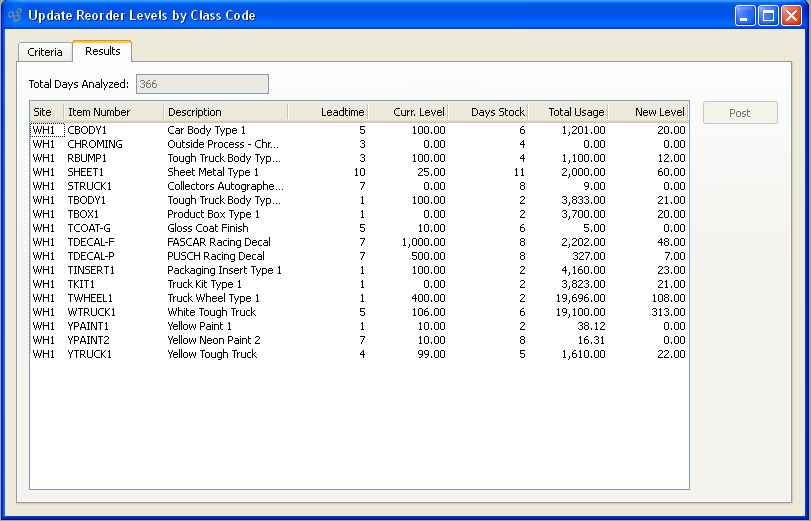
Upon selecting Results a list of Analysis results will appear on the screen.
- Total Days Analyzed
Shows how many days were analyzed in your Analysis
To the far right of the screen the following buttons are listed:
- POST
Posts new reorder levels for line items selected.
Update Order Up To Levels section.
To update Order Up To Levels by Item, select the "Order Up To Level by Item" option. The following screen will appear:
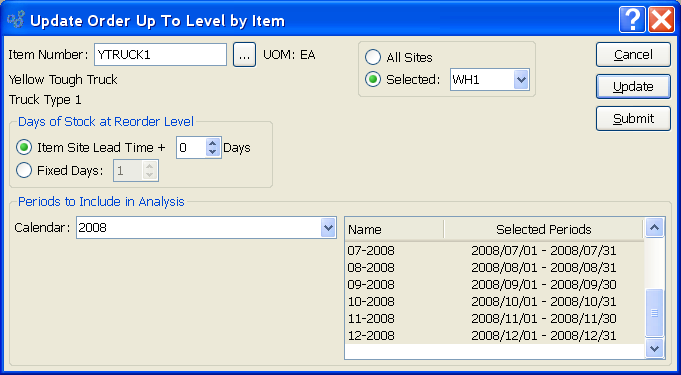
When updating Order Up To Levels by Item, you are presented with the following options:
- Item Number
Enter the Item Number of the Item whose Order Up To Level you want to update.
- UOM
Inventory Unit of Measure.
- All Sites
Select to update Order Up To Levels by Item for all Sites.
- Selected
Specify Site where Order Up To Levels by Item are to be updated.
- Days of Stock at Reorder Level
-
Specify number of days using one of the following options:
- Item Site Lead Time +
Select a number using the arrow buttons, or manually enter a value up to a maximum of 99. Average daily usage calculated using selected Calendar periods will be multiplied by this value to determine Reorder Level.
- Fixed Days
Select a number using the arrow buttons, or manually enter a value up to a maximum of 999. Average daily usage calculated using selected Calendar periods will be multiplied by this value to determine Reorder Level.
- Periods to Include in Analysis
-
Specify the periods to include in the analysis using the following Calendar options:
- Calendar
Select the Calendar you want to use for the analysis.
- Name/Selected Periods
Select as many periods as you want to include in the analysis. Selected periods correspond to Calendar specified in the "Calendar" field. Select individual periods or groups of periods together. To select an individual period, highlight the period using your mouse button. The period is now selected. To select a sequence of periods, highlight the first in the sequence using your mouse button. Then, holding down the SHIFT key on your keyboard, highlight the last period in the sequence. The entire sequence is now selected. To select periods that are out of sequence (e.g., January, April, July, October), highlight the first period in the group. Then, holding down the CTRL key on your keyboard, highlight the next period you want to select. Continue highlighting periods with the CTRL key depressed until all desired periods are selected. The entire group is now selected.
To the far right of the screen, the following buttons are available:
- CANCEL
Closes the screen without updating Reorder Levels, returning you to the application desktop.
- UPDATE
Updates Reorder Levels, using the specified parameters.
- SUBMIT
Select to submit requested action to the Batch Manager for processing.
To update Order Up To Levels by Planner Code, select the "Order Up To Levels Planner Code" option. The following screen will appear:
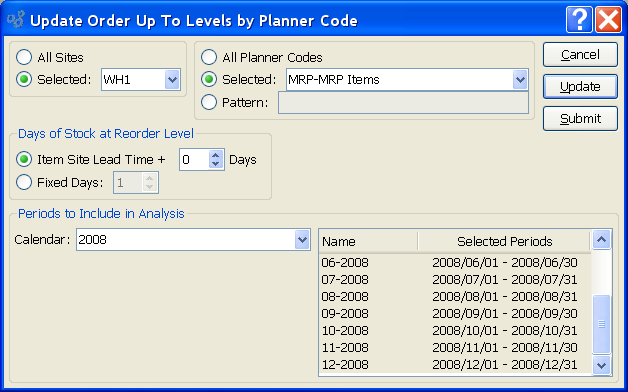
When updating Order Up To Levels by Planner Code, you are presented with the following options:
- All Sites
Select to update Order Up To Levels by Planner Code for all Sites.
- Selected
Specify Site where Order Up To Levels by Planner Code are to be updated.
- All Planner Codes
Select to update Order Up To Levels for all Planner Codes.
- Selected
Specify Planner Code whose Order Up To Levels you want to update.
- Pattern
Enter a Planner Code pattern to select a range of Planner Codes. Refine your search using Regular Expressions.
- Days of Stock at Reorder Level
-
Specify number of days using one of the following options:
- Item Site Lead Time +
Select a number using the arrow buttons, or manually enter a value up to a maximum of 99. Average daily usage calculated using selected Calendar periods will be multiplied by this value to determine Reorder Level.
- Fixed Days
Select a number using the arrow buttons, or manually enter a value up to a maximum of 999. Average daily usage calculated using selected Calendar periods will be multiplied by this value to determine Reorder Level.
- Periods to Include in Analysis
-
Specify the periods to include in the analysis using the following Calendar options:
- Calendar
Select the Calendar you want to use for the analysis.
- Name/Selected Periods
Select as many periods as you want to include in the analysis. Selected periods correspond to Calendar specified in the "Calendar" field. Select individual periods or groups of periods together. To select an individual period, highlight the period using your mouse button. The period is now selected. To select a sequence of periods, highlight the first in the sequence using your mouse button. Then, holding down the SHIFT key on your keyboard, highlight the last period in the sequence. The entire sequence is now selected. To select periods that are out of sequence (e.g., January, April, July, October), highlight the first period in the group. Then, holding down the CTRL key on your keyboard, highlight the next period you want to select. Continue highlighting periods with the CTRL key depressed until all desired periods are selected. The entire group is now selected.
To the far right of the screen, the following buttons are available:
- CANCEL
Closes the screen without updating Reorder Levels by Planner Code, returning you to the application desktop.
- UPDATE
Updates Reorder Levels by Planner Code, using the specified parameters.
- SUBMIT
Select to submit requested action to the Batch Manager for processing.
To update Order Up To Levels by Class Code, select the "Order Up To Levels by Class Code" option. The following screen will appear:

When updating Order Up To Levels by Class Code, you are presented with the following options:
- All Sites
Select to update Order Up To Levels by Class Code for all Sites.
- Selected
Specify Site where Order Up To Levels by Class Code are to be updated.
- All Class Codes
Select to update Order Up To Levels for all Class Codes.
- Selected
Specify Class Code whose Order Up To Levels you want to update.
- Pattern
Enter a Class Code pattern to select a range of Class Codes. Refine your search using Regular Expressions.
- Days of Stock at Reorder Level
-
Specify number of days using one of the following options:
- Item Site Lead Time +
Select a number using the arrow buttons, or manually enter a value up to a maximum of 99. Average daily usage calculated using selected Calendar periods will be multiplied by this value to determine Reorder Level.
- Fixed Days
Select a number using the arrow buttons, or manually enter a value up to a maximum of 999. Average daily usage calculated using selected Calendar periods will be multiplied by this value to determine Reorder Level.
- Periods to Include in Analysis
-
Specify the periods to include in the analysis using the following Calendar options:
- Calendar
Select the Calendar you want to use for the analysis.
- Name/Selected Periods
Select as many periods as you want to include in the analysis. Selected periods correspond to Calendar specified in the "Calendar" field. Select individual periods or groups of periods together. To select an individual period, highlight the period using your mouse button. The period is now selected. To select a sequence of periods, highlight the first in the sequence using your mouse button. Then, holding down the SHIFT key on your keyboard, highlight the last period in the sequence. The entire sequence is now selected. To select periods that are out of sequence (e.g., January, April, July, October), highlight the first period in the group. Then, holding down the CTRL key on your keyboard, highlight the next period you want to select. Continue highlighting periods with the CTRL key depressed until all desired periods are selected. The entire group is now selected.
To the far right of the screen, the following buttons are available:
- CANCEL
Closes the screen without updating Reorder Levels by Class Code, returning you to the application desktop.
- UPDATE
Updates Reorder Levels by Class Code, using the specified parameters.
- SUBMIT
Select to submit requested action to the Batch Manager for processing.