Work Orders define requirements for the production of manufactured Items. You may also create Work Orders for purchased items that you normally purchase, but you occasionally manufacture. These Items may have a Bill of Materials (BOM)—or not. The system supports both BOM-based and non-BOM-based Work Orders.
- BOM-based
Material Requirements are drawn from the Bill of Materials when the Work Order is exploded, using the specified Revision. Users may add or subtract Material Requirements as needed.
- Non-BOM-based
Ideal for labor-only Work Orders having a Bill of Operations (BOO) but no BOM—for example, service Work Orders which require labor Operations only. Also good for Items or Jobs where the Material Requirements are not-known—but must be added on an ad-hoc basis.
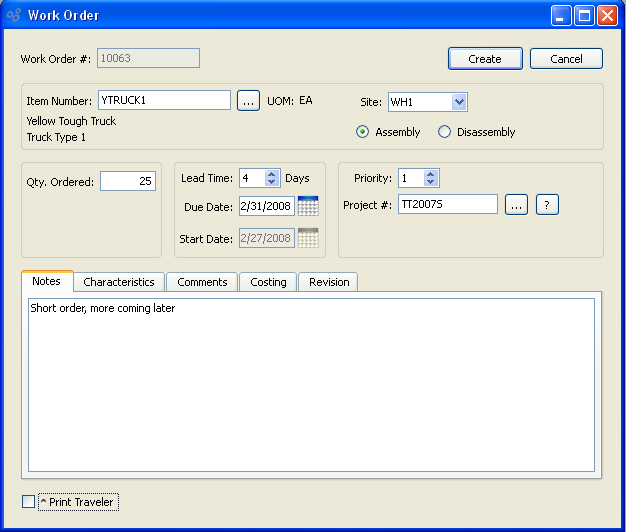
To create a new Work Order, select the "Create New Work Order" option. The following screen will appear:
Tip
To edit a Work Order after it has been created, use the right-click menu in any of the "Work Order Schedule by..." displays. There you will find an "Edit W/O" option.
When creating a new Work Order, you are presented with the following options:
- Work Order #
Next available Work Order Number will automatically display, unless your system requires you to enter Work Order Numbers manually. Default values and input parameters for Work Order Numbers are configurable at the system level.
- Item Number
-
Enter the Item Number of the Item you want to create a Work Order for. You may also enter purchased Items that you normally buy, but you occasionally make. The browse button located to the right of the field leads to a searchable list of make and buy items.
Note
Work Orders for Job Items are created exclusively by Sales Order demand. It is not possible to create a Job Item Work Order using the Work Order screen. Similarly, production posting for Job Items occurs in a unique way. Production for Job Item Work Orders is posted when the Sales Order which demanded the Job Item is issued to Shipping. This is the only way to post production for Job Item Work Orders.
- UOM
Inventory Unit of Measure.
- Site
Specify supplying Site for selected Item. Only Sites that contain supplying Item Sites for the selected Item may be chosen.
Note
Order Parameters may have an impact on Work Order quantity if the "on Manual Orders" option is selected in the Item Site master for a manufactured Item. If Order Parameters are in effect, the Work Order must conform to those restrictions. Both Minimum Order size and Order Multiple may be governed by Order Parameter settings.
- Assembly
Select to identify Work Order as Assembly order.
- Disassembly
Select to identify Work Order as Disassembly order.
- Qty. Ordered
Value entered specifies the number of Item units to be processed by the Work Order.
- Qty. Received
Displays the quantity of finished product posted as received into Inventory to date, if any.
- Lead Time (Days)
-
Select a number using the arrow buttons, or manually enter a value up to a maximum of 999. Value entered specifies the manufacturing Lead Time required between the date the Work Order starts and the date it is due. Lead Times for Items are specified in the Item Site master, but may be modified on this screen.
Tip
The Lead Time option is only available when creating a new Work Order. Once the Order is created, this option will not be visible.
- Due Date
Enter the date the Work Order must be completed by.
- Start Date
Enter the date the Work Order must be started by. By default, this date will be the due date less the Lead Time. The start date may be changed by altering the Lead Time field.
- Priority
Select a number using the arrow buttons, or manually enter a value up to a maximum of 99. Value entered assigns a priority to the selected Work Order. By assigning a priority to a Work Order, you can indicate the relative importance of a Work Order in comparison to other Work Orders.
- Project #
-
Select a Project Number to associate with the Work Order. If the Work Order was created from Sales Order demand—and the parent Sales Order had a Project Number associated with it—then the Project Number from the parent Sales Order will automatically be entered here. In this way, Sales Orders and Work Orders may be linked to the same Project.
Note
The option to associate a Project with a Work Order will only be visible if your site is configured to use Projects.
- Production Notes
This is a scrolling text field with word-wrapping for entering production Notes related to the Work Order. Production Notes are printed on Pick Lists and Packing Lists for reference by production personnel.
Tip
If a Work Order was created from a Sales Order, the Production Notes field will contain the Sales Order Number, the Customer Name, and any additional Sales Order Line Item Notes.
- Print Traveler
Select to print a Work Order Traveler when the Work Order is created. This option will no longer be available once the Work Order is created.
To the far right of the screen, the following buttons are available:
- SAVE
Creates the Work Order.
- CANCEL
Closes the screen without creating the Work Order, returning you to the application desktop.
If an Item has Characteristics associated with it, you have the option of linking those Characteristics to a Work Order Item. And, in the case where a Work Order is generated from a linked Sales Order, the Work Order will inherit Characteristics defined at the Sales Order level.
Tip
You can link Characteristics and Values to an Item by using the Item master. Once entered, these Characteristics and Values will be available to users entering Sales Order Line Items.
To associate Characteristics with a Work Order Item, select the "Characteristics" tab at the bottom of the screen, as shown below:
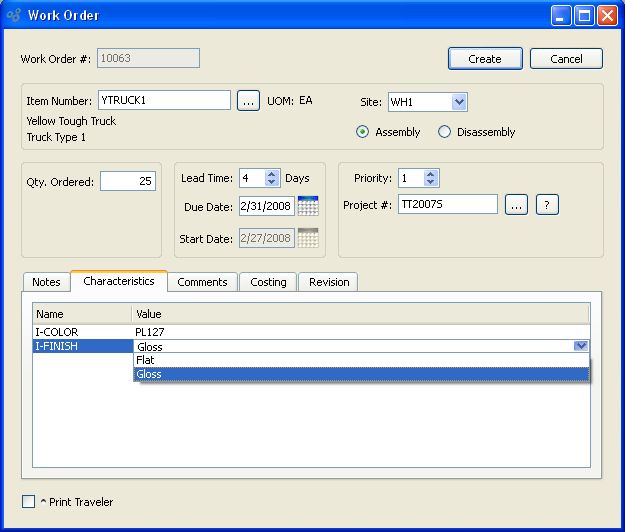
When specifying Characteristics for a Work Order Item, you are presented with the following options:
- Name
Displays the name of any Item Characteristics associated with the Item. Characteristics defined as Item Characteristics may be associated with Items on the Item master.
- Value
Displays the default Value associated with an Item Characteristic, but permits you to specify an alternate Value. When associating Characteristic Values with a Work Order Item, you have four options: 1) Select the default Value; 2) select an alternate pre-defined Value; 3) manually enter a new Value in place of the pre-defined Value; or 4) make no selection. Making no selection means the Characteristics will not be associated with the Work Order Item.
To create or view Comments related to a Work Order, select the "Comments" tab. The following screen will appear:
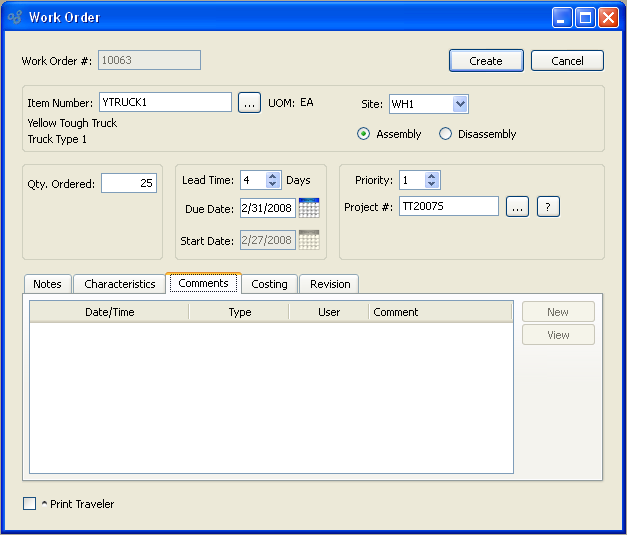
Note
Work Order Comments may not be added at the time of Work Order creation. Instead, use the Production Notes tab for entering Notes related to a Work Order.
When creating or viewing Comments related to a Work Order, you are presented with the following options:
- Comments
Display lists Comments for the specified Order.
Once a Work Order is in process—that is, either materials have been issued or Production or Operations have been posted—you can begin to view Costing information for the Work Order. To view Costing information for the Work Order, select the "Costing" tab. The following screen will appear:
Tip
The Costing tab will not be visible until after a Work Order has been created. You will not see Costing information when creating a Work Order.
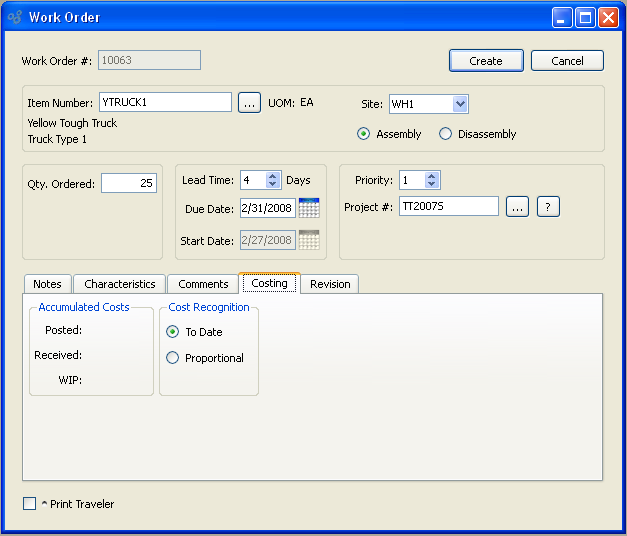
When viewing Work Order Costing information, you are presented with the following options:
- Accumulated Costs
-
Information about the following categories of currently accumulated Work Order Costs will be shown:
- Posted
Displays the current posted value of the Work Order. The posted value is equal to the total cost accumulated on the Work Order, including both labor and materials. The posted value will be the same as the WIP value until the point when finished goods are received. Ultimately, once Production (or Operations) posting is completed, the posted value will be equal to the received value. If these two values are different, then a variance will result.
- Received
Displays the current value of finished goods received into Inventory from the Work Order. The received value is equal to the posted value minus WIP.
- WIP
Displays the current value of Work in Process (WIP) for the Work Order. The WIP value is equal to the posted value minus the received value.
- Cost Recognition
-
Used by Work Orders for Job and Average Cost Items to determine how and when costs are recognized:
- To Date
All of the costs accumulated against the Work Order will be debited to Inventory and credited to WIP.
- Proportional
Costs are recognized in proportion to the total costs posted and the total Items received to date.
Note
The default Cost Recognition method is defined at the system level; however, you may change the setting manually at the Work Order level.
When creating a Work Order, you have the option to specify which Revision of the Work Order Item's Bill of Materials and Bill of Operations you want to use. By default, the active Revision will be used. Once the Work Order has been created, these options will become read-only. To specify Revision information for a Work Order Item, select the "Revision" tab. The following screen will appear:
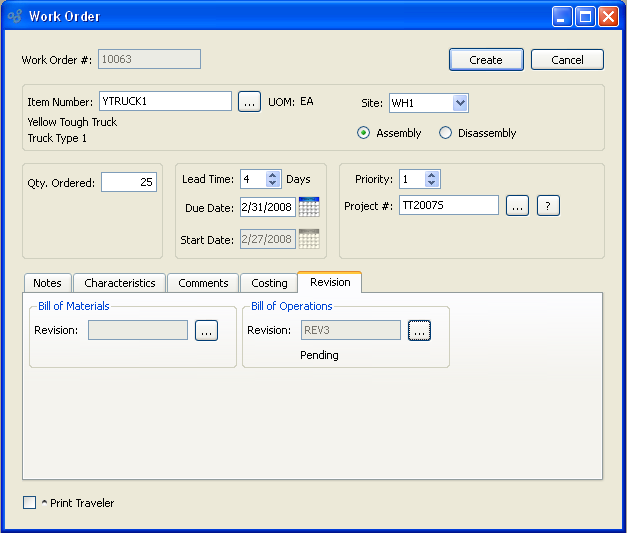
Note
You may create Work Orders for pending Revisions. For Work Order purposes, a pending Revision is considered to be the same as an inactive Revision. The Revision status of a pending Revision will not be changed if a Work Order is created for it.
When specifying Revision information for a Work Order Item, you are presented with the following options:
- Bill of Materials
-
Specify the BOM Revision you want to use for the Work Order. By default, the active Revision will be used.
- Revision
Select from the list of existing available Revisions. The status of the Revision will also be displayed.
- Bill of Operations
-
Specify the BOO Revision you want to use for the Work Order. By default, the active Revision will be used.
- Revision
Select from the list of existing available Revisions. The status of the Revision will also be displayed.