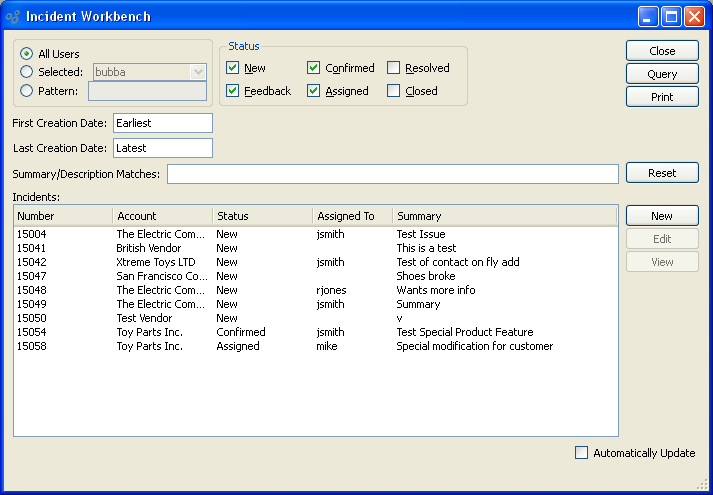
The Incident Workbench enables you to monitor and take action on the full range of issues entered in your system.

When using the Incident Workbench, you are presented with the following options:
- All Users
Select to display Incidents for all users.
- Selected User
Specify the user whose Incidents you want to display.
- Pattern
Enter a user pattern to select a range of users.
- Status
-
Specify which of the following system-defined Incident statuses you want to include in the display. Not selecting a status means Incidents having that status will not be included in the display:
- New
Select to include Incidents having "New" status in the display. This is the default Incident status when a new Incident is entered.
- Feedback
Select to include Incidents having "Feedback" status in the display. This status can be used for Incidents which require more information before they can be confirmed.
- Confirmed
Select to include Incidents having "Confirmed" status in the display. A confirmed Incident is ready to be acted on.
- Assigned
Select to include Incidents having "Assigned" status in the display. When Incidents are assigned to a user, they become that user's responsibility.
- Resolved
Select to include Incidents having "Resolved" status in the display. A resolved Incident is ready to be closed. Typically, users work to resolve the Incidents assigned to them.
- Closed
Select to include Incidents having "Closed" status in the display. This is the final status and indicates an Incident requires no further action. It is completed.
- First Creation Date
Incidents created on or after this date will be included in the display.
- Last Creation Date
Incidents created on or before this date will be included in the display.
- Summary/Description Matches
Enter a text pattern to locate keywords found in Incident "Summary" and/or "Description" fields.
- Incidents
Display lists Incidents, using the specified parameters.
- Automatically Update
Select to automatically update the display every five minutes.
To the far right of the screen, the following buttons are available:
- CLOSE
Closes the screen, returning you to the application desktop.
- QUERY
Select to generate the display, using the specified parameters.
Runs the report associated with this screen.
- RESET
Select to clear the "Summary/Description Matches" field.
- NEW
Opens screen for creating a new Incident.
- EDIT
Enables you to edit highlighted Incidents. The edit screen is the same as that for creating a new Incident—except that when editing, the fields will contain Incident information. Double-clicking on an Incident will also bring you to the editing screen.
- VIEW
Highlight an Incident and then select this button to reach a read-only view of the "Edit" screen.