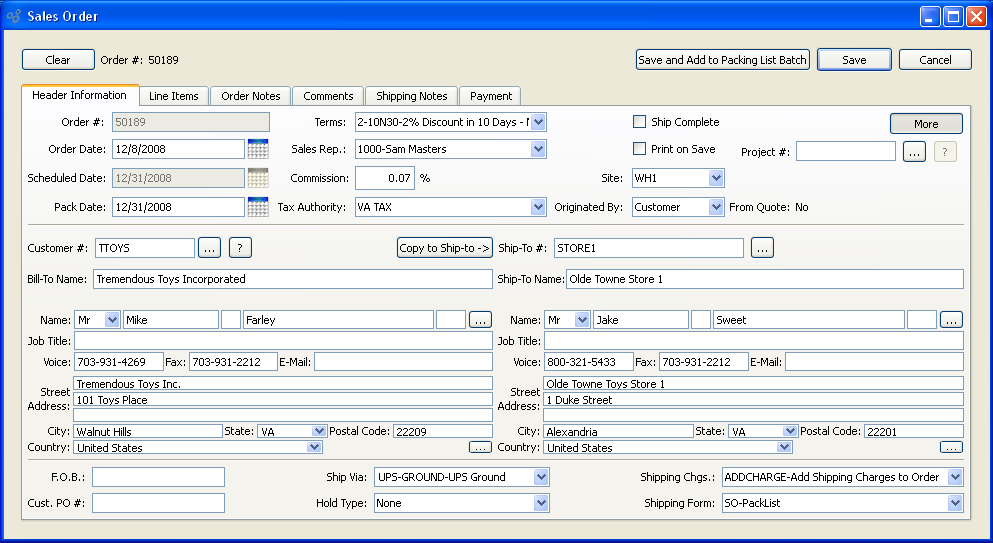
Creating a new Sales Order requires a detailed mix of Customer, Sales Representative, and Shipping information. To access the Sales Order area, select the "New Sales Order" option. The following screen will appear:
Tip
Be sure to close all Sales Order windows before exiting the system. This will prevent the creation of orphan Sales Order records.
When creating a new Sales Order, you are presented with the following options:
- Order #
Next available Sales Order Number will automatically display, unless your system requires you to enter Sales Order Numbers manually. Default values and input parameters for Sales Order Numbers are configurable at the system level.
- Order Date
Displays current day's date.
- Scheduled Date
Displays the Order's earliest scheduled date. The scheduled date corresponds to the earliest scheduled date for an included Sales Order Item. Because Sales Orders may contain multiple Sales Order Items, the scheduled date indicates the most recent scheduled date. No scheduled date will display in the "Scheduled Date" field until a Sales Order Line Item has been created and a scheduled date assigned to it. This field can be viewed by selecting the MORE button
- Pack Date
The pack date is the same date as the ship date. Because the field can be edited, you have the ability to change the pack date and make it different from the ship date. This field can be viewed by selecting the MORE button.
- Terms
Specify the billing Terms associated with the Order. By default, the Customer's standard billing Terms will appear in the field.
- Sales Rep.
Specify the Sales Representative associated with the Order. Sales Representatives are linked to a Customer on the Customer master—either by a default setting or through the assignment of Ship-To Addresses. Each Ship-To Address may have a different Sales Representative associated with it. Consequently, the name of the Sales Representative appearing on the Sales Order header will be the same as specified for the Ship-To Address being used.
- Commission
By default, the commission percentage recorded on the Customer master will be automatically entered in this field. If for some reason you select a non-default Sales Representative at Order entry, the commission rate will not change. To adjust the commission rate, you must make the change manually. This field can be viewed by selecting the MORE button.
- Tax Authority
Specify the Tax Authority associated with the Sales Order. The Tax Authority for the specified Ship-To Address will be entered here by default. Otherwise, the primary Tax Authority for the Customer will be entered. Ultimately, Tax is applied at the Line Item level—so the Tax Authority associated with an Item's Tax Type will be used. This field can be viewed upon selecting the MORE button.
- Ship Complete
Select to require that all Sales Order Line Item quantities be issued to Shipping before the Order is shipped. This feature is designed to prevent partial shipments. If selected, users will be prevented from shipping the Order unless all Line Item quantities have been issued to Shipping. If not selected, partial shipments for the Order will be allowed.
- Site
Specify the shipping Site associated with the Sales Order. The Site selected here acts as the default free on board (FOB) location. A Site may be designated as a shipping Site on the Site master. This field can be viewed upon selecting the MORE button.
- Originated By
-
Specify the origin of the Sales Order using the options below. This field can be viewed upon selecting the MORE button.:
- Customer
Indicates the Order was originated by the Customer.
- Internet
Indicates the Order was originated by an Internet lead.
- Sales Rep.
Indicates the Order was originated by the Sales Representative.
- Project #
-
Select a Project Number to associate with the Sales Order. If a Sales Order is created from a converted Quote—and the Quote had a Project Number associated with it—then the Project Number from the originating Quote will automatically be entered here. Once a Project Number is associated with a Sales Order, any Work Orders or Purchase Orders created by the Sales Order demand will automatically be linked to the same Project Number as the Sales Order. In this way, Sales Orders, Work Orders, and Purchase Orders may be linked to the same Project. This field can be viewed upon selecting the MORE button.
Note
The option to associate a Project with a Sales Order will only be visible if your site is configured to use Projects.
Tip
If your site is configured to create Projects automatically whenever new Sales Orders or Quotes are entered, the Projects generated in this way will assume the number of the Sales Order or Quote which caused their creation.
- From Quote
-
If a Sales Order was converted from a Quote, the originating Quote Number will display here. This field can be viewed upon selecting the MORE button.
Note
If the Sales Order was generated from a Return Authorization, the Return Authorization Number will display here.
- Customer #
Enter the Customer Number of the Customer to be billed for the sale. The browse button located to the right of the field leads to a searchable Customers list. You may also access this list using the keyboard shortcut "CTRL + L". Once a Customer Number is entered, the Customer name and billing address will display. Select the "?" or "$" symbol next to the browse button to view Customer information for the specified Customer. If a Customer's credit is "In Good Standing," the button will feature a black question mark ("?") icon. If the icon turns to an orange dollar sign ("$"), the Customer's credit Status is "On Credit Warning." A red dollar sign ("$") indicates the Customer's credit Status is "On Credit Hold."
Tip
A valid Customer Number must be entered in the "Customer #" field before Line Items can be added to a Sales Order. If no valid Customer Number is entered, you will not be able to add Line Items to the Sales Order. Additionally, Sales Orders may only be entered for active Customers.
Note
Sales Orders may not be entered for Customers whose credit status is either "On Credit Warning" or "On Credit Hold." Only users with special privileges may override these credit settings.
- Bill-To Phone
Displays the Customer's Bill-To phone number.
- Address
-
Displays the Customer's Bill-To Address. You may manually override the displayed Address information in the fields below—or use the browse button to select another Address.
- Street Address
The Customer's Bill-To street Address.
- City
The Customer's Bill-To city.
- State
The Customer's Bill-To state.
- Postal Code
The Customer's Bill-To Postal Code.
- Country
The Customer's Bill-To country.
- Copy to Ship-to -\>
Select to copy contents of billing address into Ship-To address field. This option is enabled if the Customer master for the specified Customer indicates that free-form Ship-To's are allowed.
- Ship-To #
Enter the number of the preferred Ship-To Address. Customers may maintain multiple Ship-To Addresses. If the Customer master for the specified Customer indicates that free-form Ship-To's are allowed, then any address may be entered. If free-form Ship-To's are not allowed, then the Ship-To Address must be entered using the browse button located to the right of the field.
- Ship-To Phone
Displays the phone number for the specified Ship-To.
- Address
-
Displays the specified Ship-To Address. You may manually override the displayed Address information in the fields below—or use the browse button to select another Address.
- Street Address:
The specified Ship-To street Address.
- City
The specified Ship-To city.
- State
The specified Ship-To state.
- Postal Code
The specified Ship-To Postal Code.
- Country
The specified Ship-To country.
- F.O.B.
Enter free on board (FOB) Terms for the Order. By default, FOB. Terms entered on the Shipping Site master will appear in this field. The default Terms may be changed during Order entry—and also at later stages during the billing cycle.
- Cust. PO #
PO #: Enter a Customer Purchase Order Number, as needed.
Note
You will be required to enter a Customer Purchase Order Number for Customers who require them. If required, duplicate numbers will only be allowed if the Customer uses blanket Purchase Orders. All Customer requirements are specified on the Customer master.
- Ship Via
The preferred Ship Via method for the Customer will appear in the field. You may change the default Ship Via using the list. You may also enter a free-form Ship Via simply by typing the name of the Ship Via into the field.
Tip
The system supports up-to-date shipment tracking with links to the websites of many leading shipping companies (i.e., "Ship Vias").
- Hold Type
-
Specify a hold type (if any) from the available options:
- None
Indicates no hold is applied, meaning the Order may be processed and shipped.
- Credit
Indicates the open balance for the Customer has exceeded the credit limit defined on their Customer master record. Users will be prevented from issuing Stock to Shipping with this hold type.
- Shipping
Indicates a Shipping hold has been placed on the Order. Users who attempt to ship an Order on Shipping hold will be prevented from doing so.
- Packing
Indicates a Packing hold has been placed on the Order. Users who attempt to issue stock to Shipping for an Order on Packing hold will be prevented from doing so.
- Return
This hold type is set automatically when a Sales Order is created from a Return Authorization and the disposition requires Inventory to be received before the replacement Order can be shipped.
- Shipping Chgs.
Specify the Shipping charges associated with the Order. The preferred Shipping Charges Type for the Customer will appear in the field. This field can be viewed upon selecting the MORE button.
- Shipping Form
-
Specify the Shipping Form associated with the Order. The preferred Shipping Form for the Customer will appear in the field. This field can be viewed upon selecting the MORE button.
Note
Shipping defaults specified on the Customer master will transfer to the Sales Order header when a new Sales Order is entered for a Customer.
At the top of the screen, the following buttons are available:
- CLEAR
Select to clear the current Sales Order screen without closing the screen.
- SAVE AND ADD TO PACKING LIST BATCH
Creates the Sales Order, saves it, and adds it to the list of Orders available for printing on the Packing List Batch.
- SAVE
Creates the Sales Order and saves the Sales Order information. The SAVE button must be selected in order to save the Sales Order record. It is not enough to save Sales Order Line Item information. The Sales Order header must also be saved. If your system is configured to prompt for printing on SAVE, then you will be presented with additional processing options after this button is selected.
- CANCEL
Closes the screen without creating a new Sales Order, returning you to the application desktop.
- MORE
Select to display extra information related to the Sales Order. To hide the extra information, simply select the MORE button again.
To create or modify Sales Order Line Items, select the "Line Items" tab at the top of the "Sales Order" screen. The following screen will appear:
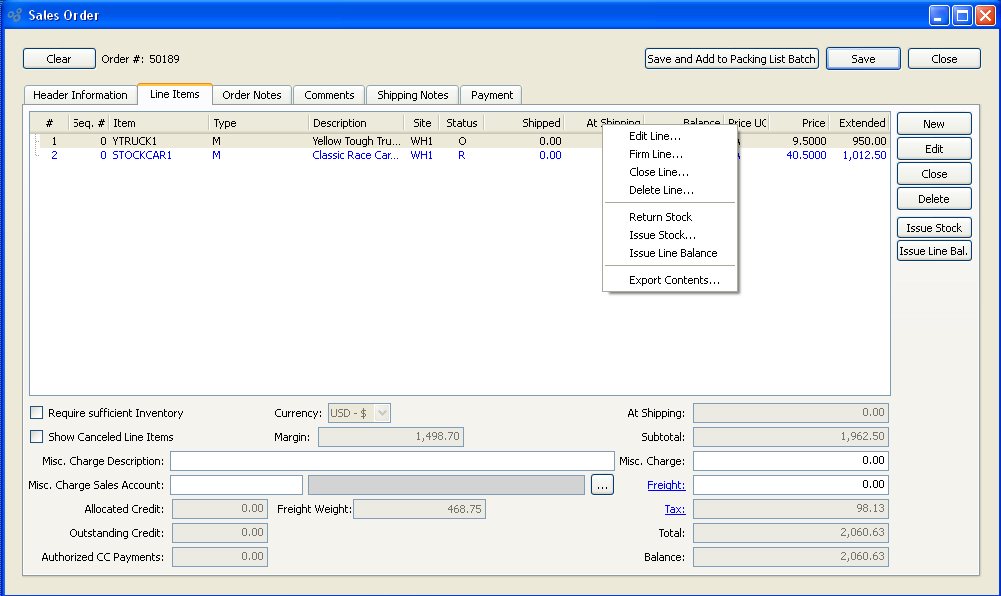
When creating or modifying Sales Order Line Items, you are presented with the following options:
- Line Items
Display lists Line Items for this Sales Order. A valid Customer Number must be entered in the "Customer #" field before Line Items can be added to the Order. The Shipping-related columns will not be visible if the system is configured to hide Shipping options at Sales Order entry. However, if the Shipping options are enabled, the Line Items may display in different colors, depending on their scheduling. If the Scheduled Date for an unshipped Line Item is in the future, the line will display in green text. If the Scheduled Date for an unshipped Line Item is not in the future, the line will display in red text. Once shipped, all Line Items revert to black text. For Kit Items, the Kit components will be given sub line numbers which will be displayed in an indented view.
Note
Sales Order Line Items may exist in any of the following statuses:
"O" = Open
"C" = Closed
"X" = Cancelled
"R" = Ready for Shipment (i.e., quantity available)
"I" = Invoiced
"P" = Partially-invoiced
"H" = On credit hold
- Require sufficient Inventory
Select to ensure you have enough Quantity on Hand of a Line Item prior to issuing Stock to Shipping. If selected, this option will prevent you from issuing Line Item quantity to Shipping if doing so would force Quantity on Hand for the Item Site to fall below zero. Not selecting this option means issuing Stock to Shipping may drive Item Site Quantity on Hand negative. This option will not be visible if the system is configured to hide Shipping options at Sales Order entry.
- Show Canceled Line Items
Select to include in the Line Items display Sales Order Line Items which have been specifically canceled. Displaying canceled Line Items can provide useful Customer and Order history information.
- $ At Shipping
Displays the monetary value of Sales Order Line Items at Shipping. The shipment value represents the total of the extended prices for all Items included in the Shipment. The amount does not include freight or Tax. This displayed information will not be visible if the system is configured to hide Shipping options at Sales Order entry.
- $ Margin
-
Displays the total profit margin for the Order. The profit margin is based on the following formula:
Order Subtotal - Total Standard Costs for all Line Items
- Subtotal
Displays the subtotal for the Sales Order Line Items.
- Tax
Displays the total amount of Tax to be charged on the Sales Order. Sales Tax is calculated at the Sales Order Line Item level. The Tax amount displayed here represents the total for all Line Item Tax amounts. To get a detailed view of the Tax calculation, click on the Tax link using your mouse.
- Misc. Charge Amount
Enter the amount of any miscellaneous charge. Examples of miscellaneous charges include palletization costs, co-op refund, etc. Before entering a miscellaneous charge amount, you must first assign the charge to a Sales Account and also enter a description of the charge.
Tip
If you do not use Miscellaneous Charges at your site, you can hide these fields so they are not visible when entering Sales Orders. To do so, simply select the "Hide Misc. Charges" option in the system-level configuration.
- Misc. Charge Description
Enter a description to identify the miscellaneous charge.
- Misc. Charge Sales Account
Enter a Sales Account to assign the miscellaneous charge to.
- Allocated C/Ms
Displays the monetary value of any open Credit Memos and/or Credit Card charges which have been specifically allocated to the Sales Order. If your system is configured to automatically allocate open Credit Memo balances to new Sales Orders, then the monetary value of these allocated Credit Memos—plus any Credit Card charges applied to the Order—will display here. If your system is not configured to automatically allocate Credit Memos, then this field will display only the monetary value of any Credit Card charges applied to the Order—if any. The automatic allocation of Credit Memos helps reduce Customer credit balances by ensuring that Customer credits are consumed when new Sales Orders are entered. Any available, open Credit Memos are eligible for allocation. The allocation of available Credit Memos occurs only once—when a Sales Order is saved for the first time. Subsequent saves will not result in additional allocations. Credit Memos which have been allocated to a Sales Order are applied at the point when the Invoice resulting from the Sales Order is posted. Once the full balance of a Credit Memo has been applied, the Credit Memo is then closed. The printed Invoice the Customer receives will indicate whether Credit Memos have been applied. In addition, the total due from the Customer will be automatically adjusted to reflect any applied credits.
Note
The allocation of available Credit Memos occurs only once—when a Sales Order is saved for the first time. Subsequent saves will not result in additional allocations.
- Outstanding C/Ms
Displays the total monetary value of all unallocated Credit Memos for the Customer. If no Credit Memos are allocated to the Sales Order, then the amount displayed here will be equal to the Customer's total open Credit Memo balance. If Credit Memos are allocated to the Order, then the remaining Credit Memo balance will be displayed. The open Credit Memo balance is considered when calculating the outstanding balance due for the Order.
- Authorized CC Payments
Displays the monetary value of any credit card pre-authorizations for the Order. Credit Card charges may be pre-authorized using the options found under the "Payment" tab. When a Credit Card charge is pre-authorized, the authorization is stored and may later be posted as a completed charge using the A/R Workbench.
- Freight Weight
Displays the combined weight of all Sales Order Line Items. Freight weight represents the sum of an Item's product weight and packaging weight, both of which are defined on the Item master. The per unit freight weight multiplied by the quantity per gives you the Line Item freight weight. The sum of all Line Item freight weights is the combined weight for the Order.
- Freight
Enter the amount of freight charge to be added to the specified Order. Freight charges may be entered during the creation or modification of a Sales Order—or at the time of shipment.
- Total
Displays the total amount of the Sales Order.
Note
Any Sales Order Line Item may be shipped—even if the Item or Item Site in question becomes inactive after the Sales Order has been created.
- Outstanding Balance
Displays the projected total due for the Sales Order. The outstanding balance represents the amount the Customer would owe if all allocated and outstanding Credit Memos and Credit Card pre-authorizations were applied to the Order.
At the top of and to the far right of the screen, the following buttons are available:
- CLEAR
Select to clear the contents of the current Sales Order and open a fresh, new Sales Order for Order entry. The Order Number of the Order being cleared will display next to the CLEAR button.
Note
Selecting the CLEAR button on the Sales Order header does not delete any information which has been saved previously.
- SAVE
Saves the Sales Order information.
- CANCEL
Closes the screen without creating a new Sales Order, returning you to the application desktop.
- NEW
Opens screen for creating a new Sales Order Line Item. Mac users may use COMMAND + N to enter a new Line Item.
- EDIT
Enables you to edit highlighted Sales Order Line Items. The edit screen is the same as that for creating a new Sales Order Line Item—except that when editing, the fields will contain Sales Order Line Item information. Double-clicking on a Sales Order Line Item will also bring you to the editing screen. Mac users may use COMMAND + E to edit an existing Line Item.
- CLOSE
Highlight a Sales Order Line Item and then select this button to close the Sales Order Line Item. If the highlighted Line Item is already closed, this button will revert to an OPEN button, which may be used to open the closed Line Item. Closing the Sales Order Line Item will remove all existing reservations.
- DELETE
Highlight a Sales Order Line Item and then select this button to remove the Sales Order Line Item from the list. Deleting the Sales Order Line Item will remove all existing reservations.
- RESERVE STOCK
Highlight a Sales Order Line Item and then select this button to reserve Inventory quantity for the Line Item.
- RES. LINE BAL.
Highlight a Sales Order Line Item and then select this button to reserve Inventory quantity for the remaining Line Item balance.
Tip
You may select multiple Line Items for issuing to Shipping by highlighting them using your mouse—or a combination of your mouse and either the SHIFT or CTRL keys.
Right-clicking on an Item in the Line Items list enables you to select from the following menu options:
- Edit Line
Enables you to edit highlighted Sales Order Line Items. The edit screen is the same as that for creating a new Sales Order Line Item—except that when editing, the fields will contain Sales Order Line Item information. Double-clicking on a Sales Order Line Item will also bring you to the editing screen. Mac users may use COMMAND + E to edit an existing Line Item.
- Close Line
Highlight a Sales Order Line Item and then select this button to close the Sales Order Line Item. If the highlighted Line Item is already closed, this button will revert to an OPEN button, which may be used to open the closed Line Item. Closing the Sales Order Line Item will remove all existing reservations.
- Delete Line
Highlight a Sales Order Line Item and then select this button to remove the Sales Order Line Item from the list. Deleting the Sales Order Line Item will remove all existing reservations.
- Reserve Stock
Select to reserve Inventory quantity for the specified Sales Order Item either by total quantity on hand or by location depending on Configure S/O settings.
- Issue Stock
Highlight a Sales Order Line Item and then select this button to issue quantity to Shipping. This button will not be visible if the system is configured to hide Shipping options at Sales Order entry.
The Shipping-related options will not be visible if the system is configured to hide Shipping options at Sales Order entry. Also, if a highlighted Line Item is Closed, the following additional option will be available:
Order Notes added to a Sales Order are used for internal purposes only. If an Invoice results from the Sales Order, these Notes will be transferred to the Invoice. To add Notes to a Sales Order, select the "Order Notes" tab at the top of the "Sales Order" screen. The following screen will appear:
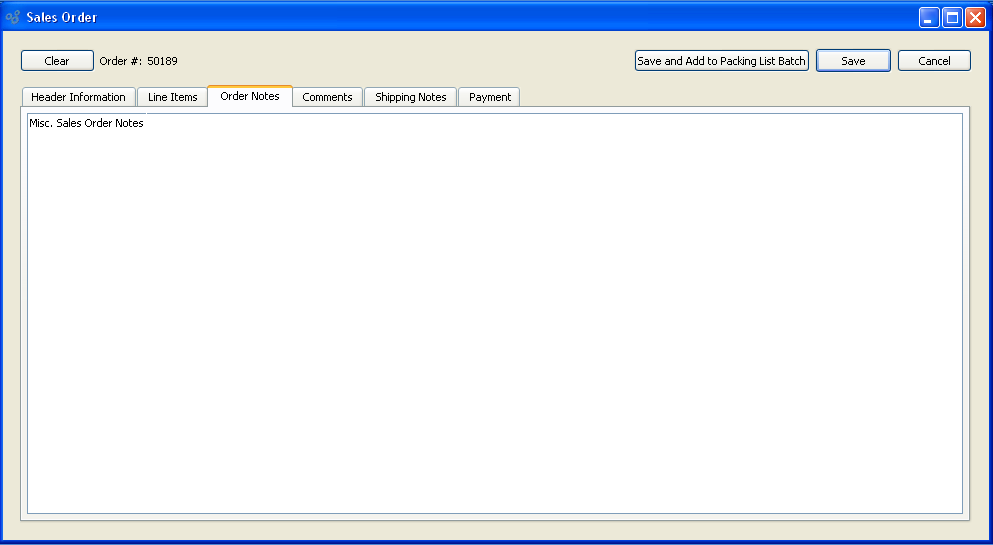
When adding Notes to a Sales Order, you are presented with the following options:
- Order Notes
This is a scrolling text field with word-wrapping for entering general Notes related to the Sales Order. These Notes are for internal use only.
To the far right of the screen, the following buttons are available:
- SAVE
Saves the Order Note.
- CANCEL
Closes the screen without creating an Order Note, returning you to the application desktop.
To add Comments related to a Sales Order, select the "Comments" tab. The following screen will appear:
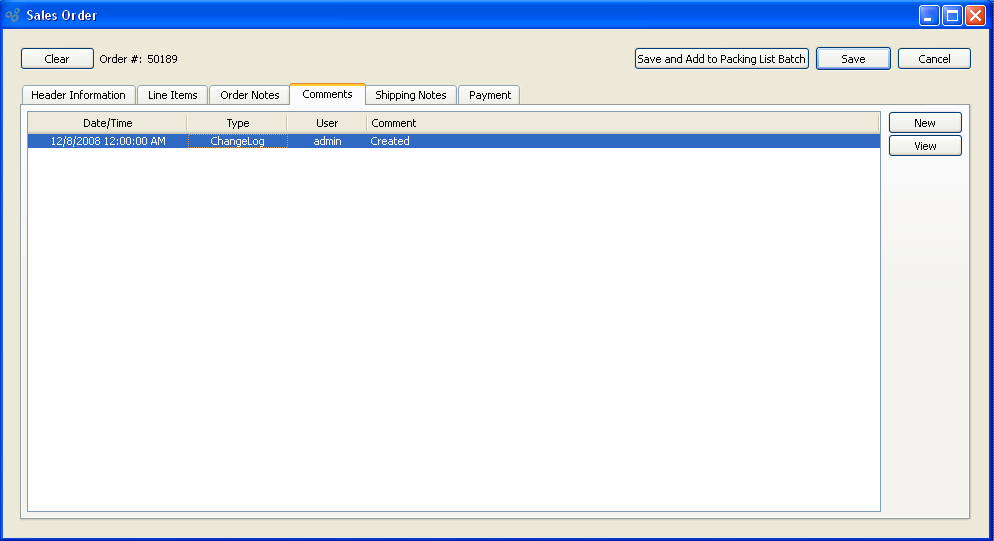
When adding Comments related to a Sales Order, you are presented with the following options:
- Comments
Display lists Comments for the specified Order.
To the far right of the screen, the following buttons are available:
- NEW
Opens screen for creating a new Comment.
- VIEW
Highlight a Comment and then select this button to reach a read-only view of the Comment.
To create a Sales Order Comment, select the NEW button. The following screen will appear:
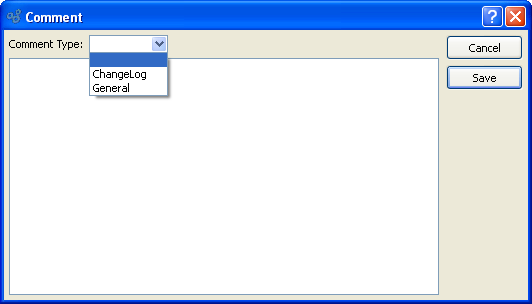
- Comment Type
Specify one of the following Comment Types from the drop-down list: ChangeLog or General. Comment Types are used to categorize Comments. Once you have specified a Comment Type, you may type your Comment in the main text area. The text area features word-wrapping and scroll-bar support for longer Comments.
To the far right of the screen, the following buttons are available:
- CANCEL
Closes the screen without creating a new Comment, returning you to the previous screen.
- SAVE
Creates the Comment and adds it to the list of Order Comments.
Shipping Notes are drawn from the Customer master—specifically from the "Shipping Notes" tab on the Ship-To Address master. The Notes may vary depending on the Ship-To Address specified for the Order. These Notes provide a mechanism for transferring shipping information from the Customer master to the Sales Order. To view Sales Order Shipping Notes, select the "Shipping Notes" tab at the top of the "Sales Order" screen. The following screen will appear:
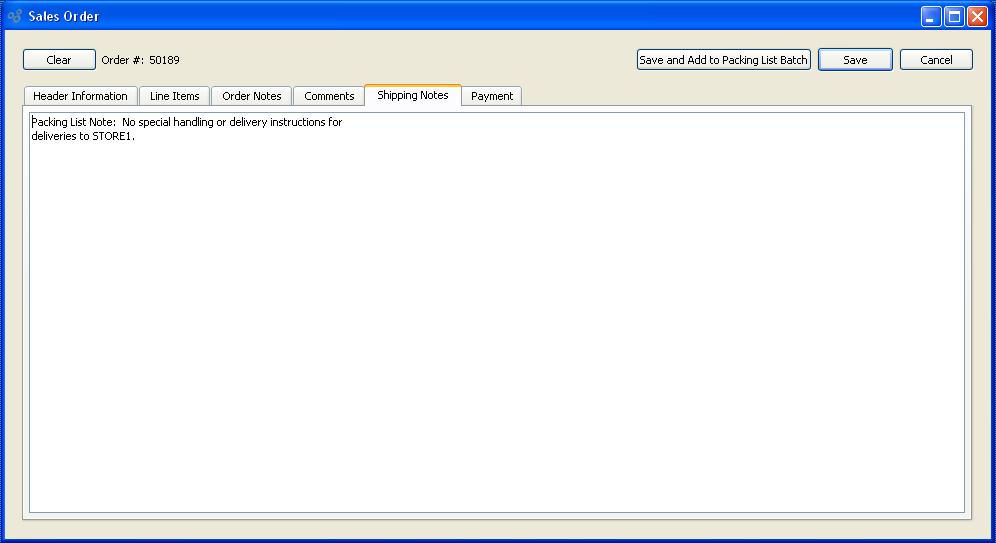
When viewing or editing Shipping Notes for a Sales Order, you are presented with the following options:
- Shipping Notes
While Shipping Notes content may originate from the Customer master, you can edit the Notes to fit the requirements of an Order. This is a scrolling text field with word-wrapping.
To the far right of the screen, the following buttons are available:
- SAVE
Saves the Shipping Note.
- CANCEL
Closes the screen without creating a Shipping Note, returning you to the application desktop.
Note
If your system is configured to use Credit Cards, the "Payment" tab will be visible. This tab will not be visible if your system is not configured to use Credit Cards.
To authorize or charge Customer Credit Cards, select the "Payment" tab at the top of the "Sales Order" screen. The following screen will appear:
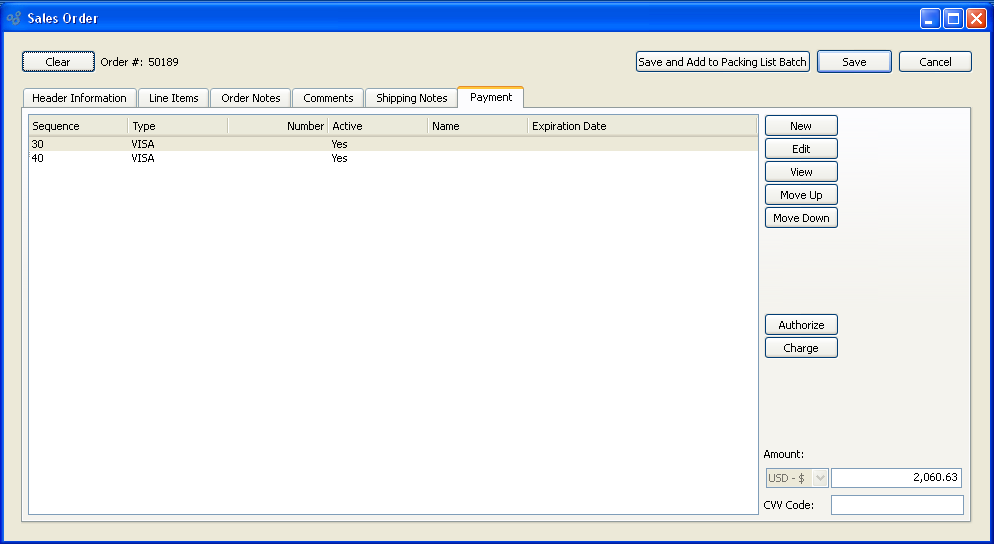
When authorizing or charging Customer Credit Cards, you are presented with the following options:
- Payment
Display lists Credit Card information for the specified Customer.
To the far right of the screen, the following buttons are available:
- NEW
Opens screen for entering new Credit Card information for the Customer.
- EDIT
Enables you to edit highlighted Credit Cards. The edit screen is the same as that for entering new Credit Card information—except that when editing, the fields will contain Credit Card information.
- VIEW
Highlight a Credit Card and then select this button to reach a read-only view of the "Edit" screen. Double-clicking on a Credit Card will also bring you to the view screen.
- MOVE UP
Highlight a Credit Card and then select this button to move the Credit Card up in the sequence of Credit Cards. Sequence numbers are automatically adjusted to reflect the change in position.
- MOVE DOWN
Highlight a Credit Card and then select this button to move the Credit Card down the sequence of Credit Cards. Sequence numbers are automatically adjusted to reflect the change in position.
- AUTHORIZE
After entering an amount below, highlight an active Credit Card and then select this button to pre-authorize the Credit Card charge for the amount specified. Pre-authorized Credit Card charges will be displayed in the "Authorized CC Payments" field on the "Line Items" tab. After a Credit Card charge has been pre-authorized, the charge may then be post-authorized using the A/R Workbench—thereby completing the Credit Card transaction.
- CHARGE
After entering an amount below, highlight an active Credit Card and then select this button to charge the Credit Card for the amount specified. When a Credit Card is charged, both a Credit Memo and a Cash Receipt are posted for the charge amount. The total due from the Customer will be automatically adjusted on the Invoice to reflect the amount of any Credit Card charges. If, by chance, you charge a Customer's Credit Card but fail to save the Sales Order, the link between the Order and the charge will be broken; however, the transactions resulting from the charge will remain in the system.
- Amount
Enter the amount of the Credit Card pre-authorization or charge. By default, the outstanding balance due will be displayed here. However, you may edit the default amount.
- CVV Code
Enter the Card Verification Value (CVV) Code found on the back of the specified Credit Card. This may be an optional feature at your site. Contact your Systems Administrator for details.
To add a new Sales Order Line Item, select the NEW button. The following screen will appear:
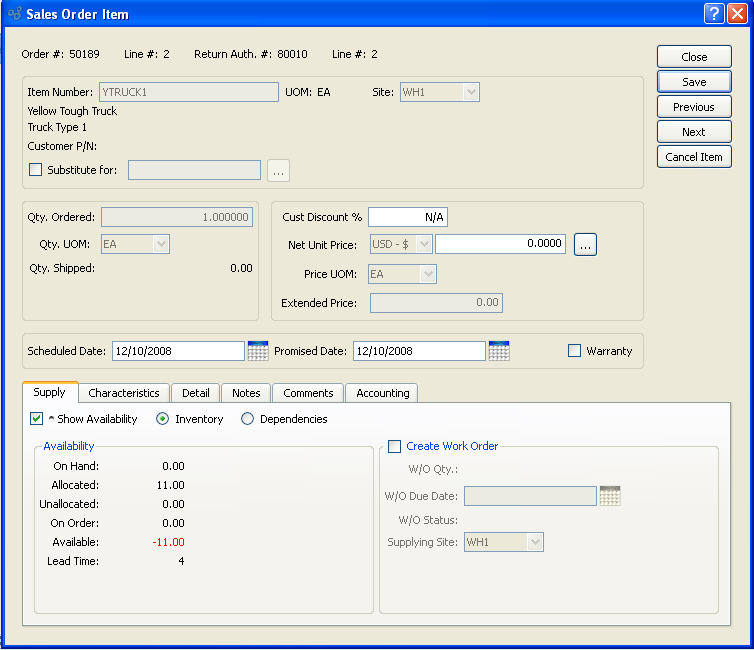
When creating a new Sales Order Line Item, you are presented with the following options:
- Order #
Displays the Sales Order Number specified on the Sales Order header.
- Line #
-
Displays the Line Item Number for the current Line Item.
Note
If the Sales Order was generated from a Return Authorization, the Return Authorization Number and corresponding Line Number will also be displayed at the top of the screen.
- Return Auth.#
Displays any Return Authorization number associated with the Sales Order.
- Line #
Displays the Line Number for the Item listed on the Return Authorization.
- Item Number
-
Enter the Item Number of the Item you want to sell. The Item list will contain sold Items available for purchase by the specified Customer. The list of available Items may vary from Customer to Customer, depending on how Pricing Schedules are implemented at your site. Once an Item Number is entered, the Inventory Unit of Measure and Item description will automatically appear.
- Customer P/N
Displays the Customer Part Number (i.e., Item Alias) that corresponds to the Item Number entered in the Item Number field. The Customer Part Number will display only if you enter an Item Alias in the Item Number field. To enter an Item Alias, place the cursor in the Item Number field and then use the keyboard shortcut "CTRL + A". After you have entered a valid Item Alias, hit the TAB key. A list of Items that use the specified Item Alias will be displayed. Select the desired Item from the list. The Item Alias will display as the Customer Part Number. Item Aliases are defined on the Item master.
- Substitute for
Optional selection used solely for gathering information related to Sales Order Line Item substitutions. This feature can be used, for example, to gather information about Inventory shortages or Customer first preferences. There is no impact on the system of using this feature. Its function is simply to store information in the database, where it may be accessed for reporting purposes.
- Site
Specify the Site the Sales Order Item is sold from. Items may be supplied to Sales Orders from multiple Item Sites. After an Item Number is entered above, the system checks for available Item Sites for the Item. Any Item Sites having the "Sold from" flag set on them will be selectable from this Site list. By default, the Item Site having the highest Ranking will be selected as the first available Site. If more than one Item Site share a Ranking of "1," the Sites will be sorted in alphabetical order. Item Site Rankings are set on the Item Site master.
Tip
If a preferred Selling Site is specified for the Customer, then that Site will be selected here by default. If the preferred Selling Site is not selected—and you think it should be—verify that the Item Site master for the Line Item in question is marked as a "Sold from" Site.
- Qty. Ordered
Enter the quantity of the specified Item being ordered.
Note
The quantity ordered is based on the quantity Unit of Measure. If the Sales Order Item is being edited and the quantity ordered is reduced then all reservations for the line item will be removed.
- Qty. UOM
Specify the Unit of Measure to be used when selling the Line Item. Sold Items may be assigned multiple Selling UOMs. These alternate UOMs may be defined on the Item master. If a Line Item has no Selling UOM defined, then the Inventory UOM will be used here by default.
- Qty. Shipped
Displays the Line Item quantity shipped to date, if any.
- Cust Discount %
-
Specify here any additional discount you want to apply to the Sales Order Item. This additional discount is applied on top of the Net Unit Price. In other words, the Customer Discount is applied after any available Pricing Schedules, Quantity Breaks, etc. have been calculated and the Net Unit Price for the Sales Order Item is determined.
Tip
When Sales Orders are entered, the system will search for Quantity Break matches between the Sales Order Item and any relevant Pricing Schedule. If duplicate Quantity Breaks are found, the lowest Price for the given quantity will be used.
- Net Unit Price
Displays the Unit Price for the Sales Order Item. By default, the system will choose the lower of the following two Prices: A) The most-specific Pricing Schedule Assignment or B) any Sale in effect at the time of Order entry. The specificity of Pricing Schedule Assignments is determined in the following descending order: By Customer Ship-To Address (most specific), by Customer, by Customer Type, by Customer Type pattern, by all Customers. The browse button located to the right of the field leads to a Price List screen.
Tip
The system can be configured to prevent users from editing the Net Unit Price. If your system is configured that way, the Net Unit Price field will not be editable.
- Price UOM
The Price Unit of Measure is the same as the Selling UOM. If an Item has Selling UOMs defined, then the Item may be sold and priced in these alternate UOMs. If no Selling UOMs are defined, then the Inventory UOM will be used here by default.
- Extended Price
Displays the Extended Price. The Extended Price for a Line Item is based on the quantity ordered multiplied by the Net Unit Price.
- Scheduled Date
The scheduled date is the date when the Line Item quantity should be shipped. The user who enters the Line Item is responsible for determining the scheduled date. After entering the scheduled date, hit the TAB key on your keyboard to display values in the remaining display only fields.
Note
The Sales Order Item having the earliest scheduled date will determine the ship date for the Sales Order.
- Promised Date
Enter the date when you promised delivery of the Line Item. This is an optional field. It will only be displayed on the screen if your system is configured to enable promise dates.
- Warranty
Select if the Line Item is a warranty Item. If selected, the Cost of Warranty Account will be used when shipping the Line Item, instead of the Cost of Sales Account. It will also be used when receiving warranty Items through a Return Authorization, instead of the P/O Liability Clearing Account.
When entering Sales Orders you have the ability to view current supply considerations, including Item availability and dependencies. You may also create replenishment Orders if they are needed.
- Show Availability
Select to display Availability information for the Sales Order Item in the following categories:
- Inventory
-
Select radio button to view Inventory availability.
- On Hand
Displays the current Quantity on Hand value.
- Allocated
Displays the quantity allocated to current Sales Orders and/or Work Orders in the system. An Item is considered allocated to a Sales Order if a Sales Order Line Item exists for the Item—and that Line Item has not yet been issued to Shipping. An Item is considered allocated to a Work Order if the Item is a material requirement—and the material has not yet been issued to the Work Order. Once the current Sales Order Line Item is saved, the "Allocated" value will increase by the quantity ordered.
- Unallocated
Displays the Quantity on Hand remaining after allocations have been accounted for, as in: QOH - Allocated Qty. = Unallocated Qty.
- On Order
If the Sales Order Item is a manufactured Item, the quantity ordered by current Work Orders will be displayed. If the Sales Order Item is a purchased Item, the quantity ordered by current Purchase Orders will be displayed.
- Available
Displays the available quantity. Available quantity is determined using the following formula: Unallocated Qty. + On Order Qty. = Available Qty.
- Lead Time
Displays the Item Site Lead Time for the specified Line Item.
Tip
The "Show Availability" feature can be turned on or off by default at the system level. If the feature is turned on, the Availability totals will display only after a Scheduled Date has been entered for the Line Item.
- Dependencies
-
Select radio button to review any components dependent on manufactured line Item.
- Show Dependencies as Indented BOM
Displays components Items associated with sold manufactured Item in a nested list with a plus ("+") sign located to the far left of the screen next to each line that may be expanded to lower levels. By clicking your mouse on a plus sign, you reveal lower levels of information related to the Line Item.
- Create Work Order
-
If the Line Item is a manufactured Item, select this option to automatically create a Work Order for the specified quantity. For make-to-order manufactured Items, this option will be selected automatically. A Work Order will be created to meet the Sales Order demand once you save the Line Item to the Order. An Item is designated as make-to-order if the "Stocked at" flag on the Item Site master is not selected. A Work Order created automatically from a Sales Order Line Item will assume the same Order Number as the Sales Order the Line Item is associated with—even if that Order Number has already been used by a previous Work Order.
Note
For purchased Items, the option "Create Purchase Request" will appear instead. The displayed fields will resemble the fields shown when "Create Work Order" is visible. One difference is you will be given the option to override the purchase Price for the Line Item. If used, this one-time override will replace any Item Source Price(s) when the Purchase Request is converted to a Purchase Order Line Item.
- W/O Qty.
The quantity ordered by the Sales Order Line Item will display here. If the Line Item is a purchased Item, the option "P/R Qty" will appear instead.
- W/O Due Date
The scheduled date of the Sales Order Line Item will display here. If the Line Item is a purchased Item, the option "P/R Due Date" will appear instead.
- Supplying Site
Specify the Site a corresponding Work Order would be supplied from. Work Orders may only be created for manufactured Items having a supplying Site. Sites designated as "Supplied at" Sites in the Item Site master for an Item are considered supplying Sites. If no supplying Site exists for an Item, a Work Order may not be created for the Item.
To the far right of the screen, the following buttons are available:
- CLOSE
Closes the screen without creating a new Sales Order Line Item, returning you to the Sales Order header.
- SAVE
Creates the new Sales Order Line Item and adds it to the list of Sales Order Line Items. If "Create Work Order" is specified, the associated Work Order will also be created.
- PREVIOUS
Select to view previous Line Items associated with the Sales Order.
- NEW
Select to create a new Sales Order Line Item.
- CANCEL ITEM
Select to cancel the current Sales Order Line Item. Records of canceled Line Items will be retained for informational purposes. To view canceled Line Items associated with a Sales Order, select the "Show Canceled Line Items" option on the Sales Order header's "Line Items tab.
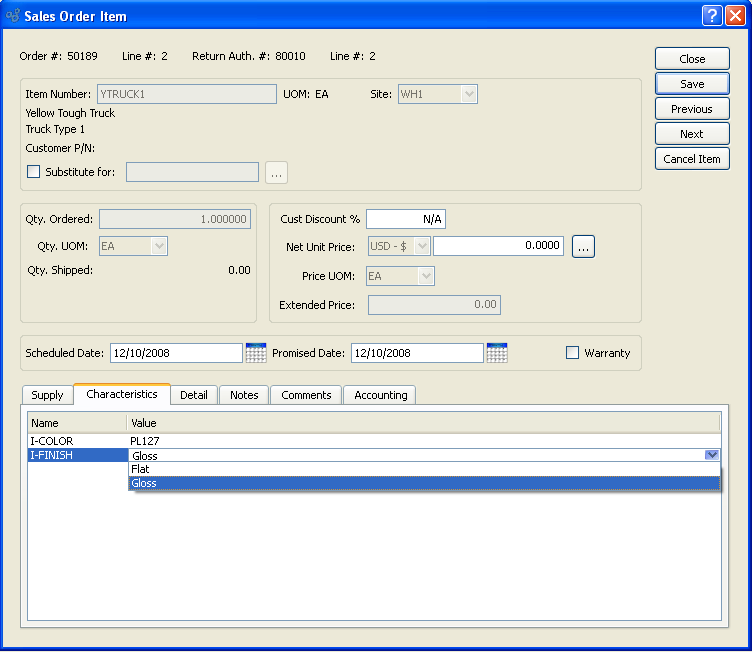
If an Item has Characteristics associated with it, you have the option of linking those Characteristics to a Sales Order Line Item. And, in the case where Sales Order demand automatically generates either a Purchase Request or a Work Order, the Characteristics defined here will be inherited by those subsequent Orders.
Tip
You can link Characteristics and Values to an Item by using the Item master. Once entered, these Characteristics and Values will be available to users entering Sales Order Line Items.
To associate Characteristics with a Sales Order Line Item, select the "Item Characteristics" tab at the bottom of the screen, as shown below:
Note
Characteristics for configured Items (i.e., Job or Reference Items) also have List Prices associated with them. When configured Item Characteristics are added to a Sales Order Item, the overall Net Unit Price of the Item increases.
When selecting or editing Characteristics for a Sales Order Line Item, you are presented with the following options:
- Name
Displays the name of any Item Characteristics associated with the Item. Characteristics defined as Item Characteristics may be associated with Items on the Item master.
- Value
Displays the default Value associated with an Item Characteristic, but permits you to specify an alternate Value. When associating Characteristic Values with a Sales Order Line Item, you have four options: 1) Select the default Value; 2) select an alternate pre-defined Value; 3) manually enter a new Value in place of the pre-defined Value; or 4) make no selection. Making no selection means the Characteristics will not be associated with the Sales Order Line Item.
- Base Price
If the Sales Order Item is a configured Item (i.e., Job or Reference Item), the "Base Price" option will be shown. Characteristics associated with configured Items may have additional List Prices associated with them. As a result, when Characteristics are added to a Sales Order Item, the overall Price of the Item may increase. The Base Price shows the Price before any Characteristic List Prices have been added to the Net Unit Price.
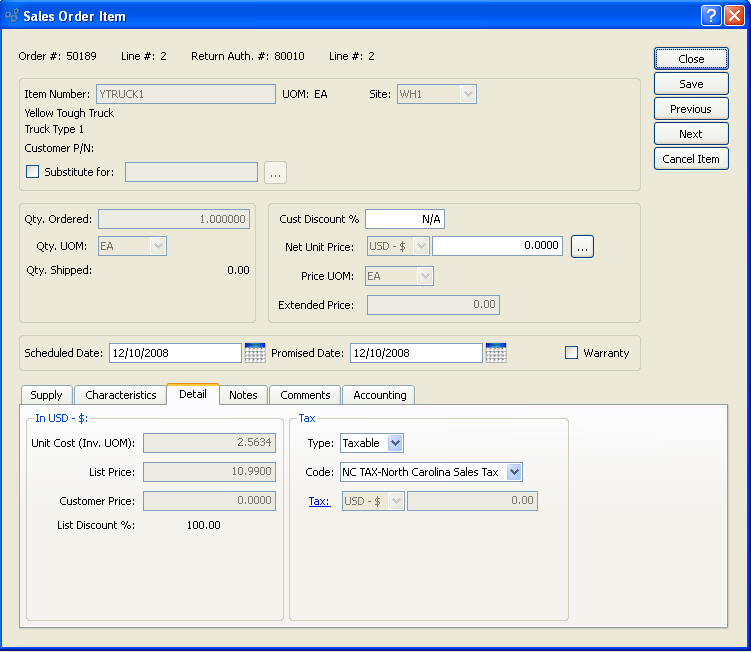
To view Costs or adjust Tax information for a Sales Order Line Item, select the "Detail" tab at the bottom of the screen, as shown below:
When viewing Costs or adjusting Tax information for a Sales Order Line Item, you are presented with the following options:
- Unit Cost (Inv. UOM)
Displays the Standard Cost per unit based on the Inventory Unit of Measure.
- List Price
Displays the sales List Price per unit.
- Customer Price
Displays the Price given to the specified Customer. Special Customer Prices can be set for individual Customers or Customer Groups by using a Pricing Schedule.
- Tax
-
The following Tax options are available, should you need to override the Tax Selection settings for the Line Item:
- Tax Type
Specify the Tax Type for the Sales Order Item. By default, the Item's Tax Type corresponding to the Sales Order's Tax Authority will be presented here. The link between Tax Types and Tax Authorities is made on the Item master. If the Item master does not have a Tax Type for the Sales Order's Tax Authority, then no Tax will be charged.
- Tax Code
Specify the Tax Code to be applied to the Sales Order Item. By default, the Tax Code specified in the Tax Selection matrix will be displayed here. For a Tax Code to be used, the matrix must have an entry which matches both the Item's Tax Type definition and the Tax Authority specified on the Sales Order header. If no Tax Selection match exists, then no Tax Code will be used—meaning no Tax will be charged.
Tip
The relationship between Tax Authorities, Tax Types, and Tax Codes is established in the Tax Selection matrix.
- Tax
Displays the amount of Tax to be charged for the Sales Order Line Item quantity. Sales Tax is calculated at the Sales Order Line Item level. To get a detailed view of the Tax calculation, click on the Tax link using your mouse.
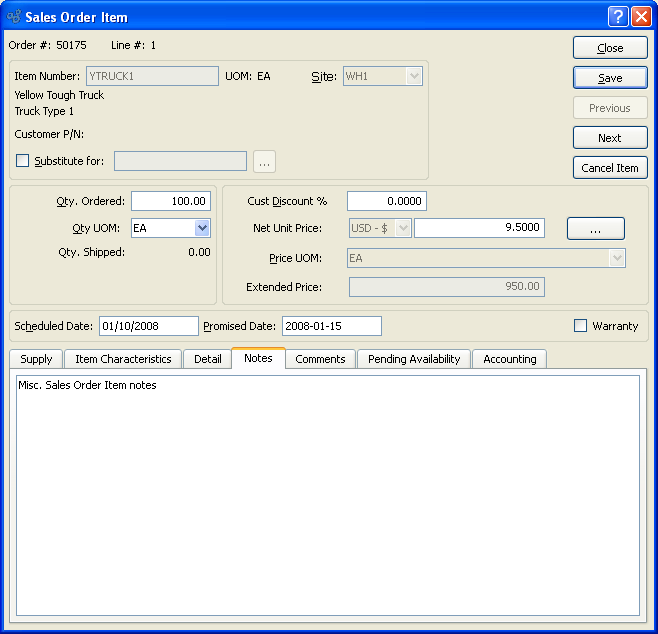
To enter Notes related to a Sales Order Line Item, select the "Notes" tab at the bottom of the screen, as shown below:
When adding Notes related to a Sales Order Line Item, you are presented with the following options:
- Notes
This is a scrolling text field with word-wrapping for entering general Notes related to the Sales Order Line Item.
Tip
If a Sales Order Item is marked to create a Work Order, the Production Notes for the created Work Order will contain the Sales Order Number, the Customer Name, and any additional Sales Order Line Item Notes.
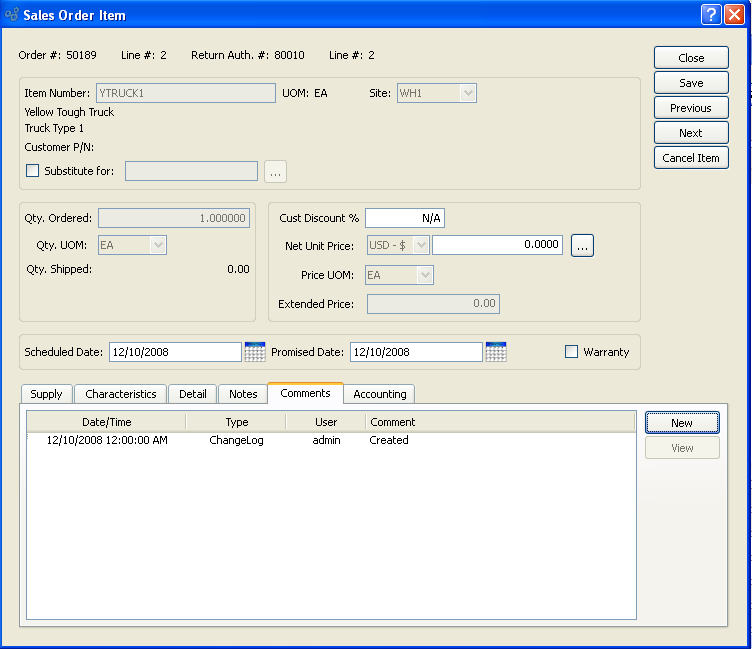
To add Comments related to a Sales Order Line Item, select the "Comments" tab. The following screen will appear:
Note
Whenever Sales Order Line Items are created or their quantities are changed, the system will automatically generate a Comment, which will appear in the list of Line Item Comments.
When adding Comments related to a Sales Order Line Item, you are presented with the following options:
- Comments
Display lists Comments for the specified Line Item.
To the far right of the screen, the following buttons are available:
- NEW
Opens screen for creating a new Comment. Sales Order Line Item Comments may only be added after the Line Item has been saved to the Sales Order.
- VIEW
Highlight a Comment and then select this button to reach a read-only view of the Comment.
To create a Sales Order Line Item Comment, select the NEW button. The following screen will appear:

- Comment Type
Specify one of the following Comment Types from the drop-down list: ChangeLog or General. Comment Types are used to categorize Comments. Once you have specified a Comment Type, you may type your Comment in the main text area. The text area features word-wrapping and scroll-bar support for longer Comments.
To the far right of the screen, the following buttons are available:
- CANCEL
Closes the screen without creating a new Comment, returning you to the previous screen.
- SAVE
Creates the Comment and adds it to the list of Order Comments.
To define an alternate Cost of Sales Account for a Sales Order Line Item, select the "Accounting" tab at the bottom of the screen, as shown below:
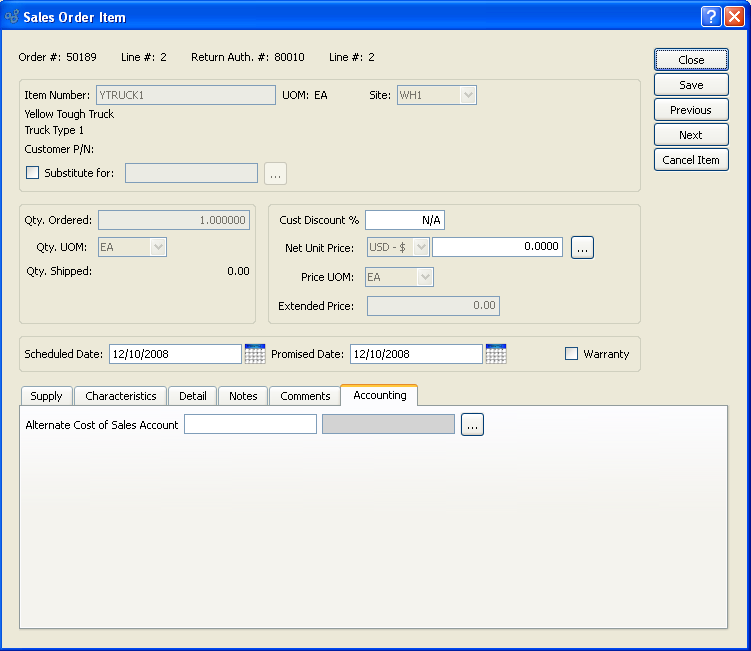
When defining an alternate Cost of Sales Account for a Sales Order Line Item, you are presented with the following options:
- Alternate Cost of Sales Account
Specify an alternate Account to be used for the Cost of Sales. The Account you specify will be used instead of the typical Account pre-defined in the Sales Account Assignments.
To enter the net Unit Price for a Sales Order Line Item, select the browse button located to the right of the "Net Unit Price" field. The following screen will appear:
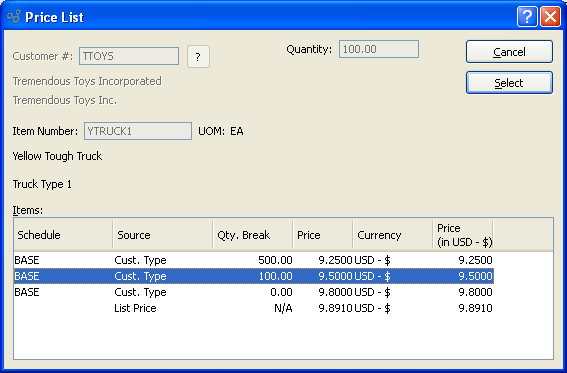
When entering the net Unit Price for a Sales Order Line Item, you are presented with the following options:
- Customer #
Displays the Customer associated with the specified Sales Order. The name of the Customer will also be displayed.
- Item Number
Displays the Item Number associated with the specified Sales Order Line Item.
- UOM
Inventory Unit of Measure.
- Quantity
Displays Line Item quantity specified on previous screen.
- Items
Display lists available pricing for the specified Sales Order Line Item. Currency values and conversions Currency will also be shown if your system is configured to use multiple Currencies.
To the far right of the screen, the following buttons are available:
- CANCEL
Closes the screen without entering a Price, returning you to the previous screen.
- SELECT
Highlight a Price from the list of Prices, then select this button to enter the Price in the "Net Unit Price" field on the previous screen.