Billing Forms section.
Although the system does not require you to print Invoices before posting them individually (i.e., one-at-a-time), you are required to print Invoices before posting them in batch mode. To print unposted Invoices, select the "Print Invoices" option. The following screen will appear:

When printing Invoices, you are presented with the following options:
- First Invoice #
The next Invoice Number in the automatic sequence of Invoice Numbers will display here. Once this Invoice Number has been printed, the next Invoice Number will appear. Default values for Invoice Numbers are configurable at the system level.
- Post Invoices after Printing
Select to automatically post Invoices after they have been printed.
Note
Invoices are posted effective on the date they are distributed, not on the date they are posted—as might be assumed.
- Invoice Copies
-
Specify details for the Invoice copies you want to print:
- # of Copies
Indicate the number of copies you want to print. Information about the specified copies will display below. To add a Watermark, double-click on a copy line.
To the far right of the screen, the following buttons are available:
- CANCEL
Closes the screen without printing Invoices, returning you to the application desktop.
Runs the report associated with this screen.
Tip
If the Customer specified on the Invoice has an EDI Profile defined, you may encounter an EDI processing interface when printing individual Invoices.
To add a Watermark to an Invoice, double-click on a copy line. The following screen will appear:

When adding a Watermark to an Invoice copy, you are presented with the following options:
- Watermark
Specify the name of the Watermark to be used for the selected copy.
- Show Prices
Select to show Prices in the selected copy.
To the far right of the screen, the following buttons are available:
- CANCEL
Closes the screen without adding a Watermark, returning you to the previous screen.
- SAVE
Saves the Watermark definition to the selected copy.
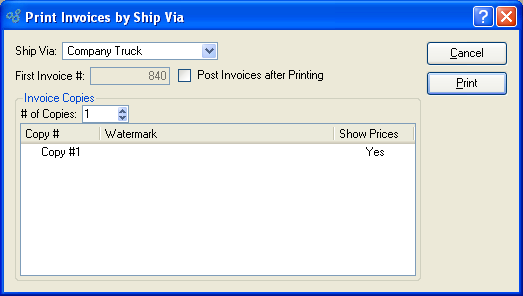
To print Invoices by Ship Via, select the "Print Invoices by Ship Via" option. The following screen will appear:
Tip
If you don"t see any Ship Vias appearing in the Ship Via list, this probably means you don"t have any unprinted Invoices on the list of unposted Invoices. To verify, open the list of unposted Invoices and check the printed status of the Invoices listed there.
When printing Invoices by Ship Via, you are presented with the following options:
- Ship Via
Specify the Ship Via whose Invoices you want to print.
Tip
The system supports up-to-date shipment tracking with links to the websites of many leading shipping companies (i.e., "Ship Vias").
- First Invoice #
The next Invoice Number in the automatic sequence of Invoice Numbers will display here. Once this Invoice Number has been printed, the next Invoice Number will appear. Default values for Invoice Numbers are configurable at the system level.
- Post Invoices after Printing
Select to automatically post Invoices after they have been printed.
Note
Invoices are posted effective on the date they are distributed, not on the date they are posted—as might be assumed.
- Invoice Copies
-
Specify details for the Invoice copies you want to print.
- # of Copies
Indicate the number of copies you want to print using the arrow buttons. Information about the specified copies will display below. To add a Watermark, double-click on a copy line.
To the far right of the screen, the following buttons are available:
- CANCEL
Closes the screen without printing Invoices, returning you to the application desktop.
Prints all Invoices available for printing, using the specified parameters.
Tip
If the Customer specified on the Invoice has an EDI Profile defined, you may encounter an EDI processing interface when printing individual Invoices.
To add a Watermark to an Invoice, double-click on a copy line. The following screen will appear:
When adding a Watermark to an Invoice copy, you are presented with the following options:
- Watermark
Specify the name of the Watermark to be used for the selected copy.
- Show Prices
Select to show Prices in the selected copy.
To the far right of the screen, the following buttons are available:
- CANCEL
Closes the screen without adding a Watermark, returning you to the previous screen.
- SAVE
Saves the Watermark definition to the selected copy.
To print an Invoice that was previously printed, select the "Re-Print Invoices" option. The following screen will appear:
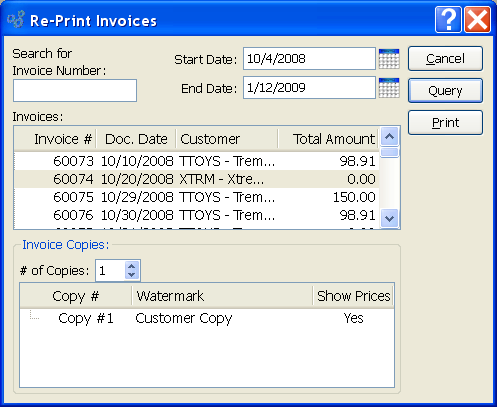
When re-printing an Invoice, you are presented with the following options:
- Search for Invoice Number
Enter an Invoice Number or Regular Expression. This field may be used independently or in conjunction with the date fields.
Tip
The "Invoice Number" field supports pattern matching with Regular Expressions.
- Start Date
Invoices posted on and after this date will be displayed, unless the list is intentionally limited by information entered in the "Search for Invoice Number" field.
- End Date
Invoices posted on and before this date will be displayed, unless the list is intentionally limited by information entered in the "Search for Invoice Number" field.
- Invoices
Display lists previously printed Invoices. Highlight the individual Invoice or group of Invoices you want to re-print using your mouse button. To select a sequence of Invoices, highlight the first in the sequence using your mouse button. Then, holding down the SHIFT key on your keyboard, highlight the last Invoice in the sequence. The entire sequence is now selected. To select Invoices that are out of sequence, highlight the first Invoice in the group. Then, holding down the CTRL key on your keyboard, highlight the next Invoice you want to select. Continue highlighting Invoices with the CTRL key depressed until all desired Invoices are selected. The entire group is now ready for re-printing.
- Invoice Copies
-
Specify details for the Invoice copies you want to print:
- # of Copies
Indicate the number of copies you want to re-print. Information about the specified copies will display below. To add a Watermark, double-click on a copy line.
To the far right of the screen, the following buttons are available:
- CLOSE
Closes the screen without re-printing Invoices, returning you to the application desktop.
- QUERY
Select to generate a list of Invoices for re-printing, using the specified parameters.
Runs the report associated with this screen.
Tip
If the Customer specified on the Invoice has an EDI Profile defined, you may encounter an EDI processing interface when printing individual Invoices.
To send a copy of a Customer Invoice by email, select the "E-mail Invoice Form" option. The following screen will appear:
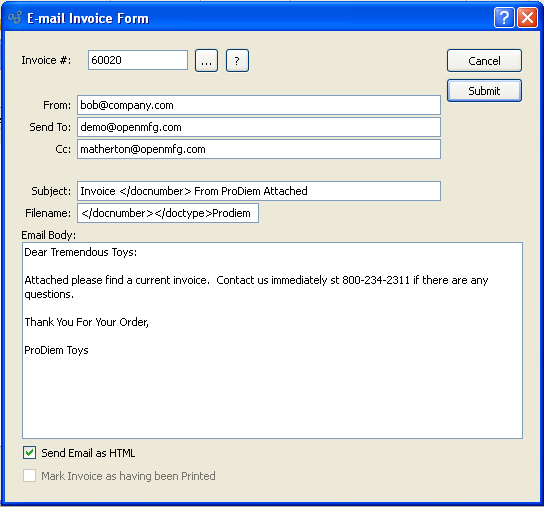
When sending a copy of a Customer Invoice by email, you are presented with the following options:
- Invoices
Display Invoice for email delivery. Select the Invoice you want to schedule for email delivery using your mouse button.
Note
Customers are set up to receive email deliveries of information using the Electronic Data Interchange (EDI) tab on the Customer master.
- From
The default address appearing in the "From" field will belong to the user who is currently logged in to the application. This address may be edited or changed. User email addresses are stored with user records at the system level.
- Send To
If the Customer associated with the selected Invoice has been set up to receive email, then the default email address for that Customer will be automatically pre-populated here. Because this is an editable field, you may also change the email address.
- Cc
If EDI is set up for the Customer, then the default carbon copy (i.e., Cc:) line found on the Customer master will be automatically pre-populated here. Because this is an editable field, you may also modify the Cc: line.
- Subject
If EDI is set up for the Customer, then the default subject line found on the Customer master will be automatically pre-populated here. Because this is an editable field, you may also modify the subject line.
- Filename
If EDI is set up for the Customer, then the default filename found on the Customer master will be automatically pre-populated here. Because this is an editable field, you may also modify the filename line. XML tags may be used in this field to dynamically generate filename text. In the example shown in the screenshot above, the filename will include the Document Type (i.e., Invoice) and the Document Number (i.e., Invoice Number).
- Email Body
If EDI is set up for the Customer, then the default email body found on the Customer master will be automatically pre-populated here. This is a scrolling text field with word-wrapping. You may also edit the default email body.
- Send Email as HTML
Select if you want the body of the Email to be sent as HTML. If not selected, the Email will be sent as plain text.
- Mark Invoice as having been Printed
Select to mark highlighted Invoice as having been printed.
To the far right of the screen, the following buttons are available:
- CANCEL
Closes the screen without scheduling an Invoice for email delivery, returning you to the application desktop.
- SUBMIT
Select to submit requested action to the Batch Manager for processing.
Printing a Credit Memo is a required step in the process of posting a Credit Memo. To print a Credit Memo, select the "Print Credit Memos" option. The following screen will appear:
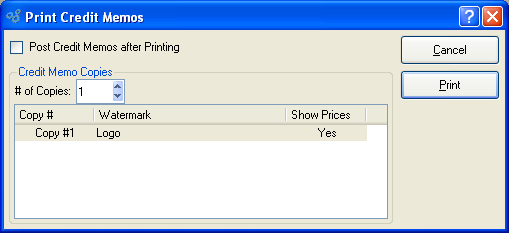
When printing Credit Memos, you are presented with the following options:
- Post Credit Memos after Printing
Select to automatically post Credit Memos after they have been printed.
Note
Credit Memos are posted effective on the date they are distributed, not on the date they are posted—as might be assumed.
- Credit Memo Copies
-
Specify details for the Credit Memo copies you want to print.
- # of Copies
Indicate the number of copies you want to print using the arrow buttons. Information about the specified copies will display below. To add a Watermark, double-click on a copy line.
To the far right of the screen, the following buttons are available:
- CANCEL
Closes the screen without printing Credit Memos, returning you to the application desktop.
Prints all Credit Memos available for printing, using the specified parameters.
To add a Watermark to a Credit Memo, double-click on a copy line. The following screen will appear:
When adding a Watermark to a Credit Memo copy, you are presented with the following options:
- Watermark
Specify the name of the Watermark to be used for the selected copy.
- Show Prices
Select to show Prices in the selected copy.
To the far right of the screen, the following buttons are available:
- CANCEL
Closes the screen without adding a Watermark, returning you to the previous screen.
- SAVE
Saves the Watermark definition to the selected copy.
To print a Credit Memo that was previously printed, select the "Re-Print Credit Memos" option. The following screen will appear:

When re-printing a Credit Memo, you are presented with the following options:
- Invoices
Display lists previously printed Credit Memos. To select a sequence of Credit Memos, highlight the first in the sequence using your mouse button. Then, holding down the SHIFT key on your keyboard, highlight the last Credit Memo in the sequence. The entire sequence is now selected. To select Credit Memos that are out of sequence, highlight the first Credit Memo in the group. Then, holding down the CTRL key on your keyboard, highlight the next Credit Memo you want to select. Continue highlighting Credit Memos with the CTRL key depressed until all desired Credit Memos are selected. The entire group is now ready for re-printing.
- Invoice Copies
-
Specify details for the Credit Memo copies you want to print.
- # of Copies
Indicate the number of copies you want to re-print using the arrow buttons. Information about the specified copies will display below. To add a Watermark, double-click on a copy line.
To the far right of the screen, the following buttons are available:
- CLOSE
Closes the screen without re-printing Credit Memos, returning you to the application desktop.
Prints the highlighted Credit Memos, using the specified parameters.