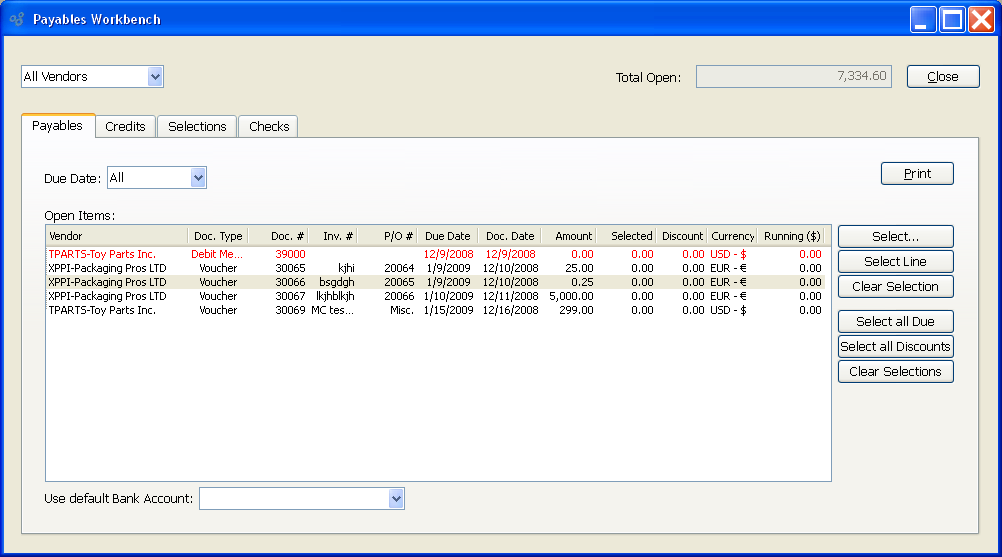
The Payables Workbench groups together in one location a range of current payables information. To access the Payables Workbench, select the "Workbench" option. The following screen will appear:

When displaying the list of Payables associated with the Vendor(s), you are presented with the following options:
- Vendor
Select all or specific Vendors whose payables you would like to view.
- Due Date
Specify date parameters to query open Payables.
- Open Items
Display lists A/P open items. If a Document is past due, the line for that Document will display in red type.
To the far right of the screen, the following buttons are available:
- CLOSE
Closes the screen, returning you to the application desktop.
Runs the report associated with this screen.
- SELECT
Highlight an A/P open item and then click this button to manually review and select the Item for payment. This option brings you to the individual Select Payment screen, where you will find the full range of payment options.
- SELECT LINE
Highlight an A/P open item and then click this button to automatically select the open item for payment. Any available Terms Discount will also be applied automatically.
- CLEAR SELECTION
Highlight an A/P open item and then select this button to clear the selected payment. This option effectively reverses the action of the SELECT option.
- SELECT ALL DUE
Select this button to select for payment all A/P open items whose Payment Date is due or past due and whose Currency is the same as the Bank Account's Currency.
- SELECT ALL DISCOUNTS
Select this option to automatically select all A/P open items which are eligible for a Terms Discount and whose Currency is the same as the Bank Account's Currency. The Terms Discount will be applied automatically to all selected open items.
- CLEAR SELECTIONS
Select this button to clear all selected payments due. This option effectively reverses the action of the SELECT ALL DUE option.
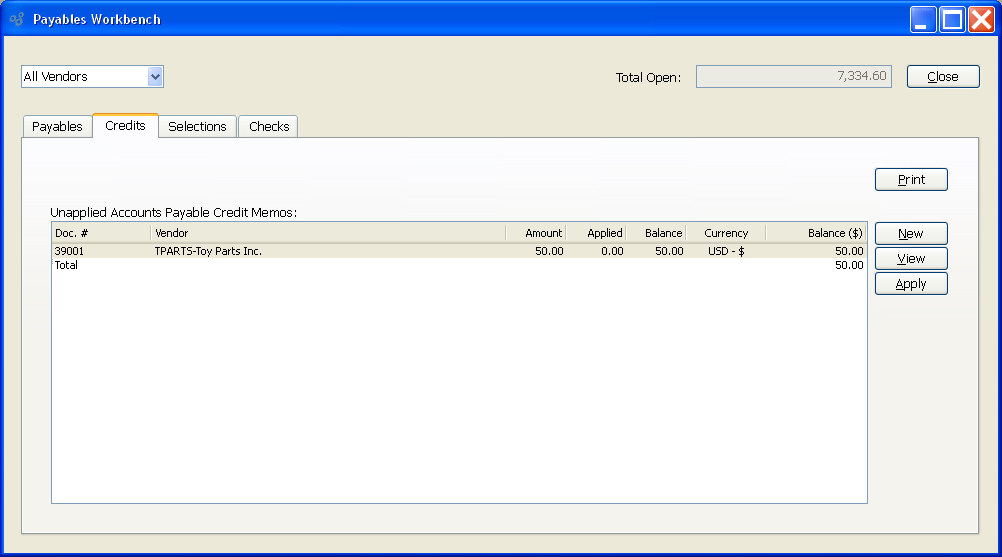
To view Credits associated with the Vendor(s), select the "Credits" tab. The following screen will appear:

When displaying Credits associated with the Vendor(s), you are presented with the following options:
- Unapplied Accounts Payable Credit Memos
Displays the list of unapplied Credit Memos associated with the specified Vendor.
To the far right of the screen, the following buttons are available:
Runs the report associated with this screen.
- NEW
Opens screen for creating a new miscellaneous Credit Memo.
- VIEW
Highlight an unapplied Credit Memo and then select this button to reach a read-only view of the A/P open item.
- APPLY
Highlight an unapplied Credit Memo and then select this button to apply an amount.
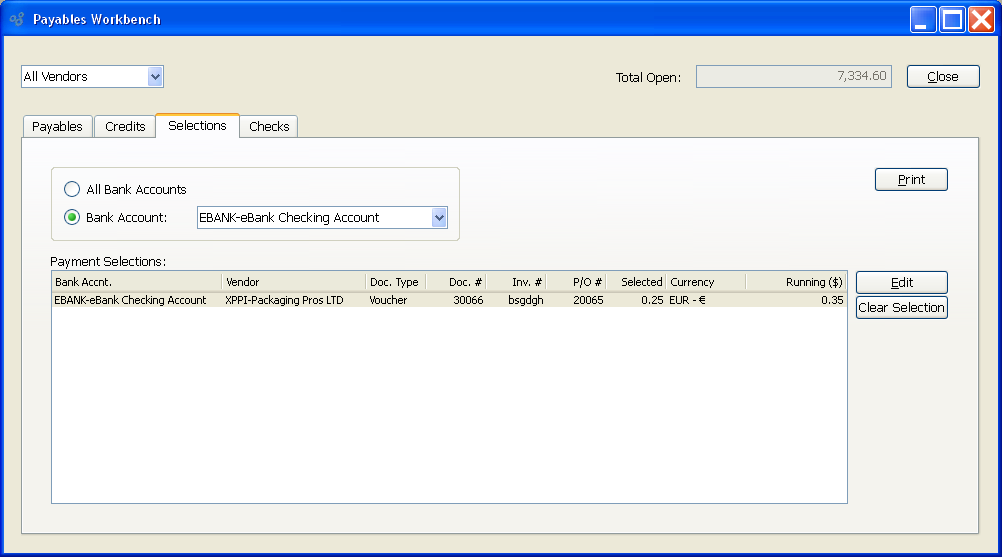
To view the list of selected payments for the specified Vendor(s), select the "List Selected Payments" option. The following screen will appear:

The "Selected Payments" screen displays information on all existing selected payments, including Bank Account to be paid from, Vendor name, Document Type, Document Number, Invoice Number, Purchase Order Number, amount selected for payment, Currency, and running total.
To the far right of the screen, the following buttons are available:
Runs the report associated with this screen.
- EDIT
Enables you to edit highlighted selected payment. The edit screen is the same as that for creating new payment details—except that when editing, the fields will contain payment information. Double-clicking on a selected payment will also bring you to the editing screen.
- CLEAR SELECTION
Highlight a selected payment and then select this button to clear the selection. Because an Item that has been cleared is no longer selected for payment, this option removes the Item from the master list of selected payments.
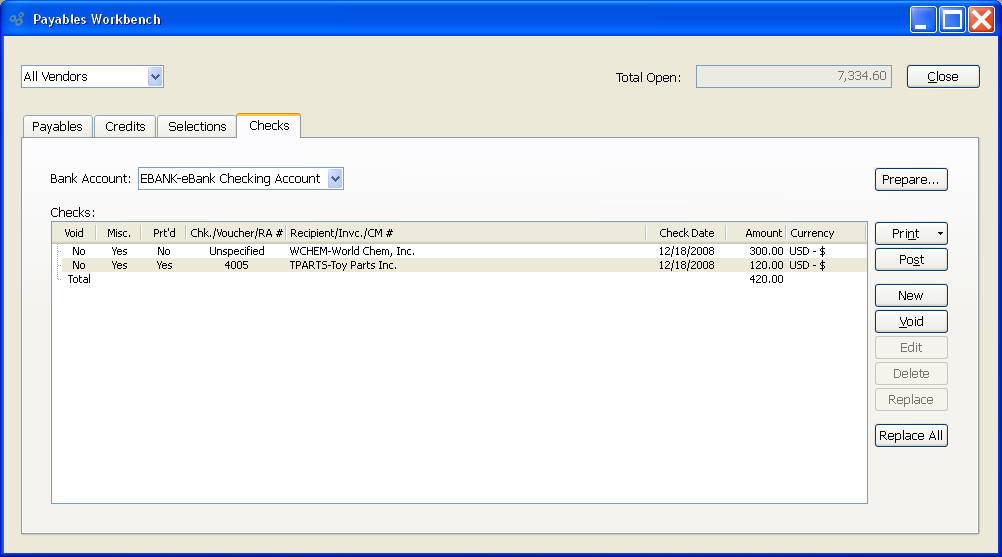
To view the Check Run, select the "Checks" tab. The following screen will appear:

When displaying the Check Run, you are presented with the following options:
- Bank Account
Specify the Bank Account whose Check Run you want to view.
- Checks
Display lists details for Checks included in the Check Run. This display is a nested list, with a plus ("+") sign located to the far left of the display next to each Check. By clicking your mouse on a plus sign, you reveal lower levels of information related to the Check.
To the far right of the screen, the following button is available:
- PREPARE
Select to prepare a Check Run. For more information on preparing Check Runs, see Section 9.1.4.3, “ Prepare Check Run”.
-
Select to print a copy of the list displayed on the screen.
- SELECTED CHECK
-
Highlight a Check in the list of Checks and then select this button to print the Check.
Tip
f Checks being printed contain reference lines which spill over and exceed one standard page, then consider using the report definition CheckMultiPage.xml. This Check Form is designed to support multiple pages for one Check number.
- CHECK RUN
Select to print the Check Run, using the specified Bank Account. For more information on printing Check Runs, see the Section 9.1.6.3, “ Print Check Run” section.
- EDIT LIST
Provides the option to select printer.
- POST
Highlight a Check in the list of Checks and then select this button to post the Check. A Check must be printed before it can be posted. See the "Printed" column in the display to determine a Check's printed status.
- VOID
Highlight a Check in the list of Checks and then select this button to void the Check. Voided Checks may not be printed or posted. When a Check is voided, the payable amount will be reopened on the Select Payments screen. In other words, if a Check for $100.00 is voided, that amount will once again be made available for payment on the Select Payments screen. The reopened amount will again be associated with the referring payable Document (i.e., Voucher or Debit Memo).
- EDIT
-
Highlight a miscellaneous Check and then select this button to edit the Check. Only unprinted miscellaneous Checks may be edited.
Note
Only unprinted miscellaneous Checks may be edited. Regular Checks may not be edited.
- DELETE
Highlight a voided Check in the list of Checks and then select this button to delete the Check. Only voided Checks may be deleted.
- REPLACE
Highlight a voided Check in the list of Checks and then select this button to replace the Check. Checks must be voided before they can be replaced. When a voided Check is replaced, the payable amount displayed on the Select Payments screen will be removed. In other words, if a voided Check for $500.00 is replaced, that amount will no longer be available for payment on the Select Payments screen.
- REPLACE ALL
Select this button to replace all Checks shown in the list of Checks. Checks must be voided before they can be replaced.