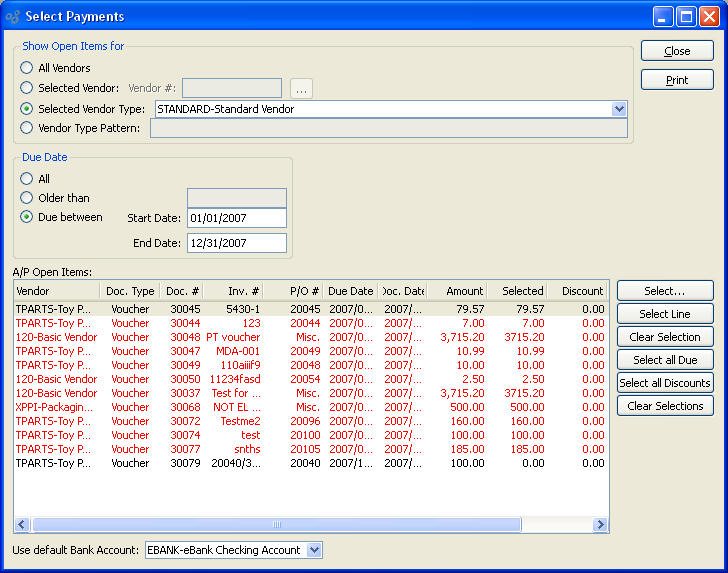
Before you can pay a Vendor an amount due, you must first select the relevant A/P open item(s) for payment. A/P open items are generated by the posting of Vouchers and miscellaneous A/P Debit Memos. To select an A/P open item for payment, choose the "Select Payments" option. The following screen will appear:
Tip
You may select multiple Vouchers for payment by using the SHIFT or CTRL keys and your mouse.
When selecting A/P open items for payment, you are presented with the following options:
- Show Open Items for
-
Select one of the following display options:
- All Vendors
Select to show A/P open items for all Vendors.
- Selected Vendor
Specify Vendor whose A/P open items you want to display.
- Selected Vendor Type
Specify Vendor Type whose A/P open items you want to display.
- Vendor Type Pattern
Enter a Vendor Type pattern to select a range of Vendor Types. Refine your search using Regular Expressions.
- Due Date
-
Select one of the following display options:
- All
Select to show all A/P open items for all due dates.
- Older than
Select to show A/P open items whose due date is older than the date entered.
- Due between
Select to show A/P open items whose due date falls within a specified range.
Note
When a Check is created to satisfy an A/P open item, the value displayed in the amount due column will be adjusted automatically to reflect the Check amount. For example, if a Check is issued for the full amount due, the value in the amount due column will adjust to "0". Once a Check for the full amount is posted, the A/P open item will be removed from the Select Payments list altogether.
- A/P Open Items
Display lists A/P open items. If a Document is past due, the line for that Document will display in red type.
Tip
Be alert to negative balances in the amount due column. A negative balance indicates that Checks have been issued for more than the amount due. To correct this situation, view your Check Run and void any superfluous Checks.
- Use default Bank Account
Specify the default Bank Account to be used whenever an A/P open item is selected for payment during the current session. If you select a Bank Account then only the A/P open items with the same Currency as the Bank Account's Currency are displayed. If you do not use this default option, you must specify a Bank Account each time you select an A/P open item for payment.
To the far right of the screen, the following buttons are available:
- CLOSE
Closes the screen, returning you to the application desktop.
Runs the report associated with this screen.
- SELECT
Highlight an A/P open item and then click this button to manually review and select the Item for payment. This option brings you to the individual Select Payment screen, where you will find the full range of payment options.
- SELECT LINE
Highlight an A/P open item and then click this button to automatically select the open item for payment. Any available Terms Discount will also be applied automatically.
- CLEAR SELECTION
Highlight an A/P open item and then select this button to clear the selected payment. This option effectively reverses the action of the SELECT option.
- SELECT ALL DUE
Select this button to select for payment all A/P open items whose Payment Date is due or past due and whose Currency is the same as the Bank Account's Currency.
- SELECT ALL DISCOUNTS
Select this option to automatically select all A/P open items which are eligible for a Terms Discount and whose Currency is the same as the Bank Account's Currency. The Terms Discount will be applied automatically to all selected open items.
- CLEAR SELECTIONS
Select this button to clear all selected payments due. This option effectively reverses the action of the SELECT ALL DUE option.
To select for payment all A/P open items whose payment date is due or past due, choose the SELECT ALL DUE button. The following screen will appear:

When selecting for payment all A/P open items whose payment date is due or past due, you are presented with the following options:
- Bank Account
Specify the Bank Account to be used for paying all selected payments due.
To the far right of the screen, the following buttons are available:
- CANCEL
Closes the screen without specifying a Bank Account, returning you to the application desktop.
- SELECT
Select this button to use the specified Bank Account for paying payments due.
To select a individual A/P open item for payment, choose the SELECT button. The following screen will appear:
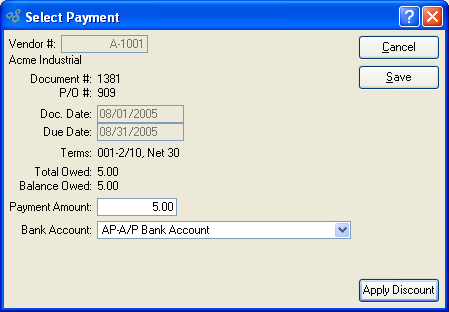
When specifying payment details for a selected A/P open item, you are presented with the following options:
- Vendor #
Displays the name of the Vendor who is owed payment.
- Document #
-
Displays the Document Number of the Document being selected for payment.
Valid Document Types include posted Vouchers and miscellaneous A/P Debit Memos.
- P/O #
Displays the Purchase Order Number (if any) of the Purchase Order associated with the Document.
- Doc. Date
-
Displays the Document's origination date.
In the case of a Voucher, the Document date is the same as the Invoice date.
- Due Date
-
Displays the date payment is due.
The due date is determined based on the billing Terms selected at the time the Document is posted.
- Terms
Displays the billing Terms selected at the time the Document was posted.
- Total Owed
-
Displays the total amount due to the Vendor.
The total owed is equal to the vouchered amount—or to the amount of the miscellaneous A/P Credit Memo at the time of posting.
- Balance Owed
-
Displays the balance due to the Vendor.
The balance owed will differ from the total owed if Discounts are applied based on the specified billing Terms.
- Payment Amount
Specify the amount to be paid to the Vendor. If a billing Terms Discount is applied, the payment amount will be reduced automatically by the Discount amount.
Note
The payment amount is the amount which appears on A/P Checks when they are created.
- Bank Account
Specify the Bank Account to be used for paying the A/P open item.
To the far right of the screen, the following buttons are available:
- CANCEL
Closes the screen without specifying payment details, returning you to the application desktop.
- SAVE
Creates and saves the payment details.
- APPLY DISCOUNT
Select to apply any billing Terms Discount you may be eligible for.
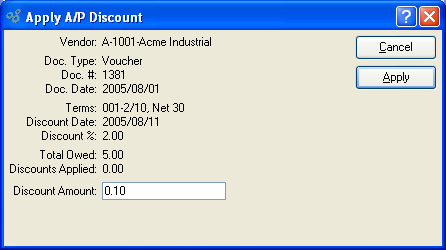
To apply a billing Terms Discount and have the Discount amount deducted from the total owed, select the APPLY DISCOUNT button. The following screen will appear:
Note
Discounts are posted to the General Ledger (G/L) when the Check they are associated with is posted. Any time prior to the posting of the Check, the Discount can be edited or reversed.
When applying a billing Terms Discount, you are presented with the following options:
- Vendor #
Displays the name of the Vendor who is owed payment.
- Doc. Type
Displays the Document Type. Valid Document Types include posted Vouchers and miscellaneous A/P Debit Memos.
- Doc #
Displays the Document Number of the Document being selected for payment.
- Doc. Date
Displays the Document's origination date. In the case of a Voucher, the Document date is the same as the Invoice date.
- Terms
Displays the billing Terms selected at the time the Document was posted.
- Discount Date
Displays the expiration date for the billing Terms Discount period. The Discount date will display in red type once the Discount period has expired. Once the Discount period has expired, the system will no longer automatically update the Discount amount field.
- Discount %
Displays the Discount percentage, as specified in the billing Terms.
- Total Owed
Displays the total amount due to the Vendor. The total owed is equal to the vouchered amount—or to the amount of the miscellaneous A/P Credit Memo at the time of posting.
- Discounts Applied
Displays the amount of any Discounts previously applied to the selected Document.
- Discount Amount
Enter the amount of the Discount to be applied to the total owed. As long as the Discount period has not expired, the system will automatically calculate the Discount amount for you. The Discount amount will be equal to the total owed multiplied by the Discount percentage. The Account used for posting Discounts to the General Ledger (G/L) is defined on the A/P Account Assignments screen.
To access the master list of selected payments, select the "List Selected Payments" option. The following screen will appear:
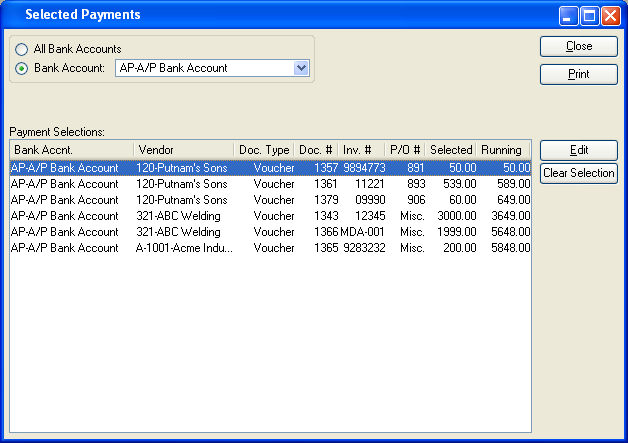
The "Selected Payments" screen displays information on all existing selected payments, including Bank Account to be paid from, Vendor name, Document Type, Document Number, Invoice Number, Purchase Order Number, amount selected for payment, and running total.
To the far right of the screen, the following buttons are available:
- CLOSE
Closes the screen, returning you to the application desktop.
Runs the report associated with this screen.
- EDIT
Enables you to edit highlighted selected payment. The edit screen is the same as that for creating new payment details—except that when editing, the fields will contain payment information. Double-clicking on a selected payment will also bring you to the editing screen.
- CLEAR SELECTION
Highlight a selected payment and then select this button to clear the selection. Because an Item that has been cleared is no longer selected for payment, this option removes the Item from the master list of selected payments.
To prepare a Check Run, select the "Prepare Check Run" option. The following screen will appear:

When preparing a Check Run, you are presented with the following options:
- Bank Account
Specify the Bank Account to be used for the Check Run.
- Check Date
Specify the date to appear on the Checks in the Check Run. By default, the current day's date will display. You may change the date in this field, thereby changing the date that will appear on the Checks being prepared.
To the far right of the screen, the following buttons are available:
- CANCEL
Closes the screen without preparing a Check Run, returning you to the application desktop.
- PREPARE
Prepares the Check Run.
For payments related to non-Inventory goods or services, you have the ability to create miscellaneous A/P Checks. You can write Checks to Vendors, Customers, or Tax Authorities. To create a miscellaneous Check, select the "Create Miscellaneous Check" option. The following screen will appear:
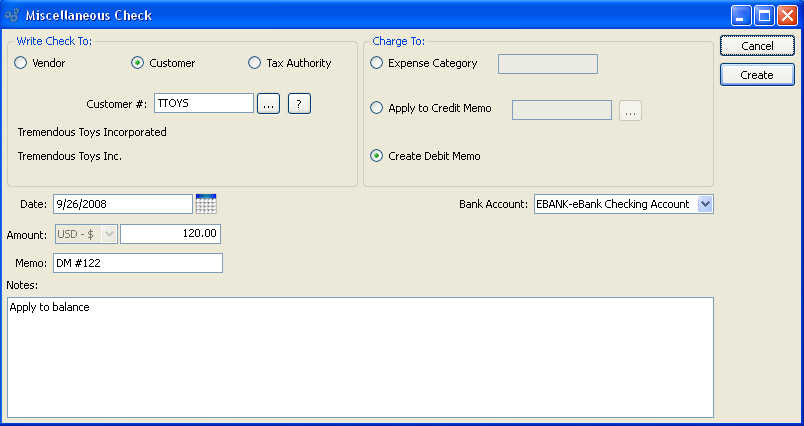
When creating a miscellaneous Check, you are presented with the following options:
- Write Check To:
-
Specify which type of recipient you want to write the miscellaneous Check to. Your options will vary depending on which type you select.
- Vendor
Select if you want to write a Check to a Vendor. Once selected, you must also specify the Vendor.
- Customer
Select if you want to write a Check to a Customer. Once selected, you must also specify the Customer.
- Tax Authority
Select if you want to write a Check to a Tax Authority. Once selected, you must also specify the Tax Authority.
- Charge To:
-
Specify how you want to handle the accounting for the miscellaneous Check. Your options will vary depending on the recipient type you choose.
- Expense Category
Specify the Expense Category you want to distribute the payment to. This option is available for all recipient types.
- Apply to Credit Memo
This option is available only for Checks to Customers. If selected, you can choose a Credit Memo from the Customer's open balance. Then, when the miscellaneous Check is posted, the open Credit Memo will automatically be closed. Use this feature for paying off and closing open Customer balances.
- Create Credit Memo
This option is available only for Checks to Vendors. Once the miscellaneous Check is posted, a Credit Memo in the Check amount will be created. This Credit Memo will offset your Accounts Payable for the specified Vendor. You would use this option, for example, to handle prepayments made to Vendors.
- Create Debit Memo
This option is available only for Checks to Customers. You would use this in the case where you lent a Customer money, with the expectation of billing them later.
- Date
Specify the date to appear on the miscellaneous Check.
- Amount
Specify the amount of the miscellaneous Check.
- Memo
Enter a Memo line to be included on the bottom portion of the printed miscellaneous Check.
- Bank Account
Specify the Bank Account you want to use for the miscellaneous Check.
- Notes
This is a scrolling text field with word-wrapping for entering Notes related to the miscellaneous Check.
To the far right of the screen, the following buttons are available:
- CANCEL
Closes the screen without creating a miscellaneous Check, returning you to the application desktop.
- CREATE
Creates the miscellaneous Check, using the specified parameters.
To view a detailed list of Checks prepared to be run, select the "View Check Run" option. The following screen will appear:
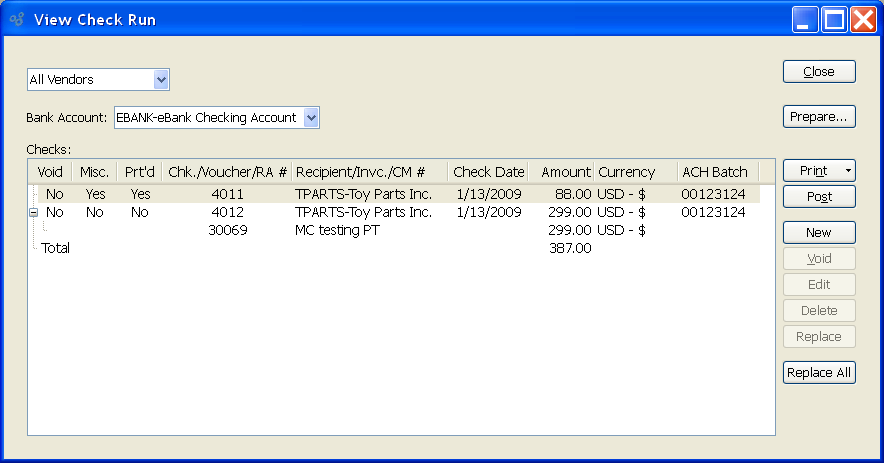
When viewing the detailed list of Checks prepared to be run, you are presented with the following options:
- Vendor
Select all or specific Vendors whose Checks you would like to view.
- Bank Account
Specify the Bank Account whose Check Run you want to view.
- Checks
Display lists details for Checks included in the Check Run. This display is a nested list, with a plus ("+") sign located to the far left of the display next to each Check. By clicking your mouse on a plus sign, you reveal lower levels of information related to the Check.
To the far right of the screen, the following buttons are available:
- CLOSE
Closes the screen, returning you to the application desktop.
- PREPARE
Select to prepare a Check Run. For more information on preparing Check Runs, see Section 9.1.4.3, “ Prepare Check Run”.
-
Select to print a copy of the list displayed on the screen.
- SELECTED CHECK
-
Highlight a Check in the list of Checks and then select this button to print the Check.
Tip
f Checks being printed contain reference lines which spill over and exceed one standard page, then consider using the report definition CheckMultiPage.xml. This Check Form is designed to support multiple pages for one Check number.
- CHECK RUN
Select to print the Check Run, using the specified Bank Account. For more information on printing Check Runs, see the Section 9.1.6.3, “ Print Check Run” section.
- EDIT LIST
Provides the option to select printer.
- POST
Highlight a Check in the list of Checks and then select this button to post the Check. A Check must be printed before it can be posted. See the "Printed" column in the display to determine a Check's printed status.
- VOID
Highlight a Check in the list of Checks and then select this button to void the Check. Voided Checks may not be printed or posted. When a Check is voided, the payable amount will be reopened on the Select Payments screen. In other words, if a Check for $100.00 is voided, that amount will once again be made available for payment on the Select Payments screen. The reopened amount will again be associated with the referring payable Document (i.e., Voucher or Debit Memo).
- EDIT
-
Highlight a miscellaneous Check and then select this button to edit the Check. Only unprinted miscellaneous Checks may be edited.
Note
Only unprinted miscellaneous Checks may be edited. Regular Checks may not be edited.
- DELETE
Highlight a voided Check in the list of Checks and then select this button to delete the Check. Only voided Checks may be deleted.
- REPLACE
Highlight a voided Check in the list of Checks and then select this button to replace the Check. Checks must be voided before they can be replaced. When a voided Check is replaced, the payable amount displayed on the Select Payments screen will be removed. In other words, if a voided Check for $500.00 is replaced, that amount will no longer be available for payment on the Select Payments screen.
- REPLACE ALL
Select this button to replace all Checks shown in the list of Checks. Checks must be voided before they can be replaced.
You may occasionally have a need to void an entire Check Run—if, for example, you print the Check Run on the wrong kind of paper, etc. To void a Check Run, select the "Void Check Run" option. The following screen will appear:

When voiding a Check Run, you are presented with the following options:
- Bank Account
Specify the Bank Account whose associated Check Run you want to void.
- First Check #
Displays the first Check Number in the Check Run for the specified Bank Account.
- # of Checks to Void
Indicates the number of Checks in the Check Run to be voided. Check Numbers increment in intervals of one (1) beginning with the first Check Number displayed above.
To the far right of the screen, the following buttons are available:
- CANCEL
Closes the screen without voiding the Check Run, returning you to the application desktop.
- VOID
Voids the Check Run, using the specified parameters.
To post an individual Check, select the "Post A/P Check" option. The following screen will appear:

When posting an individual Check, you are presented with the following options:
- Bank Account
Specify the Bank Account for the Check you want to post.
- Check #
Specify the number of the Check you want to post. Only printed Checks from prepared Check Runs associated with the specified Bank Account will appear in the list.
To the far right of the screen, the following buttons are available:
- CANCEL
Closes the screen without posting a Check, returning you to the application desktop.
- POST
Posts the Check, using the specified parameters.
To post multiple Checks, select the "Post A/P Checks" option. The following screen will appear:

When posting multiple Checks, you are presented with the following options:
- Bank Account
Specify the Bank Account for the multiple Checks you want to post.
- Number of Unposted Checks
Displays the total number of unposted Checks.
To the far right of the screen, the following buttons are available:
- CANCEL
Closes the screen without posting a Check, returning you to the application desktop.
- POST
Posts the Check, using the specified parameters.