Journal Entry section.
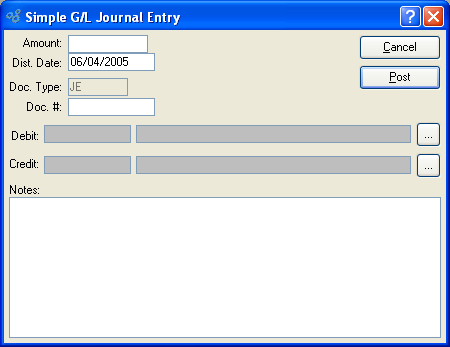
To manually create a simple G/L journal entry, select the "Simple Journal Entry" option. The following screen will appear:

When creating a simple G/L journal entry, you are presented with the following options:
- Amount
Specify the monetary value of the transaction.
- Dist. Date
Specify the date when you want the simple journal entry to be posted to the General Ledger.
- Doc. Type
Displays the system-defined document type (i.e., "JE") used to identify simple journal entries in the General Ledger.
- Doc. Number
Specify a Document Number to be associated with the transaction.
- Debit
Specify the Debit Account to be used for the transaction record.
- Credit
Specify the Credit Account to be used for the transaction record.
- Notes
This is a scrolling text field with word-wrapping for entering Notes related to the transaction. This may be a required field, depending on your system configuration.
Note
Your system may be configured to require Notes whenever manual journal entries are posted.
To the far right of the screen, the following buttons are available:
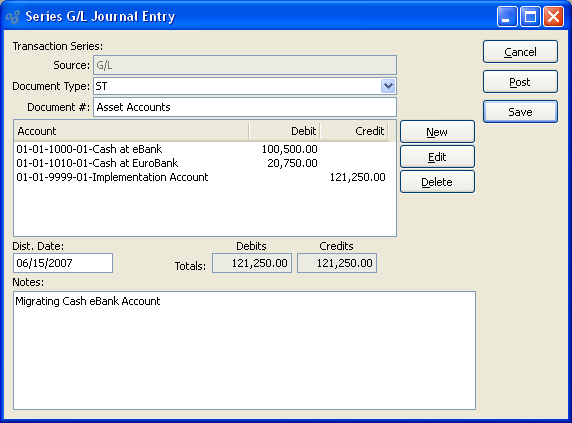
To create a series of G/L transactions, select the "Series Entry" option. The following screen will appear:

When creating a series of G/L transactions, you are presented with the following options:
- Source
Displays the source module for the transaction.
- Document Type
-
Specify a General Ledger Transaction Type for classifying the series entry.
By default, the Journal Entry (JE) Transaction Type will be used. However, you may select a different type. See Appendix A, Appendix A.
- Document #
Enter a Document Number to identify the transaction.
- Transaction Series
Display lists transactions in the transaction series.
- Totals
-
Displays the following information:
Debits: Displays total Debits associated with the series. Totals will display in red if Debits and Credits do not balance.
Credits: Displays total Credits associated with the series. Totals will display in red if Debits and Credits do not balance.
- Dist. Date
Specify the date when you want the series journal entry to be posted to the General Ledger.
- Notes
This is a scrolling text field with word-wrapping for entering Notes related to the transaction. This may be a required field, depending on your system configuration.
Note
Your system may be configured to require Notes whenever manual journal entries are posted.
To the far right of the screen, the following buttons are available:
- NEW
Opens screen for creating a new transaction.
- EDIT
Enables you to edit highlighted transaction. The edit screen is the same as that for creating a new transaction—except that when editing, the fields will contain transaction information. Double-clicking on a transaction will also bring you to the editing screen.
- VIEW
Highlight a transaction and then select this button to reach a read-only view of the "Edit" screen.
- DELETE
Highlight a transaction and then select this button to remove the transaction from the list.
- CANCEL
Closes the screen without creating a transaction series, returning you to the previous screen.
Note
Series entries are always summary posted. In other words, if multiple entries are made for the same Account Number, the balance or summary of these entries will be posted—not each individual entry.
- SAVE
Select if you want to save the series transaction for posting at a later time.
To add a new G/L transaction to the series, select the NEW button. The following screen will appear:

When adding a new G/L transaction item to the series, you are presented with the following options:
- Amount
Specify the monetary value of the transaction item.
- Sense
-
Choose one of the following options:
Debit: Select if transaction item Debits specified Account.
Credit: Select if transaction item Credits specified Account.
- Account
Specify the Account to be used for the transaction item record.
To the far right of the screen, the following buttons are available:
- CANCEL
Closes the screen without adding a new transaction item to the series, returning you to the previous screen.
- SAVE
Creates the transaction item and adds it to the series.
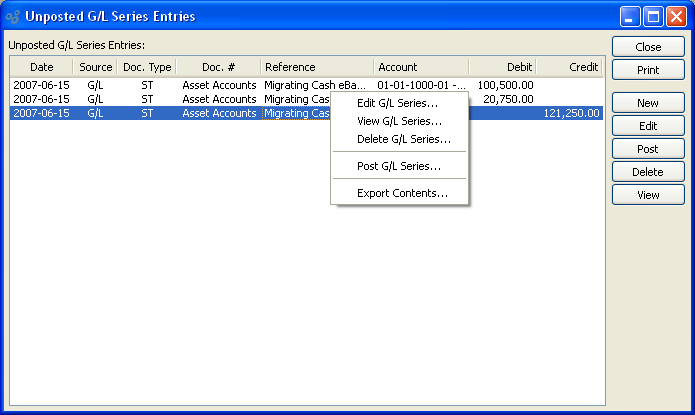
To display unposted G/L Series Journal Entries, select the "List Unposted Journal Entries" option. The following screen will appear:

The "Unposted G/L Series Entries" screen displays information on all unposted G/L Series Journal Entries, including distribution date, source module, Document Type, Document Number, reference, Account Number of first Account in series, Debit amount, and Credit amount.
Tip
You may select multiple G/L Series Journal Entries for posting by highlighting them using your mouse—or a combination of your mouse and either the SHIFT or CTRL keys.
To the far right of the screen, the following buttons are available:
- CLOSE
Closes the screen, returning you to the application desktop.
Runs the report associated with this screen.
- NEW
Opens screen for creating a new G/L Series Journal Entry.
- EDIT
Enables you to edit highlighted G/L Series Journal Entries. The edit screen is the same as that for creating a new G/L Series Journal Entry—except that when editing, the fields will contain G/L Series Journal Entry information. Double-clicking on a G/L Series Journal Entry will also bring you to the editing screen.
- POST
Highlight one—or multiple—G/L Series Journal Entries, then select this button to post the selected G/L Series Journal Entries.
Right-clicking on an unposted Voucher in the list of unposted Voucher enables you to select from the following menu options:
- Edit G/L Series
Enables you to edit highlighted G/L Series Journal Entries. The edit screen is the same as that for creating a new G/L Series Journal Entry—except that when editing, the fields will contain G/L Series Journal Entry information. Double-clicking on a G/L Series Journal Entry will also bring you to the editing screen.
- View G/L Series
Highlight a G/L Series Journal Entry and then select this button to reach a read-only view of the "Edit" screen.
- Delete G/L Series
Highlight a G/L Series Journal Entry and then select this button to remove the G/L Series Journal Entry from the list.