To configure the Inventory module, select the "Configure Inventory" option. The following screen will appear
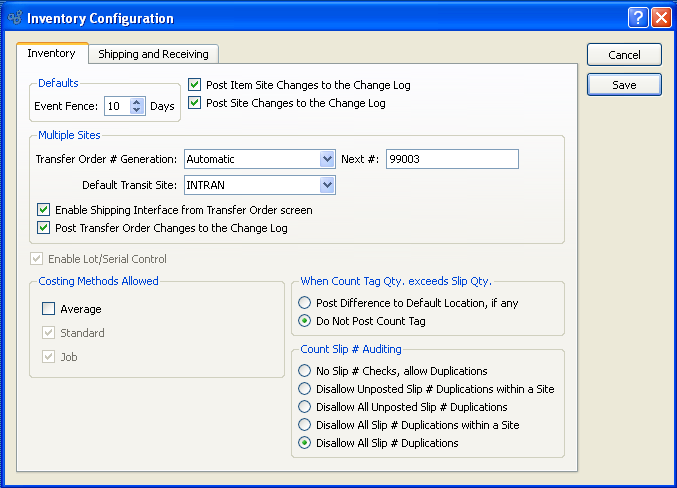
When configuring the Inventory module, you are presented with the following options:
- Defaults
-
Specify a default Event Fence:
- Event Fence
Select a value between 0 and 999 using the arrow buttons located to the right of the field. Indicates the Event Fence value that will appear by default whenever a new Item Site is created. The value is measured in days.
- Post Item Site Changes to the Change Log
Select to post to the Change Log any changes made to Item Site masters.
- Post Site Changes to the Change Log
Select to post to the Change Log any changes made to Site masters.
- Enable Multiple Sites
Select to allow more than one Site to be entered in the system. If multiple Sites are not enabled, your system will be single Site only. Users will be prevented from creating more than one Site. If your system has multiple Sites defined, this option will be hidden.
- Transfer Order # Generation
-
If multiple Sites are enabled, select one of the available Transfer Order Number generation methods:
- Automatic
Transfer Order Numbers will be automatically incremented by 1 each time a new Transfer Order is created. These automatically-generated numbers may not be edited. They are read-only.
- Manual
Transfer Order Numbers must be entered manually whenever you create a new Transfer Order.
- Automatic, Allow Override
Transfer Order Numbers will be automatically generated and incremented, as under the "Automatic" option described above. However, this option also allows you to manually override the Transfer Order Number at the time of Transfer Order creation.
- Next #
The next sequentially available Transfer Order Number will display here. You may change the number—creating a new basis for the next Transfer Order Number—by typing the new number into this field. Any changes you make here will be reflected the next time a new Transfer Order is created.
- Default Transit Site
If multiple Sites are enabled, specify the default Transit Site. The specified Site will be pre-selected by default whenever Transfer Orders are entered.
- Enable Lot/Serial Control
Select to enable Lot/Serial tracking capability in the system. If not selected, users will be prevented from creating Item Sites having either the Lot or Serial control method. Without the ability to create Lot/Serial Item Sites, the Lot/Serial tracking capability is disabled. If your system has Lot/Serial Item Sites defined, this option will be hidden.
- Costing Methods Allowed
-
Select any or all of the available methods to value inventory transactions for an Item Site. If any Item Sites exist for a particular Cost Method, that Cost Method is disabled to prevent unselecting.
- Average
Cost distributions for an Item Site is based on an average of all costs accumulated for the Item Site. The Quantity on Hand of Item Sites defined with this Cost Method will not be allowed to go negative.
- Standard
Cost distributions for an Item Site is based on the Standard Cost posted for the Item.
- Job
Cost distributions for an Item Site is based on actual accumulation of costs on a Work Order. This Cost Method is used exclusively by Items with Type of "Job".
- When Count Tag Qty. exceeds Slip Qty
-
Select one of the following options for handling discrepancies in count quantities:
- Post Difference to Default Location, if any
Select to post excess Count Tag quantity to an Item's default location if the Item's Count Tag quantity exceeds its Count Slip quantity. Applies only if a default location has been defined for the Item. Default locations are defined for an Item in the Item Site record.
- Do Not Post Count Tag
Select to prevent Count Tag quantity from being posted if it exceeds the Item's Count Slip quantity.
Note
By default, the system allows only one unposted Count Tag per Item Site. If an unposted Count Tag already exists for an Item Site, then an additional duplicate Count Tag may not be added.
- Count Slip # Auditing
-
Select one of the following Count Slip number auditing methods:
- No Slip # Checks, allow Duplications
Allows any Count Slip numbers to be used. Duplicate Count Slip numbers will also be allowed.
- Disallow Unposted Slip # Duplications within a Site
Prevents duplicate "Unposted" Count Slip numbers from existing within a given Site. However, duplicate "Unposted" Count Slip numbers may exist within multiple Sites.
- Disallow All Unposted Slip # Duplications
Prevents duplicate "Unposted" Count Slip numbers from existing within multiple Sites.
- Disallow All Slip # Duplications within a Site
Prevents duplicate Count Slip numbers from existing within a given Site. However, duplicate Count Slip numbers may exist within multiple Sites.
- Disallow All Slip # Duplications
Prevents duplicate Count Slip Numbers from existing within multiple Sites.
To configure the Inventory Shipping and Receiving options, select the "Shipping and Receiving" tab. The following screen will appear:
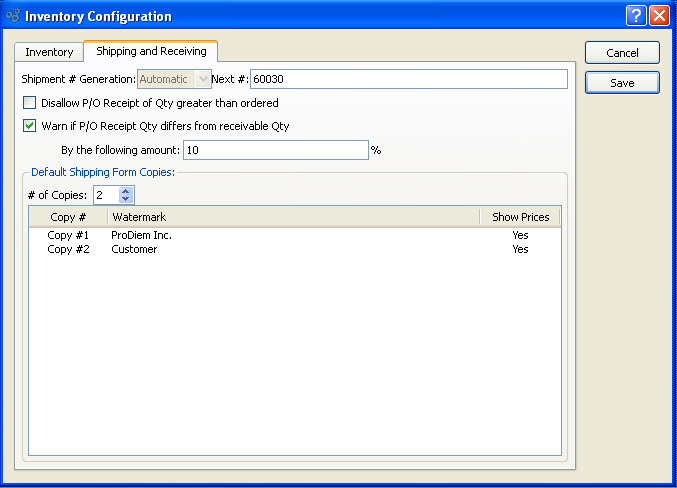
When configuring Shipping and Receiving, you are presented with the following options:
- Shipment # Generation
By default, Shipment Numbers are generated automatically.
- Next #
Enter the next Shipment Number to be used. The system assigns Shipment Numbers to Sales Order Line Item quantities when stock is issued to Shipping. All stock at Shipping for an individual Sales Order is assigned the same Shipment Number. If no stock is already at Shipping, then a new Shipment Number will be used.
- Disallow P/O Receipt of Qty greater than ordered
Select to ensure the maximum receiving quantity does not exceed the quantity ordered. If selected, the system will prevent users from receiving more Purchase Order Line Item quantity than the quantity ordered. Not selecting this option means users will be allowed to receive quantity in excess of the quantity ordered.
- Warn if P/O Receipt Qty differs from receivable Qty
-
Select to generate a warning message if the entered quantity to receive does not match the quantity remaining to be received. The warning message will alert users that a difference exists. However, it will not prevent users from continuing.
- By the following amount:
Specify the percentage difference between Receipt quantity and receivable quantity which when reached should trigger a warning message.
- Default Shipping Form Copies
-
Indicate the number of Shipping Form copies you want to print by default:
- # of Copies
Specify the number of miscellaneous copies you want to print. Information about the specified copies will display below. To add a Watermark, double-click on a copy line.
To the far right of the screen, the following buttons are available:
- CANCEL
Cancels any configuration settings, returning you to the application desktop.
- SAVE
Saves the configuration settings, returning you to the application desktop.