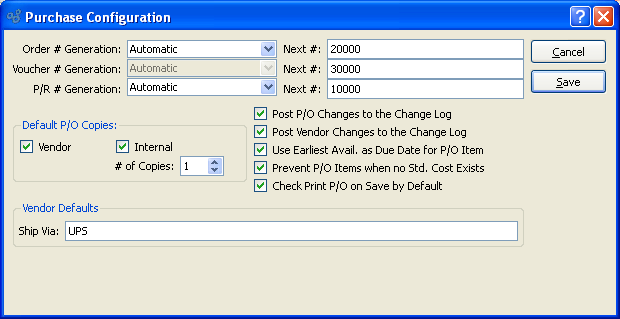
To configure the Purchase module, select the "Configure Purchase" option. The following screen will appear:

When configuring the Purchase module, you are presented with the following options:
- Order # Generation
-
Specify one of the available Purchase Order Number generation methods:
- Automatic
Purchase Order Numbers will be automatically incremented by 1 each time a new Purchase Order is created. These automatically-generated numbers may not be edited. They are read-only.
- Manual
Purchase Order Numbers must be entered manually whenever you create a new Purchase Order.
- Automatic, Allow Override
Purchase Order Numbers will be automatically generated and incremented, as under the "Automatic" option described above. However, this option also allows you to manually override the Purchase Order Number at the time of Purchase Order creation.
- Next #
The next sequentially available Purchase Order Number will display here. You may change the number—creating a new basis for the next Purchase Order Number—by typing the new number into this field. Any changes you make here will be reflected the next time a new Purchase Order is created in the P/O module.
- Voucher # Generation
By default, Voucher Numbers are automatically generated. This system setting cannot be changed.
- Next #
The next sequentially available Voucher Number will display here. You may change the number—creating a new basis for the next Voucher Number—by typing the new number into this field. Any changes you make here will be reflected the next time a new Voucher is created in the P/O module.
- P/R # Generation
-
Select one of the available Purchase Request Number generation methods:
- Automatic
Purchase Request Numbers will be automatically incremented by 1 each time a new Purchase Request is created. These automatically-generated numbers may not be edited. They are read-only.
- Manual
Purchase Request Numbers must be entered manually whenever you create a new Purchase Order.
- Automatic, Allow Override
Purchase Request Numbers will be automatically generated and incremented, as under the "Automatic" option described above. However, this option also allows you to manually override the Purchase Request Number at the time of Purchase Request creation.
- Next #
The next sequentially available Purchase Request Number will display here. You may change the number—creating a new basis for the next Purchase Request Number—by typing the new number into this field. Any changes you make here will be reflected the next time you issue a new Purchase Request within the P/O module.
- Default P/O Copies
-
Indicate the copies you want to print.
- Vendor
Select to print one Vendor copy.
- Internal
Select to print a specified number of internal copies. When you select this option, the "# of Copies" field will be enabled.
- # of Copies
Specify the number of copies you want to print.
- Post P/O Changes to the Change Log
Select to post to the Change Log any changes made to Purchase Orders.
- Post Vendor Changes to the Change Log
Select to post to the Change Log any changes made to Vendor masters.
- Use Earliest Avail. as Due Date for P/O Item
Select to use Item Source Earliest Available dates as the default due date when entering manual Purchase Order Line Items. If not selected, the due date field will be left blank when entering Purchase Order Line Items—requiring users to enter the date manually. Earliest Available dates are determined by adding Item Source Lead Times to the current date.
Note
The "Use Earliest Avail." option applies only to Purchase Orders entered manually. This option does not impact the scheduling of POs generated from MRP Planned Orders.
- Prevent P/O Items when no Std. Cost Exists
Select if you want to prevent users from entering Purchase Order Line Items for Items which have no Standard Cost. If selected, users will be shown a message stating the problem. The solution is to add Standard Cost to the Item(s) in question.
- Check Print P/O on Save by Default
Select to prompt users to print Purchase Orders whenever Purchase Orders are saved. If selected, users will be presented with a Purchase Order print screen whenever a Purchase Order is saved. To bypass this feature, do not select this option.
To the far right of the screen, the following buttons are available:
- CANCEL
Cancels any configuration settings, returning you to the application desktop.
- SAVE
Saves the configuration settings, returning you to the application desktop.