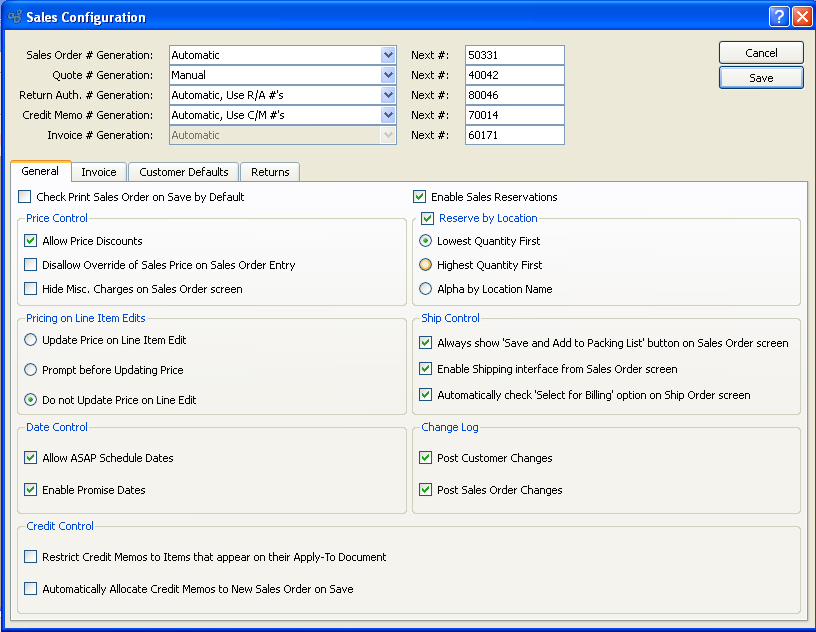
To configure the Sales module, select the "Configure Sales" option. The following screen will appear:
When configuring the S/O module, you are presented with the following options:
- Sales Order # Generation
-
Select one of the available Sales Order Number generation methods:
- Manual
Sales Order Numbers must be entered manually whenever you create a new Sales Order.
- Automatic
Sales Order Numbers will be automatically incremented by 1 each time a new Sales Order is created. These automatically-generated numbers may not be edited. They are read-only.
- Automatic, Allow Override
Sales Order Numbers will be automatically generated and incremented, as under the "Automatic" option described above. However, this option also allows you to manually override the Sales Order Number at the time of Sales Order creation.
- Next #
The next sequentially available Sales Order Number will display here. You may change the number—creating a new basis for the next Sales Order Number—by typing the new number into this field. Any changes you make here will be reflected the next time a new Sales Order is created in the S/O module.
- Quote # Generation
-
Select one of the available Quote Number generation methods:
- Manual
Quote Numbers must be entered manually whenever you create a new Quote.
- Automatic, Use Quote #'s
Quote Numbers will be automatically incremented by 1 each time a new Quote is created. These automatically-generated numbers may not be edited. They are read-only.
- Automatic, Use Quote #'s, Allow Override
Quote Numbers will be automatically generated and incremented, as under the "Automatic" option described above. However, this option also allows you to manually override the Quote Number at the time of Quote creation.
- Automatic, Use S/O #'s
Quote Numbers will be automatically incremented by 1 each time a new Quote is created, using the same number generation method specified for the creation of Sales Order Numbers. These automatically-generated numbers may not be edited. They are read-only.
- Next #
The next sequentially available Quote Number will display here. You may change the number—creating a new basis for the next Quote Number—by typing the new number into this field. Any changes you make here will be reflected the next time a new Quote is created in the S/O module.
- Return Auth. # Generation
-
Select one of the available Return Authorization Number generation methods:
- Manual
Return Authorization Numbers must be entered manually whenever you create a new Return Authorization.
- Automatic, Use R/A #'s
Return Authorization Numbers will be automatically incremented by 1 each time a new Return Authorization is created. These automatically-generated numbers may not be edited. They are read-only.
- Automatic, Use R/A #s, Allow Override
Return Authorization Numbers will be automatically generated and incremented, as under the "Automatic" option described above. However, this option also allows you to manually override the Return Authorization Number at the time of Return Authorization creation.
- Credit Memo # Generation
-
Select one of the available Credit Memo Number generation methods:
- Manual
Credit Memo Numbers must be entered manually whenever you create a new Credit Memo.
- Automatic, Use C/M #'s
Credit Memo Numbers will be automatically incremented by 1 each time you issue a new Credit Memo. These automatically-generated numbers may not be edited. They are read-only.
- Automatic, Use C/M #"s, Allow Override
Credit Memo Numbers will be automatically generated and incremented, as under the "Automatic" option described above. However, this option also allows you to manually override the Credit Memo Number at the time of Credit Memo creation.
- Automatic, Use S/O #'s
Credit Memo Numbers will be automatically incremented by 1 each time a new Credit Memo is created, using the same number generation method specified for the creation of Sales Order Numbers. These automatically-generated numbers may not be edited. They are read-only.
- Next #
The next sequentially available Credit Memo Number will display here. You may change the number—creating a new basis for the next Credit Memo Number—by typing the new number into this field. Any changes you make here will be reflected the next time you issue a new Credit Memo within the S/O module.
- Invoice # Generation
By default, Invoice Numbers are automatically generated. This system setting cannot be changed.
- Next #
The next sequentially available Invoice Number will display here. You may change the number—creating a new basis for the next Invoice Number—by typing the new number into this field. Any changes you make here will be reflected the next time you create a new Invoice within the S/O module.
To establish general settings for the S/O module, select the "General" tab. The following options will appear:
- Check Print Sales Order on Save by Default
Select to prompt users to print Sales Orders whenever Sales Orders are saved. If selected, users will be presented with a Sales Order print screen whenever a Sales Order is saved. To bypass this feature, do not select this option.
- Price Control
-
Select from the following price control options:
- Allow Price Discounts
Check this option to allow pricing discounts for select customers. This option instructs the system to verify whether any Pricing Discounts have been established for a Customer, prior to calculating the Line Item Price for of an Item within a Sales Order. If this option is unchecked, then the system will apply the full List Price for an Item within a Sales Order.
- Disallow Override of Sales Price on Sales Order Entry
Select to prevent all users from overriding the Sales Price when entering Sales Order Line Items. This is a system-wide setting, affecting all users. Do not select this option if you want to selectively prevent users from overriding Sales Prices. Individual users may be granted the ability to override Sales Prices, use the S/O module's OverridePrice privilege.
- Hide Misc. Charges on Sales Order screen
Select to hide all fields related to Miscellaneous Charges on the Sales Order Line Item tab. If your site does not use Misc. Charges when entering Sales Orders, it may make sense to hide this functionality to avoid confusion.
- Pricing on Editing Line Items
-
Select one of the following as your preferred response when users change Sales Order Line Item quantities:
- Update Price on Line Item Edit
If selected, the system will automatically update the Net Unit Price for the Line Item, adjusting to accommodate the newly-entered quantity.
- Prompt before Updating Price
If selected, the system will ask users if they want to update the Net Unit Price (YES/NO). If they answer "YES" because they do want to update the Price, then they will have to manually make the Price adjustment.
- Do not Update Price on Line Edit
-
If selected, the Net Unit Price will not be changed when Line Item quantity is changed on EDIT—and users will not be prompted to consider changing the Price.
Note
The Sales Order Line Item pricing options apply only when editing Line Item quantity.
- Date Control
-
Select from the following date control options:
- Allow ASAP Schedule Dates
-
Selecting this option will cause Sales Order Line Items to default to the current date if no schedule date is entered.
Note
The allocation of available Credit Memos occurs only once—when a Sales Order is saved for the first time. Subsequent saves will not result in additional allocations.
- Enable Promise Dates
Select to display a Promised Date field on the Sales Order Line Item screen, by default. If not selected, there will be no Promised Date field shown on that screen.
- Enable S/O Reservations
Select to enable the Sales Order Reservations functionality system-wide. This feature allows for the hard allocation of quantity to Sales Orders. If not selected, the Sales Order reservation options will be hidden from view.
- Reserve by Location
-
Select to set S/O Reservations for discrete locations and lots. The hard allocation of quantity will be for particular locations and will prevent other orders from issuing reserved inventory. The S/O Pick List will print the reserved location to expedite inventory picking. You may choose the order of precedence for selecting locations; Lowest Quantity First, Highest Quantity First, or Alpha by Location Name.
- Lowest Quantity First
Locations for the Item will be sorted ascending by quantity. Reservations will start with the Location with the lowest quantity and continue until the quantity required is fully reserved or there is insufficient quantity on hand.
- Highest Quantity First
Locations for the Item will be sorted descending by quantity. Reservations will start with the Location with the highest quantity and continue until the quantity required is fully reserved or there is insufficient quantity on hand.
- Alpha by Location Name
Locations for the Item will be sorted ascending alphabetically by the Location Name. Reservations will start with the first Location and continue until the quantity required is fully reserved or there is insufficient quantity on hand.
Note
The change of Reserve by Location from a state of enabled to disabled will remove all location reservations.
- Ship Control
-
Select from the following ship control options:
- Always show "Save and Add to Packing List" button on Sales Order screen
Select if you want the SAVE AND ADD TO PACKING LIST button to always be displayed on the Sales Order header screen. If this option is not selected, the SAVE AND ADD TO PACKING LIST button will only be displayed for newly-entered Sales Orders which have not yet been saved.
- Enable Shipping interface from Sales Order screen
Select to enable the performance of limited Shipping functionality from the Sales Order header. If selected, users will be able to issue Stock to Shipping and also return Stock from Shipping directly from the Sales Order header. If not selected, these Shipping options will not be available on the Sales Order header.
- Automatically check "Select for Billing" option on Ship Order screen
Select if you want the "Select for Billing" option to be selected by default whenever you ship Sales Order Line Items. Selecting this option reduces steps in the billing process. Specifically, if an Order is selected for billing when it is shipped, you do not then have to take the extra step of independently selecting the Order for billing. This can save time and also ensure your shipped Orders are selected for billing at the time of shipment.
- Change Log
-
Select from the following change log options
- Post Customer Changes to the Change Log
Select to post to the Change Log any changes made to Customer masters.
- Post Sales Order Changes to the Change Log
Select to post to the Change Log any changes made to Sales Orders.
- Credit Control
-
Select from the following credit control options:
- Restrict Credit Memos to Items that appear on their Apply-To Document
Select if you want to restrict Credit Memo Items to their Apply-To Document. Selecting this option narrows the Credit Memo Item selection process to only those Items which appeared on the Invoice the Credit Memo is being applied to. If not selected, a sold Item master list will appear instead when selecting Credit Memo Items for Credit Memos applied to a specific Invoice. This setting has no bearing on unapplied Credit Memos.
- Automatically Allocate Credit Memos to New Sales Order on Save
Select to have open Credit Memos for a Customer automatically allocated to any new Sales Orders entered for that Customer. This functionality helps reduce Customer credit balances by ensuring that Customer credits are consumed when new Sales Orders are entered. Any available, open Credit Memos are eligible for allocation. The allocation of available Credit Memos occurs only once—when a Sales Order is saved for the first time. Subsequent saves will not result in additional allocations. Credit Memos which have been allocated to a Sales Order are applied at the point when the Invoice resulting from the Sales Order is posted. Once the full balance of a Credit Memo has been applied, the Credit Memo is then closed. The printed Invoice the Customer receives will indicate whether Credit Memos have been applied. In addition, the total due from the Customer will be automatically adjusted to reflect any applied credits.
To the far right of the screen, the following buttons are available:
- CANCEL
Cancels any configuration settings, returning you to the application desktop.
- SAVE
Saves the configuration settings, returning you to the application desktop.
To establish Invoice and Credit Memo settings, select the "Invoice" tab. The following screen will appear:
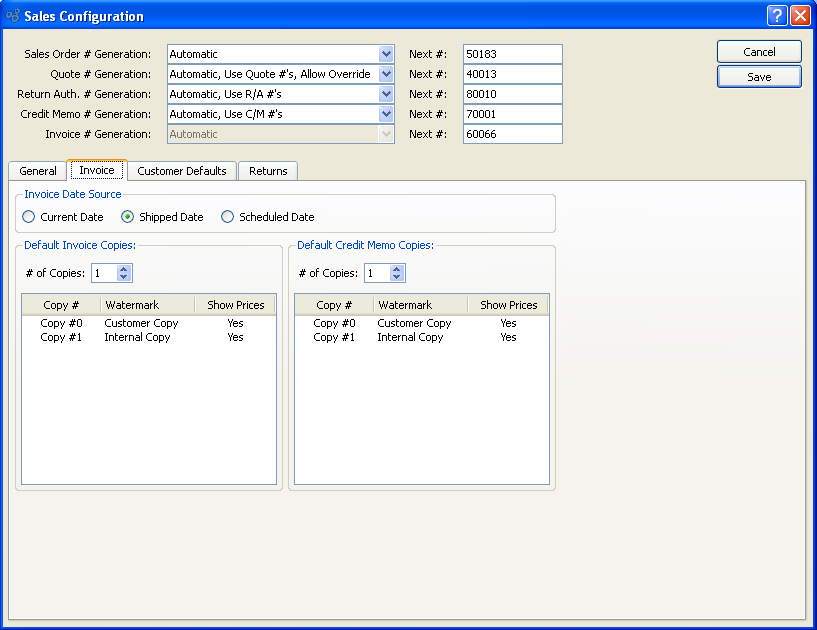
When establishing Invoice and Credit Memo settings, you are presented with the following options:
- Invoice Date Source
-
Select one of the following Invoice date options:
- Current Date
If selected, the Invoice date on the Invoice header will be the same date as the Sales order date.
- Shipped Date
If selected, the Invoice date on the Invoice header will be the same date as the Sales Order ship date.
- Scheduled Date
If selected, the Invoice date on the Invoice header will be the same date as the Sales Order scheduled date.
- Default Invoice Copies
-
Indicate how you want invoice copies to print.
- # of Copies
Indicate the number of copies you want to print. Information about the specified copies will display below.
- Default Credit Memo Copies
-
Indicate how you want credit memo copies to print.
- # of Copies
Indicate the number of copies you want to print. Information about the specified copies will display below.
To establish default settings to be used whenever new Customers are entered, select the "Customer Defaults" tab. The following screen will appear:
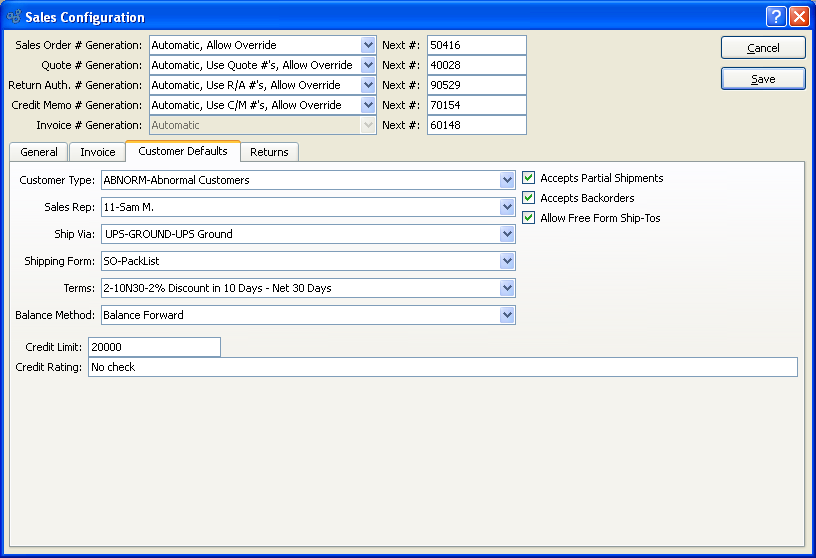
When establishing Customer master default settings, you are presented with the following options:
- Customer Type
Specify a default Customer Type to be used whenever new Customers are created. The default Customer Type may be changed when entering or editing new Customers.
- Sales Rep
Specify a default Sales Representative to be used whenever new Customers are created. The Sales Rep may be changed when entering or editing new Customers.
- Ship Via
Specify a default Ship Via.
- Shipping Form
Specify a default Shipping Form.
- Terms
Specify the default billing Terms to be used whenever new Customers are created. The default Terms may be changed when entering or editing new Customers.
- Balance Method
Specify a default procedure for handling cash receipts from Customers. This notation is informational only. Balance Forward: Select to apply cash receipts to the Customer's current balance due.
- Credit Limit
Specify the default credit limit to be used for all Customers.
- Credit Rating
Specify the default credit rating to be used for all Customers.
- Accepts Partial Shipments
Select to indicate Customers accept partial shipments by default.
- Accepts Backorders
Select to indicate Customers accept backorders by default.
- Allow Free Form Ship-Tos
Select to indicate Customers allow free-form Ship-Tos by default. This default appears on the Customer master.
To define your system's Return Authorization configuration, select the "Return" tab. The following screen will appear:
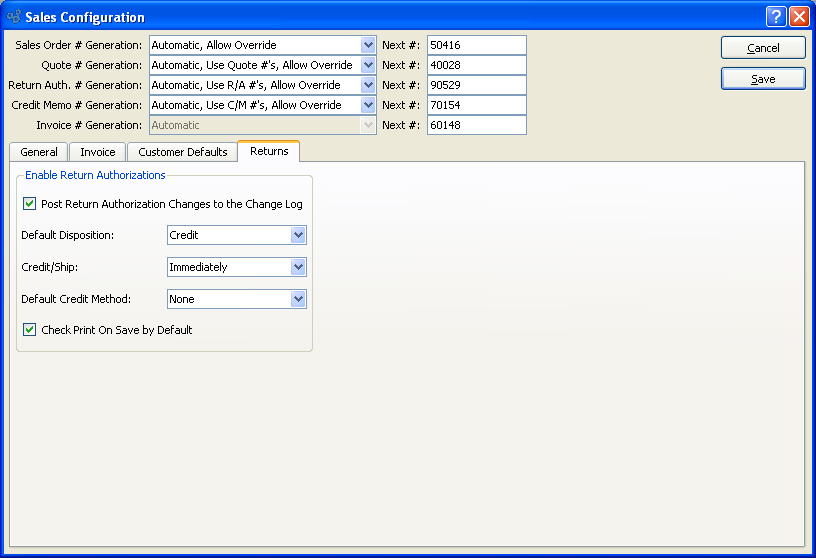
Returns Configuration Options
When configuring Return Authorization settings, you are presented with the following options:
- Enable Return Authorizations
Select to enable the system's Return Authorizations capability. If not selected, users will be prevented from performing any tasks related to Return Authorizations—and related functionality will be hidden from view. For systems where Return Authorizations are enabled, this option will be hidden.
- Post Return Authorization Changes to the Change Log
Select to record changes made to Return Authorizations in the Return Authorization change log. If not selected, the Return Authorization changelog will not contain change information.
- Default Disposition
-
Specify one of the following default methods for handling Return Authorizations:
- Credit
Select if, by default, you want to issue credit to Customers for authorized Line Items and quantities. No return is required or expected. Return Authorization Line Items will close when an associated Credit Memo is posted.
- Return
Select if, by default, you want to authorize returns from Customers. Return Authorization Items will close when an associated Credit Memo is posted, or when all Items on a line have been returned, whichever comes last.
- Replace
Select if, by default, you want to replace Items returned by Customers. Authorized quantities will be added as additional order quantity to an associated Sales Order line, which in turn should be reopened if closed. Return Authorization Items will close when all Items on the line have been returned or all authorized Items on the line have been shipped, whichever comes last. No money should be involved when invoicing replacement Items.
- Service
Select if, by default, you want to repair or service Items returned by Customers. Service or repair items will first be received by a Return Authorization. Then a new Sales Order with linked Work Order(s) will be created to track work and shipping on the repair or service. The new Sales Order will be on RMA Hold until Items have been received by the Return Authorization.
- Substitute
Select if, by default, you want to authorize the substitution of Items returned by Customers. Under this option, when an original Sales Order is imported into the Return Authorization, the Return Authorization Line Items will default to the Return disposition. Any new Line Items added beyond the original ones will have a default disposition of Ship.
- Credit/Ship
-
Specify the default timetable for Customer credits and/or returns:
- Immediately
Select to issue credit or send returns to Customers immediately by default.
- Upon Receipt
Select to issue credit or send returns to Customers only after you have received returned goods from them by default.
- Default Credit Method
-
Specify one of the following default credit method options:
- None
Select if, by default, you do not issue credit for Customer returns.
- Credit Memo
Select if, by default, you credit Customer returns with a Credit Memo to the Customer's account. This option will result in the automatic creation of a sales Credit Memo.
- Check
Select if, by default, you credit Customer returns by sending them a Check. This option will create a Credit Memo, then a Misc. Check that applies to the Credit Memo.
- Credit Card
Select if, by default, you credit Customer returns with a refund on their Credit Card.