Setting up the default Account Number structure is one of the primary purposes of the General Ledger Configuration. The system uses a multi-segment approach to defining General Ledger accounts. The various segments include the following:
Base Account Segment
Company Segment
Profit Center
Subaccount
Depending on the parameters selected, the system will display General Ledger Account Numbers in the Profit Center-Account Number-Subaccount sequence. An example of this sequence would be 001-11111-001.
Tip
It is important to realize that the system does not utilize sub-Accounts in the same manner that some other packaged software does. It does not roll-up into the base account, but allows you to define "related" Accounts.
To configure the General Ledger, select the "General Ledger" tab. The following screen will appear:
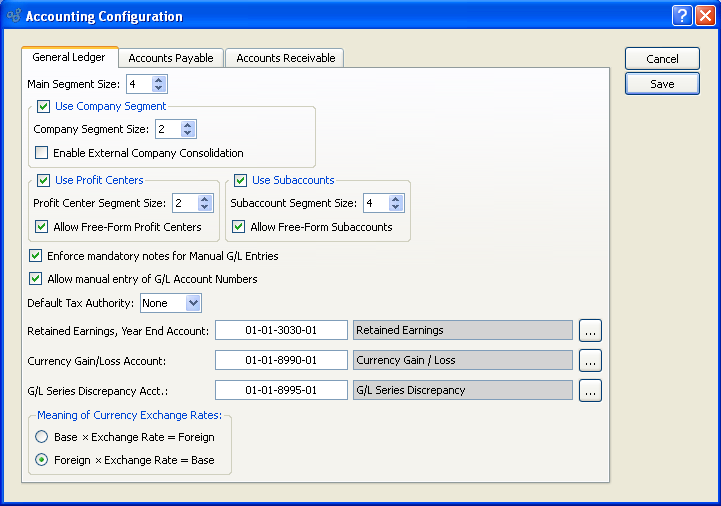
When configuring the General Ledger, you are presented with the following options:
- Main Segment Size
Specify a main Segment size value between 3 and 10. This setting defines how large the base Account Number portion should be. For example, if you specify "4" here, then your Account Numbers would probably range from 1000 through 9999. Similarly, if you specify "5" then your Account Number range would be from 10000 though 99999.
- Use Company Segment
-
Select to utilize a Company Segment by default. This is an optional setting.
- Company Segment Size
If a Company Segment is being utilized, specify a Company Segment size value between 1 and 10.
- Enable External Company Consolidation
Check this setting to enable the ability associate a Company to another database that can be used to synchronize trial balance information. To learn more read the associated wiki topic here.
- Use Profit Centers
-
Select to utilize Profit Centers by default. This is an optional setting.
- Profit Center Segment Size
If Profit Centers are being utilized, specify a Profit Center Segment size value between 1 and 10. This segment is placed at the front end of the Account Number. Profit Centers are typically used to identify activity for different Sites.
- Allow Free-Form Profit Centers
Select to allow free-form Profit Centers. Free-form means the values may be edited on the Account Number master. In other words, you will not be required to select a predetermined Profit Center value from the list. Using free-form Profit Centers can lead to inconsistent Account Numbers if not handled correctly.
- Use Subaccounts
-
Select to utilize Subaccounts by default. This is an optional setting.
- Subaccount Segment Size
If Subaccounts are being utilized, specify a Subaccount Segment size value between 1 and 10. This segment is placed at the back end of the Account Number. Subaccounts are typically used to identify activity for similar types of accounts where detail is important.
- Allow Free-Form Subaccounts
Select to allow free-form Subaccounts. Free-form means the values may be edited on the Account Number master. In other words, you will not be required to select a predetermined Subaccount value from the list. Using free-form Subaccounts can lead to inconsistent Account Numbers if not handled correctly.
- Enforce mandatory notes for Manual G/L Entries
Select if you want to require users to be required to enter Notes when posting simple or series manual Journal entries. If this option is not selected, users will not be required to enter Notes when posting simple or series manual Journal entries.
Tip
Try to avoid changing your Year End Equity Account if you have already used it to close a Fiscal Year. If you do change this Account after a fiscal year has been closed, be sure to consult your system administrator. The trial balance for the new Account will need to be manually updated.
- Allow manual entry of G/L Account Numbers
Select to enable users to manually enter G/L Account Numbers wherever G/L Account Numbers may be entered. If not selected, users will be required to use a browse button to select G/L Account Numbers from a list.
Note
If Account Numbers have multiple segments separated by dashes, the dashes must be included when manually entering G/L Account Numbers. If the dashes are not included, the manual entry will not work.
- Default Tax Authority
Specify the default Tax Authority to be used when setting up Sites.
- Retained Earnings, Year End Account
Select a valid General Ledger Account. This is an Equity Account. It will be credited if retained earnings are positive—and debited if retained earnings are negative. The retained earnings calculation occurs when a Fiscal Year is closed. Total Expenses for the year are subtracted from total Revenues, and the balance is transferred to the Year End Equity Account. The system then automatically resets the beginning balances for Revenue and Expense Accounts to $0 for the start of the new Fiscal Year.
Note
The Currency Gain/Loss Account is needed only for databases where multiple Currencies are used.
- Currency Gain/Loss Account
Select a valid General Ledger Account. This is an Expense Account. It will debited for Currency gains and credited for Currency losses arising from fluctuating Exchange Rates. Currency gains/losses may be recognized at the following points: 1) When posting a Cash Receipt applied to an Invoice; 2) when posting an A/P Check applied to a Voucher; 3) when applying an A/R Misc. Credit Memo to an Invoice; and 4) when applying an A/P Misc. Credit Memo to a Voucher. In each case, the gain or loss arises when the Exchange Rate used for the Apply-To document differs from the Exchange Rate used for the application.
- G/L Series Discrepancy Account
Select a valid General Ledger Account. This is an Expense Account. It will be debited or credited if rounding errors cause discrepancies when multiple line item (i.e., series) transactions are posted to the General Ledger. If used, the amounts posted to this Account will be minuscule, as rounding errors are fractional by nature.
- Meaning of Currency Exchange Rates
-
Specify how you want Exchange Rates to be implemented and also displayed on the Exchange Rates master list:
- Base x Exchange Rate = Foreign
If selected, this equation will be used.
- Foreign x Exchange Rate = Base
If selected, this equation will be used.
To the far right of the screen, the following buttons are available:
- CANCEL
Cancels any configuration settings, returning you to the application desktop.
- SAVE
Saves the configuration settings, returning you to the application desktop.
To configure Accounts Payable options, select the "Accounts Payable" tab. The following screen will appear:
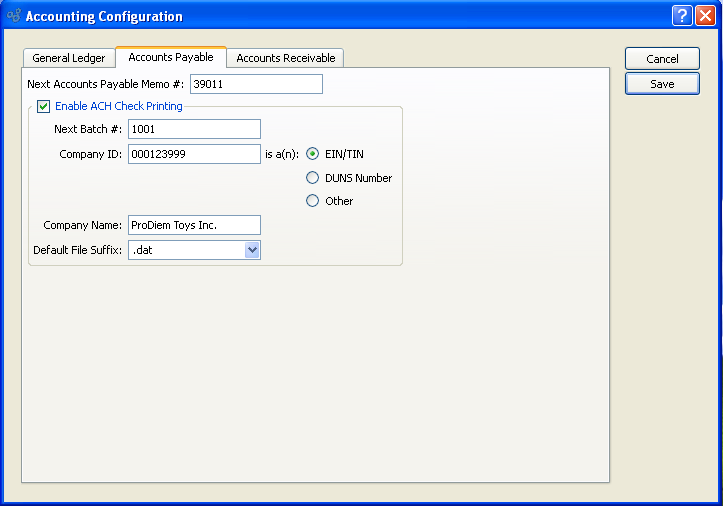
Configure Accounts Payable
When configuring the A/P module, you are presented with the following options:
- Next A/P Memo #
The next sequentially available Accounts Payable Memo Number will display here. You may change the number—creating a new basis for the next A/P Memo Number—by typing the new number into this field.
- Enable ACH Check Printing
Select to enable Automated Check Clearinghouse (ACH), which is automated electronic funds transfer and clearing.
- Next Batch #
Start number for the next batch of Checks issued.
- Company ID
-
Unique company number used to identify legal business entity. Select a radio button to specify what type of number is used.
- EIN/TIN
Employer Identification Number (EIN) or Federal Tax Identification Number (TIN)
- DUNS Number
Dun & Bradstreet nine digit unique business ID number.
- Other
Any other unique Identifier.
- Company Name
Legal Name of organization.
- Default File Suffix
Specifies file format used for check printing based on items in drop down list.
To configure Accounts Receivable options, select the "Accounts Receivable" tab. The following screen will appear:
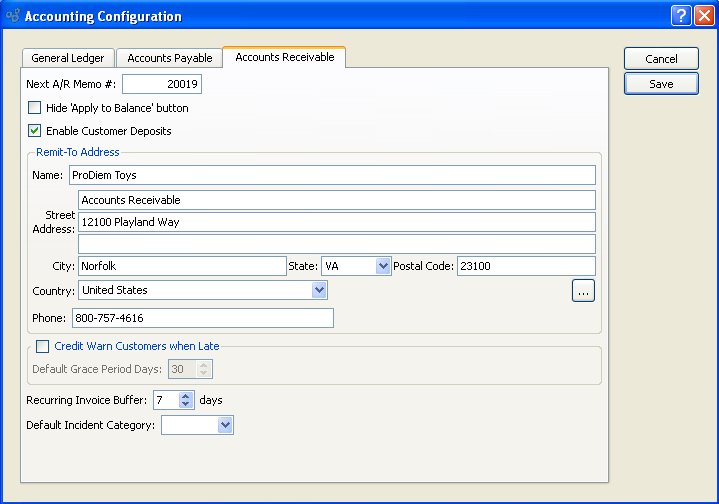
Configure Accounts Receivable
When configuring Accounts Receivable options, you are presented with the following options:
- Next A/R Memo #
The next sequentially available Accounts Receivable Memo Number will display here. You may change the number—creating a new basis for the next A/R Memo Number—by typing the new number into this field.
- Hide "Apply to Balance" button
Select if you want to hide the APPLY TO BALANCE button on the "Enter Cash Receipt" screen. If this option is selected, users will be required to apply Cash Receipts manually to individual open A/R items.
- Enable Customer Deposits
Select if you want unapplied Cash Receipts from Customers to be handled by a Deferred Revenue Account. If selected, the A/R Account Assignments screen will include a Deferred Revenue Account option. Not selecting this option will hide the Deferred Revenue Account option on the A/R Account assignments screen. Also hidden will be Customer Deposit options on the Cash Receipts screen. If the Deferred Revenue approach is not being used, then unapplied Cash Receipts will be handled by the Asset Account for the specified Bank Account.
- Remit-To Address
-
The Remit-To Address is used in multiple report definitions. Specify details to be used for your site's default Remit-To Address:
- Street Address
Enter the street Address to be used on the default Remit-To Address.
- City:
Enter the city to be used on the default Remit-To Address.
- State:
Enter the state to be used on the default Remit-To Address.
- Postal Code
Enter the Postal Code for the Contact.
- Country:
Enter the country to be used on the default Remit-To Address.
- Phone
Enter the phone for the default Remit-To Address.
- Credit Warn Customers when Late
-
Select to globally enable the ability to place Customers on credit warning when the due dates on their A/R open items become late past the specified grace period. If this option is selected, you will have the ability to run a utility called "Update Late Customer Credit Status" described here: Section 9.12.4, “Update Late Customer Credit Status”. When run, this utility will review all late A/R open items for all Customers. Any Customers found to have late items falling outside the grace period will be placed on credit warning. These Customers will automatically be taken off credit warning once their late items are paid.
- Default Grace Period Days
Specify the standard number of days beyond the A/R open due date which will serve as a grace period. As long as A/R open item due dates are within the grace period, Customers will not be put on credit warning when the late status utility is run. Once outside the grace period, they will be placed on credit warning.
- Recurring Invoice Buffer
Specify the number of buffer days you want to allow for when automatically processing recurring Invoices. This setting is used by the recurring Invoices utility, which is described in more detail here Section 9.12.5, “ Create Recurring Invoices”. Essentially, the buffer days setting tells the utility how far to look ahead. When it runs, the utility will create new Invoices for any recurring Invoices having Invoice dates within the look-ahead (i.e., buffer) days. If an Invoice date falls outside the buffer period, then no new Invoice will be created.
- Default Incident Category
Specifies the default Incident category used for Incidents associated with Accounts Receivable.