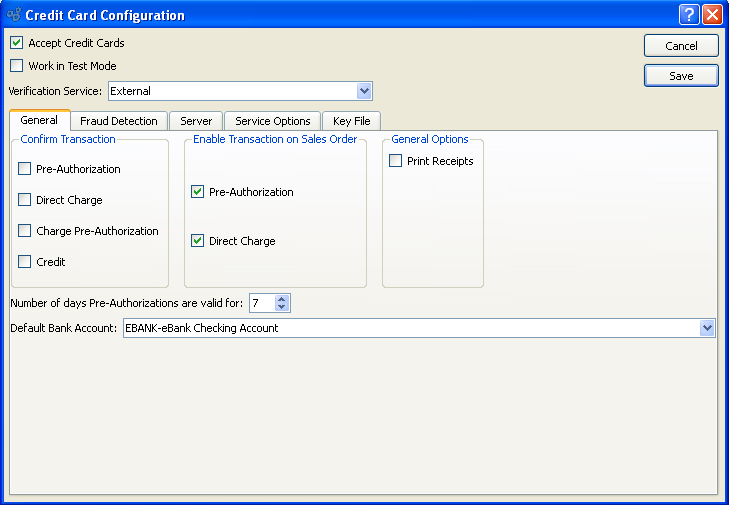
To configure your system to process Credit Cards, select the "Credit Cards" option. The following screen will appear:
Note
The system currently supports only the YourPay and Authorize.Net verification services.
When establishing the general settings for your Credit Card configuration, you are presented with the following options:
- Accept Credit Cards
-
Select to indicate the system is configured to accept Credit Card Payments. If selected, the Credit Card processing functionality will be enabled throughout the system. For example, users will be able to store Customer Credit Card information on the Customer master—and receive Credit Card payments when processing Sales Orders. If this option is not selected, Credit Card functionality will be disabled.
Tip
Check to verify you have the cURL tool installed with your xTuple ERP executable to ensure Credit Card processing operates smoothly.
- Work in Test Mode
-
Select if your site is testing the Credit Card configuration and functionality. If selected, the system will verify that the server specified under the "Server" tab is in fact the correct test server. If this option is not selected, the system will verify that the correct production server is specified.
Warning
Make sure that you uncheck this option as soon as you are ready to put the application into production. Most credit card transactions will appear to succeed whether running in test mode or live mode but there will be no actual charges made if in test mode.
If you are using Authorize.Net then you should also make sure that the Merchant Interface is configured to run in live mode instead of test mode. Both xTuple ERP and the Authorize.Net gateway allow sending test transactions to the live server but both applications must be set to run in live mode for real transactions to occur.
- Verification Service
-
Specify the Credit Card verification service you will be using:
- Authorize.Net
Select if you will be using the Authorize.Net payment gateway for handling Credit Card transactions. Specific Authorize.Net options will be enabled on the screen if you select this service.
- YourPay
Select if you will be using the YourPay payment gateway for handling Credit Card transactions. Specific YourPay options will be enabled on the screen if you select this service.
- External
Select if you will be using tools outside of xTuple ERP to communicate with your Credit Card company. If selected, you may still process Credit Card transactions in xTuple ERP—and this information will be stored in your xTuple database. However, no information will be sent to outside Credit Card processors. You can learn more about the interface used to collect external Credit Card transactions in the Section 10.14.10.1, “External Credit Card Transaction” section.
- Confirm Transaction
-
Specify when you want to application users to confirm transactions before they are processed:
- Pre-Authorization
Select if you want confirmation before pre-authorizing charges on a Credit Card.
- Direct Charge
Select if you want confirmation before directly charging a Credit Card.
- Charge Pre-Authorization
Select if you want confirmation before posting pre-authorized charges.
- Credit
Select if you want confirmation before crediting back charges on a Credit Card.
- Enable Transaction on Sales Order
-
Select which of the following options should be enabled under the Payments tab of the Sales Order header. This setting does not affect the A/R Workbench or any other window in the application.
- Pre-Authorization
If selected, only the AUTHORIZE button will be enabled.
- Direct Charge
If selected, only the CHARGE button will be enabled.
- Number of days Pre-Authorizations are valid for
Select a value between 1 and 30 using the arrow buttons located to the right of the field. Value entered specifies the number of days pre-authorizations will remain valid from the date they were entered. Once a pre-authorization expires, it will no longer be visible in the system and will be unavailable for post-authorization.
- General
- Print Receipts
Select if you want the ability to print credit card receipts.
To the far right of the screen, the following buttons are available:
- CANCEL
Cancels any configuration settings, returning you to the application desktop.
- SAVE
Saves the configuration settings, returning you to the application desktop.
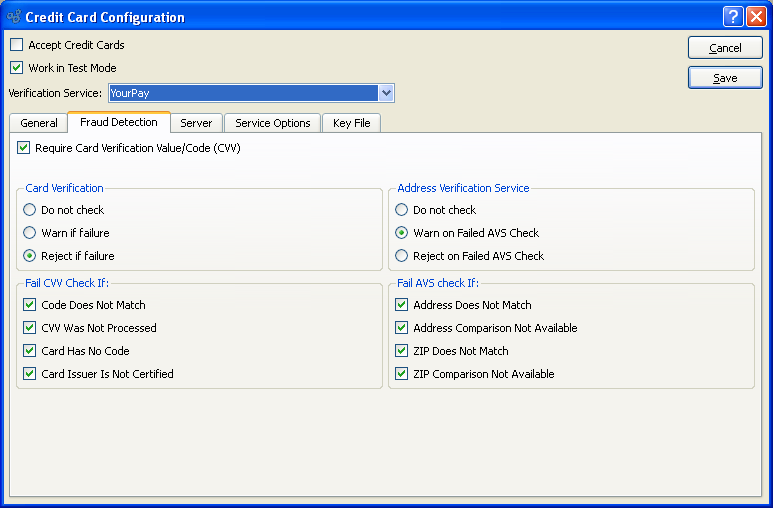
Fraud detection methods vary depending on the payment gateway used. Authorize.Net requires fraud settings to be configured on the gateway server. Other services, like YourPay, send fraud detection results back to the client software and require the client to decide whether to accept the transaction or void it. To configure client-side fraud detections settings, if required, select the "Fraud Detection" tab. The following screen will appear:
Tip
If YourPay is the service being used, the options on the "Fraud Detection" tab will be enabled and selections should be made. These options will be disabled if the Authorize.Net gateway is being used. Fraud detection settings for Authorize.Net must be configured through the Merchant Interface.
When configuring client-side fraud detection settings, if required, you are presented with the following options:
- Require Card Verification Value/Code (CVV)
Select if you want to require users to enter a CVV code when processing Credit Cards.
- Card Verification
-
Specify how you want to handle Credit Card verification processing:
- Do not check
Select if the xTuple application should ignore the CVV result sent by the payment gateway.
- Warn if failure
Select if the xTuple application should tell the user if the CVV result sent by the payment gateway fails based on the criteria checked in the "Fail CVV Check If" section.
- Reject if failure
Select if the xTuple application should void the transaction and tell the user if the CVV result sent by the payment gateway fails based on the criteria checked in the "Fail CVV Check If" section.
- Fail CVV Check If:
-
Specify how you want to handle Credit Card Verification Value (CVV) check failures:
- Code Does Not Match
Select if the transaction should be treated as fraudulent if the CVV does not match the credit card number.
- CVV Was Not Processed
Select if the transaction should be treated as fraudulent if the Credit Card company, such as Visa or American Express, could not process the CVV for the payment gateway.
- Card Had No Code
Select if the transaction should be treated as fraudulent if the Credit Card does not have a CVV but is expected to have one.
- Card Issuer Is Not Certified
Select if the transaction should be treated as fraudulent if the financial institution that issued the Credit Card is not certified.
- Address Verification Service
-
Specify how you want to handle address verification:
- Do not check
Select if the xTuple application should ignore the AVS result sent by the payment gateway.
- Warn on Failed AVS Check
Select if the xTuple application should tell the user if the AVS result sent by the payment gateway fails based on the criteria checked in the "Fail AVS Check If" section.
- Reject on Failed AVS Check
Select if the xTuple application should void the transaction and tell the user if the AVS result sent by the payment gateway fails based on the criteria checked in the "Fail AVS Check If" section.
- Fail AVS check if:
-
Specify how you want to handle address verification check failures:
- Address Does Not Match
Select if the transaction should be treated as fraudulent if the address stored by the xTuple application does not match the Credit Card company's recorded billing address for the Credit Card.
- Address Comparison Not Available
Select if the transaction should be treated as fraudulent if the Credit Card company could not process the street address information for the payment gateway.
- ZIP Does Not Match
Select if the transaction should be treated as fraudulent if the postal code stored by the xTuple application does not match the Credit Card company's recorded billing address for the Credit Card.
- ZIP Comparison Not Available
Select if the transaction should be treated as fraudulent if the Credit Card company could not process the postal code information for the payment gateway.
To establish the server settings for your Credit Card configuration, select the "Server" tab. The following screen will appear:
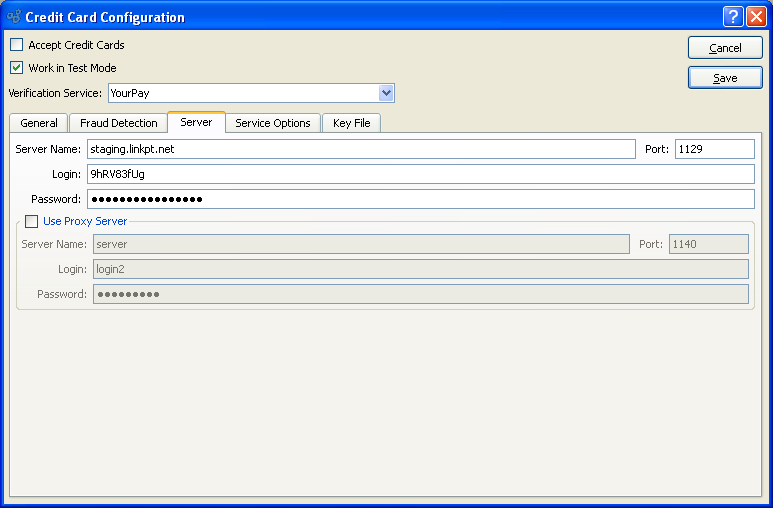
When establishing the server settings for your Credit Card configuration, you are presented with the following options:
- Server Name
Enter the URL for the specified Verification Service's server. The URL specified may vary, depending on whether you are working in test mode or production mode. If this is empty then the application will use the default URL for this Verification Service, which again may vary depending on whether you are working in test mode or production mode.
- Port
Enter the port number for the specified Verification Service's server. If this is left empty then the application will use the default Port for this Verification Service.
- Login
YourPay does not require login information to be entered in this field. For Authorize.Net, use your API Login here, not your Merchant Interface Login, which may differ.
- Password
YourPay does not require login information to be entered in this field. Type your Transaction Key here for Authorize.Net. The label for this field may change if you select Authorize.Net.
- Use Proxy Server
-
Select if your site uses a proxy server.
- Server Name
Specify the IP Address for your proxy server.
- Port
Specify the port used by your proxy server.
- Login
Specify the login name for your proxy server.
- Password
Specify the password for your proxy server.
Tip
You can leave the Server Name and Port fields blank if you desire. This is the easiest way to switch between test mode and production mode, as you won't have to change these values every time you switch modes.
Some payment gateways, such as Authorize.Net, allow testing against the live, production server. If you want to run test transactions against the live payment gateway then you must set the Server Name explicitly to the live payment gateway's URL. You will get a warning from the application when you click the Save button if you do this.
To establish the service option settings for your Credit Card configuration, select the "Service Options" tab. The options will vary depending on the payment gateway being used. If YourPay is being used, the following screen will appear:
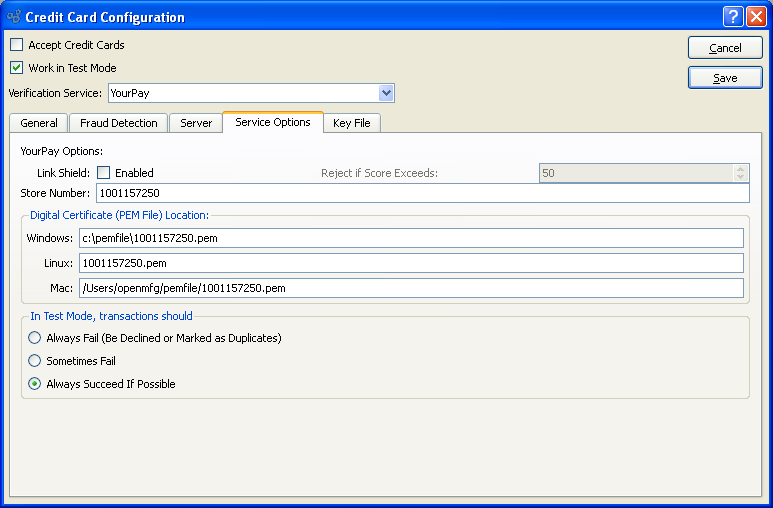
When establishing the service option settings for your YourPay configuration, you are presented with the following options:
- Link Shield
-
LinkShield is a risk-scoring service provided by YourPay at an additional fee. If you have purchased this service then check the Enabled box and set the desired cut-off score.
- Reject if Score Exceeds
Set your risk tolerance by selecting a value between 0 and 100 using the arrow buttons located to the right of the field or by typing a number in this field. A Link Shield score of 0 indicates that this transaction has an extremely low risk, while a score of 100 indicates a high risk transaction.
- Store Number
Enter the number of your YourPay store. Store numbers are assigned when you register with the YourPay Verification Service.
- Digital Certificate (PEM File) Location:
-
Specify the physical location of the digital certificate (i.e., PEM file) according to your operating system:
- Windows
Specify the directory path any Windows machine on your system would use to access the YourPay PEM file. The PEM file may be stored locally for use by individual machines, or on a network drive for wider distribution.
- Linux
Specify the directory path any Linux machine on your system would use to access the YourPay PEM file. The PEM file may be stored locally for use by individual machines, or on a network drive for wider distribution.
- Mac
Specify the directory path any Mac machine on your system would use to access the YourPay PEM file. The PEM file may be stored locally for use by individual machines, or on a network drive for wider distribution.
- In Test Mode, transactions should
-
The YourPay test gateway allows testing the client application's ability to handle failed transactions. The client application can build transaction messages and then indicate whether the test gateway should return an error or not.
- Always Fail (Be Declined or Marked as Duplicates)
If this is selected then the test gateway will always return a message indicating that the transaction failed. Sometimes it will send a message saying the transaction was declined and sometimes it will send a message saying the transaction failed because it is a duplicate of a prior transaction.
- Sometimes Fail
This is similar to "Always Fail" but about 80% of the transactions attempted by the application will be sent unaltered and should be expected to succeed. Approximately 10% of the transactions sent to the test server should be marked as declined and approximately 10% should be marked as duplicates.
- Always Succeed If Possible
This option does not inject failure requests in the transaction stream. This allows testing normal flow of all credit card transactions in the application.
If Authorize.Net is being used, the following screen will appear:
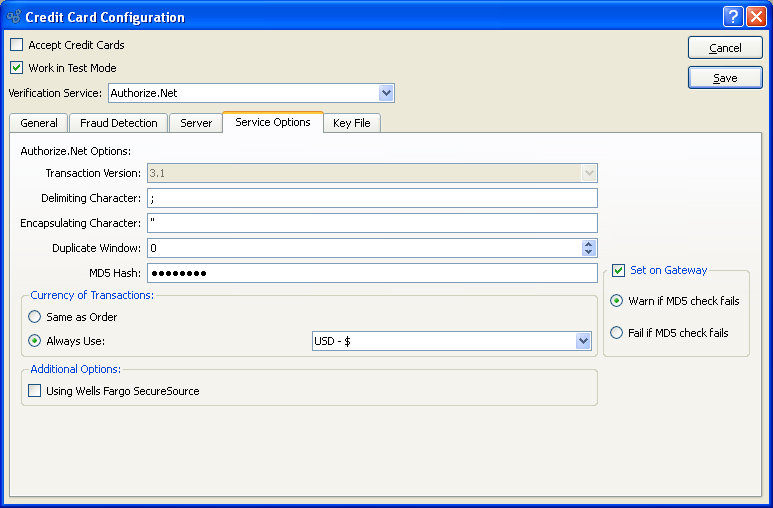
When establishing the service option settings for your Authorize.Net configuration, you are presented with the following options:
- Transaction Version
Authorize.Net supports three different versions of the communications protocol at this time, with the potential for more to be added in the future. The xTuple application builds transaction requests which conform to version 3.1 of the Authorize.Net protocol. This field is a placeholder to allow for future expansion by both xTuple and Authorize.Net.
- Delimiting Character
This field allows overriding the default character used by Authorize.Net to separate parts of the messages sent by the gateway to the client application. If this field is blank then Authorize.Net will use the comma (,) to separate message fields. If you expect your data to contain commas as part of their content, such as street addresses, then you should change the Delimiting Character.
- Encapsulating Character
This field allows setting the character used by Authorize.Net to enclose individual parts of the messages sent by the gateway to the client application. If this field is blank then Authorize.Net will not use any character for this purpose.
- Duplicate Window
Use this field to indicate a time window to Authorize.Net for checking for duplicate transactions. If similar transactions are sent to Authorize.Net within this window then it may reject them as duplicates. This is a value in seconds.
- MD5 Hash
If you want an additional sense of security, set the MD5 Hash field to a short string and set the same value on the Merchant Interface. This shared secret can be used to assure that the payment gateway is actually Authorize.Net's server and not an imposter. The value of the MD5 Hash field and a few other fields in the transaction request are processed with the MD5 algorithm by the payment gateway and the resulting string is returned to the xTuple application. The xTuple application performs the same processing and compares the result with the value sent by the payment gateway.
- Set on Gateway
-
Specify how you want the gateway to respond if the MD5 hash fails:
- Warn if MD5 check fails
If the comparison of the MD5 value fails then warn the user.
- Fail if MD5 check fails
If the comparison of the MD5 values fails then treat the transaction as failed, regardless of apparent success or failure, and tell the user. This transaction is not voided.
- Currency of Transactions
-
Specify how you want to handle foreign Currency transactions:
- Same as Order
Always process credit card transactions using the same currency as the Sales Order, Cash Deposit, or Credit Memo.
- Always Use
Select to always use the Currency specified here for all Credit Card transactions.
- Additional Options
You have the option to specify the following additional options:
- Using Wells Fargo SecureSource
Check this box if you are using Authorize.Net with Wells Fargo SecureSource. Wells Fargo SecureSource requires that transaction requests be built slightly differently than pure Authorize.Net transactions and this configuration option tells the xTuple application to construct the transactions to work with this service.
Warning
You should set the Encapsulating Character to a value. Otherwise some transactions may fail with an error reporting that the response from the payment gateway has the wrong number of fields.
Several of these configuration options may be set through the Authorize.Net Merchant Interface. If you set any of these options there, you must use exactly the same values here in the Service Options tab. If you do not then most or all of your credit card transactions will fail, often with mysterious errors.
If you want to use the MD5 Hash feature, you must set it to exactly the same value here and on the Merchant Interface, including spaces and capitalization.
You may set the Delimiting Character, Encapsulating Character, Duplicate Window, and Currency of Transactions in the xTuple application without setting them through the Authorize.Net Merchant Interface.
To establish the key file settings for your Credit Card configuration, select the "Key File" tab. The following screen will appear:
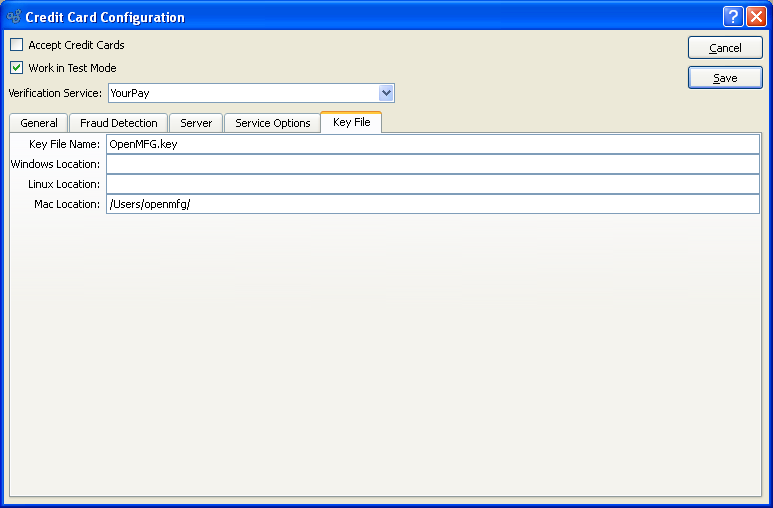
Tip
All users on your system who need access to Credit Card information must use the same key file. The key file can be a simple text file with any contents whatsoever. It should be stored at the same level as the xTuple executable file. For Mac users, this would be within the MacOS directory inside the Package Contents for your xTuple executable. The key file is not stored in the database.
Note
The encryption key information may be entered on this screen, or on the Encryption screen—and vice versa.
When establishing the key file settings for your Credit Card configuration, you are presented with the following options:
- Key File Name
Enter the name of your key file. The key file is an encryption seed file, which enables you to read encrypted Credit Card information. The key file is required regardless of the Verification Service used at your site. The contents of the key file should be at least 16 characters long and use a combination of upper and lower case letters and numbers. Special characters should not be used.
Note
If you change the contents of your key file after it has already been in production, steps must be taken to convert any data encrypted up to that point. The function "alterencrypt" must be used to handle the conversion. Please contact your Systems Administrator for more information.
- Windows Location
Specify the directory path any Windows machine on your system would use to access the key file. All users and machines on the system must use the same key file. To ensure consistency and security, the file should be stored in a central location.
Tip
If you name the key file "OpenMFG.key" and place it in the installation directory, then you do not need to enter the path.
- Linux Location
Specify the directory path any Linux machine on your system would use to access the key file. All users and machines on the system must use the same key file. To ensure consistency and security, the file should be stored in a central location.
- Mac Location
Specify the directory path any Mac machine on your system would use to access the key file. All users and machines on the system must use the same key file. To ensure consistency and security, the file should be stored in a central location.
If you are using an external Credit Card processing mechanism to record information about xTuple ERP Credit Card transactions, the following screen will be used when these transactions are recorded:
When entering details related to an external Credit Card transaction, you are presented with the following options:
- Customer
Displays the name of the Customer you are entering a Credit Card transaction for.
- Credit Card Number
Displays the selected Credit Card for the specified Customer.
- Transaction Type
Displays the transaction type (i.e., Charge).
- Amount
Displays the amount of the transaction.
- Order
Displays the number of the Order (e.g., Sales Order, Cash Receipt, etc.) which the selected Credit Card is being charged for.
- Approval Status
Specify the status of the external Credit Card transaction. The following options are available: Approved, Declined, Error, and Held for Review.
- Approval Code
Enter the approval code you received from the external Credit Card processor.
- Transaction ID
Enter the transaction identifier you received from the external Credit Card processor. By default, this value will be the same as the Order Number.
- Passed Address Verification
Select if the external transaction passed the address verification.
- Passed Card Verification
Select if the external transaction passed the card verification.
To the far right of the screen, the following buttons are available:
- CANCEL
Closes the screen without processing details of the external Credit Card transaction, returning you to the previous screen.
- SAVE
Creates the record of the external Credit Card transaction and stores this information in the database.