The Electronic Data Interchange (EDI) system supports the export of documents and files using either of the following two delivery methods:
Email
FTP
EDI Profiles are the master records which contain specifications for EDI recipients—whether those recipients are Customers, Suppliers, or intermediaries such as VANs (Value-Added Networks). When creating an EDI Profile, you specify recipient details, delivery method, and output format. The following output formats are available:
xTuple Report (.PDF)
Comma Delimited (.TXT)
Tab Delimited (.TXT)
Using different combinations of delivery methods and output formats, you have the flexibility to create a wide range of unique EDI Profiles.
Tip
The EDI system exports files using the Batch Manager. The Batch Manager must be installed and running at your site for EDI exports to be successful.
To access the master list of EDI Profiles, select the "EDI Profiles" option. The following screen will appear:
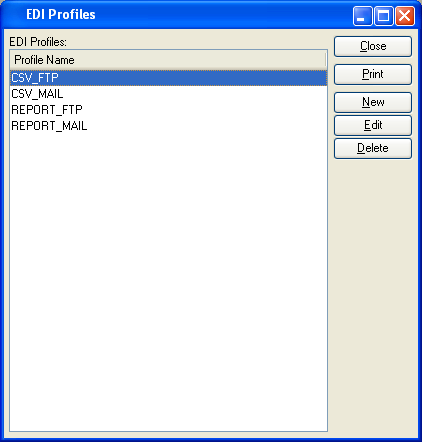
The "EDI Profiles" screen displays information on all existing EDI Profiles. To the far right of the screen, the following buttons are available:
- CLOSE
Closes the screen, returning you to the application desktop.
Runs the report associated with this screen.
- NEW
Opens screen for creating a new EDI Profile.
- EDIT
Enables you to edit highlighted EDI Profile definitions. The edit screen is the same as that for creating a new EDI Profile definition—except that when editing, the fields will contain EDI Profile information. Double-clicking on an EDI Profile definition will also bring you to the editing screen.
- DELETE
Highlight an EDI Profile definition and then select this button to remove the EDI Profile from the list.
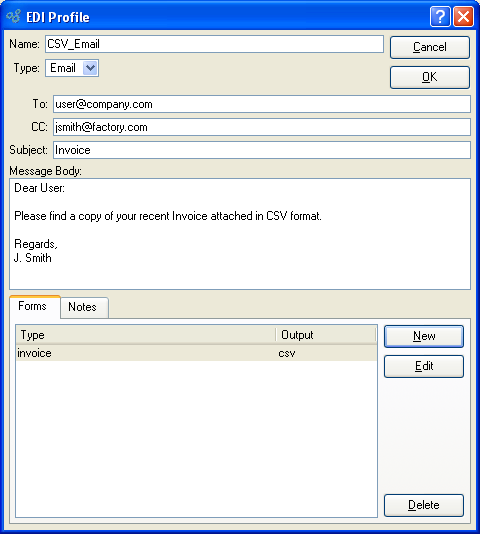
To create a new EDI Profile, select the NEW button. For this example, we have chosen the Email delivery method, as shown in the following screenshot:
Note
The screen options will vary depending on which EDI delivery method you select—Email or FTP.
When creating an EDI Profile using the Email delivery type, you are presented with the following options:
- Name
Enter a brief name to identify the EDI Profile. This is the name which will appear when the Profile is cross-referenced throughout the application—in the Customer master, for example.
- Type
For this example, we have selected the "Email" delivery method. Selecting the "Email" option indicates that recipients will receive EDI documents as Email attachments.
- To
Enter the email address to be used as the default recipient address whenever documents are emailed using this Profile.
Tip
Send documents to multiple recipients by separating email addresses with a comma. Be sure to omit any spaces between addresses when using commas to send copies to multiple recipients.
- Cc
Enter the email address to be used as the default carbon copy address whenever documents are emailed using this Profile.
- Subject
Enter a default email subject line to be used whenever documents are emailed using this Profile.
- Message Body
Use this text field to enter the default message that will accompany any documents emailed using this Profile.
- Forms
Displays the EDI Form(s) associated with the Profile.
- Notes
This is a scrolling text field with word-wrapping for entering Notes related to the Profile.
To the far right of the screen, the following buttons are available:
- CANCEL
Closes the screen without adding a new Profile to the master list of EDI Profiles.
- OK
Creates the EDI Profile and adds it to the master list of EDI Profiles.
- NEW
Opens screen for creating a new EDI Form definition.
- EDIT
Enables you to edit highlighted EDI Form definitions. The edit screen is the same as that for creating a new EDI Form definition—except that when editing, the fields will contain EDI Form information. Double-clicking on an EDI Form definition will also bring you to the editing screen.
- DELETE
Highlight an EDI Form definition and then select this button to remove the EDI Form from the list.
To create a new EDI Profile using the FTP delivery method, select the NEW button from the EDI Profiles master list. Once the new Profile screen opens, choose the "FTP" option. As the following screenshot shows, the screen options change when "FTP" is selected:
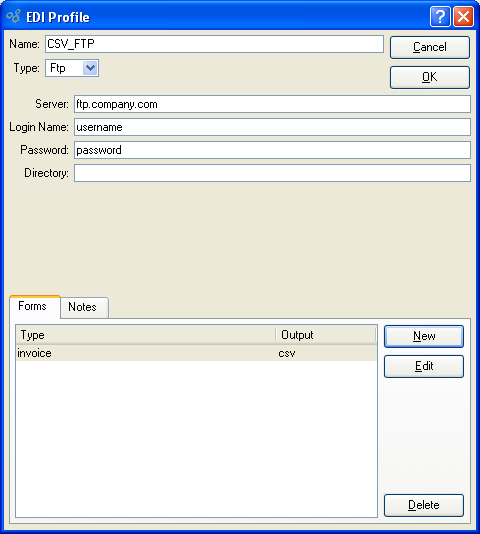
When creating a new EDI Profile using the FTP delivery method, you are presented with the following options:
- Name
Enter a brief name to identify the EDI Profile. This is the name which will appear when the Profile is cross-referenced throughout the application—in the Customer master, for example.
- Type
For this example, we have selected the "FTP" delivery method. Selecting the "FTP" option indicates that recipients will receive EDI documents as files transferred by FTP to the server address specified in the Profile.
- Login Name
Enter the login name required to access the specified server.
- Password
Enter the password required to access the specified server.
- Directory
Specify the directory location (if any) where EDI documents transferred by FTP should be placed. By default, EDI documents will be placed in the top level directory.
- Forms
Displays the EDI Form(s) associated with the Profile.
- Notes
This is a scrolling text field with word-wrapping for entering Notes related to the Profile.
To the far right of the screen, the following buttons are available:
- CANCEL
Closes the screen without adding a new Profile to the master list of EDI Profiles.
- OK
Creates the EDI Profile and adds it to the master list of EDI Profiles.
- NEW
Opens screen for creating a new EDI Form definition.
- EDIT
Enables you to edit highlighted EDI Form definitions. The edit screen is the same as that for creating a new EDI Form definition—except that when editing, the fields will contain EDI Form information. Double-clicking on an EDI Form definition will also bring you to the editing screen.
- DELETE
Highlight an EDI Form definition and then select this button to remove the EDI Form from the list.
EDI Forms specify the file format an EDI Profile will use. To associate an EDI Form with a Profile, select the NEW button. For this example, we will choose the "Report" format, as shown in the following screenshot:
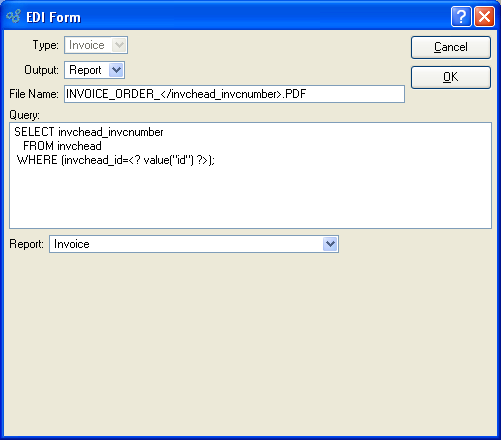
When creating a new EDI Form using the Report format, you are presented with the following options:
- Type
Select the type of document the Form will be used for. Invoices are currently the only supported document type. The Invoice type will be selected by default.
- Output
For this example, we have selected the "Report" output format. Selecting the "Report" option indicates that document information will be written using the report definition specified below. Documents will be forwarded to EDI recipients in .PDF format.
- File Name
Enter a standard file name to be used when documents are forwarded to EDI recipients using this EDI Form. You may enter tags to generate dynamic file names using information stored in your database. In the example shown, the file name will include the specific Invoice Number of each Invoice being forwarded to EDI recipients.
- Query
This is an optional field to be used if you want to generate dynamic file names using information stored in your database. The example uses a basic SQL statement to select an Invoice number from the "invchead" table. You will note in the WHERE clause that MetaSQL is used to dynamically capture the specific Invoice number. For more information on writing queries using MetaSQL, please see the Report Writer User Guide.
- Report
Specify the report definition you want to associate with the EDI Form.
To create a new EDI Form using Comma Separated Value (CSV) format, select the NEW button from the EDI Profiles master list. Once the new Profile screen opens, choose the "CSV" option. As the following screenshot shows, the screen options change when "CSV" is selected:
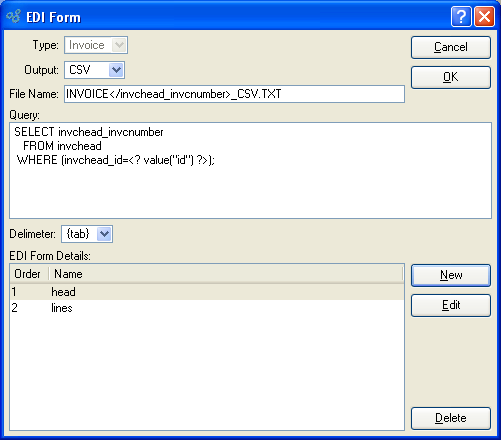
When creating a new EDI Form using the Report format, you are presented with the following options:
- Type
Select the type of document the Form will be used for. Invoices are currently the only supported document type. The Invoice type will be selected by default.
- Output
For this example, we have selected the "CSV" output format. Selecting the "CSV" option indicates that document information will be written using the Form details specified below. Documents will be forwarded to EDI recipients in .TXT format.
- File Name
Enter a standard file name to be used when documents are forwarded to EDI recipients using this EDI Form. You may enter tags to generate dynamic file names using information stored in your database. In the example shown, the file name will include the specific Invoice Number of each Invoice being forwarded to EDI recipients.
- Query
This is an optional field to be used if you want to generate dynamic file names using information stored in your database. The example uses a basic SQL statement to select an Invoice number from the "invchead" table. You will note in the WHERE clause that MetaSQL is used to dynamically capture the specific Invoice number. For more information on writing queries using MetaSQL, please see the Report Writer User Guide.
- Delimiter
-
Select one of the following delimiter options:
- Comma
Select to generated comma-delimited CSV files.
- Tab
Select to generated tab-delimited CSV files.
- EDI Form Details
Displays a list of all the SQL queries to be used when generating the CSV file output.
To the far right of the screen, the following buttons are available:
- NEW
Opens screen for creating a new Form Detail query.
- EDIT
Enables you to edit highlighted Form Detail definitions. The edit screen is the same as that for creating a new Form Detail definition—except that when editing, the fields will contain Form Detail information. Double-clicking on a Form Detail definition will also bring you to the editing screen.
- DELETE
Highlight a Form Detail definition and then select this button to remove the Form Detail from the list.
To create a new Form Detail query to be used when generating CSV file output, select the NEW button. The following screen will appear:
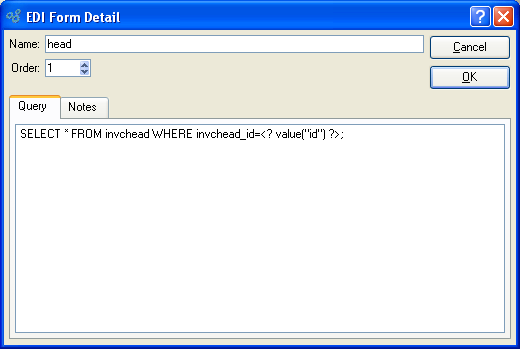
When creating a new Form Detail query, you are presented with the following options:
- Name
Enter a name to identify the Form Detail query. In the example shown, the name indicates the query will return information to be used in the header of the CSV file output.
- Order
Select a value between 1 and 99 using the arrow buttons located to the right of the field. The value entered specifies the order in which a query will be executed.
- Query
Enter a SQL query to identify the information you want to populate your CSV file with. As you can see in the example, the query selects invoice header information from the "invchead" table. You will note in the WHERE clause that MetaSQL is used to dynamically capture the specific Invoice number. For more information on writing queries using MetaSQL, please see the Report Writer User Guide.
- Notes
This is a scrolling text field with word-wrapping for entering Notes related to the EDI Detail query.
To the far right of the screen, the following buttons are available:
- CANCEL
Closes the screen without adding a new query to the Form Details list.
- OK
Creates the query and adds it to the master list of Form Details.