Accounts Receivable section.
Invoice section.
When you post a Sales Order that has been selected for billing, an Invoice is created for that Order. This is the standard flow for creating Invoices tied to Sales Orders. However, you also have the option of creating miscellaneous Invoices—that is, Invoices which are not tied to Sales Orders. For example, you might use a miscellaneous Invoice to bill for non-Inventory Items you have sold. To create a miscellaneous Invoice, select the "Create Invoice" option. The following screen will appear:
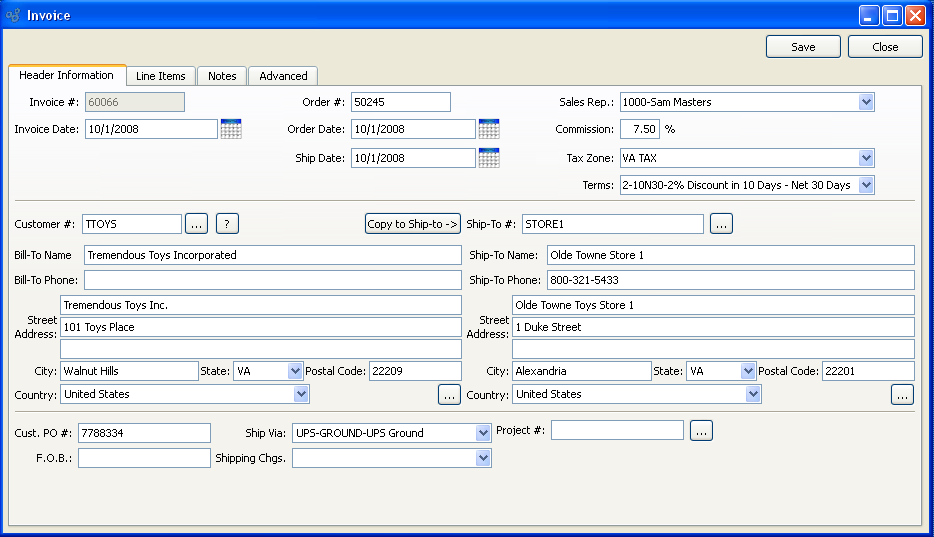
When creating an Invoice, you are presented with the following options:
- Invoice #
Next available Invoice Number will automatically display, unless your system requires you to enter Invoice Numbers manually. Default values and input parameters for Invoice Numbers are configurable at the system level.
- Order #
Will display the relevant Sales Order Number for Invoices generated from the Select for Billing process flow. If the Invoice is miscellaneous and was not generated by the Select for Billing process, then use this field for informational or reference purposes. Possible references might include Sales Order Number or Customer Purchase Order Number.
- Invoice Date
By default, the current day's date will be entered.
- Order Date
By default, the current day's date will be entered.
- Ship Date
By default, the current day's date will be entered.
- Customer #
Enter the Customer Number of the Customer to be billed. The browse button located to the right of the field leads to a searchable Customers list. You may also access this list using the keyboard shortcut "CTRL + L". Once a Customer Number is entered, the Customer name and billing address will display. Select the "?" or "$" symbol next to the browse button to view Customer information for the specified Customer. If a Customer's credit is "In Good Standing," the button will feature a black question mark ("?") icon. If the icon turns to an orange dollar sign ("$"), the Customer's credit Status is "On Credit Warning." A red dollar sign ("$") indicates the Customer's credit Status is "On Credit Hold."
Note
A valid Customer Number must be entered in the "Customer #" field before Line Items can be added to an Invoice. If no valid Customer Number is entered, you will not be able to add Line Items to the Invoice.
- Billing Address
Enter the Customer address where bills should be sent. By default, the billing address defined on the Customer master will be entered here.
- Copy to Ship-to
Select to copy contents of billing address into Ship-To address field. This option is enabled if the Customer master for the specified Customer indicates that free-form Ship-To's are allowed.
- Sales Rep.
Specify the Sales Representative for the Invoice. By default, the Customer's designated Sales Representative will appear in the field.
- Commission
By default, the commission percentage recorded on the Customer master will be automatically entered in this field. If for some reason you select a non-default Sales Representative at Order entry, the commission rate will not change. To adjust the commission rate, you must make the change manually.
- Tax Zone
Specify the Tax Zone for the Invoice. By default, the main Tax Zone for the Customer will appear in the field. The Ship-To Address Tax Zone will be shown if a Ship-To Address is being used.
- Terms
Specify the billing Terms for the Invoice. By default, the Customer's standard billing terms will appear in the field.
- Ship-To #
Enter the number of the preferred Ship-To Address. Customers may maintain multiple Ship-To Addresses. If the Customer master for the specified Customer indicates that free-form Ship-To's are allowed, then any address may be entered. If free-form Ship-To's are not allowed, then the Ship-To Address must be entered using the browse button located to the right of the field. The browse button leads to a searchable Ship-To Addresses list.
- Cust. PO #
PO #: Enter a Customer Purchase Order Number, as needed.
- F.O.B.
Enter free on board (FOB) terms for the Invoice.
- Ship Via
The preferred Ship Via method for the Customer will appear in the field. You may change the Ship Via using the list.
Tip
The Ship Via field supports free-form Ship Vias. If you want to enter a free-form Ship Via, simply type the name of the Ship Via into the field.
- Shipping Chgs.
Specify the Shipping charges associated with the Invoice. The preferred Shipping Charges Type for the associated Sales Order will appear in the field.
- Project #
Select a Project Number to associate with the Invoice. If the Invoice was created from a Sales Order—and the Sales Order had a Project Number associated with it—then the Project Number from the originating Sales Order will automatically be entered here. Once a Project Number is associated with a Sales Order, any Work Orders or Purchase Orders created by the Sales Order demand will automatically be linked to the same Project Number as the Sales Order. In this way, Sales Orders, Work Orders, and Purchase Orders may be linked to the same Project.
Tip
If your site is configured to create Projects automatically whenever new Sales Orders or Quotes are entered, the Projects generated in this way will assume the number of the Sales Order or Quote which caused their creation.
To the far right of the screen, the following buttons are available:
- SAVE
Creates the new Invoice.
- CLOSE
Closes the screen without creating a new Invoice, returning you to the application desktop.
To create or modify Invoice Line Items, select the "Line Items" tab at the top of the "Invoice" screen. The following screen will appear:
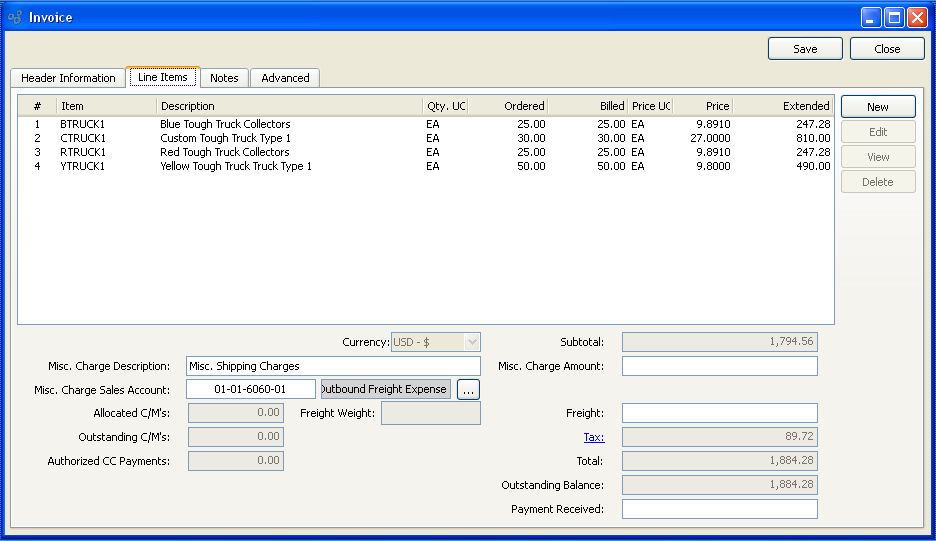
When creating or modifying Invoice Line Items, you are presented with the following options:
- Line Items
Display lists Line Items for this Invoice. A valid Customer Number must be entered in the "Customer #" field before Line Items can be added to the Order.
- Subtotal
Displays the subtotal for the Invoice Line Items.
- Tax
Tax is not calculated automatically when creating a miscellaneous Invoice—as it is when an Invoice is generated from a Sales Order. You must manually enter a Tax amount if you want to add Tax to a miscellaneous Invoice. To get a detailed view of the Tax calculation, click on the Tax link using your mouse.
- Misc. Charge Amount
Enter the amount of any miscellaneous charge. Examples of miscellaneous charges include palletization costs, co-op refund, etc. Before entering a miscellaneous charge amount, you must first assign the charge to a Sales Account and also enter a description of the charge.
- Misc. Charge Description
Enter a description to identify the miscellaneous charge.
- Misc. Charge Sales Account
Enter a Sales Account to assign the miscellaneous charge to.
- Freight
Enter the amount of freight charge to be added to the Invoice.
- Total
Displays total amount of the Invoice.
- Payment Received
Enter the amount of payment received against the specified Sales Order, if any. This amount will appear on the Invoice, but will not be posted as a credit against the Invoice.
Note
The Payment Received field is an optional field which may be used to provide visibility into prepaid amounts. Because the field exists for visual purposes only, entering an amount in this field will not affect the amount due. The only way an Invoice may be offset is through the application of a Cash Receipt or a Credit Memo.
To the far right of the screen, the following buttons are available:
- SAVE
Saves the Invoice Line Item information.
- CLOSE
Closes the screen without creating a new Invoice, returning you to the application desktop.
- NEW
Opens screen for creating a new Invoice Line Item. Mac users may use COMMAND + N to enter a new Line Item.
- EDIT
Enables you to edit highlighted Invoice Line Items. The edit screen is the same as that for creating a new Invoice Line Item—except that when editing, the fields will contain Invoice Line Item information. Double-clicking on an Invoice Line Item will also bring you to the editing screen. Mac users may use COMMAND + E to edit an existing Line Item.
- VIEW
Highlight an Invoice Line Item and then select this button to reach a read-only view of the "Edit" screen.
- DELETE
Highlight an Invoice Line Item and then select this button to remove the Invoice Line Item from the list.
To add Notes to an Invoice, select the "Notes" tab at the top of the "Invoice" screen. If the Invoice was created from a Sales Order, any Sales Order Notes will be transferred to the Invoice. The following screen will appear:
When adding Notes to an Invoice, you are presented with the following options:
- Notes
This is a scrolling text field with word-wrapping for entering Notes related to the Invoice. Notes entered on this screen will follow the Invoice through the billing process. For example, you may view notes associated with a posted Invoice within the Invoice Information report.
To the far right of the screen, the following buttons are available:
- SAVE
Saves the Invoice Notes.
- CLOSE
Closes the screen without creating a Note, returning you to the application desktop.
To specify advanced details related to the Invoice, select the "Advanced" tab. The following screen will appear:
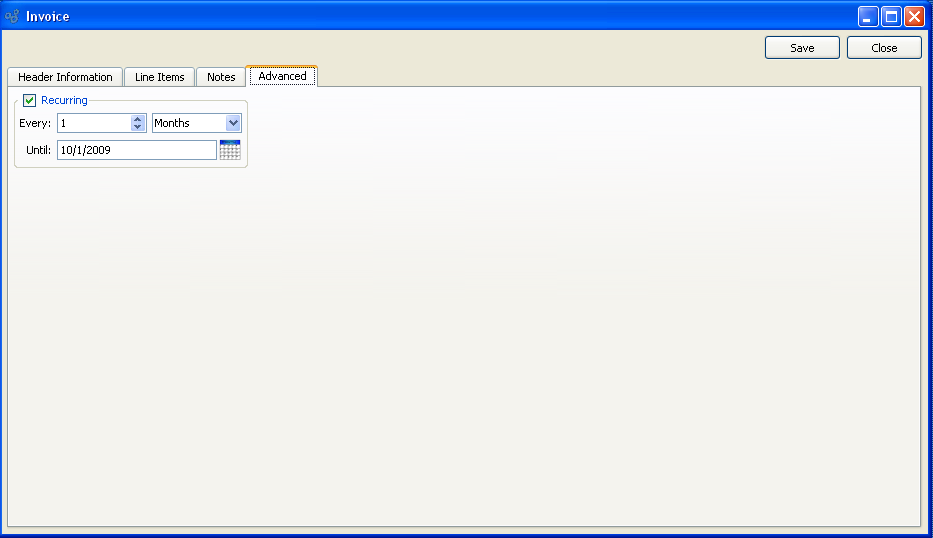
- Recurring
Select to indicate you want the Invoice to be a recurring Invoice, using the frequency settings you specify below. This feature enables you to automatically generate Invoices on a recurring basis (e.g., the same day of every month). Recurring Invoices are generated when you run the recurring Invoices utility, which is described in more detail here: Section 11.5, “ Create Recurring Invoices”. Newly-created recurring Invoices will appear on the list of unposted Invoices. Their distribution date will depend on the frequency specified and the Invoice date on the original Invoice. For example, if the original Invoice is dated January 1 and the frequency is once every month, then the next Invoices will be dated February 1, March 1, etc.
Tip
Once the recurring flag is set on the original Invoice, all subsequent, recurring Invoices will be marked in the database as children of the original parent Invoice. If you need to make changes to the frequency of a recurring Invoice (or to cancel the recurring Invoice), you must go back to the original parent Invoice and make the changes there.
- Every
Specify how frequently you want the Invoice to recur. For example, once (1) per month, six (6) times per year, etc.
- Until
Specify when the recurrence should stop. For example, on the last day of the year, at the end of six months, etc.
To the far right of the screen the following buttons are available:
- SAVE
Saves Advanced information.
- CLOSE
Closes the screen without creating Advanced information, returning you to the application desktop.
To add a new Invoice Line Item, select the NEW button. The following screen will appear:
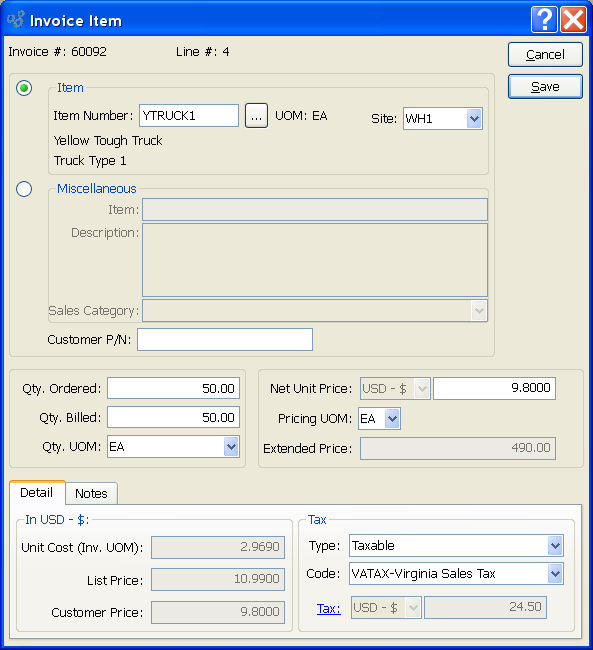
When creating a new Invoice Line Item, you are presented with the following options:
- Invoice #
Displays the Invoice Number specified in the "Invoice" screen.
- Line #
Displays the Line Item Number for the current Line Item.
- Item Type
Indicate the Item Type for the Invoice Line Item, by selecting one of the following options:
- Item
The browse button located to the right of the field leads to a searchable list of Inventory Items. The list will contain sold Items available for purchase by the specified Customer. The list of available Items may vary from Customer to Customer, depending on how Pricing Schedules are implemented at your site. Once an Item Number is entered, the Inventory Unit of Measure and Item description will automatically appear. Additionally, you may also specify the Item's supplying Site. Items may be supplied from multiple Sites. Sites designated as "Sold from" Sites in the Item Site master for an Item are considered "Supplying Sites" on this screen. By default, the Item Site with the highest Ranking will be selected as the supplying Site. If more than one Item Site share a Ranking of "1", the default supplying Site will be selected in alphabetical order. Item Sites are ranked using the Ranking mechanism on the Item Site master.
- Miscellaneous
Enter a name and description for the miscellaneous, non-Inventory Item you are billing the Customer for. The name and description fields are free-form, meaning they accept unlimited alphanumeric characters. You must also select a Sales Category. Sales Categories are used to identify the General Ledger (G/L) Accounts to be used when non-Inventory Sales transactions take place.
- Customer P/N
If applicable, enter a Customer Part Number to further identify the Item you are billing the Customer for. In the case of Inventory Items, the Customer Part Number will display automatically if you enter an Item Alias in the Item Number field. To enter an Item Alias, place the cursor in the Item Number field and then use the keyboard shortcut "CTRL + A". After you have entered a valid Item Alias, hit the TAB key. A list of Items that use the specified Item Alias will be displayed. Select the desired Item from the list. The Item Alias will display as the Customer Part Number. Item Aliases are defined on the Item master.
- Qty. Ordered
Enter the quantity of the Item you are billing for. The quantity ordered for Inventory Items is measured in the Item's Inventory UOM.
Note
The Quantity Ordered for Inventory Items is based on the Inventory UOM. But the Price is based on the Price UOM. Whenever these two UOMs are not identical, the Extended Price for a Line Item will be based on the following formula:
(Qty. Ordered) x (Price/Inv. Ratio) x (Net Unit Price)
If for some reason the Prices don"t look correct, check the Item master for the Line Item in question. It may be that the Inventory and Price UOMs do not exist in a 1:1 relationship.
- Qty. Billed
Specify the quantity of ordered Items you are billing for.
- Qty. UOM
Specify the Unit of Measure to be used when selling the Line Item. Sold Items may be assigned multiple Selling UOMs. These alternate UOMs may be defined on the Item master. If a Line Item has no Selling UOM defined, then the Inventory UOM will be used here by default.
- Net Unit Price
Displays the Unit Price for the Invoice Item. By default, the system will choose the lower of the following two Prices: A) The most-specific Pricing Schedule Assignment or B) any Sale in effect at the time of Order entry. The specificity of Pricing Schedule Assignments is determined in the following descending order: By Customer Ship-To Address (most specific), by Customer, by Customer Type, by Customer Type pattern, by all Customers. The browse button located to the right of the field leads to a Price List screen.
Note
For Inventory Items having assigned Pricing Schedules, the Net Unit Price will be automatically calculated using the information provided above. For miscellaneous Items, the Net Unit Price must be entered manually.
If your Pricing Schedule has multiple Units of Measure (UOM) on it―or if several Pricing Schedules share the same level of Price specificity, but they have different UOMs―then the UOM which matches the selected UOM will be chosen―that is, as long as the quantity break does not exceed the quantity being priced. If no entry matches the UOM with a quantity break less than the quantity being priced, then the lowest value Price for any UOM will be chosen. To make sure a specific UOM is always chosen at the desired level of Price specificity, then your Pricing Schedules should include at least one UOM with a quantity break of 0.
Tip
The system can be configured to prevent users from editing the Net Unit Price. If your system is configured that way, the Net Unit Price field will not be editable.
- Pricing UOM
The Price Unit of Measure is the same as the Selling UOM. If an Item has Selling UOMs defined, then the Item may be sold and priced in these alternate UOMs. If no Selling UOMs are defined, then the Inventory UOM will be used here by default.
- Extended Price
Displays the Extended Price. The Extended Price for a Line Item is based on the quantity ordered multiplied by the Net Unit Price.
To view Costing and Tax information related to the Invoice Item, select the "Detail" tab. You will be presented with the following options:
- Unit Cost (Inv. UOM)
Displays the Standard Cost per unit in the Item's Inventory Unit of Measure.
- List Price
Displays the Item's List Price per Inventory UOM.
- Customer Price
Displays the Price (per Inventory UOM) given to the specified Customer for the specified Item. Special Customer Prices can be set for individual Customers or Customer Groups by using a Pricing Schedule.
- Tax
The following Tax-related information is available:
- Type
Specify the Tax Type for the Invoice Item. If the Item master does not have a Tax Type for the Invoice's Tax Authority, then no Tax will be charged.
- Tax
Displays the amount of Tax to be charged for the Invoice Line Item quantity. To get a detailed view of the Tax calculation, click on the Tax link using your mouse.
To add Notes to an Invoice Line Item, select the "Notes" tab at the bottom of the screen. If the Invoice was created from a Sales Order, any Sales Order Line Item Notes will be transferred to the Invoice. The following screen will appear:
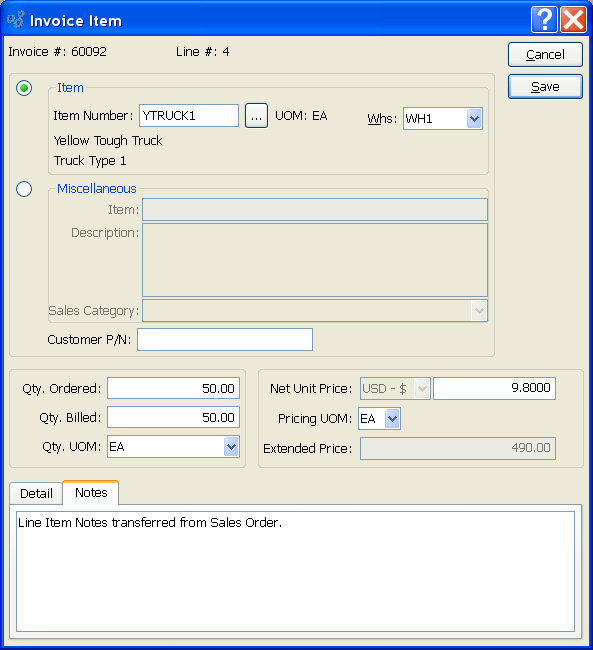
When entering Invoice Line Item Notes, you are presented with the following options:
- Notes
This is a scrolling text field with word-wrapping for entering general Notes related to the Invoice Item.
To edit or post Orders selected for billing, select the "Unposted Invoices" option. The following screen will appear:

Tip
You may select multiple Invoices for printing or posting by highlighting them using your mouse—or a combination of your mouse and either the SHIFT or CTRL keys.
The Unposted Invoices list displays information on all Invoices available for posting. Users with the appropriate privilege will also see the G/L distribution date column.
To the far right of the screen, the following buttons are available:
- CLOSE
Closes the screen, returning you to the application desktop.
- QUERY
Refreshes the screen with latest Invoices.
- NEW
Opens screen for creating a new Invoice.
- EDIT
Enables you to edit highlighted Invoices. The edit screen is the same as that for selecting a new Invoice—except that when editing, the fields will contain Invoice information. Double-clicking on an Invoice will also bring you to the editing screen.
- VIEW
Highlight an Invoice and then select this button to reach a read-only view of the "Edit" screen.
- DELETE
Highlight an Invoice and then select this button to remove the Invoice from the list. Deleting an Invoice causes the source Sales Order to be returned to the Billing Selections list.
Tip
Deleting an Invoice effectively reverses the transaction which created it. In other words, when you delete an Invoice the source Sales Order will be returned to the Billing Selections list. From there, you have the ability to either A) cancel the Billing Selection or B) re-create the Invoice.
Note
If the Customer specified on the Invoice has an EDI Profile attached, you may encounter an EDI processing interface when printing Invoices.
- POST
Highlight one—or multiple—Invoices, then select this button to post the selected Invoice(s). By default, Invoices post to the General Ledger (G/L) on the Invoice date. However, users with the appropriate privilege may change the default G/L distribution date to an alternate date during the Invoice posting process. If used, Invoices will post on the alternate date. The ability privileged users have to change the distribution date applies to the posting of both individual and also batches of Invoices from this screen.
- Print Sales Journal
Select to print the Sales Journal when selected Invoices are posted.
To post Invoices in batch mode, select the "Post Invoices" option. The following screen will appear:
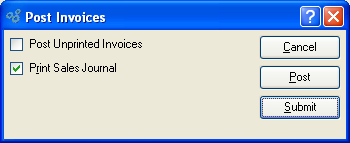
When posting Invoices, you are presented with the following options:
- Post Unprinted Invoices
Select to include unprinted Invoices in the list of Invoices to be posted. If not selected—and if there are unprinted Invoices waiting to be posted—you will be prompted to print the unprinted Invoices before posting may occur.
- Print Sales Journal
Select to print the Sales Journal in addition to posting the Invoices. Sales Journals are assigned a unique identification number, which corresponds to the Invoice batch and the date the batch was posted.
Note
A Sales Journal will also be created for Invoices that are posted individually—that is, not in batch mode, but one at a time. As with batch postings, the Sales Journals for individually-posted Invoices are assigned a unique identification number.
To the far right of the screen, the following buttons are available:
- CANCEL
Closes the screen without posting any Invoices, returning you to the application desktop.
- POST
Posts the Invoices, using the specified parameters.
- SUBMIT
Select to submit the requested action to the Batch Manager.
To send a copy of a Customer Invoice electronically, select the "Send Electronic Invoice" option. The following screen will appear:

E-mail Invoice Form
This window shows either a list or search window for Invoices for those Customers configured to receive EDI. You are presented with the following options:
- Search for
Optionally enter an Invoice number here to find it in the list.
- Invoices
List of Invoices that can be sent by EDI.
Note
Customers are set up to receive electronic deliveries of information using the "Transmission" tab on the Customer master.
To the far right of the screen, the following buttons are available:
- CANCEL
Closes the screen without scheduling an Invoice for delivery, returning you to the application desktop.
- SELECT
Select the Invoice for delivery. This closes the window and proceeds to sending the EDI.
You may be presented with one of two screens, depending on whether the document will be sent by email or by FTP. If you do not see either screen, the EDI Profile has been set to disable review before sending and will automatically be sent to the Batch Manager.
If the document will be sent by email, you will see the following screen:
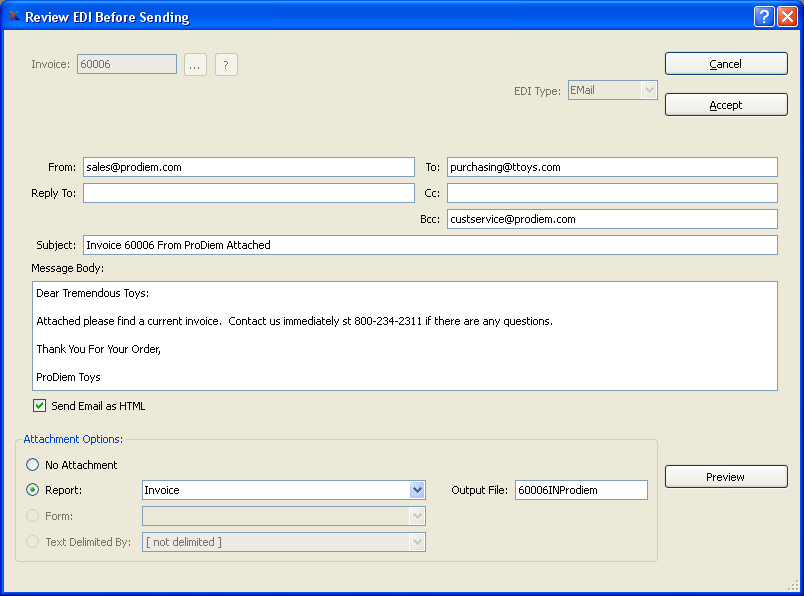
Review EDI Before Sending a document by email
The fields at the top of the window show basic information about the EDI that will be sent:
- A/R Open Item, Credit Memo, Customer #, Invoice, Order #, Quote
This shows the document number of the document you want to schedule for delivery. Which label appears depends on the document being sent. The "Customer #" is shown when sending A/R Statements.
- EDI Type
This shows whether the EDI will be sent by email or FTP.
The information in the following fields will be populated from the EDI Profile. If you have the "EditEDIBeforeSending" privilege, you will be allowed to edit the contents of these fields. You are presented with the following email-specific options:
- From
This is the email address of the person sending the email. It can be set to the address of the user running the application or a generic address (e.g. "[email protected]"). If it is left blank on this screen, the Batch Manager will fill in the email address of the user running the application at the time the EDI was prepared.
- Reply To
This is the reply-to address that will be set on the outgoing email message. This controls the email address used when someone replies to the email sent by xTuple ERP.
- To
This is the email address of the primary intended recipient of the email.
- Cc
This is the carbon copy (i.e., Cc:) email address—a copy of the email will be sent to this address.
- Bcc
This is the blind carbon copy (i.e., Bcc:) email address—a copy of the email will be sent to this address but none of the recipients will see this address.
- Subject
This is the subject line that will be used for this email.
- Message Body
This is the body of the email message that will be sent. This is a scrolling text field with word-wrapping.
- Send Email as HTML
Select if you want the body of the Email to be sent as HTML. If not selected, the Email will be sent as plain text.
- Attachment Options
Use the Attachment Options to control the contents and format of the file attached to this email. The following options are available, depending on the settings in the EDI Profile:
- No Attachment
No file will be attached to the email.
- Report
The named report will be run by the Batch Manager and attached to the email as a .PDF file.
- Form
If the document is a Sales Order or an Invoice, the Customer Form Assignment will be used. That report will be run by the Batch manager and attached to the email as a .PDF file.
- Text Delimited By
The queries defined in the EDI Form Details for the EDI Profile will be run. The results will be used to build a file with the fields delimited by the given character. Pre-defined characters include the comma (",") and tab. If you need to change the delimiter, select "[ not delimited ]" from the drop-down menu, then replace that text with your own single character. Normally, however, this should be left to the value specified in the EDI Profile.
- Output File
This is the name that will be given to the email attachment. For Forms and Reports it should end with a ".pdf" suffix. For comma-delimited files the output file should end with ".csv". Tab-delimited files should have a ".tsv" suffix.
- PREVIEW
This brings up a preview window to show what the attachment will look like when generated by the Batch Manager. It can show either reports or delimited text files.
To the far right of the screen, the following buttons are available:
- CANCEL
Closes the screen without scheduling a document for email delivery, returning you to the application desktop.
- ACCEPT
Select to submit the requested action to the Batch Manager for processing. If the EDI will be sent by email, there must be at least one email address in either the To, Cc, or Bcc fields.
If the document will be sent by FTP, you will see the following screen.
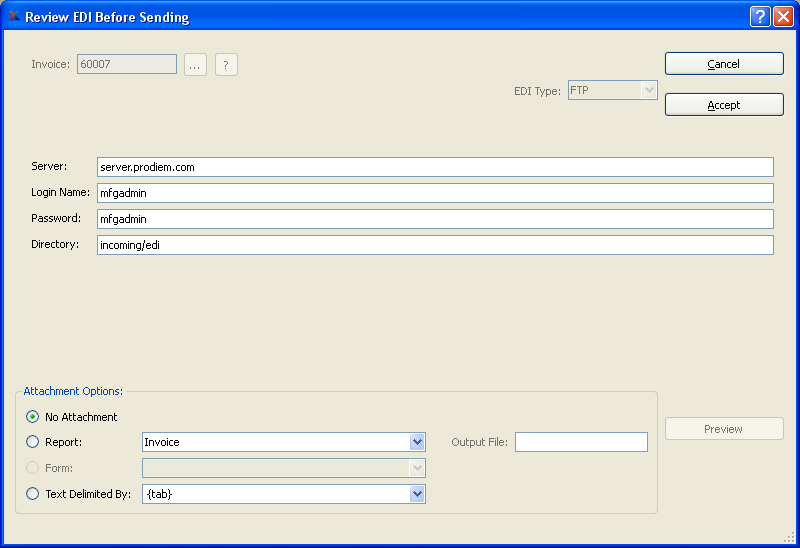
Review EDI Before Sending a document by FTP
The Attachment Options will be the same as for sending email but the transmission options will be different. Get the values for these from the EDI recipient (either your Vendor or Customer, depending on the document type). See the xTuple Batch Manager Product Guide for one suggestion on how to store these data. You are presented with the following FTP-specific options:
- Server
This is the host name or Internet address of the FTP server to send the document to.
- Login Name
This is the user name required to log in to the FTP server.
- Password
This is the password required to log in to the FTP server.
- Directory
This is the directory in which the recipient wants you to put the EDI message on the FTP server.
If both the "Login Name" and "Password" fields are empty, the Batch Manager will attempt an anonymous FTP, using the name "anonymous" for the "Login Name" and the email address of the user submitting the EDI for the "Password".
A/R Memos section.
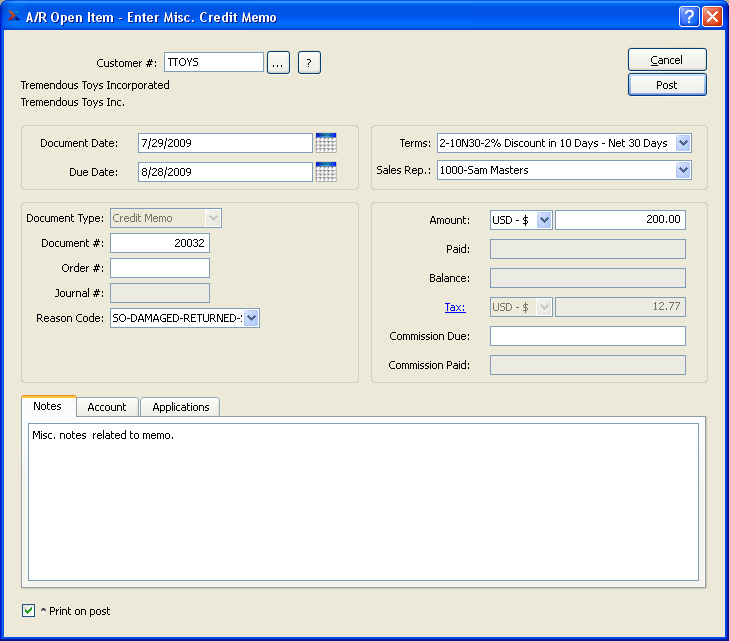
To enter a miscellaneous Credit Memo, select the "Enter Misc. Credit Memo" option. The following screen will appear:
Note
Miscellaneous A/R Credit Memos can be applied to Invoices or miscellaneous A/R Debit Memos.
When entering a miscellaneous Credit Memo, you are presented with the following options:
- Customer #
Enter the Customer Number of the Customer you want to enter a miscellaneous Credit Memo for. The browse button located to the right of the field leads to a searchable Customers list. You may also access this list using the keyboard shortcut "CTRL + L". Once a Customer Number is entered, the Customer name and billing address will display. Select the "?" or "$" symbol next to the browse button to view Customer information for the specified Customer. If a Customer's credit is "In Good Standing," the button will feature a black question mark ("?") icon. If the icon turns to an orange dollar sign ("$"), the Customer's credit Status is "On Credit Warning." A red dollar sign ("$") indicates the Customer's credit Status is "On Credit Hold."
- Document Date
Specify a date to associate with the miscellaneous Credit Memo.
- Due Date
Displays the due date for the miscellaneous Credit Memo.
- Document Type
Displays the Document Type, namely "Credit Memo."
- Document #
Displays the next available miscellaneous Credit Memo Number. The value for the next available Credit Memo Number is configured at the system level.
- Order #
Enter the Order Number you want to associate with the Credit Memo. You may leave this field blank if you do not want to enter an associated Order Number.
- Journal #
Displays the Journal number if any amount has been applied.
- Reason Code
Specify the reason for the Credit Memo. Reason codes are used to explain why an adjustment is being made to a Customer's account.
- Terms
Displays Invoice Terms if any amount has been applied to an Invoice.
- Sales Rep.
Displays the Sales Representative associated with the Invoice if any amount has been applied to an Invoice.
- Amount
Specify the amount of the miscellaneous Credit Memo.
- Paid
Displays the amount applied to date for the miscellaneous Credit Memo.
- Balance
Displays the remaining amount still available to apply for the miscellaneous Credit Memo.
- Tax
Enter the Tax, if any, associated with the Credit Memo. To enter Tax, simply select the blue Tax link next to this field. If Tax is entered, the amount will be charged to the General Ledger account for the relevant Tax Code.
- Commission Due
Displays the amount of the commission due to the associated Sales Representative.
- Commission Paid
Displays the amount of the commission paid to the associated Sales Representative.
Note
If an alternate Prepaid Account is not specified, the system will use the default Prepaid Account specified for the Customer Type under A/R Account Assignments.
- Notes
This is a scrolling text field with word-wrapping for entering Notes related to the miscellaneous Credit Memo. Notes entered on this screen will follow the Credit Memo through the billing process. For example, you may view notes associated with a posted Credit Memo within the Customer History report.
- Print on post
Select if you want to print a copy of the Credit Memo after the POST button is selected. Credit Memos may also be reprinted from, among other places, the Customer screen.
If the Customer specified on the Credit Memo has an EDI Profile attached, you may encounter an EDI processing interface when printing it.
To assign an alternate prepaid Account, select the "Account" tab at the bottom of the screen. The following screen will appear:

- Use Alternate Prepaid Account
Select one of the following optional Prepaid Accounts:
- From Sales Category
Specify a Sales Category whose Prepaid Account option you want to use instead of the default Prepaid Account.
- Account Number
Specify an alternate Account Number to use for the transaction.
Note
If an alternate Prepaid Account is not specified, the system will use the default Prepaid Account specified for the Customer Type under A/R Account Assignments.
To view Applications, select the "Applications" tab at the bottom of the screen. The following screen will appear:
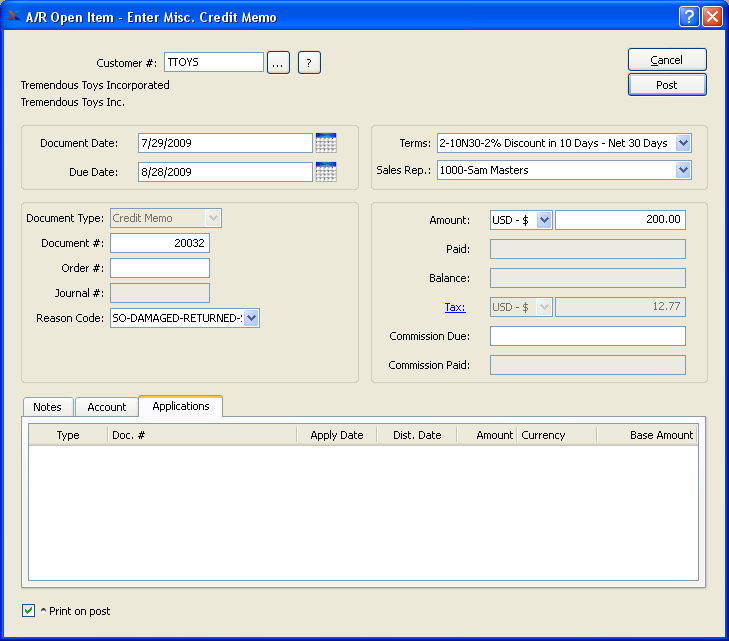
- Applications
Display lists the history of applications related to the miscellaneous Credit Memo, if any.
To the far right of the screen, the following buttons are available:
- CANCEL
Closes the screen without entering a miscellaneous Credit Memo, returning you to the application desktop.
- POST
Posts the miscellaneous Credit Memo, using the amount specified.
Whenever a Credit Memo amount has not been applied to a specific Invoice or Debit Memo—either in whole or in part—that Credit Memo will appear on the list of unapplied Credit Memos. Both miscellaneous A/R Credit Memos and unapplied Credit Memos generated from the Billing section may appear on the list.
Note
A newly-entered miscellaneous Credit Memo is an unapplied Credit Memo by default. However, Credit Memos generated from the Billing section may or may not be unapplied—depending on circumstances. For example, if an S/O Credit Memo is applied to a specific Invoice when the Credit Memo is created, then that Credit Memo is applied and will not appear on the list of unapplied Credit Memos. However, if an S/O Credit Memo is not applied when it is created, it will subsequently appear on the unapplied list.
To access the master list of unapplied Credit Memos, select the "List Unapplied Credit Memos" option. The following screen will appear:
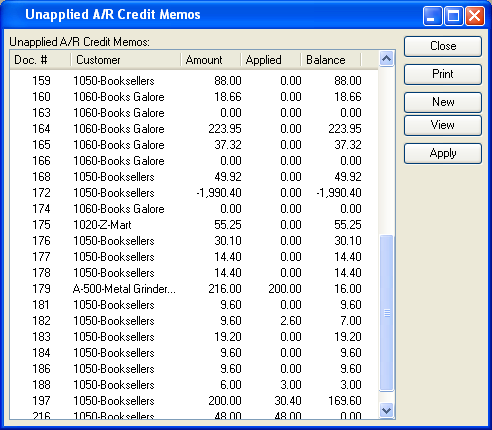
The master list of unapplied Credit Memos displays basic information on all existing unapplied Credit Memos, including Document Number, Customer name, Document amount, applied amount, and amount available to apply.
Note
Once the full amount of a Credit Memo has been applied, the Credit Memo will be removed from the unapplied Credit Memos list.
To the far right of the screen, the following buttons are available:
- CLOSE
Closes the screen, returning you to the application desktop.
Runs the report associated with this screen.
- NEW
Opens screen for creating a new miscellaneous Credit Memo.
- VIEW
Highlight an unapplied Credit Memo and then select this button to reach a read-only view of the "Edit" screen.
- APPLY
Highlight an unapplied Credit Memo and then select this button to apply an amount.
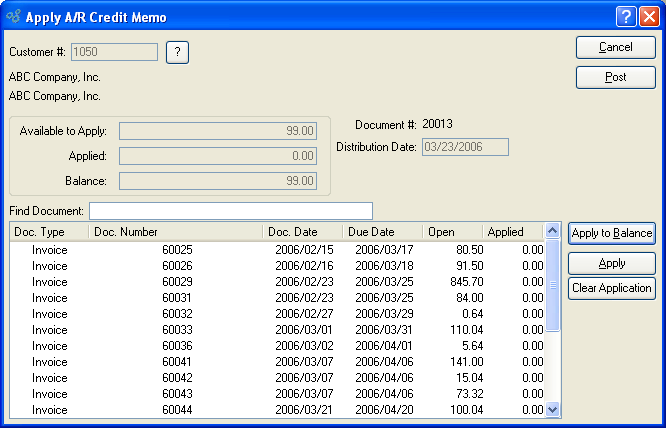
To apply a Credit Memo amount, select the APPLY button. The following screen will appear:
Note
Credit Memo amounts may be applied to either open Invoices or open miscellaneous Debit Memos.
When applying a Credit Memo amount, you are presented with the following options:
- Customer #
Displays the Customer Number of the Customer associated with the unapplied Credit Memo amount. The Customer name and billing address will also display.
- Available to Apply
Displays the Credit Memo amount which is available to be applied.
- Applied
Displays the amount of the Credit Memo applied to the specified Document.
- Balance
Displays the amount of the Credit Memo remaining to be applied, if any.
- Document #
Displays the Credit Memo Number.
- Distribution Date
Displays the date the Credit Memo applied amount was applied.
- Find Document
To search for an Invoice in the Open Items display, begin typing an Invoice Number into this field. As you type, the list will automatically scroll toward the Invoice Number you are typing. You can also search for Invoices manually by scrolling through the list.
- Items
Display lists A/R open items for the specified Customer.
To the far right of the screen, the following buttons are available:
- CANCEL
Closes the screen without applying an amount to the Debit/Credit Memo, returning you to the application desktop.
- POST
Posts the applied amount to the General Ledger.
- APPLY TO BALANCE
Select to apply the available balance to the A/R open items. If the applied balance exceeds the amount due on an open Item, the remaining balance will be applied to the next open amount.
- APPLY
Highlight an Item and then select this button to apply an amount to the Item.
- CLEAR APPLICATION
Highlight an Item and then select this button to remove any amount applied toward the Item.
To apply a Credit Memo amount to an open A/R Item, select the APPLY button. The following screen will appear:
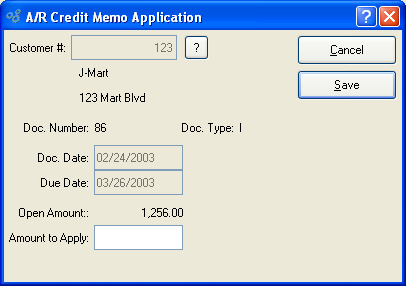
When applying a Credit Memo amount to an open A/R Item, you are presented with the following options:
- Customer #
Displays the Customer Number of the Customer whose open A/R Item the amount is being applied to. The Customer name and billing address will also display.
- Doc. Number
Displays the Document Number associated with the open A/R Item.
- Doc. Type
Displays the Document Type of the Document.
- Doc. Date
Displays the Document's origination date.
- Due Date
Displays the date the Document is due.
- Amount
Displays the original amount due for the selected Document.
- Paid
Displays the amount paid to date toward the original Document amount.
- Balance
Displays the remaining balance due.
- Amount Available to Apply
Displays the amount of the referring Credit Memo available to be applied.
- Amount to Apply
Specify the amount to apply to the open A/R Item.
To the far right of the screen, the following buttons are available:
- CANCEL
Closes the screen without applying an amount to the Item, returning you to the application desktop.
- SAVE
Applies the amount to the Item.
A miscellaneous Debit Memo is like an Invoice—the main difference being that a miscellaneous Debit Memo is not necessarily linked to a Sales Order. To enter a miscellaneous Debit Memo, select the "Enter Misc. Debit Memo" option. The following screen will appear:

When entering a miscellaneous Debit Memo, you are presented with the following options:
- Customer #
Enter the Customer Number of the Customer you want to enter a miscellaneous Debit Memo for. The browse button located to the right of the field leads to a searchable Customers list. You may also access this list using the keyboard shortcut "CTRL + L". Once a Customer Number is entered, the Customer name and billing address will display. Select the "?" or "$" symbol next to the browse button to view Customer information for the specified Customer. If a Customer's credit is "In Good Standing," the button will feature a black question mark ("?") icon. If the icon turns to an orange dollar sign ("$"), the Customer's credit Status is "On Credit Warning." A red dollar sign ("$") indicates the Customer's credit Status is "On Credit Hold."
- Document Date
Specify a date to associate with the miscellaneous Debit Memo.
- Due Date
Displays the due date for the miscellaneous Debit Memo.
- Document Type
Displays the Document Type, namely "Debit Memo."
- Document #
Displays the next available miscellaneous Debit Memo Number. The value for the next available Debit Memo Number is configured at the system level.
- Order #
Enter the Order Number you want to associate with the Debit Memo. You may leave this field blank if you do not want to enter an associated Order Number.
- Journal #
Displays the Journal number if any amount has been applied.
- Reason Code
Specify the reason for the Debit Memo. Reason codes are used to explain why an adjustment is being made to a Customer's account.
- Terms
Displays Invoice Terms if any amount has been applied to an Invoice.
- Sales Rep.
Displays the Sales Representative associated with the Invoice if any amount has been applied to an Invoice.
- Amount
Specify the amount of the miscellaneous Debit Memo.
- Paid
Displays the amount applied to date for the miscellaneous Debit Memo.
- Balance
Displays the remaining amount still available to apply for the miscellaneous Debit Memo.
- Tax
Enter the Tax, if any, associated with the Debit Memo. To enter Tax, simply select the blue Tax link next to this field. If Tax is entered, the amount will be charged to the General Ledger account for the relevant Tax Code.
- Commission Due
Displays the amount of the commission due to the associated Sales Representative.
- Commission Paid
Displays the amount of the commission paid to the associated Sales Representative.
- Notes
This is a scrolling text field with word-wrapping for entering Notes related to the miscellaneous Debit Memo.
- Print on post
Select if you want to print a copy of the Debit Memo after the POST button is selected. Debit Memos may also be reprinted from, among other places, the Customer screen.
If the Customer specified on the Debit Memo has an EDI Profile attached, you may encounter an EDI processing interface when printing it.
To assign an alternate prepaid Account, select the "Account" tab at the bottom of the screen. The following screen will appear:
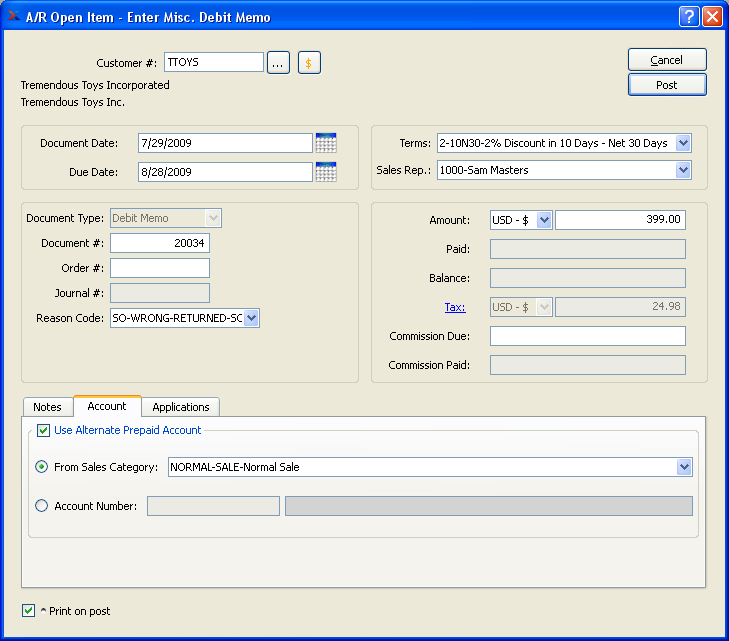
- Use Alternate Prepaid Account
Select one of the following optional Prepaid Accounts:
- From Sales Category
Specify a Sales Category whose Prepaid Account option you want to use instead of the default Prepaid Account.
- Account Number
Specify an alternate Account Number to use for the transaction.
Note
If an alternate Prepaid Account is not specified, the system will use the default Prepaid Account specified for the Customer Type under A/R Account Assignments.
To view Applications, select the "Applications" tab at the bottom of the screen. The following screen will appear:

- Applications
Display lists the history of applications related to the miscellaneous Debit Memo, if any.
To the far right of the screen, the following buttons are available:
- CANCEL
Closes the screen without entering a miscellaneous Debit Memo, returning you to the application desktop.
- POST
Posts the miscellaneous Debit Memo, using the amount specified.
Cash Receipts section.
Cash Receipts may be applied to either an open Invoice or an open miscellaneous Debit Memo. To enter a Cash Receipt, select the "Enter Cash Receipt" option. The following screen will appear:
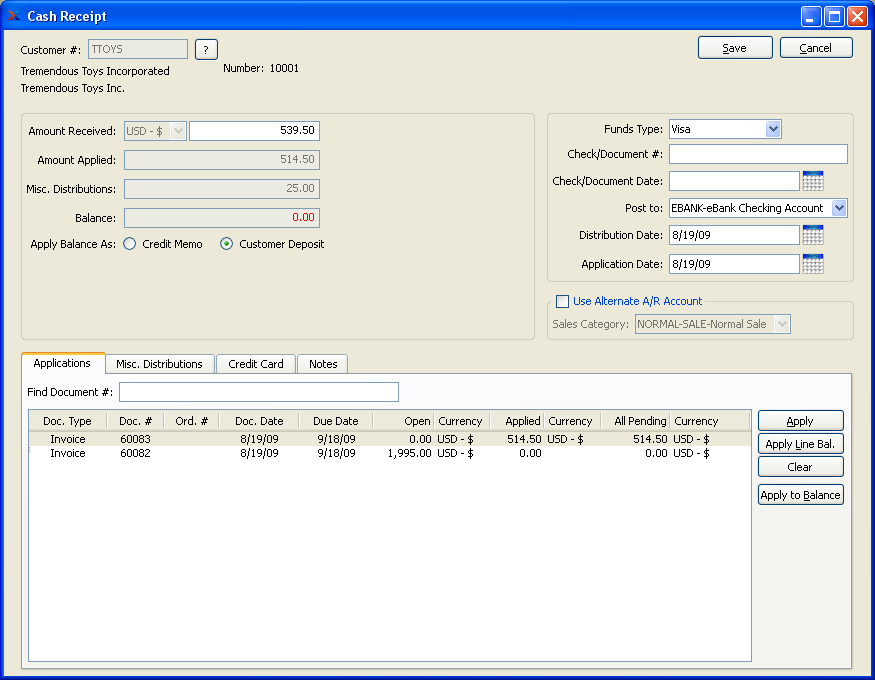
When entering a Cash Receipt, you are presented with the following options:
- Customer #
Enter the Customer Number of the Customer whose Cash has been received. The browse button located to the right of the field leads to a searchable Customers list. You may also access this list using the keyboard shortcut "CTRL + L". Once a Customer Number is entered, the Customer name and billing address will display. Select the "?" or "$" symbol next to the browse button to view Customer information for the specified Customer. If a Customer's credit is "In Good Standing," the button will feature a black question mark ("?") icon. If the icon turns to an orange dollar sign ("$"), the Customer's credit Status is "On Credit Warning." A red dollar sign ("$") indicates the Customer's credit Status is "On Credit Hold."
Tip
If you receive an overpayment from a Customer, you can go ahead and apply the full Payment to an Invoice—even if the amount exceeds the Invoice amount. In these cases, the system will automatically generate an unapplied Credit Memo for the Customer, in the overpayment amount.
- Amount Received
Specify the amount of Cash received from the Customer.
- Misc. Applications
Displays the amount of any miscellaneous distribution(s).
- Amount Applied
Displays the amount of Cash that has been applied to the specified Customer's Invoice(s).
- Balance
Displays the difference between the amount to be applied and the amount applied.
- Apply Balance As
If your system is configured to enable Customer Deposits, you may select one of the following options for applying any unapplied Cash Receipt balance:
Note
If the distribution date for the Cash Receipt precedes the application date, the label "Apply Balance As" will change to "Record Receipt as" to clarify that the cash will be recorded as a Credit Memo or Customer Deposit until the application date arrives. On the application date, the Credit Memo or Customer Deposit will automatically be applied to its specified receivable document(s).
- Credit Memo
Select to treat the unapplied balance as a miscellaneous Credit Memo, which may be applied to A/R open items at a later time.
- Customer Deposit
Select to treat the unapplied balance as a Customer Deposit. The Deferred Revenue Account specified on the A/R Account Assignments screen will be used. A Credit Memo will also be created, allowing the Customer Deposit to be applied to A/R open items at a later time.
- Funds Type
Specify the type of the Cash Receipt. Choose from following Funds Types: Check, Certified Check, Cash, Wire Transfer, and Other. If you are using xTuple's Credit Card processing functionality at your site, the following additional Funds Types options will be available: Master Card, Visa, American Express, Discover Card, Other Credit Card.
Note
If a Credit Card is being used and your site is configured to process Credit Cards from the system, then you must select a valid Credit Card using the "Credit Card" tab below. The charge transaction will begin processing once you select the SAVE button.
Tip
You can use the Funds Type "Other" for entering Credit Card information if you are not using xTuple's Credit Card processing functionality at your site.
- Check/Document #
Use this field to enter the Customer's Check Number, transaction number, Credit Card number, or any other Document Number associated with the Cash Receipt.
- Check/Document Date
Use this field to specify the date on the Check you received. This is the Document date used when running the A/R aging report.
- Post to
Select the Bank Account you want to post the Cash Receipt to. The Asset Account used for the selected Bank Account is specified on the Bank Account master.
Tip
If your site uses a unique Bank Account for receiving Credit Card payments, make sure to select the appropriate Bank Account when entering payments from a Credit Card.
- Distribution Date
Specify the date of the cash distribution. This is the date the Cash Receipt will hit the General Ledger (G/L). By default, the current day's date will appear. If the distribution date precedes the application date, the label "Apply Balance As" will change to "Record Receipt as" to clarify that the cash will be recorded as a Credit Memo or Customer Deposit until the application date arrives. On the application date, the Credit Memo or Customer Deposit will automatically be applied to its specified receivable document(s).
- Application Date
Specify the date you want the cash to be applied to the selected receivables. By default, the current day's date will appear. To prevent A/R aging and G/L balance mismatches, you may not enter an application date prior to the earliest document date of receivables the cash is being applied to.
- Use Alternate A/R Account From Sales Category
Select one of the following optional A/R Accounts:
- Sales Category
Specify a Sales Category whose A/R Account option you want to use instead of the default A/R Account.
Note
If an alternate A/R Account is not specified, the system will use the default A/R Account specified for the Customer Type under A/R Account Assignments.
- Find Document #
To search for an Invoice in the Open Items display, begin typing an Invoice Number into this field. As you type, the list will automatically scroll toward the Invoice Number you are typing. You can also search for Invoices manually by scrolling through the list.
- Applications
Display lists A/R open items (i.e., Invoices and Debit Memos) for the specified Customer.
To the far right of the screen, the following buttons are available:
- CANCEL
Closes the screen without entering a new Cash Receipt, returning you to the application desktop.
- SAVE
Saves the Cash Receipt record. If your site is configured to process Credit Cards from the system, the charge transaction will begin processing when you select the SAVE button.
Tip
You may select multiple open Items simultaneously by highlighting them using your mouse—or a combination of your mouse and either the SHIFT or CTRL keys.
- APPLY
Highlight an open Item and then select this button to apply an amount to an individual open Item.
- APPLY LINE BAL.
Highlight an open Item and then select this button to apply cash to the balance for the line.
- CLEAR
Highlight an open Item and then select this button to remove any amount applied toward the open Item.
- APPLY TO BALANCE
Select to apply the available balance to A/R open items. If the applied balance exceeds the amount due on an open Item, the remaining balance will be applied to the next open amount.
Tip
You may disable the APPLY TO BALANCE button for your site if you wish, by selecting the appropriate option in the system-level configuration.
If you need to distribute all or some portion of the amount to a miscellaneous General Ledger account click on the Misc. Distributions and the following screen will appear:
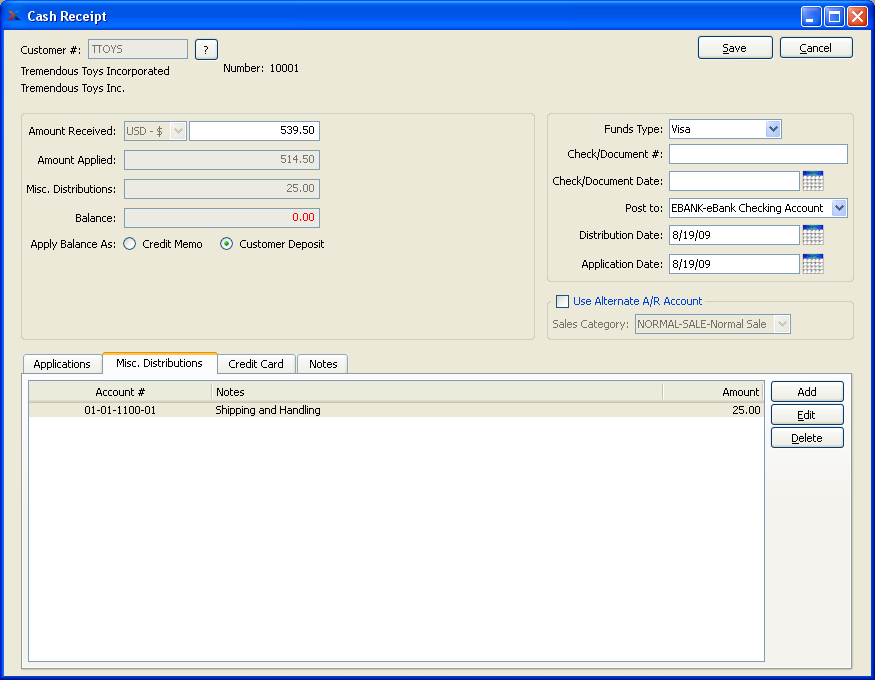
- ADD
Select to add a miscellaneous distribution.
- EDIT
Enables you to edit highlighted miscellaneous distributions. The edit screen is the same as that for creating a new miscellaneous distribution—except that when editing, the fields will contain miscellaneous distribution information. Double-clicking on a miscellaneous distribution will also bring you to the editing screen.
- DELETE
Highlight a miscellaneous distribution and then select this button to remove the distribution from the list.
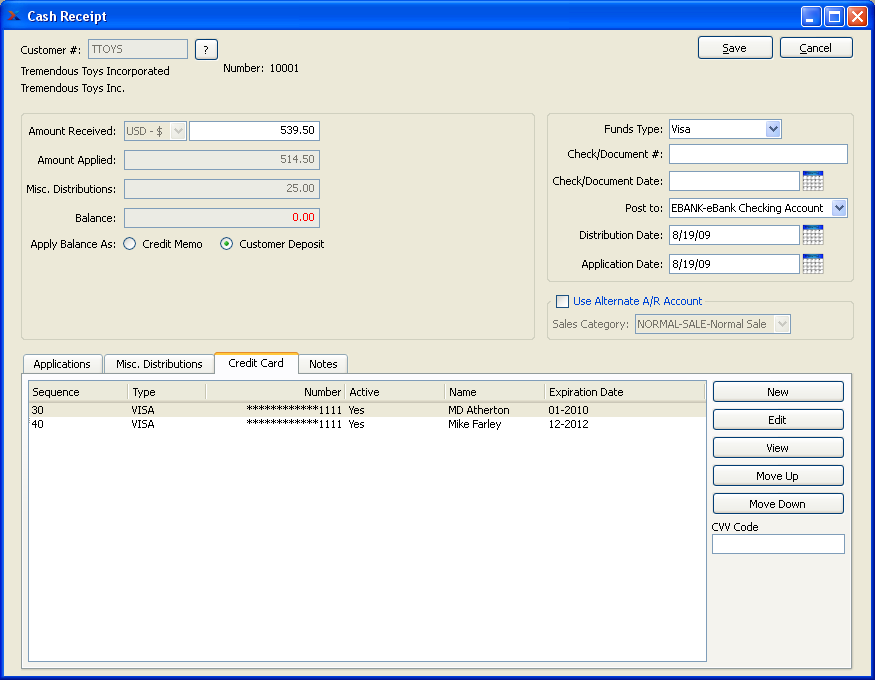
If a Customer is paying with a Credit Card, select the "Credit Card" tab to specify which Credit Card to use. The following screen will appear:
Note
Once all the required information has been entered and a valid Credit Card has been selected, the charge transaction will begin processing when you select the SAVE button.
When selecting a Credit Card to use for processing a Cash Receipt, you are presented with the following options:
- Credit Card
Display lists Credit Card information for the specified Customer.
To the far right of the screen, the following buttons are available:
- NEW
Opens screen for entering new Credit Card information for the Customer.
- EDIT
Enables you to edit highlighted Credit Cards. The edit screen is the same as that for entering new Credit Card information—except that when editing, the fields will contain Credit Card information.
- VIEW
Highlight a Credit Card and then select this button to reach a read-only view of the "Edit" screen. Double-clicking on a Credit Card will also bring you to the view screen.
- MOVE UP
Highlight a Credit Card and then select this button to move the Credit Card up in the sequence of Credit Cards. Sequence numbers are automatically adjusted to reflect the change in position.
- MOVE DOWN
Highlight a Credit Card and then select this button to move the Credit Card down the sequence of Credit Cards. Sequence numbers are automatically adjusted to reflect the change in position.
- CVV Code
Enter the Card Verification Value (CVV) Code found on the back of the specified Credit Card. This may be an optional feature at your site. Contact your Systems Administrator for details.
To add Notes to a Cash Receipt, select the "Notes" tab. The following screen will appear:
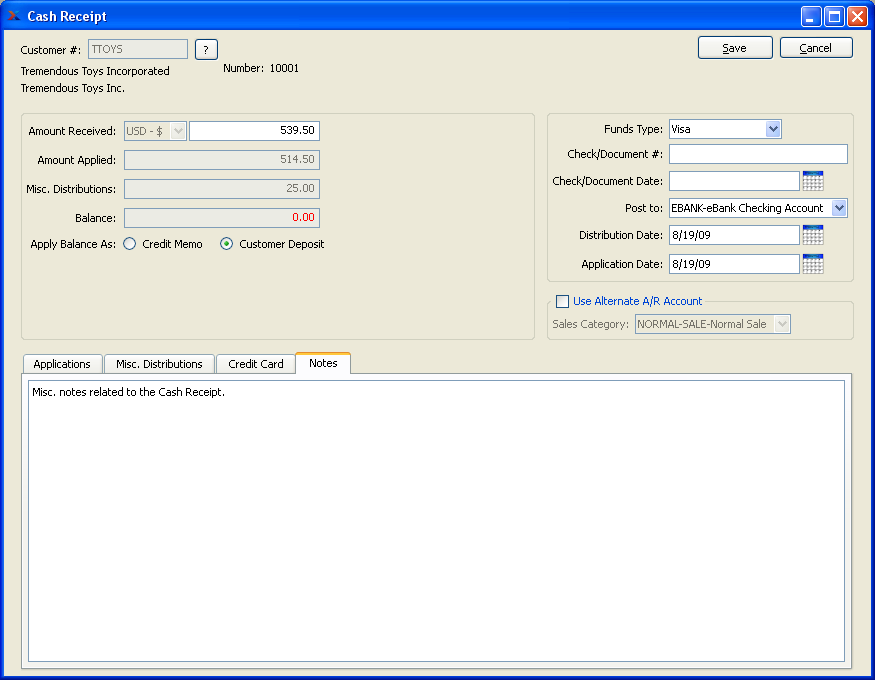
When entering Notes related to a Cash Receipt, you are presented with the following options:
- Notes
This is a scrolling text field with word-wrapping for entering Notes related to the Cash Receipt. Notes entered here may be viewed later on the Cash Receipts report screen.
To apply a Cash Receipt to an individual open A/R Item, select the APPLY button. The following screen will appear:
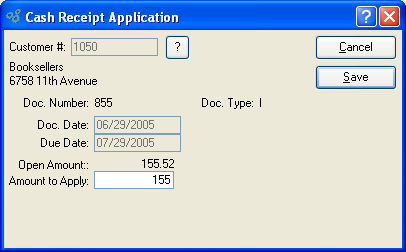
Tip
You will not be able to post a Cash Receipt if the amount applied is greater than the Cash Receipt total.
When applying a Cash Receipt to an individual open Item, you are presented with the following options:
- Customer #
Displays the Customer Number of the Customer selected on the previous screen. The Customer name and billing address will also display. Select the "?" symbol to view Customer information for the specified Customer.
- Doc. Number
Displays the Document Number associated with the Item.
- Doc. Type
Displays the Document Type of the Document.
- Doc. Date
Displays the Document's origination date. In the case of a Sales Order, the Document date is the date when the Sales Order is created.
- Due Date
Displays the date payment is due. In the case of a Sales Order, billing terms are defined in the Sales Order master.
- Open Amount
Displays the amount due for the open Item.
- Amount to Apply
Specify the Cash Receipt amount to apply to the open Item. You may not apply more than the open amount.
To the far right of the screen, the following buttons are available:
- CANCEL
Closes the screen without applying a new Cash Receipt, returning you to the application desktop.
- SAVE
Applies the Cash Receipt to the open Item.
To add a miscellaneous distribution, select the ADD button. The following screen will appear:
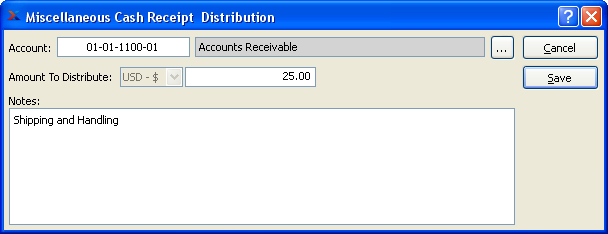
When adding a miscellaneous distribution, you are presented with the following options:
- Account
Select an Account for the miscellaneous distribution.
- Amount to Distribute
Specify the amount to distribute to/from the specified Account.
- Notes
This is a scrolling text field with word-wrapping for entering Notes related to the miscellaneous distribution.
To the far right of the screen, the following buttons are available:
- CANCEL
Closes the screen without applying a miscellaneous distribution, returning you to the application desktop.
- SAVE
Creates the miscellaneous distribution record.
Note
If your system is configured to use Credit Cards, the "Credit Card" tab will be visible. This tab will not be visible if your system is not configured to use Credit Cards.
To view and edit unposted Cash Receipts, select the "Cash Receipt Edit List" option. The following screen will appear:
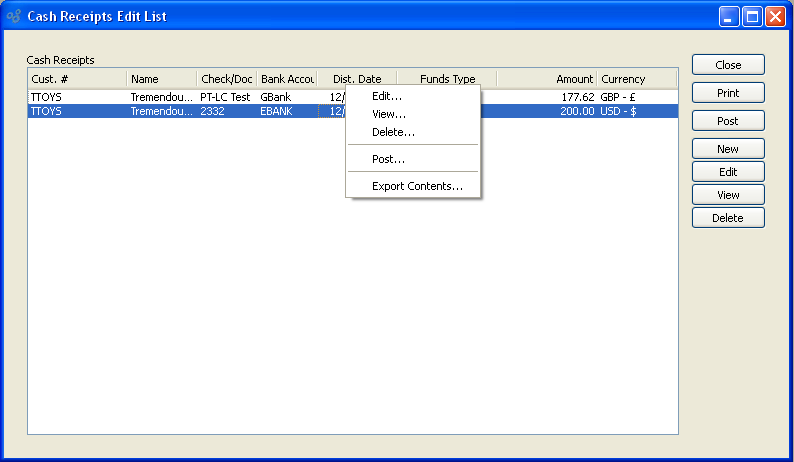
The Cash Receipt Edit List displays information on all unposted Cash Receipts, including Customer name, distribution date, and distribution amount.
Note
The Cash Receipt Edit List may include Cash Receipts generated as a result of post-authorized Credit Card charges.
To the far right of the screen, the following buttons are available:
- CLOSE
Closes the screen, returning you to the application desktop.
Runs the report associated with this screen.
- POST
Highlight a Cash Receipt(s) and then select this button to post the selected Cash Receipt(s).
- NEW
Opens screen for creating a new Cash Receipt.
- EDIT
Enables you to edit highlighted Cash Receipt. The edit screen is the same as that for creating a new Cash Receipt—except that when editing, the fields will contain pre-loaded Cash Receipt information. Double-clicking on a Cash Receipt will also bring you to the editing screen.
Note
When editing a Cash Receipt, you may notice the "Credit Card" tab is not visible. This is an intentional design to prevent users from altering Credit Card transactions which have already been processed.
To post unposted Cash Receipts, select the "Post Cash Receipts" option. The following screen will appear:
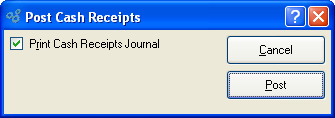
When posting unposted Cash Receipts, you are presented with the following options:
To the far right of the screen, the following buttons are available:
The Receivable Workbench is designed to consolidate on one screen the functions performed by Accounts Receivable personnel. To view the Receivables Workbench, select the "Workbench" option. The following screen will appear:

When viewing the Receivables Workbench, you are presented with the following options:
- Customer
Select all or specific Customers whose A/R information you want to display.
Tip
To generate results in the display you first have to select the QUERY button. If you are not seeing any results, this is probably the reason why.
- Debits
Select to include only Invoices and Debit Memos in the display.
- Credits
Select to include only Credit Memos in the display.
- Both
Select to include both Debits and Credits in the display.
- Find Document #
Enter the number of the document you want to locate. The record you are looking for will be highlighted in the display.
- Due Date
Specify one of the following document due date options:
- All
Select to include all due dates in the display.
- On or before
Select to include only documents having due dates on or before the date you specify.
- Between
Select to include documents having due dates falling between the dates you specify.
- Receivables
Displays the current list of receivable open items for the specified Customer, based on the parameters you specify. Documents in the display may include Invoices, Debit Memos, and Credit Memos.
To the far right of the screen, the following buttons are available:
Select to print the list of receivable documents currently displayed on the screen.
- PRINT STATEMENT
Select to print a statement for the specified Customer. This option is only available when displaying information for individual Customers.
Highlight a document in the display and then select this button to print a copy of the document.
- NEW
Select from one of the following new document options:
- Invoice
Select to create a new Invoice.
- Misc. Debit Memo
Select to create a new Miscellaneous Debit Memo.
- Credit Memo
Select to create a new Sales Order Credit Memo.
- Misc. Credit Memo
Select to create a new Miscellaneous Credit Memo.
- EDIT
Enables you to edit highlighted receivables. Double-clicking on an item will also bring you to the editing screen.
- VIEW
Highlight an item and then select from the following context-sensitive viewing options:
- Receivable Item
Select to view the specified A/R open item record.
- Invoice
Select to view the specified Invoice.
- Invoice Information
Select to view Invoice information for the specified Invoice.
- APPLY
Highlight a Credit Memo in the list and then select this button to apply the Credit Memo to an A/R open amount, as described in ???.
- REFUND
Highlight a Credit Memo which was created from a Credit Card transaction to refund the transaction amount. This option will only be available if Credit Cards are enabled at your site—and then only for Credit Memo created from a Credit Card transaction.
To manage Cash Receipts on the Receivables Workbench, select the "Cash Receipts" tab. The following screen will appear:
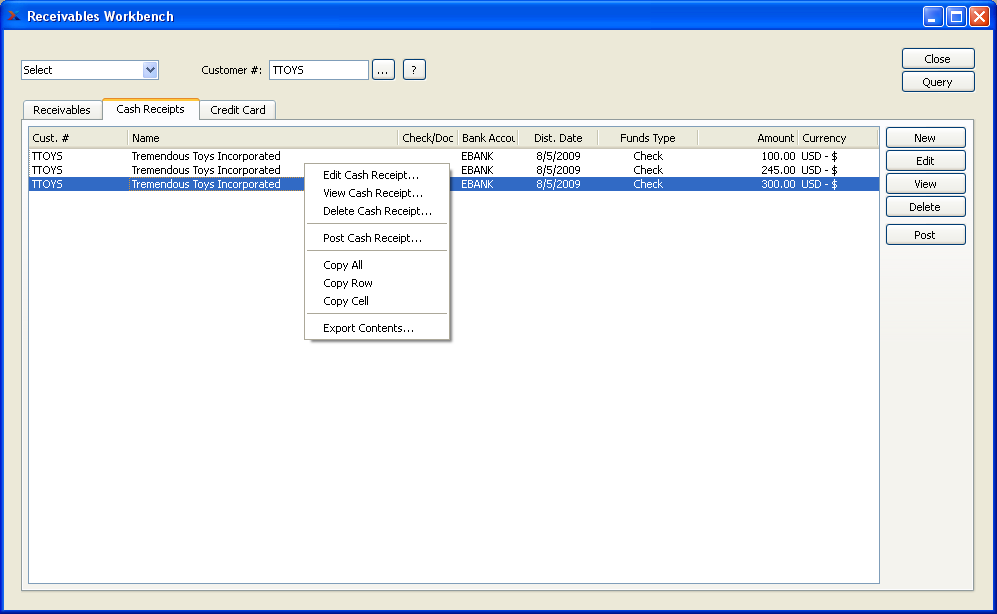
When managing Cash Receipts on the Receivables Workbench, you are presented with the following options:
- Cash Receipts
Displays the current list of unposted Cash Receipts for the specified Customer.
Note
Once a Cash Receipt is posted, it will no longer appear in the Cash Receipts list.
To the far right of the screen, the following buttons are available:
- NEW
Opens screen for creating a new Cash Receipt. For more information on entering Cash Receipts, see Section 2.3.1, “ New Cash Receipt”.
- EDIT
Enables you to edit highlighted Cash Receipt. The edit screen is the same as that for creating a new Cash Receipt—except that when editing, the fields will contain pre-loaded Cash Receipt information. Double-clicking on a Cash Receipt will also bring you to the editing screen.
- VIEW
Highlight a Cash Receipt and then select this button to reach a read-only view of the "Edit" screen.
- DELETE
Highlight a Cash Receipt and then select this button to remove the Cash Receipt from the edit list.
- POST
Highlight a Cash Receipt and then select this button to post the Cash Receipt.
To process pre-authorized Credit Card payments on the Receivables Workbench, select the "Credit Card" tab. The following screen will appear:
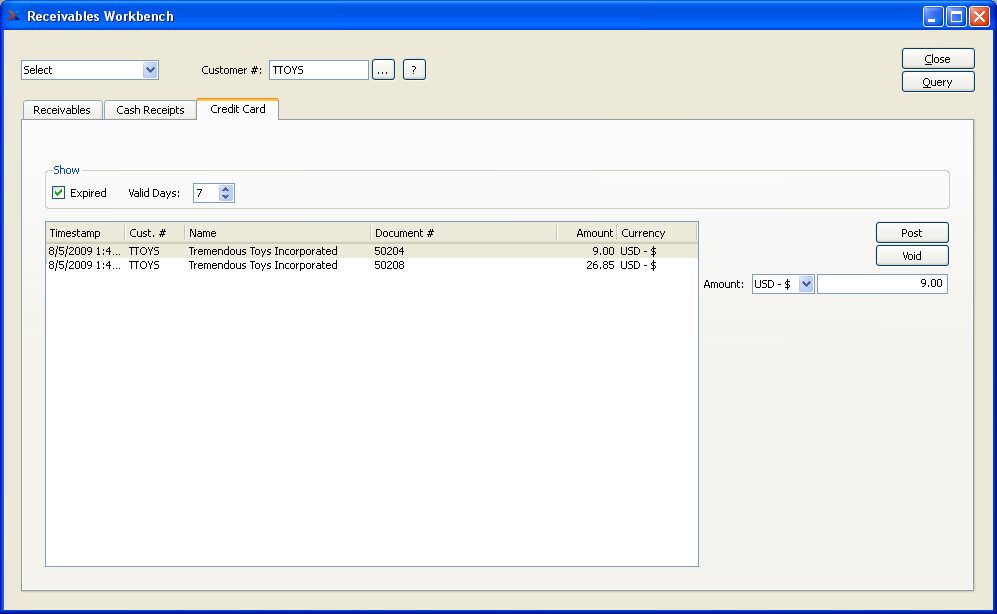
- Show
Select from the following options to include in the display:
- Expired
Lists all Credit Cards, including Expired cards.
- Valid Days
Displays Credit cards which expire on after the number of days selected.
- Credit Card
Displays the current list of pre-authorized Credit Card charges for the specified Customer. Pre-authorizations are generated from the "Payments" tab of the Sales Order header.
To the far right of the screen, the following options are available:
- POST
Highlight a pre-authorized Credit Card charge amount and then select this button to post-authorize the charge. When a pre-authorization is post-authorized, an unposted Cash Receipt is created in the specified post-authorization amount.
Tip
You only get one chance to post a Credit Card pre-authorization. Once a pre-authorization is post-authorized, it will no longer appear in the "Pre-authorized Credit Card Charges" list.
- VOID
Highlight a pre-authorized Credit Card charge amount and then select this button to void the pre-authorization.
- AMOUNT
Specify the amount of the post-authorization. By default, the pre-authorized amount will display here. However, you may override the default amount. After posting, a Cash Receipt for the Customer will be generated in the amount entered here (i.e., the post-authorization amount).
A/R Forms section.
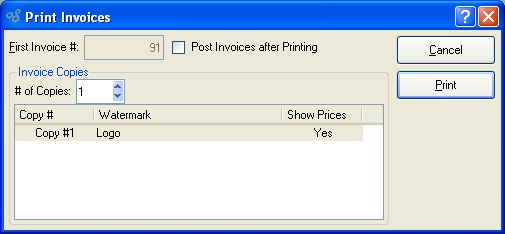
Although the system does not require you to print Invoices before posting them individually (i.e., one-at-a-time), you are required to print Invoices before posting them in batch mode. To print unposted Invoices, select the "Print Invoices" option. The following screen will appear:
When printing Invoices, you are presented with the following options:
- First Invoice #
The next Invoice Number in the automatic sequence of Invoice Numbers will display here. Once this Invoice Number has been printed, the next Invoice Number will appear. Default values for Invoice Numbers are configurable at the system level.
- Post Invoices after Printing
Select to automatically post Invoices after they have been printed.
Note
Invoices are posted effective on the date they are distributed, not on the date they are posted—as might be assumed.
- Invoice Copies
Specify details for the Invoice copies you want to print:
- # of Copies
Indicate the number of copies you want to print. Information about the specified copies will display below. To add a Watermark, double-click on a copy line.
To the far right of the screen, the following buttons are available:
- CANCEL
Closes the screen without printing Invoices, returning you to the application desktop.
Runs the report associated with this screen.
Note
If the Customer specified on the Invoice has an EDI Profile defined, you may encounter an EDI processing interface when printing individual Invoices.
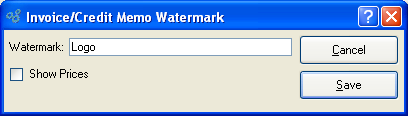
To add a Watermark to an Invoice, double-click on a copy line. The following screen will appear:
When adding a Watermark to an Invoice copy, you are presented with the following options:
- Watermark
Specify the name of the Watermark to be used for the selected copy.
- Show Prices
Select to show Prices in the selected copy.
To the far right of the screen, the following buttons are available:
- CANCEL
Closes the screen without adding a Watermark, returning you to the previous screen.
- SAVE
Saves the Watermark definition to the selected copy.
To print an Invoice that was previously printed, select the "Re-Print Invoices" option. The following screen will appear:

When re-printing an Invoice, you are presented with the following options:
- Search for Invoice Number
Enter an Invoice Number or Regular Expression. This field may be used independently or in conjunction with the date fields.
Tip
The "Invoice Number" field supports pattern matching with Regular Expressions.
- Only include Invoices with Balance
Select to include only those invoices having an open balance due in the display. If not selected, all invoices in the specified date range will be shown.
- Start Date
Invoices posted on and after this date will be displayed, unless the list is intentionally limited by information entered in the "Search for Invoice Number" field.
- End Date
Invoices posted on and before this date will be displayed, unless the list is intentionally limited by information entered in the "Search for Invoice Number" field.
- Invoices
Display lists previously printed Invoices. Highlight the individual Invoice or group of Invoices you want to re-print using your mouse button. To select a sequence of Invoices, highlight the first in the sequence using your mouse button. Then, holding down the SHIFT key on your keyboard, highlight the last Invoice in the sequence. The entire sequence is now selected. To select Invoices that are out of sequence, highlight the first Invoice in the group. Then, holding down the CTRL key on your keyboard, highlight the next Invoice you want to select. Continue highlighting Invoices with the CTRL key depressed until all desired Invoices are selected. The entire group is now ready for re-printing.
- Invoice Copies
Specify details for the Invoice copies you want to print:
- # of Copies
Indicate the number of copies you want to re-print. Information about the specified copies will display below. To add a Watermark, double-click on a copy line.
To the far right of the screen, the following buttons are available:
- CLOSE
Closes the screen without re-printing Invoices, returning you to the application desktop.
- QUERY
Select to generate a list of Invoices for re-printing, using the specified parameters.
Runs the report associated with this screen.
Tip
If the Customer specified on the Invoice has an EDI Profile defined, you may encounter an EDI processing interface when printing individual Invoices.
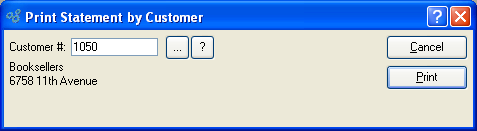
A Customer Statement shows past due information for A/R open items. To print a Customer Statement, select the "Print Statement by Customer" option. The following screen will appear:
When printing a Customer Statement, you are presented with the following options:
- Customer #
Enter the Customer Number of the Customer whose Statement you want to print. The browse button located to the right of the field leads to a searchable Customers list. You may also access this list using the keyboard shortcut "CTRL + L". Once a Customer Number is entered, the Customer name and billing address will display. Select the "?" or "$" symbol next to the browse button to view Customer information for the specified Customer. If a Customer's credit is "In Good Standing," the button will feature a black question mark ("?") icon. If the icon turns to an orange dollar sign ("$"), the Customer's credit Status is "On Credit Warning." A red dollar sign ("$") indicates the Customer's credit Status is "On Credit Hold."
To the far right of the screen, the following buttons are available:
- CANCEL
Closes the screen without printing a Customer Statement, returning you to the application desktop.
Runs the report associated with this screen.
Tip
If the specified Customer has an EDI Profile attached, you may encounter an EDI processing interface when printing the Customer Statement.
Customer Statements show past due information for A/R open items. To print Customer Statements by Customer Type, select the "Print Statements by Customer Type" option.

When printing Customer Statements by Customer Type, you are presented with the following options:
- All Customer Types
Select to print Customer Statements for all Customer Types.
- Selected
Specify the Customer Type you want to print Customer Statements for.
- Pattern
Enter a Customer Type pattern to select a range of Customer Types. Refine your search using Regular Expressions.
- Grace Period
Select a number using the arrow buttons, or manually enter a value up to a maximum of 990. The Grace Period extends backwards in time from the current day, covering the number of days specified here. If the due dates for a Customer's A/R open items fall within the Grace Period, a Statement will not be printed for that Customer. Statements will only be printed for Customers having overdue balances—that is, A/R open item which fall outside the Grace Period.
- Only Print Customers with Past Due Amounts
Select if you only want to print Statements for Customers who have past due amounts. If not selected, you will get Statements for all Customers.
To the far right of the screen, the following buttons are available:
- CANCEL
Closes the screen without printing Customer Statements, returning you to the application desktop.
Prints the Customer Statements, using the specified parameters.
Tip
If some Customers have EDI Profiles attached, you may encounter an EDI processing interface when printing particular Customer Statements.
A/R Reports section.
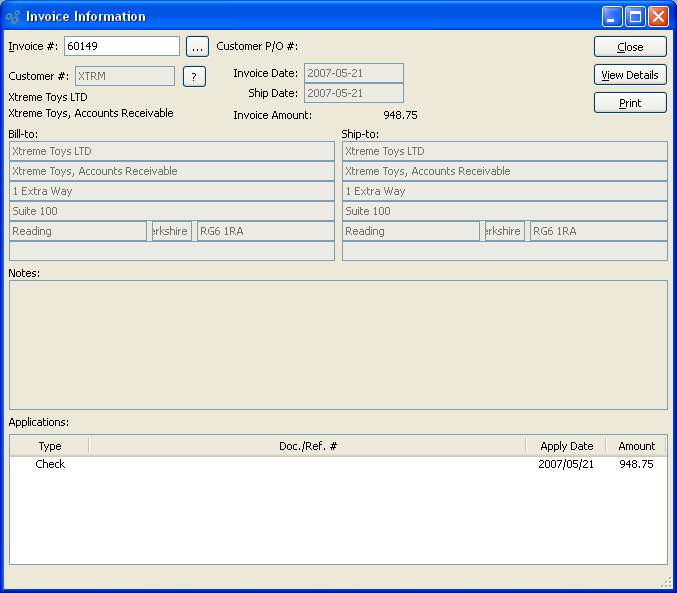
To view Invoice information, select the "Invoice Information" option. The following screen will appear:
When displaying Invoice information, you are presented with the following options:
- Invoice #
Enter the Invoice Number of the Invoice whose information you want to display.
- Customer #
Displays the Customer Number of the Customer associated with the specified Invoice. The Customer name and billing address will also display.
- Customer P/O #
Displays related Customer Purchase Order Number, if any.
- Invoice Date
Displays the date the Invoice was created.
- Ship Date
Displays the date the Invoice Items were shipped.
- Invoice Amount
Displays the amount due on the Invoice.
- Bill-To
Displays the Customer's Bill-To Address.
- Ship-To
Displays the Ship-To Address used for the specified Invoice.
- Notes
Displays any Notes associated with the Invoice.
- Applications
Display lists associated applications.
To the far right of the screen, the following buttons are available:
- CLOSE
Closes the screen, returning you to the application desktop.
- VIEW DETAILS
Select to view the original Invoice.
Runs the report associated with this screen.
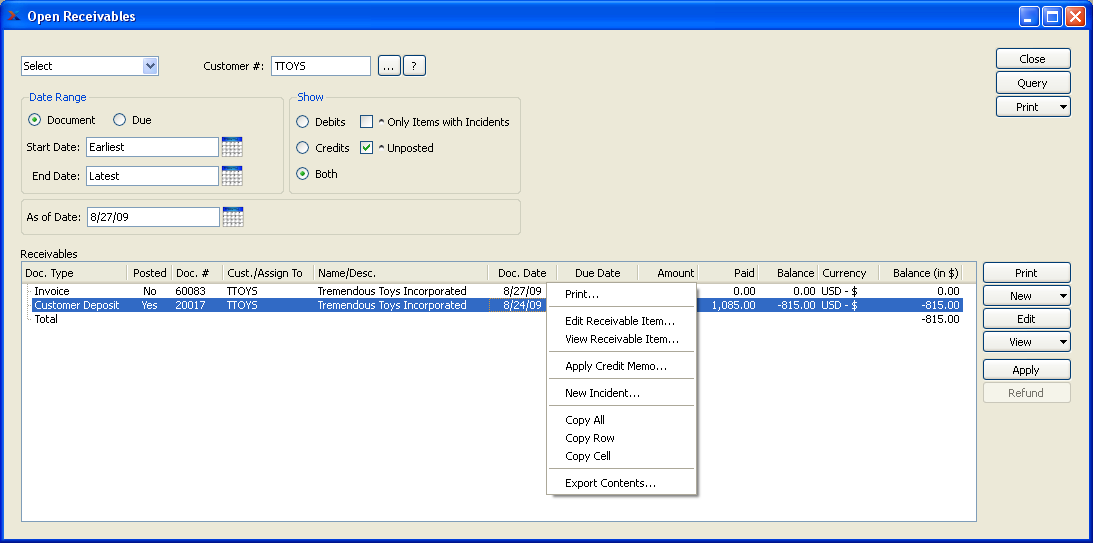
To view the complete list of open receivables, select the "Open Receivables" option. The following screen will appear:
Note
If a Customer's open Accounts Receivable (A/R) balance exceeds their Credit Limit, the Customer will automatically be placed on Credit Warning. In addition, any new or open Sales Orders for the Customer will also be placed on Credit Hold.
When displaying open receivables, you are presented with the following options:
- Customer
Select all or specific Customers whose Open Receivables you want to display.
Tip
To generate results in the display you first have to select the QUERY button. If you are not seeing any results, this is probably the reason why.
- Date Rate
Specify the following date range options:
- Document
Select if you want to show open receivables whose document date falls within the specified date range.
- Due
Select if you want to show open receivables whose due date falls within the specified date range.
- Start Date
Open receivables having document or due dates (depending on selection) on and after this date will be displayed.
- End Date
Open receivables having document or due dates (depending on selection) on and before this date will be displayed.
- As of Date
Specify the date you want the open receivables to be relative to. The report will include any open receivables which were open—that is, not yet paid—as of the specified date. This feature provides "point-in-time" open balance functionality.
Note
The payment date used as a reference for the "As of Date" field is the G/L distribution date, not the posting date.
- Show
Specify which of the following options you want to display:
- Debits
Select to include only debit balance documents in the display.
- Credits
Select to include only credit balance documents in the display.
- Both
Select to include both debit and credit balance documents in the display.
- Only Items with Incidents
Select to include only documents having linked CRM Incidents in the display.
- Unposted
Select to include unposted documents in the display.
- Receivables
Display lists open receivables by Customer, using the specified parameters.
To the far right of the screen, the following buttons are available:
- CLOSE
Closes the screen, returning you to the application desktop.
- QUERY
Select to generate the display, using the specified parameters.
If the Customer selection is for a group of Customers, this button will print the report associated with this screen. If a single Customer is displayed then the PRINT button gives a menu of choices. Select from one of the following print options:
- List
Print the report associated with this screen.
- Statement
Print an A/R Statement report for the selected Customer.
If the selected Customer has an EDI Profile attached, you may encounter an EDI processing interface when printing the A/R Statement.
The PRINT button next to the Receivables list prints the document selected in the list.
If the Customer specified on the document has an EDI Profile attached, you may encounter an EDI processing interface when printing it.
- NEW
Select from one of the following options:
- INVOICE
Create a new Invoice. If a single Customer is selected, the Invoice is pre-populated with the information about this Customer.
- MISC. DEBIT MEMO
Create a new Miscellaneous Debit Memo. If a single Customer is selected, the Miscellaneous Debit Memo is pre-populated with this Customer.
- CREDIT MEMO
Create a new Credit Memo. If a single Customer is selected, the Credit Memo is pre-populated with the information about this Customer.
- MISC. CREDIT MEMO
Create a new Miscellaneous Credit Memo. If a single Customer is selected, the Miscellaneous Credit Memo is pre-populated with this Customer.
- EDIT
Edit the selected document.
- VIEW
Select from one of the following options (not all options are available for all document types):
- RECEIVABLE ITEM
Opens the A/R Open Item window for this Receivable
- INVOICE
Opens the Invoice window for the selected Invoice without the ability to make changes.
- INVOICE INFORMATION
Opens the Invoice Information window for the selected Invoice
- APPLY
Apply the selected document to other open receivables if the selected document is a Credit Memo or a Customer Deposit.
- POST
Post the selected document if it is a Debit Memo or Invoice.
- REFUND
Refund the balance on the selected document if it was paid with a credit card.
The A/R Aging report gives you the ability to view A/R open items in a bucketed, time-phased perspective. And this perspective is portable, allowing you to view point-in-time snapshots of open balances.
An open Item is recognized by the A/R Aging report "as of" the item's document date. In the case of Invoices, the document date is the Invoice date—not the date the Invoice is distributed to the General Ledger (G/L) nor the date on which the Invoice is posted. (A/R Debit/Credit Memos are recognized on their document date.) For example, if you post an Invoice on January 1, but the Invoice date is February 15, then the "as of" date for that open item will be February 15. This means, if you run the A/R Aging report with an "as of" date in January, the open item with an Invoice date of February 15 will not appear in the report. In fact, it will not appear in the report until an "as of" date of February 15 or later is specified.
Tip
You can view the document date for an open item by right-clicking on a line in the A/R Aging display. You can also find open item details on other screens—for example, A/R Workbench, Customer History, Open Items by Customer, etc.
The grouping of open items into time-phased buckets is driven by a document's due date. In other words, if a due date falls within 0-30 days of the "as of" date specified when the report is run, then the open item will appear in the first bucket. If the due date falls 31-60 days past the specified "as of" date, then the open item will appear in the second bucket. And so on. But again, keep in mind that the document date for an A/R open item (e.g., Invoice date) must be on or before the specified "as of" date for the item to be recognized by the report.
To view open Accounts Receivable (A/R) open items from an aging perspective, select the "A/R Aging" option. The following screen will appear:
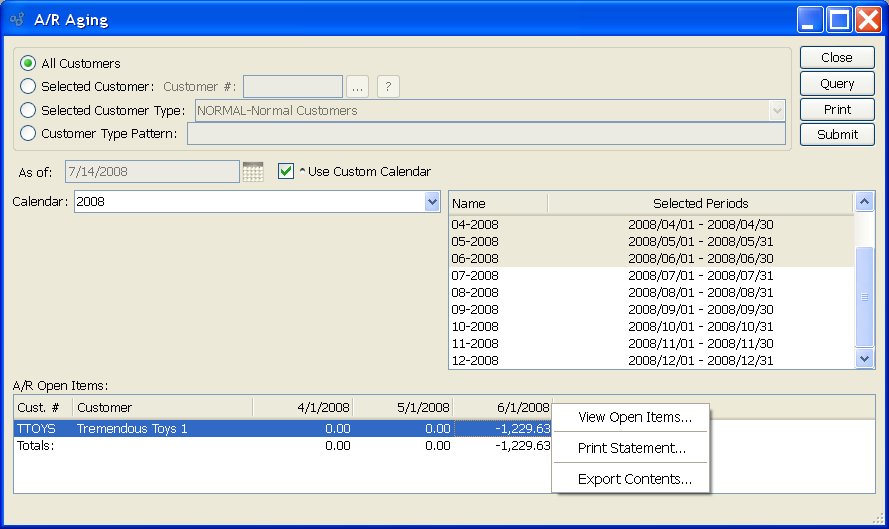
When displaying aging A/R open items, you are presented with the following options:
- All Customers
Select to display A/R open items for all Customers.
- Selected Customer
Select to display A/R open items for a selected Customer.
- Selected Customer Type
Specify Customer Type whose A/R open items you want to display.
- Customer Type Pattern
Enter a Customer Type pattern to select a range of Customer Types.
- As of Date
Specify the date you want the A/R open items to be relative to. The report will include any A/R items which were open—that is, not yet paid—as of the specified date. This feature provides "point-in-time" open balance functionality. But again, keep in mind that the document date for an A/R open item (e.g., Invoice date) must be on or before the specified "as of" date for the item to be recognized by the report.
- Use Custom Calendar
Select if you want to display A/R open items using a custom Calendar of your choosing.
If selected, the screen will present a series of different options, including the option to select a Calendar and associated periods.
- A/R Open Items
Display lists aging A/R open items, using the specified parameters.
To view A/R open items using a custom Calendar, select the "Use Custom Calendar" option above. The following screen will appear:
Note
If a Customer's open Accounts Receivable (A/R) balance exceeds their Credit Limit, the Customer will automatically be placed on Credit Warning. In addition, any new or open Sales Orders for the Customer will also be placed on Credit Hold.
When displaying A/R open items using a custom Calendar, you are presented with the following options:
- Calendar
Select the Calendar you want to use for the report.
Associated Calendar periods will be displayed.
- Name/Selected Periods
Select as many periods as you want to display. Selected periods correspond to Calendar specified in the "Calendar" field. Select individual periods or groups of periods together. To select an individual period, highlight the period using your mouse button. The period is now selected. To select a sequence of periods, highlight the first in the sequence using your mouse button. Then, holding down the SHIFT key on your keyboard, highlight the last period in the sequence. The entire sequence is now selected. To select periods that are out of sequence (e.g., January, April, July, October), highlight the first period in the group. Then, holding down the CTRL key on your keyboard, highlight the next period you want to select. Continue highlighting periods with the CTRL key depressed until all desired periods are selected. The entire group is now selected.
- A/R Open Items
Display lists time-phased A/R open items, using the specified parameters.
To the far right of the screen, the following buttons are available:
- CLOSE
Closes the screen, returning you to the application desktop.
- QUERY
Select to generate the display, using the specified parameters.
Runs the report associated with this screen.
- SUBMIT
Select to submit report to the Batch Manager.
To view daily Invoice and Credit Memo transactions, select the "Invoice Register" option. The following screen will appear:
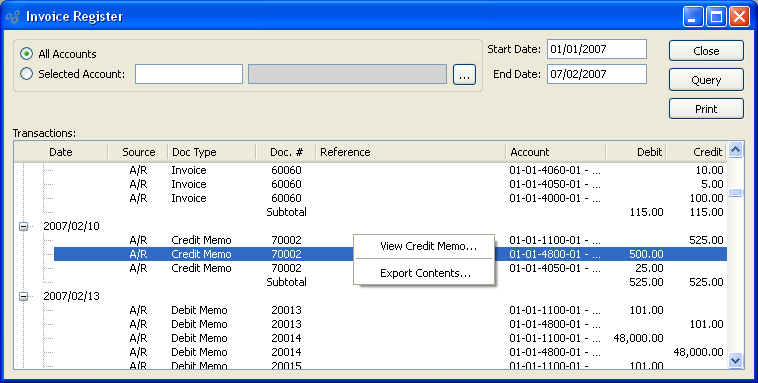
When displaying the Invoice Register, you are presented with the following options:
- All Accounts
Select to display Invoice and Credit Memo transactions for all G/L Accounts.
- Selected Account
Specify G/L Account whose Invoice and Credit Memo transactions you want to display.
- Start Date
Invoices and Credit Memos posted on and after this date will be displayed. This is a required field.
- End Date
Invoices and Credit Memos posted on and before this date will be displayed. This is a required field.
- Transactions
Display lists daily Invoice and Credit Memo transactions based on the specified parameters. This display is a nested list, with a plus ("+") sign located to the far left of the display next to each date. By clicking your mouse on a plus sign, you reveal lower levels of information related to transactions on that date. In addition, the totals for the included transactions will appear at the bottom of the screen.
Tip
If a Ship-To Address was used for an Invoice, the Ship-To Address will appear in the Reference column of the Transactions display.
To the far right of the screen, the following buttons are available:
- CLOSE
Closes the screen, returning you to the application desktop.
- QUERY
Select to generate the display, using the specified parameters. Start date and end date must be entered for request to proceed. Results will be displayed in the "Transactions" list.
Runs the report associated with this screen.
To view the history of Cash Receipts and their applications by Customer, select the "Cash Receipts" option. The following screen will appear:
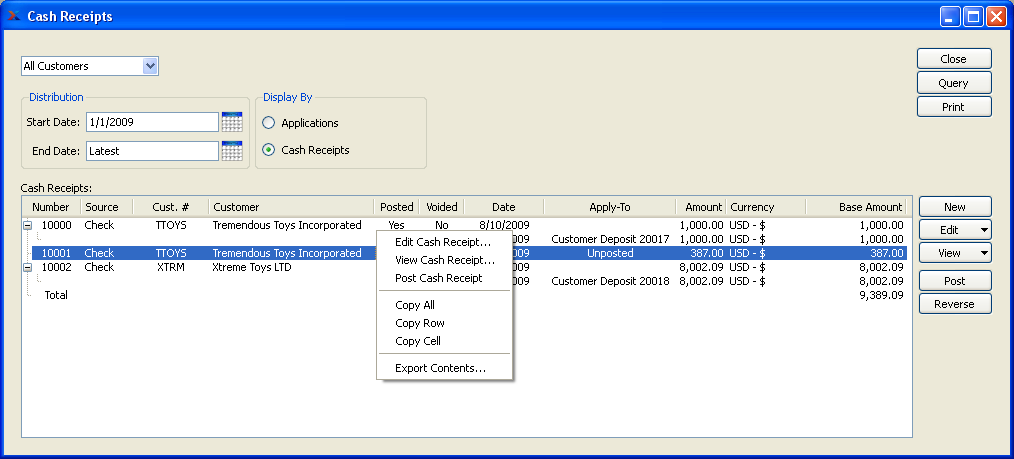
Note
Prior to xTuple ERP version 3.3.0, Cash Receipt history was not retained for use by this screen. As a result, you will not see Cash Receipt history for any Cash Receipts entered prior to version 3.3.0. Since old Cash Receipt information is not available prior to version 3.3.0, the A/R Applications screen should be used until sufficient Cash Receipt history is accumulated.
When viewing Cash Receipts and their applications, you are presented with the following options:
- Customer
Select all or specific Customers whose Cash Receipt details you want to display.
Tip
To generate results in the display you first have to select the QUERY button. If you are not seeing any results, this is probably the reason why.
- Distribution
Specify a date range for Cash Receipt history you want to display:
- Start Date
Cash Receipts entered on and after this date will be displayed.
- End Date
Cash Receipts entered on and before this date will be displayed.
- Display By
Choose one of the following display options:
- Applications
Select to order the results by the Cash Receipt applications. This functionality was not changed in xTuple ERP version 3.3.0—and so it operates in the same manner it did prior to that version.
- Cash Receipts
Select to order the results by Cash Receipt. Only Cash Receipts entered in or after xTuple ERP version 3.3.0 will be shown. For older Cash Receipt history, see the A/R Applications screen.
- Cash Receipts
Display lists Cash Receipt details, using the specified parameters.
Note
The display will include unposted as well as posted Cash Receipts.
To the far right of the screen, the following buttons are available:
- CLOSE
Closes the screen, returning you to the application desktop.
- QUERY
Select to generate the display, using the specified parameters.
Runs the report associated with this screen.
- NEW
Select to create a new Cash Receipt.
- EDIT
Select to edit the specified unposted Cash Receipt or receivable item.
- VIEW
Select to view the specified Cash Receipt or receivable item.
- POST
Select to post the specified Cash Receipt.
- REVERSE
Select to reverse (i.e., void) the specified posted Cash Receipt. When a Cash Receipt is voided, any applications will also be reversed. Keep in mind that any Credit Memos or Customer Deposits created from the unapplied balance when the original Cash Receipt was posted will not be reversed when a Cash Receipt is voided. Instead, a misc. A/R Debit Memo will be created in the amount of the original unapplied balance. You may only reverse Cash Receipts entered in xTuple ERP version 3.3.0 or later.
To view details concerning the application of Cash Receipts and Credit Memos to A/R open items, select the "A/R Applications" option. The following screen will appear:

When viewing A/R application details, you are presented with the following options:
- All Customers
Select to display A/R application details for all Customers.
- Selected Customer
Select to display A/R application details for a selected Customer.
- Selected Customer Type
Specify Customer Type whose A/R application details you want to display.
- Customer Type Pattern
Enter a Customer Type pattern to select a range of Customer Types. Refine your search using Regular Expressions.
- Start Date
A/R applications made on and after this date will be displayed.
- End Date
A/R applications made on and before this date will be displayed.
- Show Cash Receipts
Select to display only Cash Receipt application details.
- Show Credit Memos
Select to display only Credit Memo application details.
- A/R Applications
Display lists A/R application details, using the specified parameters. The amount of each A/R Application is displayed in the document's Currency. The total amount of all applications during the period will display, normalized to the Base Currency using the Currency Exchange Rate effective on the document's Posting Date, at the bottom of the screen.
Tip
When you see the term "Other" in the "Apply-To" column, this typically refers to a Misc. Application made while entering a Cash Receipt.
To the far right of the screen, the following buttons are available:
- CLOSE
Closes the screen, returning you to the application desktop.
- QUERY
Select to generate the display, using the specified parameters.
Runs the report associated with this screen.
To view the records of posted Cash Receipts, select the "Deposits Register" option. The following screen will appear:
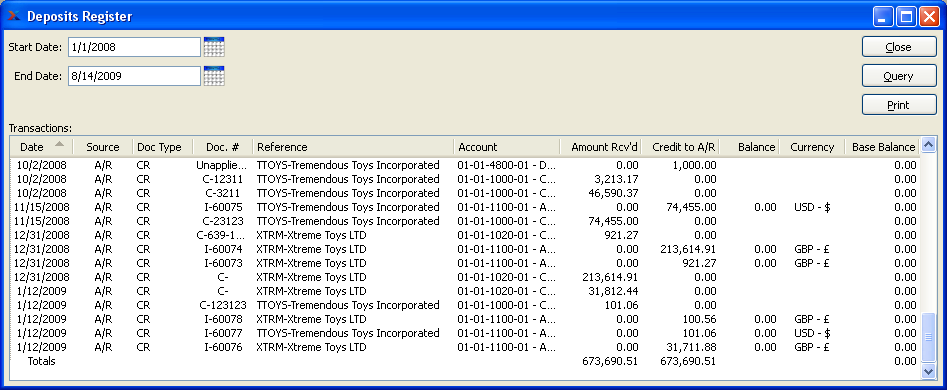
When displaying the Deposits Register, you are presented with the following options:
- Start Date
Cash Receipts posted on and after this date will be displayed.
- End Date
Cash Receipts posted on and before this date will be displayed.
- Transactions
Display lists posted Cash Receipts, using the specified parameters. The totals for the received and A/R application amounts will display at the bottom of the screen.
Note
The balance due amount displayed here refers to any open amount remaining on the A/R open item which the Cash Receipt was applied to. No balance due will appear for prepaid transactions.
To the far right of the screen, the following buttons are available:
- CLOSE
Closes the screen, returning you to the application desktop.
- QUERY
Select to generate the display, using the specified parameters.
Runs the report associated with this screen.
To view Customer history, select the "Customer History" option. The following screen will appear:
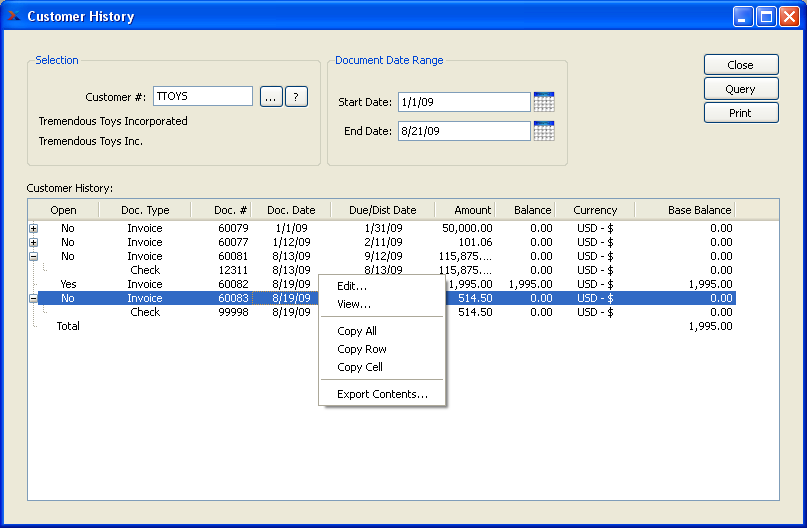
When displaying Customer history, you are presented with the following options:
- Selection
Specify your Customer selection:
- Customer #
Enter the Customer Number of the Customer whose history you want to display.
- Document Date Range
Specify the date range for documents you want to include in the display:
- Start Date
Documents whose document date falls on and following this date will be displayed.
- End Date
Documents whose document date falls on and before this date will be displayed.
- Customer History
Display lists Customer history, using the specified parameters. This display is a nested list, with a plus ("+") sign located to the far left of the display next to each Document that may be expanded to lower levels. By clicking your mouse on a plus sign, you reveal lower levels of information related to the Document.
To the far right of the screen, the following buttons are available:
- CLOSE
Closes the screen, returning you to the application desktop.
- QUERY
Select to generate the display, using the specified parameters.
Runs the report associated with this screen.
When posting Invoices in batch mode, you are given the option to print a Sales Journal. To print a Sales Journal, select the "Sales Journal" option. The following screen will appear:
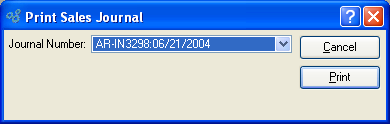
When printing a Sales Journal, you are presented with the following options:
Note
There is no intended relationship between the Sales Journal Number and any Invoice Numbers appearing on the Sales Journal—even though the Journal Number prefix "AR IN" would seem to suggest a relationship.
- Journal Number
Specify the number of the Sales Journal you want to print. Sales Journals are created when Invoices are posted. The Journal Number you select will include both the Sales Journal Number and also the date when the Invoices were posted.
To the far right of the screen, the following buttons are available:
- CANCEL
Closes the screen without printing a Sales Journal, returning you to the application desktop.
Runs the report associated with this screen.
When posting Credit Memos in batch mode, you are given the option to print a Credit Memo Journal. To print a Credit Memo Journal, select the "Credit Memo Journal" option. The following screen will appear:
When printing a Credit Memo Journal, you are presented with the following options:
- Journal Number
Specify the number of the Credit Memo Journal you want to print. Credit Memo Journals are created when Credit Memos are posted. The Journal Number you select will include both the Credit Memo Journal Number and also the date when the Credit Memos were posted.
To the far right of the screen, the following buttons are available:
- CANCEL
Closes the screen without printing a Credit Memo Journal, returning you to the application desktop.
Runs the report associated with this screen.
To access the Customer master list, select the "Customers" option. The following screen will appear:
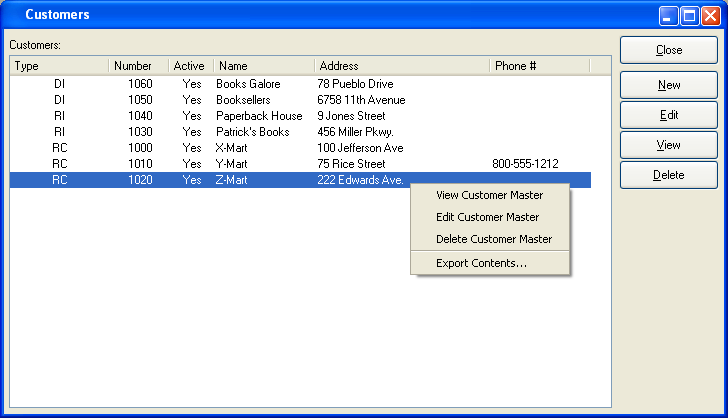
The Customer master list displays basic information on all existing Customers, including Customer Type, Customer Number, active status, Customer name, billing address, and phone number.
To the far right of the screen, the following buttons are available:
- CLOSE
Closes the screen, returning you to the application desktop.
- NEW
Opens screen for creating a new Customer.
- EDIT
Enables you to edit highlighted Customer. The edit screen is the same as that for creating a new Customer—except that when editing, the fields will contain pre-loaded Customer information. Double-clicking on a Customer will also bring you to the editing screen.
- VIEW
Highlight a Customer and then select this button to reach a read-only view of the "Edit" screen.
- DELETE
Highlight a Customer and then select this button to remove the Customer from the master list.