Tax section.
To search for a Tax Authority, select the "Search for Tax Authority" option. The following screen will appear:
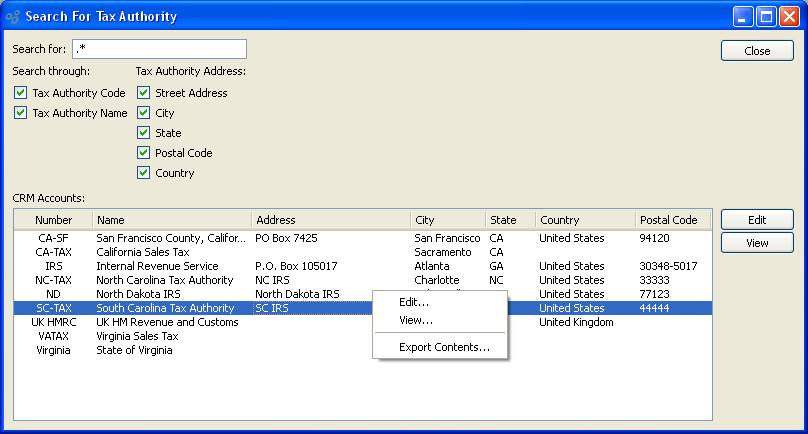
When searching to retrieve Tax Authority information from the database, you are presented with the following options:
- Search for
Enter any character or combination of characters you want to match, followed by the TAB key. The "Search for" field supports pattern matching with Regular Expressions.
Tip
Hitting the TAB key activates the search operation.
- Search through
Specify which of the following criteria you want to include in the search:
- Tax Authority Code
Select to search by Tax Authority code.
- Tax Authority Name
Select to search by Tax Authority Name.
- Street Address
Select to search by Tax Authority Street Address.
- City
Select to search by Tax Authority City.
- State
Select to search by Tax Authority State.
- Postal Code
Select to search by Tax Authority Postal Code.
- Country
Select to search by Tax Authority Country.
- CRM Accounts
Display will show search results for Tax Authorities, using specified parameters.
To the far right of the screen, the following buttons are available:
- CLOSE
Closes the screen, returning you to the application desktop.
- EDIT
Enables you to edit highlighted Tax Authority. The edit screen is the same as that for creating a new Tax Authority—except that when editing, the fields will contain Tax Authority information. Double-clicking on a Tax Authority will also bring you to the editing screen.
- VIEW
Highlight a Tax Authority and then select this button to reach a read-only view of the "Edit" screen.
Tax Authorities are any entities legally-authorized to collect Taxes—for example, city, county, state, or federal government agencies. To access the master list of Tax Authorities, select the "Tax Authorities" option. The following screen will appear:

The "Tax Authorities" screen displays information on all existing Tax Authorities, including Tax Authority code and Tax Authority name.
To the far right of the list, the following buttons are available:
- CLOSE
Closes the screen, returning you to the application desktop.
Runs the report associated with this screen.
- NEW
Opens screen for creating a new Tax Authority.
- EDIT
Enables you to edit highlighted Tax Authorities. The edit screen is the same as that for creating a new Tax Authority—except that when editing, the fields will contain Tax Authority information. Double-clicking on a Tax Authority will also bring you to the editing screen.
- VIEW
Highlight a Tax Authority and then select this button to reach a read-only view of the "Edit" screen.
- DELETE
Highlight a Tax Authority and then select this button to remove the Tax Authority from the list.
To create a new Tax Authority, select the NEW button. The following screen will appear:
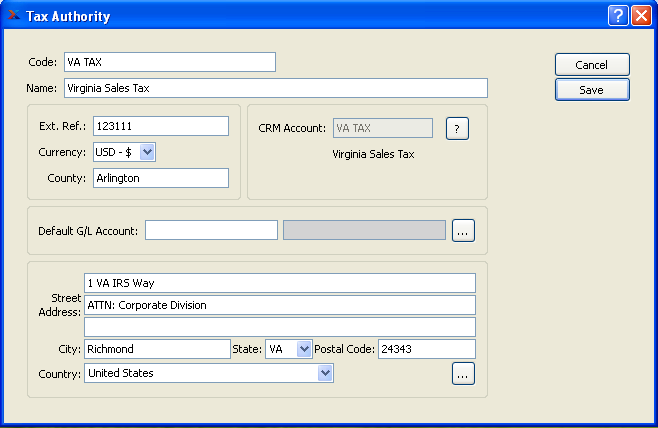
When creating a new Tax Authority, you are presented with the following options:
- Code
Enter a code to identify the Tax Authority.
- Name
Enter a name to describe the Tax Authority.
- Ext. Ref
Use this field to record any external accounting references for the Tax Authority—if applicable.
- Currency
Specify the Currency to be used for Tax calculations when transactions are governed by the Tax Authority.
The Currency selection affects only Tax calculations for transactions governed by the Tax Authority. It has no impact on the Currency used for Line Items, etc. on an Order. If the Tax Authority requires Tax to be collected in the base Currency, then do not make a selection; leave this field blank. This option won"t even be available if your site does not have multiple Currencies defined.
Tip
If a Tax Authority collects Tax in your base Currency, then leave the Currency selection blank.
- County
Enter the County which the Tax Authority has jurisdiction over—if applicable.
- CRM Account
Displays the CRM Account Number associated with the Tax Authority.
Tax Authorities are a form of CRM Account. If a Tax Authority is created from the Accounting module, a linked CRM Account will automatically be created. To view the CRM Account information for the Tax Authority, select the "?" symbol next to the field.
- Default G/L Account
Specify the G/L Account to credit when payment (check) to Tax Authority is posted.
- Address
Manually enter Tax Authority's Address information in the fields below—or use the browse button to select pre-existing Address information. If a new Address is manually entered here, that Address will be added automatically to the master list of Addresses. For additional documentation related to creating Addresses, see Section 8.1, “ New Address”.
To the far right of the screen, the following buttons are available:
- CANCEL
Closes the screen without creating a Tax Authority, returning you to the previous screen.
- SAVE
Creates the Tax Authority and adds it to the master list of Tax Authorities.
Tax Zones are geographic areas that have a specific tax jurisdiction and tax assignment. Tax Assignments are assigned on a Tax Zone and Tax Type basis to determine what tax structure to apply to a given item. To access the master list of Tax Zones, select the "Tax Zones" option. The following screen will appear:
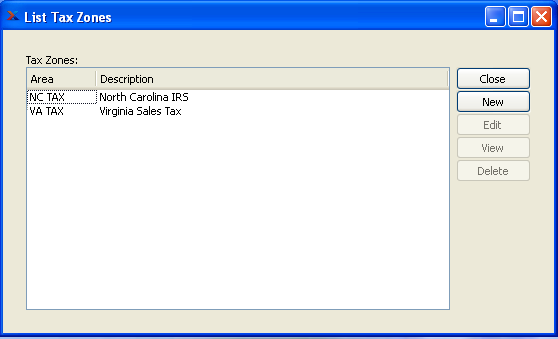
The "Tax Zones" screen displays information on all existing Tax Zones, including Tax Zone area and Tax Zone description.
To the far right of the list, the following buttons are available:
- CLOSE
Closes the screen, returning you to the application desktop.
- NEW
Opens screen for creating a new Tax Zone.
- EDIT
Enables you to edit highlighted Tax Zones. The edit screen is the same as that for creating a new Tax Zone—except that when editing, the fields will contain Tax Zone information. Double-clicking on a Tax Zone will also bring you to the editing screen.
- VIEW
Highlight a Tax Zone and then select this button to reach a read-only view of the "Edit" screen.
- DELETE
Highlight a Tax Zone and then select this button to remove the Tax Zone from the list.
To create a new Tax Zone, select the NEW button. The following screen will appear:
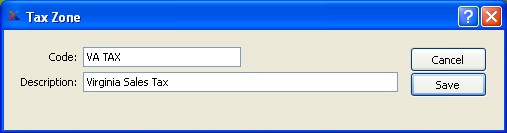
When creating a new Tax Zone, you are presented with the following options:
- Code
Enter a code to identify the Tax Zone.
- Description
Enter a description to describe the Tax Zone.
To the far right of the screen, the following buttons are available:
- CANCEL
Closes the screen without creating a Tax Zone, returning you to the previous screen.
- SAVE
Creates the Tax Zone and adds it to the master list of Tax Zones.
Tax Classes are used as a grouping mechanism for structuring of cumulative taxes. Can also be used for reporting purposes such as summarized historical reporting and subtotaling on forms. To access the master list of Tax Classes, select the "Tax Classes" option. The following screen will appear:

The "Tax Classes" screen displays information on all existing Tax Classes.
To the far right of the list, the following buttons are available:
- CLOSE
Closes the screen, returning you to the application desktop.
- NEW
Opens screen for creating a new Tax Class.
- EDIT
Enables you to edit highlighted Tax Classes. The edit screen is the same as that for creating a new Tax Class—except that when editing, the fields will contain Tax Class information. Double-clicking on a Tax Class will also bring you to the editing screen.
- VIEW
Highlight a Tax Class and then select this button to reach a read-only view of the "Edit" screen.
- DELETE
Highlight a Tax Class and then select this button to remove the Tax Class from the list.
To create a new Tax Class, select the NEW button. The following screen will appear:
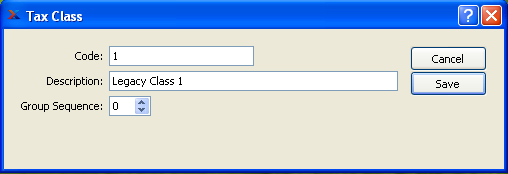
When creating a new Tax Class, you are presented with the following options:
- Code
Enter a code to identify the Tax Class.
- Description
Enter a description to describe the Tax Class.
- Group Sequence
Select or enter a Group Sequence for this Tax Class. The Group Sequence is used for calculating cumulative taxes.
To the far right of the screen, the following buttons are available:
- CANCEL
Closes the screen without creating a Tax Class, returning you to the previous screen.
- SAVE
Creates the Tax Class and adds it to the master list of Tax Classes.
Tax Codes define the amount and type(s) of Tax to be added to an Order. To access the master list of Tax Codes, select the "Tax Codes" option. The following screen will appear:
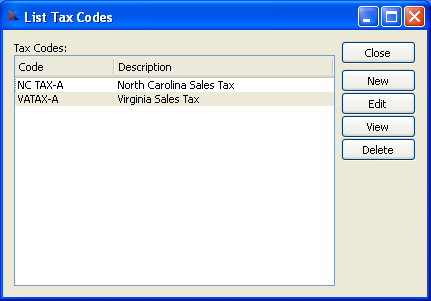
The Tax Codes master list displays the code and description for all existing Tax Codes.
To the far right of the screen, the following buttons are available:
- CLOSE
Closes the screen, returning you to the application desktop.
- NEW
Opens screen for creating a new Tax Code.
- EDIT
Enables you to edit highlighted Tax Code. The edit screen is the same as that for creating a new Tax Code—except that when editing, the fields will contain Tax Code information. Double-clicking on a Tax Code will also bring you to the editing screen.
- VIEW
Highlight a Tax Code and then select this button to reach a read-only view of the "Edit" screen.
- DELETE
Highlight a Tax Code and then select this button to remove the Tax Code from the master list
To create a new Tax Code, select the NEW button. The following screen will appear:
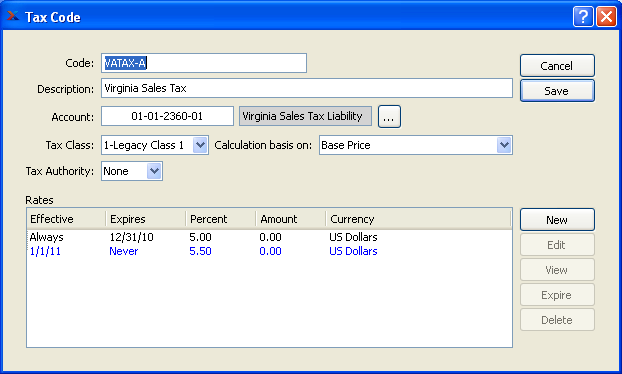
When creating a new Tax Code, you are presented with the following options:
- Code
Enter an identifying code for the Tax Code.
- Description
Enter a description to identify the Tax Code.
- Account
Specify a valid General Ledger Account. This is a Liability Account. It will be credited when Invoices are posted and debited when Credit Memos are posted.
- Tax Class
Select a valid Tax Class.
- Calculation basis on
Select a valid calculation basis. This list includes "Base Price" and all other Tax Codes that share the same Tax Class. When "Base Price" is selected the Tax Code may be assigned on the Tax Assignment window, and the tax calculation will be based on the base price amount to be taxed, plus any applicable cumulative taxes. When a Tax Code is selected, then the Tax Code will be calculated against the derived amount from the referenced Tax Code. This is a method to defined nested taxes or "a tax on a tax".
- Tax Authority
Select a valid Tax Authority.
To the far right of the screen, the following buttons are available:
- CANCEL
Closes the screen without creating a Tax Code, returning you to the application desktop.
- SAVE
Creates the Tax Code and adds it to the master list of Tax Codes.
When defining or maintaining Tax Code Rates, you are presented with the following options:
To the far right of the screen, the following buttons are available:
- NEW
Opens screen for creating a new Tax Code Rate.
- EDIT
Enables you to edit highlighted Tax Code Rates. The edit screen is the same as that for creating a new Tax Code Rate—except that when editing, the fields will contain Tax Code Rate information. Double-clicking on a Tax Code Rate also bring you to the editing screen.
- VIEW
Enables you to view highlighted Tax Code Rates. Highlight a Tax Code Rate and then select this button to reach a read-only view of the "Edit" screen.
- EXPIRE
Highlight a Tax Code Rate and then select this button to expire the Rate. The Effectivity End Date will be changed to the current date.
- DELETE
Highlight a Tax Code Rate and then select this button to remove the Rate from the list.
To create a new Tax Code Rate, select the NEW button. The following screen will appear:
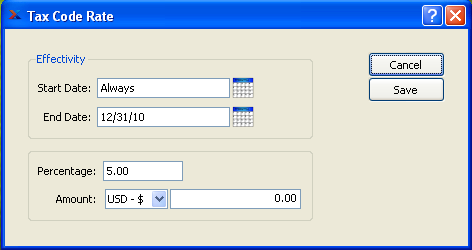
When creating a new Tax Code Rate, you are presented with the following options:
- Effectivity Start Date
Enter the date that this Tax Code Rate becomes effective.
- Effectivity End Date
Enter the date that this Tax Code Rate is no longer effective.
- Percentage
Enter the tax rate as a percentage.
- Amount
Enter the additional flat rate amount.
To the far right of the screen, the following buttons are available:
- CANCEL
Closes the screen without adding a new Tax Code Rate to the list of Tax Code Rates.
- SAVE
Creates the Tax Code Rate and adds it to the list of Tax Code Rates.
Tax Types provide a system for classifying goods and services into taxable categories. For example, using the Item master you can associate an Item with a particular Tax Type. To access the master list of Tax Types, select the "Tax Types" option. The following screen will appear:
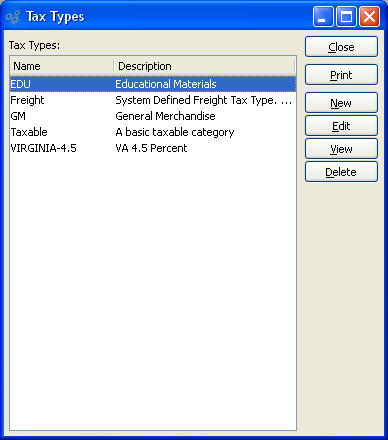
The "Tax Types" screen displays information on all existing Tax Types, including Tax Type name and description.
To the far right of the list, the following buttons are available:
- CLOSE
Closes the screen, returning you to the application desktop.
Runs the report associated with this screen.
- NEW
Opens screen for creating a new Tax Type.
- EDIT
Enables you to edit highlighted Tax Types. The edit screen is the same as that for creating a new Tax Type—except that when editing, the fields will contain Tax Type information. Double-clicking on a Tax Type will also bring you to the editing screen.
- VIEW
Highlight a Tax Type and then select this button to reach a read-only view of the "Edit" screen.
- DELETE
Highlight a Tax Type and then select this button to remove the Tax Type from the list.
To create a new Tax Type, select the NEW button. The following screen will appear:
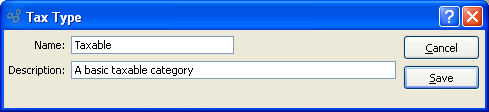
When creating a new Tax Type, you are presented with the following options:
- Name
Enter a name to describe the Tax Type.
- Description
Enter a description to further describe the Tax Type.
To the far right of the screen, the following buttons are available:
- CANCEL
Closes the screen without creating a Tax Type, returning you to the previous screen.
- SAVE
Creates the Tax Type and adds it to the master list of Tax Types.
Tax Assignments create a matrix used to find the Tax Codes to apply to an Item given the Item's Tax Type and the Tax Zone with jurisdiction over the transaction. Nested Tax Codes, whose calculations are based on other Tax Codes are shown as indented. To access the master list of Tax Assignments, select the "Tax Assignments" option. The following screen will appear:
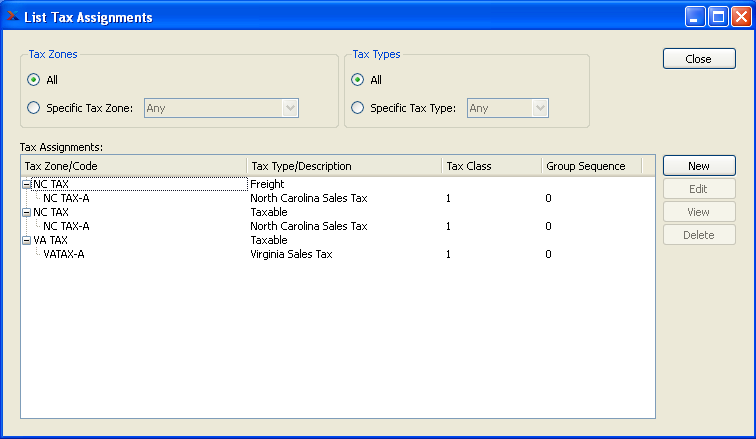
When creating a Tax Assignment, you are presented with the following options:
- Show All Tax Zones
Select to include all Tax Zones in the display.
- Show Specific Tax Zone
Select to include a specific Tax Zone in the display.
- Show All Tax Types
Select to include all Tax Types in the display.
- Show Specific Tax Type
Select to include a specific Tax Type in the display.
- Tax Assignments
Display lists Tax Assignments based on the specified parameters.
To the far right of the list, the following buttons are available:
- CLOSE
Closes the screen, returning you to the application desktop.
- NEW
Opens screen for creating a new Tax Assignment.
- EDIT
Enables you to edit highlighted Tax Assignment. The edit screen is the same as that for creating a new Tax Assignment—except that when editing, the fields will contain Tax Assignment information. Double-clicking on a Tax Assignment will also bring you to the editing screen.
- VIEW
Highlight a Tax Assignment and then select this button to reach a read-only view of the "Edit" screen.
- DELETE
Highlight a Tax Assignment and then select this button to remove the Tax Authority from the list.S
To create a new Tax Assignment, select the NEW button. The following screen will appear:
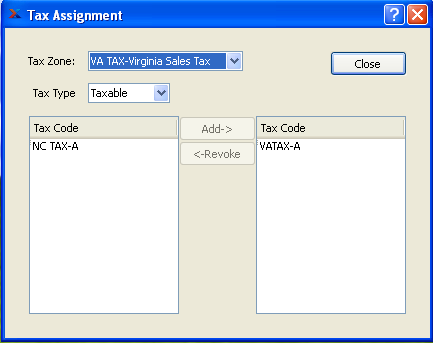
When creating a new Tax Assignment, you are presented with the following options:
- Tax Zone
Specify the Tax Zone you want to associate with the Tax Assignment.
- Tax Type
Specify the Tax Type you want to associate with the Tax Assignment.
- Tax Code
Use the Add-> and <-Revoke buttons to specify the Tax Codes you want to associate with the Tax Assignment.
To the far right of the screen, the following buttons are available:
- CLOSE
Closes the screen returning you to the previous screen.
Tax Registrations are the registration numbers used by Tax Authorities to identify businesses and/or individuals. An Employer Identification Numbers (EIN) is an example of a Tax Registration Number. Use the Tax Registration list for entering Tax Registration Numbers related to your Company.
Tip
Tax Registration information for individual Customers and Vendors is stored on the Customer and Vendor master files.
To access the master list of your Company's Tax Registrations, select the "Tax Registrations" option. The following screen will appear:
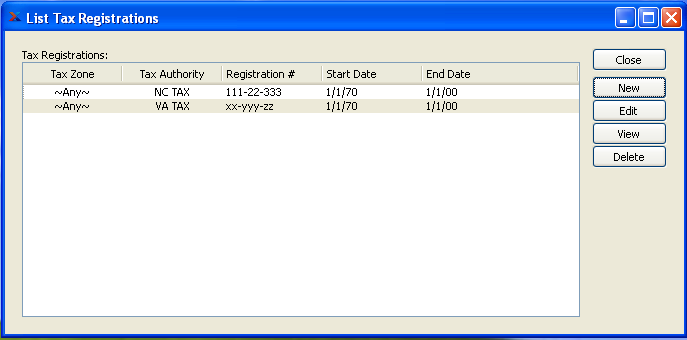
The "Tax Registrations" screen displays information on all existing Tax Registrations, including Tax Authority and Tax Registration Number.
To the far right of the list, the following buttons are available:
- CLOSE
Closes the screen, returning you to the application desktop.
- NEW
Opens screen for creating a new Tax Registration.
- EDIT
Enables you to edit highlighted Tax Registration. The edit screen is the same as that for creating a new Tax Registration—except that when editing, the fields will contain Tax Registration information. Double-clicking on a Tax Registration will also bring you to the editing screen.
- VIEW
Highlight a Tax Registration and then select this button to reach a read-only view of the "Edit" screen.
- DELETE
Highlight a Tax Registration and then select this button to remove the Tax Registration from the list.
To create a new Tax Registration, select the NEW button. The following screen will appear:
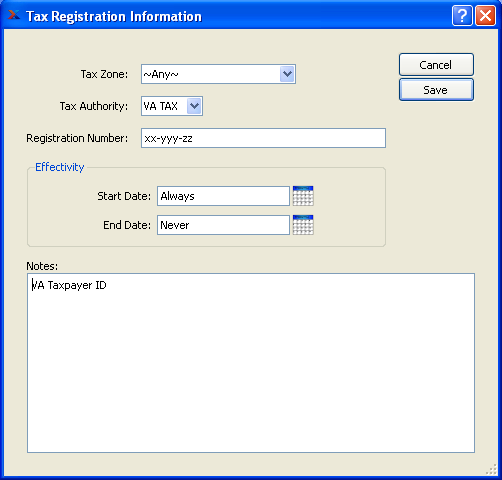
When creating a new Tax Registration, you are presented with the following options:
- Tax Zone
Specify the Tax Zone or "Any" for all Tax Zones associated with the Tax Registration Number.
- Tax Authority
Specify the Tax Authority associated with the Tax Registration Number.
- Registration Number
Enter the appropriate Tax Registration Number for the specified Tax Authority.
The registration number is used by Tax Authorities to identify businesses and/or individuals. An Employer Identification Numbers (EIN) is an example of a Tax Registration Number.
- Effectivity Start Date
Enter the date that this Tax Registration becomes effective.
- Effectivity End Date
Enter the date that this Tax Registration is no longer effective.
- Notes
Enter any notes for this Tax Registration.
To the far right of the screen, the following buttons are available:
- CANCEL
Closes the screen without creating a Tax Registration, returning you to the previous screen.
- SAVE
Creates the Tax Registration and adds it to the master list of Tax Registrations.
Tax reports section.
The Tax history report offers you the ability to view summarized or detailed information about both sales and purchase Tax history. This report will be especially useful for those who both collect and pay VAT taxes―and must report on and pay net VAT taxes collected. The netting column will only be visible when both the "Sales" and "Purchases" options are selected. To view Tax history, select the "Tax History" option. The following screen will appear:
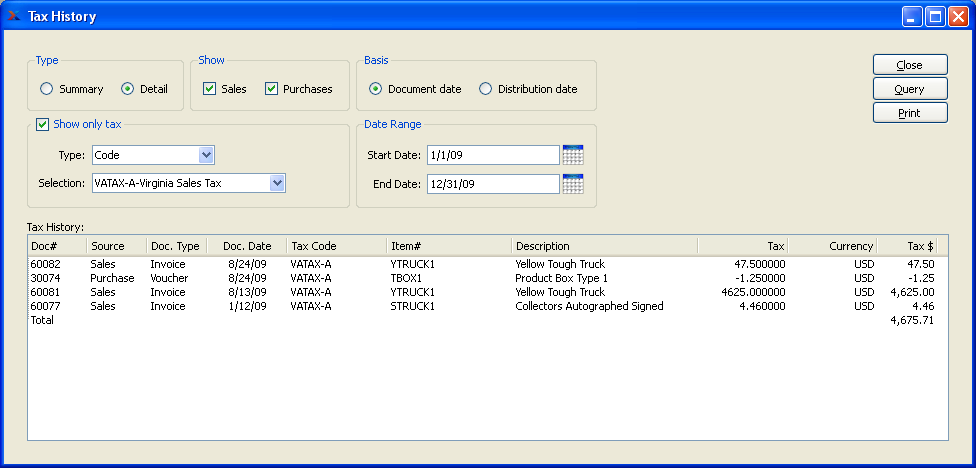
When displaying Tax history, you are presented with the following options:
- Type
Specify one of the following options for viewing your Tax history:
- Summary
Select to display a summarized view of your Tax history.
- Summarize by
In summary mode, you may select from the following filter options:
- Type
Select to show summarized Tax information based on one of the following types of information: Tax Code, Tax Type, Tax Class, Tax Authority, or Tax Zone.
- Selection
Specify a selection option to further refine your results. The selection options will vary depending on the type chosen. For example, if you choose "Zone," then you will be able to choose from a list of all your defined Tax Zones.
- Detail
Select to display a detailed view of your Tax history.
- Show only tax
In detail mode, you may select from the following filter options:
- Type
Select to show detailed Tax information based on one of the following types of information: Tax Code, Tax Type, Tax Class, Tax Authority, or Tax Zone.
- Selection
Specify a selection option to further refine your results. The selection options will vary depending on the type chosen. For example, if you choose "Zone," then you will be able to choose from a list of all your defined Tax Zones.
- Show
Specify the kind(s) of Tax you want to display. If both options are selected, the report will automatically include the net balance between sales Tax paid and purchase Tax collected.
- Sales
Select to include sales Tax in the report. When this option is selected, the columns in the report will include sales information. If not selected, those column headers will be hidden.
- Purchases
Select to include Tax on purchases in the report. When this option is selected, the columns in the report will include purchase information. If not selected, those column headers will be hidden.
- Basis
Specify a date basis to use for the report:
- Document date
Select to use the document date as the basis for the report.
- Distribution date
Select to use the G/L distribution date as the basis for the report.
- Date Range
Specify the date range, based on the chosen date basis:
- Start Date
Taxes posted on and after this date will be included in the report.
- End Date
Taxes posted on and before this date will be included in the report.
- Tax History
Display lists Tax history, using the specified parameters.
To the far right of the screen, the following buttons are available:
- CLOSE
Closes the screen, returning you to the application desktop.
- QUERY
Select to generate the display, using the specified parameters.
Runs the report associated with this screen.