Accounting Master Information section.
Terms are used to determine the billing Terms for Accounts Payable and Accounts Receivable. To access the master list of Terms, select the "Terms" option. The following screen will appear:
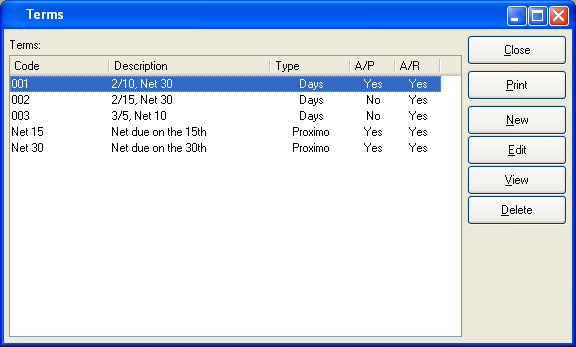
The "Terms" screen displays information on all existing Terms, including Term Code, Term description, Terms type, and Accounts Payable or Accounts Receivable status.
To the far right of the screen, the following buttons are available:
- CLOSE
Closes the screen, returning you to the application desktop.
Runs the report associated with this screen.
- NEW
Opens screen for creating new billing Terms.
- EDIT
Enables you to edit highlighted billing Terms. The edit screen is the same as that for creating new billing Terms—except that when editing, the fields will contain billing Terms information. Double-clicking on a billing Terms line will also bring you to the editing screen.
- VIEW
Highlight a billing Term and then select this button to reach a read-only view of the "Edit" screen.
- DELETE
Highlight a billing Terms line and then select this button to remove the billing Terms from the master list.
To create new billing Terms, select the NEW button. The following screen will appear:
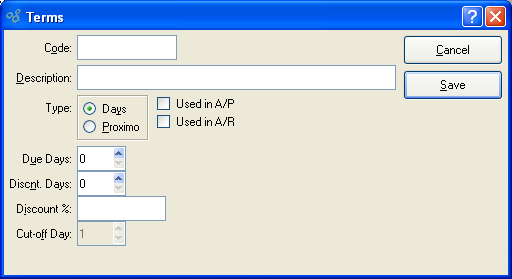
When creating new billing Term, you are presented with the following options:
Note
A/P billing Terms may be applied and Discounts taken when selecting a posted Voucher for payment.
- Used in A/R
Select if billing Terms are used for Accounts Receivable.
- Due Days
Select a number using the arrow buttons, or manually enter a value up to a maximum of 999. If the Terms type is "Days," then this refers to the number of days after the document (Invoice, Voucher, etc.) date which a payment is considered overdue. If the Terms type is "Proximo," then the setting refers to the day of the month of the document (Invoice, Voucher, etc.) date on which payment is due.
- Discnt. Days
Days: Select a number using the arrow buttons, or manually enter a value up to a maximum of 999. Specifies the number of days within which a payment must be made or received to take advantage of any Terms discount.
- Discount %
Specify the amount of any early payment discount.
- Cut-off Day
Specify the day of the month on or after which the due date will advance to the next month.
To the far right of the screen, the following buttons are available:
Bank Accounts are established to define the Asset Account to be used when receiving or making payments. To access the master list of Bank Accounts, select the "Bank Accounts" option. The following screen will appear:
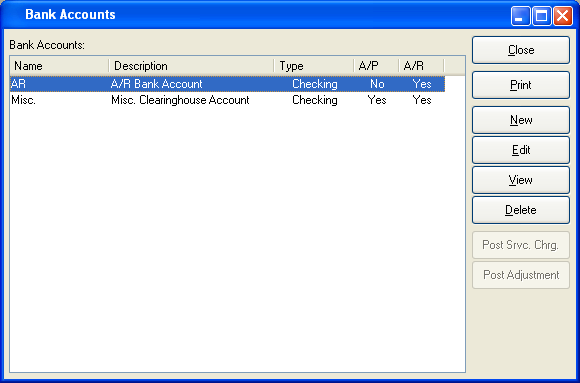
The "Bank Accounts" screen displays information on all existing Bank Accounts, including period start date, period end date, and closed status.
To the far right of the list, the following buttons are available:
- CLOSE
Closes the screen, returning you to the application desktop.
Runs the report associated with this screen.
- NEW
Opens screen for creating a new Bank Account.
- EDIT
Enables you to edit highlighted Bank Account. The edit screen is the same as that for creating a new Bank Account—except that when editing, the fields will contain Bank Account information. Double-clicking on a Bank Account will also bring you to the editing screen.
- VIEW
Highlight a Bank Account and then select this button to reach a read-only view of the "Edit" screen.
- DELETE
Highlight a Bank Account and then select this button to remove the Bank Account from the list.
- POST SRVC. CHRG.
Highlight a Bank Account and then select this button to post a service charge to the account.
- POST ADJUSTMENT
Highlight a Bank Account and then select this button to post an adjustment to the account.
A Bank Account can be set up for use by either Accounts Receivable (A/R), Accounts Payable (A/P), or both. To create a new Bank Account, select the NEW button. The following screen will appear:
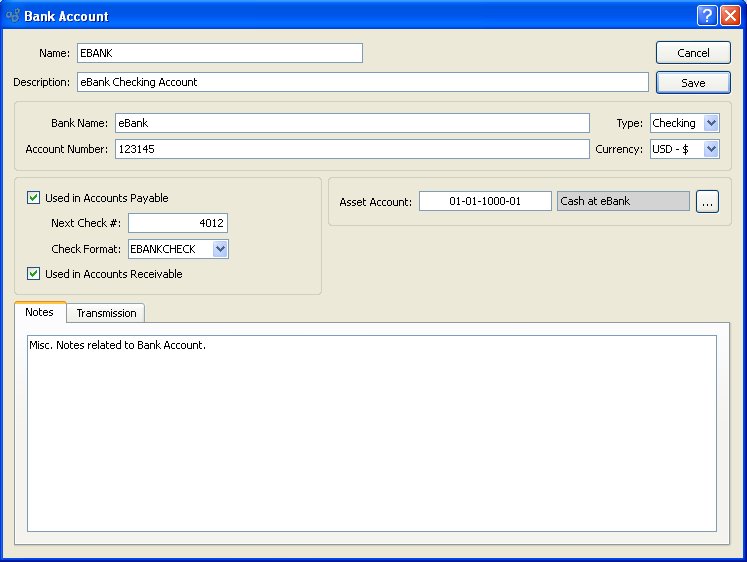
When creating a new Bank Account, you are presented with the following options:
- Name
Enter a name to describe the Bank Account.
- Description
Enter a description to further describe the Bank Account.
- Bank Name
Enter the name of the Bank where the Bank Account is held.
- Account Number
Enter the Account Number for the Bank Account.
- Type
Specify whether the Bank Account is a checking or cash account.
- Currency
Specify what type of currency to use for this bank account.
- Used in Accounts Payable
Select if the Bank Account is used for Accounts Payable. If selected, the Bank Account will be available for use when making Payments. Not selecting means the Bank Account is not used for Accounts Payable. Check specifications will be disabled if this option is not selected.
- Next Check #
Indicate the next Check Number to be issued from the Bank Account. Check Numbers will increment in intervals of one (1) beginning with the Check Number entered here. By default, the next available number will display.
- Check Format
Specify the Check Format to be used when Checks drawn against the Bank Account.
- Used in Accounts Receivable
Select if the Bank Account is used for Accounts Receivable. If selected, the Bank Account will be available for use when receiving money. Not selecting means the Bank Account is not used for Accounts Receivable.
- Asset Account
Specify the Asset Account to be credited when payments are made from the Bank Account.
- Notes
This is a scrolling text field with word-wrapping for entering Notes related to the Bank Account.
To the far right of the screen, the following buttons are available:
- CANCEL
Closes the screen without creating a Bank Account, returning you to the previous screen.
- SAVE
Creates the Bank Account and adds it to the master list of Bank Accounts.
To add Transmission details to an Account, select the "Transmissions" tab. The following screen will appear:
When adding Transmission details to the bank account, you are presented with the following options:
- Enable ACH Check Printing
Select to enable online processing or Automated Clearing House (ACH) Check printing.
- Routing Number
Bank Account Routing Number.
- Settlement Lead Time
Number of days prior to funds transfer.
- Create Check Number for ACH Checks
Select to create Check number for automated transactions.
- Immediate Origin Name and Number
Number used by the financial institution of origin, either routing or other, specified by ACH gateway.
- Immediate Destination Name and Number
Number used by the destination financial institution, routing or other, specified by ACH gateway.
To access the master list of Check formats, select the "Check Formats" option. The following screen will appear:
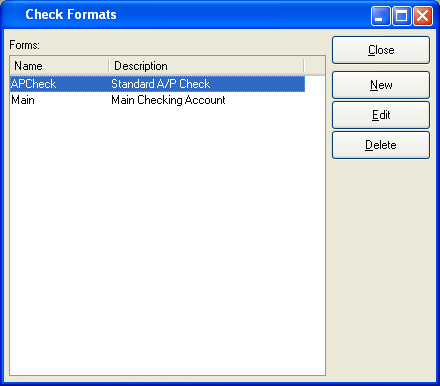
The "Check Formats" screen displays information on all existing Check formats, including Check format name and description.
To the far right of the list, the following buttons are available:
- CLOSE
Closes the screen, returning you to the application desktop.
- NEW
Opens screen for creating a new Check format.
- EDIT
Enables you to edit highlighted Check format. The edit screen is the same as that for creating a new Check format—except that when editing, the fields will contain Check format information. Double-clicking on a Check format will also bring you to the editing screen.
- DELETE
Highlight a Check format and then select this button to remove the Check format from the list.
To add a new Check format, select the NEW button. The following screen will appear:
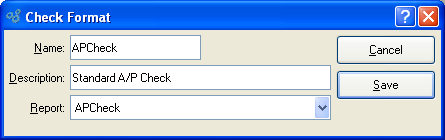
When creating a new Check format, you are presented with the following options:
- Name
Enter a name to describe the Check format.
- Description
Enter a description to further describe the Check format.
- Report
Specify the report definition you want to associate with the Check format.
To the far right of the screen, the following buttons are available:
- CANCEL
Closes the screen without creating a Check format, returning you to the previous screen.
- SAVE
Creates the Check format and adds it to the master list of Check formats.
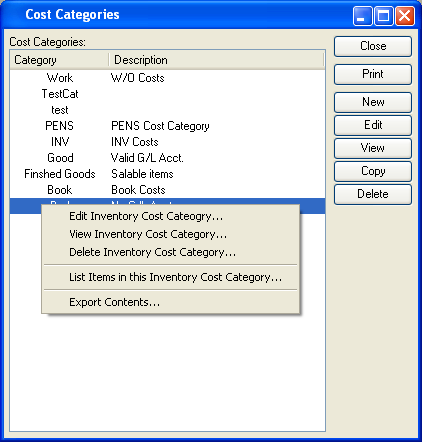
Cost Categories are applied to Item Sites as a mechanism for specifying how Costs should be distributed to the General Ledger whenever Inventory is received, moved, consumed, produced, shipped, scrapped, or returned. To access the master list of Cost Categories, select the "Cost Categories" option.
Note
Cost Categories define Cost distributions for Inventory Items. The distribution of Costs for non-Inventory Items are determined by Expense Categories.
The "Cost Categories" screen displays information on all existing Cost Categories, including Cost Category code and Cost Category description.
To the far right of the screen, the following buttons are available:
- CLOSE
Closes the screen, returning you to the application desktop.
Runs the report associated with this screen.
- NEW
Opens screen for creating a new Cost Category.
- EDIT
Enables you to edit highlighted Cost Categories. The edit screen is the same as that for creating a new Cost Category—except that when editing, the fields will contain Cost Category information. Double-clicking on a Cost Category will also bring you to the editing screen.
- VIEW
Highlight a Cost Category and then select this button to reach a read-only view of the "Edit" screen.
- COPY
Highlight a Cost Category and then select this button to reach a screen for copying the Cost Category master.
- DELETE
Highlight a Cost Category and then select this button to remove the category from the list.
To create a new Cost Category, select the NEW button. The following screen will appear:
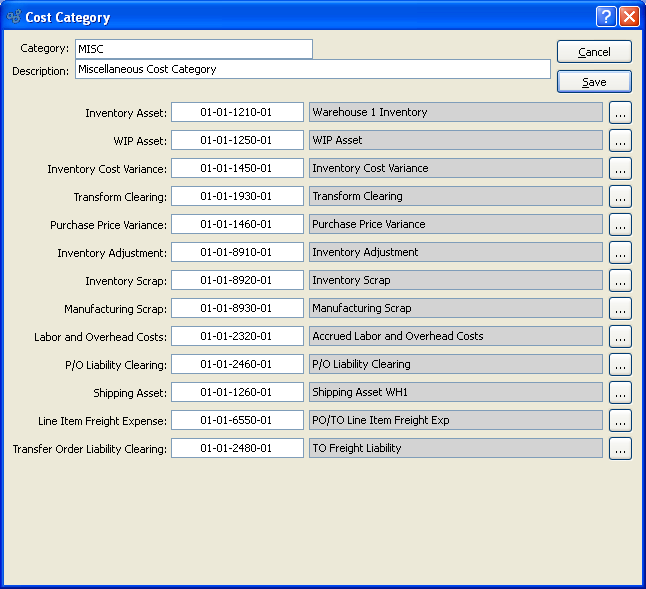
Tip
The Account Numbers assigned to Cost Categories should not all be the Inventory Account. Instead, they should be individual accounts selected specifically for each Cost-tracking purpose. This will increase your visibility into your Inventory Costs and valuation.
When creating a new Cost Category, you are presented with the following options:
- Category
Enter the Cost Category name.
- Description
Enter a brief description of the Cost Category.
- Inventory Asset
Identify a General Ledger (G/L) Account to distribute Inventory assets to. This is an Asset Account. It will be debited when Inventory is received and credited whenever Inventory Items are removed from Inventory.
- WIP Asset
Identify a General Ledger (G/L) Account to distribute work-in-process (WIP) assets to. This is an Asset Account. It will be credited and/or debited with labor, material, and overhead Costs while a Work Order is in-process. The sense of the transaction record depends on the circumstances of the transaction.
- Inventory Cost Variance
Identify a General Ledger (G/L) Account to distribute Inventory Cost variances to. This is an Asset Account. It is used in several scenarios: 1) If there is a difference between new Actual Cost and old Standard Cost when posting Actual Costs to Standard; 2) during Work Order processing if too many materials are issued to a Work Order, or if a Work Order is closed without the full quantity being posted; or 3) when posting cycle counts there is a difference between the new counted quantity and the quantity recorded in the system. The sense of the transaction record depends on the circumstances of the transaction.
- Transform Clearing
Identify a General Ledger (G/L) Account to distribute Transform transactions to. This is an Asset Account. It will be credited when a source Item quantity is transformed, and debited for an equal amount when the target Item quantity is received into Inventory.
- Purchase Price Variance
Identify a General Ledger (G/L) Account to distribute purchase Price variances to. This is an Asset Account. It will be credited or debited with the value of any variance that may arise when a Voucher is posted. The sense of the transaction record depends on the circumstances of the transaction.
- Inventory Adjustment
Identify a General Ledger (G/L) Account to distribute Inventory adjustments to. This is an Expense Account. It will be credited or debited with the value of any variance that may arise when a Miscellaneous Adjustment transaction or Cycle Count transaction is posted against an Item. The sense of the transaction record depends on the circumstances of the transaction.
- Inventory Scrap
Identify a G/L Account to distribute Inventory Scrap to. This is an Expense Account. It will be credited when a Scrap transaction is posted against an Item.
- Manufacturing Scrap
Identify a G/L Account to distribute Manufacturing Scrap to. This is an Expense Account. It will be credited when Work Order Material Requirements are scrapped from a Work Order.
- Labor and Overhead Costs
Overhead Costs: Identify a General Ledger (G/L) Account to distribute labor and overhead Costs to. This is a Liability Account. It will be debited and/or credited with labor and overhead Costs when Work Orders are in-process or posted. The sense of the transaction record depends on the circumstances of the transaction.
- P/O Liability Clearing
Identify a General Ledger (G/L) Account to distribute Purchase Order liability clearing to. This is a Liability Account. It will be credited when a Purchase Order Receipt is posted and debited when a Voucher is posted.
- Shipping Asset
Identify a General Ledger (G/L) Account to distribute shipping assets to. This is an Asset Account. It will be debited with the Standard Cost of a Sales Order Item when the Item is issued to Shipping and credited once the Item has been shipped.
- Line Freight Expense
Identify a General Ledger (G/L) Account to distribute Purchase Order or Transfer Order Line Item freight expenses to. This is an Expense Account. It will be debited when Purchase Order or Transfer Order Line Items are received. The Account may be debited or credited when correcting Purchase Order Receipts.
- Transfer Order Liability Clearing
Identify a General Ledger (G/L) Account to distribute Transfer Order Liability Clearing to. This is a Liability Account. It is used for recognizing liability related to transportation costs related to Transfer Orders. It will be credited when Transfer Orders receipts having freight charges are posted. It should be debited when the Freight (or other Vendor) is paid by Miscellaneous Check.
To the far right of the screen, the following buttons are available:
- CANCEL
Closes the screen without creating a Cost Category, returning you to the previous screen.
- SAVE
Creates the Cost Category and adds it to the master list of Cost Categories.
Expense Categories are used to identify the General Ledger (G/L) Accounts to be used when processing the following:
Non-Inventory Purchase Order Items
Miscellaneous Vouchers
Miscellaneous A/P Checks
Expense Transactions
For example, when entering a Purchase Order for a non-Inventory Item, you must select an Expense Category—thereby identifying the G/L Accounts the purchasing transaction will be distributed to. To access the master list of Expense Categories, select the "Expense Categories" option. The following screen will appear:
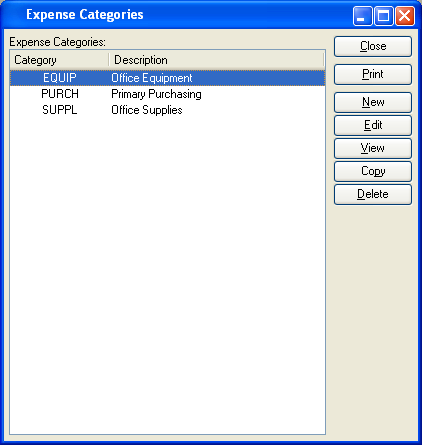
The "Expense Categories" screen displays information on all existing Expense Categories, including Expense Category code and Expense Category description.
To the far right of the screen, the following buttons are available:
- CLOSE
Closes the screen, returning you to the application desktop.
Runs the report associated with this screen.
- NEW
Opens screen for creating a new Expense Category.
- EDIT
Enables you to edit highlighted Expense Categories. The edit screen is the same as that for creating a new Expense Category—except that when editing, the fields will contain Expense Category information. Double-clicking on an Expense Category will also bring you to the editing screen.
- VIEW
Highlight an Expense Category and then select this button to reach a read-only view of the "Edit" screen.
- COPY
Highlight an Expense Category and then select this button to reach a screen for copying the Expense Category master.
- DELETE
Highlight an Expense Category and then select this button to remove the category from the list.
To create a new Expense Category, select the NEW button. The following screen will appear:
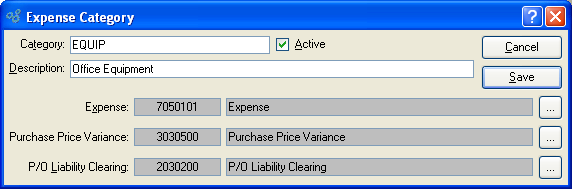
When creating a new Expense Category, you are presented with the following options:
- Category
Enter the Expense Category name.
- Description
Enter a brief description of the Expense Category.
- Active
Select to show the Expense Category as active. Not selecting means the Expense Category will be considered inactive. To re-activate an Expense Category, simply select this option.
- Expense
Identify a General Ledger (G/L) Account to distribute Purchasing Expenses to. This is an Expense Account. It will be debited when transactions using Expense Categories are posted.
- Purchase Price Variance
Identify a General Ledger (G/L) Account to distribute purchase Price variances to. This is an Asset Account. It will be credited or debited with the value of any variance that may arise when a Voucher is posted for non-Inventory Items.
- P/O Liability Clearing
Identify a General Ledger (G/L) Account to distribute Purchase Order liability clearing to. This is a Liability Account. It will be credited when non-Inventory Items are received, and debited when a Voucher for these Items is posted.
To the far right of the screen, the following buttons are available:
- CANCEL
Closes the screen without creating an Expense Category, returning you to the previous screen.
- SAVE
Creates the Expense Category and adds it to the master list of Expense Categories.
Accounts Payable (A/P) Account assignments represent the default General Ledger (G/L) Accounts used by the system when processing the following:
Vouchers
Payment Discounts
Miscellaneous A/P Credit Memos
Miscellaneous A/P Debit Memos
The Account assignments are made by Vendor Type. This means that transactions involving a Vendor will follow the assignments established for the Vendor Type—unless otherwise specified. To access the A/P Account assignments master list, select the "A/P Account Assignments" option. The following screen will appear:
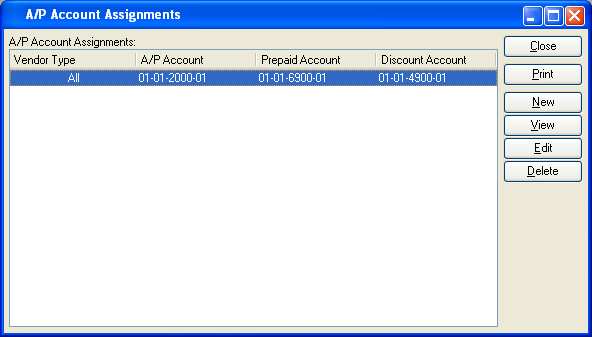
The "A/P Account Assignments" screen displays information on all existing A/P Account assignments.
To the far right of the screen, the following buttons are available:
- CLOSE
Closes the screen, returning you to the application desktop.
Runs the report associated with this screen.
- NEW
Opens screen for creating a new Account assignment.
- VIEW
Highlight an Account assignment and then select this button to reach a read-only view of the "Edit" screen.
- EDIT
Enables you to edit highlighted Account Assignment. The edit screen is the same as that for creating a new Account assignment —except that when editing, the fields will contain Account assignment information. Double-clicking on an Account assignment will also bring you to the editing screen.
- DELETE
Highlight an Account assignment and then select this button to remove the Account Assignment from the list.
To create a new A/P Account assignment, select the NEW button. The following screen will appear:
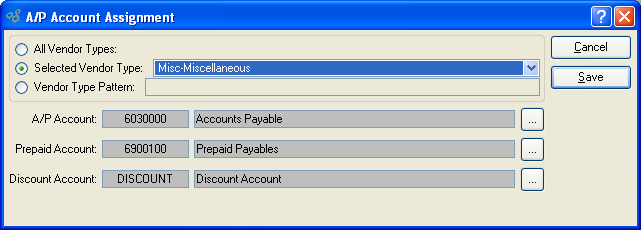
When creating a new A/P Account assignment, you are presented with the following options:
- All Vendor Types
Select to assign the A/P Accounts to all Vendor Types.
- Selected Vendor Type
Specify Vendor Type you want to associate with the A/P Account assignment.
- Vendor Type Pattern
Enter a Vendor Type pattern to select a range of Vendor Types. Refine your search using Regular Expressions.
- A/P Account
Identify a General Ledger (G/L) Account to assign as the default A/P Account. This is a Liability Account. It will be credited when Vouchers are posted and debited when Checks are posted.
- Prepaid Account
Identify a General Ledger (G/L) Account to assign as the default A/P Prepaid Account. This is an Asset Account. It should not be confused with or used interchangeably with the default A/P Account. The Prepaid Account will be credited when Miscellaneous A/P Credit Memos are posted and debited when Miscellaneous A/P Debit Memos are posted.
- Discount Account
Identify a General Ledger (G/L) Account to distribute purchasing Discounts to. This is a Revenue Account. It will be credited when purchasing Discounts are applied to selected Payments.
To the far right of the screen, the following buttons are available:
- CANCEL
Closes the screen without creating an Account assignment, returning you to the previous screen.
- SAVE
Creates the Account assignment and adds it to the master list of Account Assignments.
The system gives you the ability to categorize Customers according to Customer Type. To access the Customer Types master list, select the "Customer Types" option. The following screen will appear:
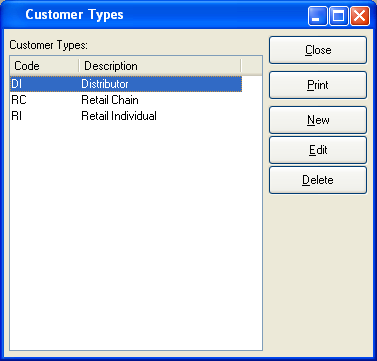
The Customer Types master list displays all existing Customer Types codes and descriptions.
To the far right of the screen, the following buttons are available:
- CLOSE
Closes the screen, returning you to the application desktop.
Runs the report associated with this screen.
- NEW
Opens screen for creating a new Customer Type.
- EDIT
Enables you to edit highlighted Customer Type. The edit screen is the same as that for creating a new Customer Type—except that when editing, the fields will contain Customer Type information. Double-clicking on a Customer Type will also bring you to the editing screen.
- DELETE
Highlight a Customer Type and then select this button to remove it from the master list of Customer Types.
To create a new Customer Type, select the NEW button. The following screen will appear:

Tip
Create your Customer Types using a logical, hierarchical structure. This will make it easier to retrieve Customer Type information in the future.
When creating a new Customer Type, you are presented with the following options:
- Code
Enter a code number to identify the Customer Type.
- Description
Enter a description to identify the Customer Type.
- Enable Characteristics Profile
Select to enforce the use of a Characteristics template for any Customer assigned to the specified Customer Type. If Characteristics Profiles are used, the full slate of Characteristics and corresponding Values will be presented in the Characteristics Tab of the Customer master for every Customer assigned to the Customer Type. If not selected, the template approach will not be used—and users will have the ability to create ad hoc Characteristics for Customers.
To the far right of the screen, the following buttons are available:
- CANCEL
Closes the screen without creating a Customer Type, returning you to the application desktop.
- SAVE
Creates the Customer Type and adds it to the master list of Customer Types.
- NEW
Opens screen for creating a new Customer Characteristic to be added to the Profile.
- EDIT
Enables you to edit highlighted Customer Characteristics. The edit screen is the same as that for creating a new Customer Characteristic—except that when editing, the fields will contain Customer Characteristic information. Double-clicking on a Customer Characteristic will also bring you to the editing screen.
- DELETE
Highlight a Customer Characteristic and then select this button to remove the Characteristic from the list.
To create a new Customer Characteristic, select the NEW button. The following screen will appear:
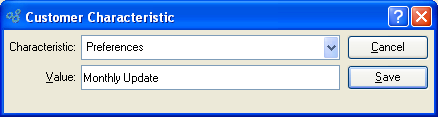
Create New Customer Characteristic
When creating a new Customer Characteristic, you are presented with the following options:
- Characteristic
Select a Characteristic from the list of Characteristics designated as being available for use as Customer Characteristics.
- Value
Enter a description of the Customer Characteristic.
To the far right of the screen, the following buttons are available:
- CANCEL
Closes the screen without creating the Customer Characteristic, returning you to the previous screen.
- SAVE
Creates the Customer Characteristic and adds it to the list of Customer Characteristics.
To access the master list of Vendor Types, select the "Vendor Types" option. The following screen will appear:
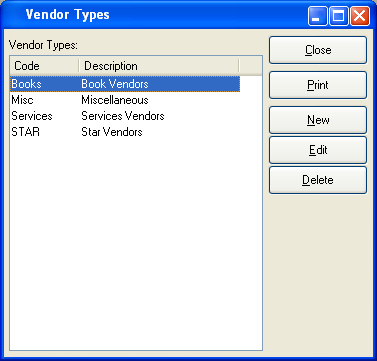
The "Vendor Types" screen displays information on all existing Vendor Types, including Vendor Type code and Vendor Type description.
To the far right of the screen, the following buttons are available:
- CLOSE
Closes the screen, returning you to the application desktop.
Runs the report associated with this screen.
- NEW
Opens screen for creating a new Vendor Type.
- EDIT
Enables you to edit highlighted Vendor Type. The edit screen is the same as that for creating a new Vendor Type—except that when editing, the fields will contain Vendor Type information. Double-clicking on a Vendor Type will also bring you to the editing screen.
- VIEW
Highlight a Vendor Type and then select this button to reach a read-only view of the "Edit" screen.
- DELETE
Highlight a Vendor Type and then select this button to remove the Vendor from the list.
To create a new Vendor Type, select the NEW button. The following screen will appear:
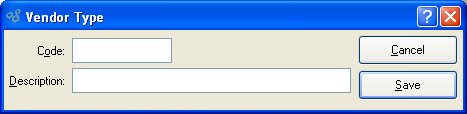
When creating a new Vendor Type, you are presented with the following options:
- Code
Enter a code to uniquely identify the Vendor Type.
- Description
Enter a description to identify the Vendor Type.
To the far right of the screen, the following buttons are available:
- CANCEL
Closes the screen without creating a new Vendor Type, returning you to the previous screen.
- SAVE
Creates the Vendor Type and adds it to the master list of Vendor Types.
Sales Categories are used to identify the General Ledger (G/L) Accounts to be used when processing the following:
Non-Inventory A/R Invoices
A/R Credit Memos (optional)
A/R Debit Memos (optional)
Cash Receipts (optional)
For example, when creating an Invoice for miscellaneous goods or services unrelated to Inventory, you must select a Sales Category—thereby identifying the G/L Accounts the sales transaction will be distributed to. To access the Sales Categories master list, select the "Sales Categories" option. The following screen will appear:
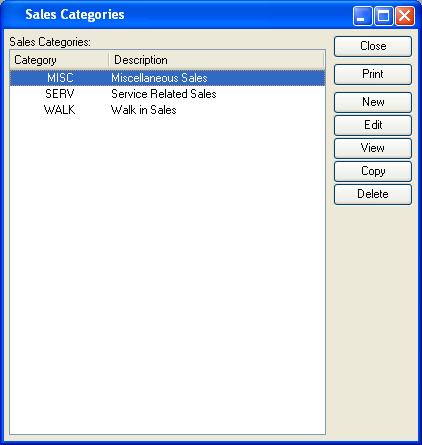
The "Sales Categories" screen displays information on existing Sales Categories.
To the far right of the screen, the following buttons are available:
- CLOSE
Closes the screen, returning you to the application desktop.
Runs the report associated with this screen.
- NEW
Opens screen for creating a new Sales Category.
- EDIT
Enables you to edit highlighted Sales Categories. The edit screen is the same as that for creating a new Sales Category—except that when editing, the fields will contain Sales Category information. Double-clicking on a Sales Category will also bring you to the editing screen.
- VIEW
Highlight a Sales Category and then select this button to reach a read-only view of the "Edit" screen.
- COPY
Highlight a Sales Category and then select this button to create a new Sales Category which duplicates the source Sales Category.
- DELETE
Highlight a Sales Category and then select this button to remove the Sales Category from the master list.
To create a new Sales Category, select the NEW button. The following screen will appear:
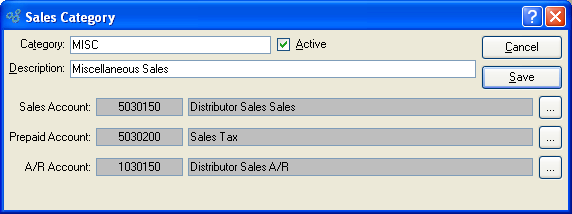
When creating a new Sales Category, you are presented with the following options:
- Category
Enter an identifying code for the Sales Category.
- Active
Select if the Sales Category is currently active. Not selecting means the Sales Category is inactive.
- Description
Enter a description to identify the Sales Category.
- Sales Account
Identify a General Ledger (G/L) Account to distribute Sales Revenue to. This is a Revenue Account. It will be credited when Invoices for Non-Inventory goods are posted.
- Prepaid Account
Specify a General Ledger (G/L) Account to use for handling prepaid Receivables. This is a Revenue contra Account. If a Sales Category is used when entering a Miscellaneous A/R Credit Memo, this Account will be debited when the Credit Memo is posted. If used when entering a Miscellaneous A/R Debit Memo, the Account will be credited when the Debit Memos are posted.
- A/R Account
Specify a General Ledger (G/L) Account to use for handling Customer deposits. This is an Asset Account. If a Sales Category is used when applying a Cash Receipt to a Customer Invoice, this Account will be credited when the Cash Receipt is posted.
To the far right of the screen, the following buttons are available:
- CANCEL
Closes the screen without creating a Sales Category, returning you to the application desktop.
- SAVE
Creates the Sales Category and adds it to the master list of Sales Categories.
Accounts Receivable (A/R) Account assignments represent the default General Ledger (G/L) Accounts used by the system when processing the following:
Invoices
Cash Receipts
S/O Credit Memos
Miscellaneous A/R Credit Memos
Miscellaneous A/R Debit Memos
The Account assignments are made by Customer Type. This means that transactions involving a Customer will follow the assignments established for the Customer Type—unless otherwise specified. To access the A/R Account assignments master list, select the "A/R Account Assignments" option. The following screen will appear:
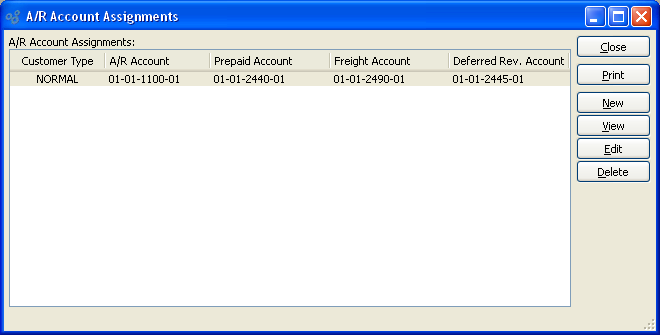
The "A/R Account Assignments" screen displays information on existing A/R Account assignments.
To the far right of the screen, the following buttons are available:
- CLOSE
Closes the screen, returning you to the application desktop.
Runs the report associated with this screen.
- NEW
Opens screen for creating a new A/R Account assignment.
- VIEW
Highlight an A/R Account assignment and then select this button to reach a read-only view of the "Edit" screen.
- EDIT
Enables you to edit highlighted A/R Account assignment. The edit screen is the same as that for creating a new A/R Account assignment—except that when editing, the fields will contain A/R Account assignment information. Double-clicking on an A/R Account assignment will also bring you to the editing screen.
- DELETE
Highlight an A/R Account assignment and then select this button to remove the A/R Account assignment from the master list.
To create a new A/R Account assignment, select the NEW button. The following screen will appear:
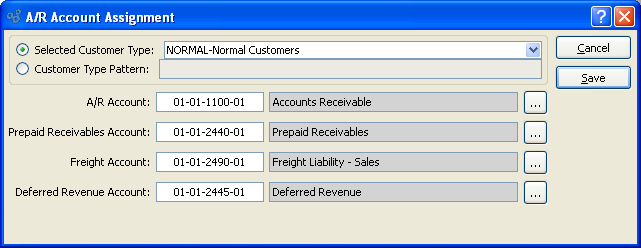
When creating a new A/R Account assignment, you are presented with the following options:
- Selected Customer Type
Specify the Customer Type you want to associate with the A/R Account assignment.
- Pattern
Enter a Customer Type pattern to select a range of Customer Types. Refine your search using Regular Expressions.
- A/R Account
Identify a General Ledger (G/L) Account to assign as the default A/R Account. This is an Asset Account. For example, it will be debited when Invoices are posted and credited when Cash Receipts are posted.
- Prepaid Receivables Account
Identify a General Ledger (G/L) Account to assign as the default A/R Prepaid Account. This is a Revenue contra Account. It will be debited when Miscellaneous A/R Credit Memos are posted and credited when Miscellaneous A/R Debit Memos are posted.
- Freight Account
Identify a General Ledger (G/L) Account to assign as the default Freight Account. This is a Revenue Account. It will be credited when Invoices are posted and debited when S/O Credit Memos are posted.
- Deferred Revenue Account
Identify a General Ledger (G/L) Account to assign as the default Deferred Revenue Account. This is a Liability Account. It is an optional Account, as systems may be configured to ignore it when handling Customer Deposits. When this Account is used, it will be credited when unapplied Cash Receipts are posted and debited when the A/R Credit Memos resulting from unapplied Cash Receipts are applied to A/R open items.
Note
You can disable the use of a Deferred Revenue Account for handling Customer Deposits at the system level.
To the far right of the screen, the following buttons are available:
- CANCEL
Closes the screen without creating an A/R Account assignment, returning you to the previous screen.
- SAVE
Creates the A/R Account assignment and adds it to the master list of A/R Account assignments.
Reason Codes provide a means for explaining why a Customer is being given sales credit. To access the master list of Reason Codes, select the "Reason Codes" option. The following screen will appear:
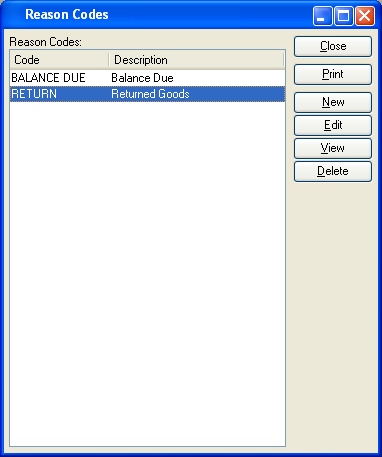
The "Reason Codes" screen displays information on all existing Reason Codes, including Reason Code and Reason Code description.
To the far right of the screen, the following buttons are available:
- CLOSE
Closes the screen, returning you to the application desktop.
Runs the report associated with this screen.
- NEW
Opens screen for creating a new Reason Code.
- EDIT
Enables you to edit highlighted Reason Code. The edit screen is the same as that for creating a new Reason Code—except that when editing, the fields will contain Reason Code information. Double-clicking on a Reason Code will also bring you to the editing screen.
- VIEW
Highlight a Reason Code and then select this button to reach a read-only view of the "Edit" screen.
- DELETE
Highlight a Reason Code and then select this button to remove the Reason Code from the list.
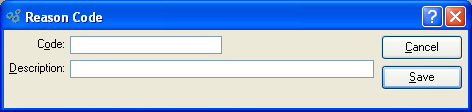
To create a new Reason Code, select the NEW button. The following screen will appear:
Tip
Reason Codes are abbreviations used to quickly and easily identify the reason why a Customer is being given sales credit. Keep these Codes short and meaningful so employees will have an easy time identifying them.
When creating a new Reason Code, you are presented with the following options:
- Code
Enter a code to identify the Reason Code.
- Description
Enter a brief description of the Reason Code.
To the far right of the screen, the following buttons are available:
- CANCEL
Closes the screen without creating a Reason Code, returning you to the previous screen.
- SAVE
Creates the Reason Code and adds it to the master list of Reason Codes.
To access the master list of Adjustment Types, select the "Adjustment Types" option. The following screen will appear:
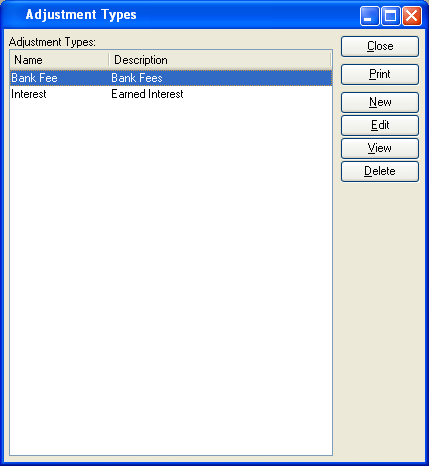
The "Adjustment Types" screen displays information on all existing Adjustment Types, including Adjustment Type name and description.
To the far right of the list, the following buttons are available:
- CLOSE
Closes the screen, returning you to the application desktop.
Runs the report associated with this screen.
- NEW
Opens screen for creating a new Adjustment Type.
- EDIT
Enables you to edit highlighted Adjustment Type. The edit screen is the same as that for creating a new Adjustment Type—except that when editing, the fields will contain Adjustment Type information. Double-clicking on an Adjustment Type will also bring you to the editing screen.
- VIEW
Highlight an Adjustment Type and then select this button to reach a read-only view of the "Edit" screen.
- DELETE
Highlight an Adjustment Type and then select this button to remove the Adjustment Type from the list.
To create a new Adjustment Type, select the NEW button. The following screen will appear:
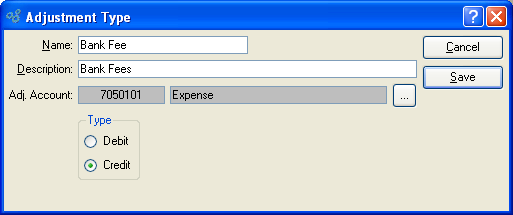
When creating a new Adjustment Type, you are presented with the following options:
- Name
Enter a name to describe the Adjustment Type.
- Description
Enter a description to further describe the Adjustment Type.
- Adj. Account
Specify the Account to be used for the Adjustment Type.
- Type
Define the sense of the Adjustment Type by selecting one of the following:
Debit: Select if the Adjustment should increase your Bank Account balance.
Credit: Select if the Adjustment should decrease your Bank Account balance.
To the far right of the screen, the following buttons are available:
- CANCEL
Closes the screen without creating an Adjustment Type, returning you to the previous screen.
- SAVE
Creates the Adjustment Type and adds it to the master list of Adjustment Types.